|
|

Cisco IOS includes a number of configuration tools that simplify the process of setting up the initial configuration of a router or access server. The configuration tools are ClickStart, AutoInstall, and Setup. ClickStart is the most recent addition to the Cisco IOS. ClickStart enables you to configure and monitor a router using a World Wide Web browser.
This chapter is divided into three main sections:
This section describes how to use ClickStart. ClickStart is a Cisco IOS software feature that allows you to configure a router using a Web browser, such as Netscape. You can use ClickStart to configure a Cisco 1003, a Cisco 1004, or a Cisco 1005.
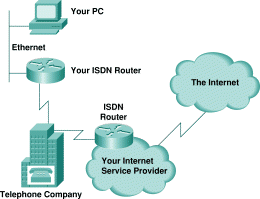
ClickStart can be used to configure a router to connect a small office or home PC to the Internet or to another network. In this environment, your PC is connected to the router via an Ethernet connection. You configure the router to dial your Internet service provider, and your Internet service provider supplies an ISDN, Frame Relay, or Asynchronous Serial connection to the Internet. This environment is illustrated in Figure 12 which shows a connection for an ISDN connection and an ISDN router.
You do not need to have an extensive background in networks and routers to configure your router using ClickStart.
You can use ClickStart to configure a Cisco 1003 or Cisco 1004 ISDN router running Cisco IOS Release 11.0(6) or later software, or Cisco IOS Release 11.1(2) or later software. You can also use ClickStart to configure a Cisco 1005 Frame Relay or Asynchronous Serial router running Cisco IOS 11.1(5) or later software.
To configure a router using ClickStart, complete the tasks in the following sections:
For detailed information about how ClickStart works, read the "How ClickStart Works (Optional)" section later in this chapter.
If you are going to configure a Cisco 1003 or Cisco 1004 ISDN router, you need the following information before proceeding.
From your ISDN service provider, telephone company, or the administrator of your company's network, get the following information:
From your Internet service provider, get the following information:
To use a Cisco router, you must order internet service from your telephone company. The type of internet service you order depends on the type of Cisco router you have. If you have a Cisco 1003 or Cisco 1004 ISDN router, then you should order ISDN service. If you have a Cisco 1005 Frame Relay router, then you should order Frame Relay service. If you have a Cisco 1005 Asynchronous Serial router, then you should order Asynchronous Serial service.
To order internet service, order regular telephone service (sometimes referred to as POTS) with the desired internet service and billing options. Once your internet service is installed, plug the telephone into the phone jack.
Many times, you can simply tell your telephone company that you want ISDN service and they will install it correctly. This is common in Europe and fairly common in North America. The telephone company may ask you for specific information about the type of service you want. If they do, read the "Ordering ISDN Service" section that follows.
If your telephone company asks for specific information about the type of ISDN service you want, find out from them which ISDN switch type they support.
In Europe, common switches are basic-net3, 1TR6, and VN3. Normally, you should be able to order ISDN service without needing to specify switch capabilities.
In North America, common switches are the 5ESS custom, DMS-100, and the NI-1. Information about the type of capabilities you should order for these switches is listed in the sections that follow.
For data service only, order the following capabilities:
If you have an ISDN telephone connected to the line, you can order voice and data service with the following capabilities:
Order the following capabilities:
Order the following capabilities:
The sections that follow contain specific instructions for how to verify the TCP/IP configuration on your system. There are instructions for each of the most common PC environments: on a Windows 3.11 PC, on a Windows 95 PC, on a Macintosh, and on a UNIX workstation.
To verify the TCP/IP configuration on a PC running Windows 3.11, perform the following tasks:
1 . Check that the PC has the correct IP address.
2 . Configure 255.255.255.255 as the address of the DNS server.
3 . After you have configured the router, set the default gateway to the router's IP address.
If you change any of these parameters from previous settings, you must either exit all the TCP/IP applications and restart them, or restart your PC.
To verify the TCP/IP configuration on a PC running Windows 95, perform the following tasks:
1 . Click the Start button.
2 . Select Settings.
3 . Select Control Panel from the Settings menu.
4 . From the Control Panel list, double-click Network.
5 . Select the TCP/IP configuration information.
6 . In the IP Address section, check that the PC has the correct IP address.
7 . After you have configured the router, set the default gateway to the router's IP address.
If you change any of the TCP/IP parameters, you must restart your PC.
To verify the TCP/IP configuration on a Macintosh, perform the following tasks using the MacTCP Control Panel (Control Panels are in the Apple menu).
1 . Check that the Macintosh has the correct IP address. This address is shown in the IP Address box:
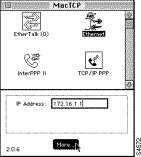
2 . Click the More... button to display the next MacTCP dialog box:
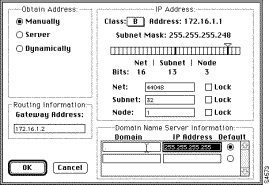
3 . Configure 255.255.255.255 as the IP address of the DNS server.
4 . Configure the domain name as a period (.).
5 . After you have configured the router, set the default gateway to the router's IP address.
If you change any of these parameters from previous settings, you must restart the Macintosh.
From a UNIX workstation or PC, you cannot use ClickStart to configure your router for the first time because the router cannot discover its IP address. Instead, you must configure the router's IP address when you set up the router as follows:
1 . Connect a terminal to the router's console port.
2 . Configure an IP address for the router's Ethernet port.
To set up the router, perform the following tasks:
Step 1 Plug your router into a power socket.
Step 2 If necessary, power on the router (some Cisco routers do not have power switches). Allow the router to initialize for about 2 minutes.
Step 3 Make sure that the PC and the router are connected to each other using the proper Ethernet cables.
Step 4 If you are configuring a new router, skip this step.
If you are reconfiguring a router that already has a working configuration file, save the configuration file in a text file on your system. Then issue an erase startup-config command and restart the router.
You can provide an Ethernet connection with one of the following:
To check that the Ethernet connection is attached properly, do the following:
Now you are ready to configure the router. You do this by completing the router EZ Setup form, which is located on the router.
Before you continue, make sure you have your list of ISDN and IP parameters handy. We suggest that you print a sample copy of the Router EZ Setup form and fill in all the values you want to enter on the form located on the router.
To use ClickStart to configure the router software, follow these steps:
Step 1 Start Netscape or another Web browser on one of the computers connected to the network.
Step 2 In the browser's location field, enter the following URL to get to the router home page:
Step 3 Select EZ Setup from the router home page.
This link displays the EZ Setup form, which you use to configure the router software.
Step 4 Complete the section on the EZ Setup form that configures the router name and password.
Step 5 Complete the section on the EZ Setup form that configures the WAN interface in the router.
If your router has an ISDN interface, use the remote router name, remote phone number, remote CHAP password, ISDN switch type, ISDN interface speed, and SPIDs given to you by your service provider or network administrator.
If your router has a Frame Relay interface, use the IP address, netmask, and DLCI given to you by your service provider or network administrator.
Step 6 Complete the section of the EZ Setup form that configures the IP address of the default router. The default router is a router that can direct packets to their destination if your local router does now know the path to the destination. You commonly enter the IP address of a router located at the remote end of the WAN connection. If there is a router on your local network on which IP routing is enabled, you can enter the IP address of that router.
Step 7 Complete the section of the EZ Setup form that configures IP addresses.
Enter the IP address and netmask of the Ethernet interface on the router. Use the IP address and netmask given to you by your service provider or network administrator. If your router has a Frame Relay interface, note that the IP address and netmask you enter in this step are different from those you entered in Step 5.
Enter the IP address of a DNS server.
Step 8 Enable or disable debug information.
Step 9 Click the Submit button to configure the router.
When you are done configuring the router, check the configuration.
If you did not get to the router EZ Setup form on the router or if the router did not configure properly, try one or more of the following steps until you succeed in configuring the router:
1 . Check that the Ethernet cable is correctly connected.
2 . If you have already clicked new-router.cisco.com, turn the router off. Then restart it and try to configure the router using the EZ Setup form.
3 . If your initial configuration attempt did not work, turn off and restart the router, and quit and reload your browser. Try to configure the router using the EZ Setup form.
4 . If you reconfigured TCP on your PC and did not reboot the PC, reboot the PC and try to configure the router.
5 . If your router was previously configured, ClickStart will not work. To use ClickStart on a previously configured router, connect a terminal to the router's console port and use the erase startup-config command to erase the existing configuration file. Then use the EZ Setup form to configure the router.
If, after completing these steps, the router is still not configured properly, contact the Cisco Technical Response Center (TRC).
If you followed the directions when configuring the router, you created an HTTP bookmark to the router's home page when you configured the router. Use this bookmark to visit the router and try a few of the hyperlinks on the home page, such as the link to the show interfaces command.
If you forgot to create a bookmark, use the router's IP address to get to the router's home page. To do this, open a URL that looks like this:
http://10.0.0.l1/
Change the 10.0.0.1 address to the IP address that you assigned your router.
You can use a Web browser to issue Cisco IOS commands to your router. This functionality is not limited to Cisco 1003, Cisco 1004, and Cisco 1005 routers. You can use it on any access server or router running a current version of Cisco IOS Release 11.1 or 11.0 software.
If you have a Cisco 1003, Cisco 1004, or Cisco 1005 router, you can automatically use this functionality.
If you have any other Cisco router, you must enable this functionality before you can use it to issue commands to your router.
This section provides the technical background for how ClickStart operates. In most cases, you do not need to understand the technical background in order to use ClickStart. This background information is provided primarily for network administrators. For more information about the terms used in this section, refer to the configuration guides for Cisco IOS Release 11.2.
When using a Web browser and ClickStart to configure a router, there are two broad issues:
When using a web browser to configure a router, the trickiest part is the initial configuration because the router does not yet have an IP address. Traditionally, you use protocols such as BOOTP or DHCP and their corresponding server programs to configure a router initially. In fact, the router can use BOOTP to get an initial IP address, and Windows NT has a DHCP server. However, using thse protocols assumes you have moderate computer and networking expertise.
When a router without a valid configuration file in nonvolatile RAM (NVRAM) starts up , it tries several ways to locate a configuration file, including RARP, BOOTP, and the setup console dialog. The router can also get a configuration file using HTML.
When a router without a configuration file starts up, the Cisco IOS software listens on Ethernet interface 0 for a DNS request to the name new-router.cisco.com. This name is reserved within Cisco for initial router configuration. No system will ever have this name, and name servers do not respond to requests for this name, not even with a Name Error response.
When the Cisco IOS software receives the DNS request for new-router.cisco.com, the request contains the IP address of the PC that issued the DNS request. The Cisco IOS software then uses ARP to probe for an unused IP address near the PC's IP address, staying within likely subnet boundaries. If a machine responds to the ARP probe, the Cisco IOS software tries the next IP address. If, after several tries, there is no response to an ARP probe, the Cisco IOS software uses that address as the IP address of the router. The software sends a DNS reply to the PC toanswer the DNS request for new-router.cisco.com with the address it just found.
The IP address discovery process presents some possible problems:
new-router.cisco.com and will send a Name Error response, probably before the Cisco IOS sofware can locate an available address using ARP probes. The web browser will report that it could not find an IP address for new-router.cisco.com. In this case, trying again from the browser sometimes works because the router will have finished its ARP probing and can respond promptly to the DNS request.
new-router.cisco.com, and if the router is restarted before the configuration is completed and the process is repeated, the web browser remembers the name-to-address mapping and the DNS request is not sent out again. The solution to this problem is to exit the browser and restart it. The PC's local DNS resolver should not remember the name-to-address mapping because the response sent by the Cisco IOS software has a time to live (TTL) of only 30 seconds. Browsers typically cache mappings without honoring TTLs.
A second issue in configuring a router with a Web browser is that the Cisco IOS software can be configured with an enormous variety of options. While these options are useful for an experienced network manager, the sheer number of commands and possible approaches to configure even a simple dial-up ISDN router is a formidable barrier if you simply want to configure the router.
ClickStart translates the information you fill in on the EZ Setup form to a standard configuration template. The standard configuration assumes that you will dial only one destination and use PPP/CHAP and static routing. It requires values for the following parameters:
hostname - Name of the router
password - Enable password for the router
remote-name - Name of the remote router (used by CHAP)
remote-number - Telephone number to dial
remote-password - Password at the remote end (used by CHAP)
switch-type - Service provider switch type
isdn-spid1 - Service profile identifier number assigned by the ISDN server provider for the B1 channel
isdn-spid2 - Service profile identifier number assigned by the ISDN server provider for the B2 channel
ip-address - IP address of Ethernet interface 0
ip-mask - Address mask for Ethernet interface 0
dns-server-address - IP address of the DNS server for Ethernet interface 0
ClickStart configures the router with the following configuration:
service timestamps debug
service timestamps log
!
hostname hostname
!
service password-encryption
enable-secret password password
line vty 0 5
password password
!
isdn switch-type switch-type
username remote-name password remote-password
!
interface ethernet 0
ip address ip-address ip-mask
ip helper-address dns-address
no lat enabled
no mop enabled
!
interface bri 0
ip unnumbered ethernet 0
encapsulation ppp
dialer map ip 192.168.254.254 name remote-name speed 56 remote-number
isdn spid1 spid1
isdn spid2 spid2
ppp authentication chap
dialer-group 1
!
ip classless
ip route 0.0.0.0 0.0.0.0 192.168.254.254
ip route 192.168.254.254 interface bri 0
logging buffered
access-list 101 deny udp any any eq snmp
access-list 101 deny udp any any eq ntp
access-list 101 permit ip any any
snmp-server community public RO
dialer-list 1 list 101
!
end
This section further explains some of the features of the configuration used by ClickStart.
The address 192.168.254.254 is specified in RFC 1597, Address Allocation for Private Internets. RFC 1597 addresses are available for private use. They are never used on the public Internet. Using unnumbered interfaces for the BRI results in the static routing and dialer map commands still needing an IP address. However, this address is never advertised outside the router and no packets are ever addressed to it.
ClickStart configures the logging buffered command and a few debug commands, such as debug dialer and debug isdn events, to simplify problem resolution. The debug commands are already in the log.
The dialer access lists allow any IP packets, except SNMP and NTP packets, to bring or keep up the link. In other words, SNMP and NTP packets are considered to be uninteresting and are ignored.
interface bri 0
...
dialer group 1
...
access-list 101 deny udp any any eq snmp
access-list 101 deny udp any any eq ntp
access-list 101 permit ip any any
Because the PC is configured with a DNS server address of 255.255.255.255, the local broadcast needs to be directed to the real address of the DNS server.
interface ethernet 0
...
ip helper-address dns-address
This section provides information about AutoInstall, a procedure that allows you to configure a new router automatically and dynamically. The AutoInstall procedure involves connecting a new router to a network where an existing router is preconfigured, turning on the new router, and enabling it with a configuration file that is automatically downloaded from a Trivial File Transfer Protocol (TFTP) server.
The following sections provide the requirements for AutoInstall and an overview of how the procedure works. To start the procedure, see the "Perform the AutoInstall Procedure" section.
For the AutoInstall procedure to work, your system must meet the following requirements:
ip helper 171.69.2.75
frame-relay map ip 172.21.177.100 100 dlci
AutoInstall over Frame Relay and other WAN encapsulations support downloading configuration files from UNIX-based and DOS-based TFTP servers. Other booting mechanisms such as RARP and SLARP also support UNIX-based and DOS-based TFTP servers.
The DOS format of the UNIX network-confg file that must reside on the server must be 8 characters or fewer, with a 3-letter extension. Therefore, when an attempt to load network-confg fails, AutoInstall automatically attempts to download the file cisconet.cfg from the TFTP server.
If cisconet.cfg exists and is downloaded successfully, the server is assumed to be a DOS machine. The AutoInstall program then attempts to resolve the host name for the router through host commands in cisconet.cfg.
If cisconet.cfg does not exist or cannot be downloaded, or the program is unable to resolve a host name, DNS attempts to resolve the host name. If DNS cannot resolve the host name, the router attempts to download ciscortr.cfg. If the host name is longer than eight characters, it is truncated to eight characters. For example, a router with a host name "australia" will be treated as "australi" and AutoInstall will attempt to download australi.cfg.
The format of cisconet.cfg and ciscortr.cfg is to be the same as those described for network-confg and hostname-confg.
If neither network-confg nor cisconet.cfg exists and DNS is unable to resolve the host name, AutoInstall attempts to load router-confg, and then ciscortr.cfg if router-confg does not exist or cannot be downloaded. The cycle is repeated three times.
Once the requirements for using AutoInstall are met, the dynamic configuration of the new router occurs in the following order:
1 . The new router acquires its IP address. Depending on the interface connection between the two routers and/or access servers, the new router's IP address is dynamically resolved by either SLARP requests or BOOTP or RARP requests.
2 . The new router resolves its name through network-confg, cisconet.cfg, or DNS.
3 . The new router automatically requests and downloads its configuration file from a TFTP server.
4 . If a host name is not resolved, the new router attempts to load router-confg or ciscortr.cfg.
The new router (newrouter) resolves its interface's IP addresses by one of the following means:
The existing router (existing) responds in one of the following ways depending on the request type:
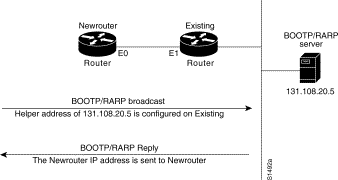
As of Software Release 9.21, routers can be configured to act as RARP servers.
Because the router attempts to resolve its host name as soon as one interface resolves its IP address, only one IP address needs to be set up with SLARP, BOOTP, or RARP.
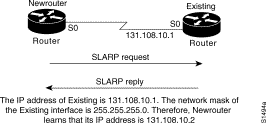
The new router resolves its IP address-to-host name mapping by sending a TFTP broadcast requesting the file network-confg, as shown in Figure 15.
The network-confg file is a configuration file generally shared by several routers. In this case, it is used to map the IP address of the new router (just obtained dynamically) to the name of the new router. The file network-confg must reside on a reachable TFTP server and must be globally readable.
The following is an example of a minimal network-confg file that maps the IP address of the new router (131.108.10.2) to the name newrouter. The address of the new router was learned via SLARP and is based on existing's IP address of 131.108.10.1.
ip host newrouter 131.108.10.2
If you are not using AutoInstall over Frame Relay, the host portion of the address must be 1 or 2. AutoInstall over Frame Relay does not have this addressing constraint.
If newrouter does not receive a network-confg or a cisconet.cfg file, or if the IP address-to-host-name mapping does not match the newly acquired IP address, newrouter sends a DNS broadcast. If DNS is configured and has an entry that maps newrouter's SLARP, BOOTP, or RARP-acquired IP address to its name, newrouter successfully resolves its name.
If DNS does not have an entry that maps the new router's SLARP, BOOTP, or RARP-acquired address to its name, the new router cannot resolve its host name. The new router attempts to download a default configuration file as described in the next section, and failing that, enters setup mode--or enters user EXEC mode with AutoInstall over Frame Relay.

After the router successfully resolves its host name, newrouter sends a TFTP broadcast requesting the file newrouter-confg or newrouter.cfg. The name newrouter-confg must be in all lowercase letters, even if the true host name is not. If newrouter cannot resolve its host name, it sends a TFTP broadcast requesting the default host configuration file router-confg. The file is downloaded to newrouter, where the configuration commands take effect immediately.
When using AutoInstall over Frame Relay, you are put into setup mode while the AutoInstall process is running. If the configuration file is successfully installed, the setup process is terminated. If you expect the AutoInstall process to be successful, either do not respond to the setup prompts or respond to the prompts as follows:
Would you like to enter the initial configuration dialog? [yes]: no
Would you like to terminate autoinstall? [yes]: no
If you do not expect the AutoInstall process to be successful, create a configuration file by responding to the setup prompts. The AutoInstall process is terminated transparently.
You will see the following display as the AutoInstall operation is in progress:
Please Wait. AutoInstall being attempted!!!!!!!!!!!!!!!!!!!
If the host configuration file contains only the minimal information, you must connect using Telnet into existing, from there connect via Telnet to newrouter, and then run the setup command to configure newrouter. Refer to the "Using Setup for Configuration Changes" section later in this chapter for details on the setup command.
If the host configuration file is complete, newrouter should be fully operational. You can enter the enable command (with the system administrator password) at the system prompt on newrouter, and then issue the copy running-config startup-config command to save the information in the recently obtained configuration file into nonvolatile random-access memory (NVRAM) or to the location specified by the CONFIG_FILE environment variable. If it must reload, newrouter simply loads its configuration file from NVRAM.
If the TFTP request fails, or if newrouter still has not obtained the IP addresses of all its interfaces, and those addresses are not contained in the host configuration file, then newrouter enters setup mode automatically. Setup mode prompts you for manual configuration of the Cisco IOS software at the console. The new router continues to issue broadcasts to attempt to learn its host name and obtain any unresolved interface addresses. The broadcast frequency will dwindle to every 10 minutes after several attempts. Refer to the "Using Setup for Configuration Changes" section later in this chaper for details on the setup command.
To dynamically configure a new router using AutoInstall, complete the following tasks. Steps 1, 2, and 3 are completed by the central administrator. Step 4 is completed by the person at the remote site.
Step 1 Modify the existing router's configuration to support the AutoInstall procedure.
Step 2 Set up the TFTP server to support the AutoInstall procedure.
Step 3 Set up the BOOTP or RARP server if needed. A BOOTP or RARP server is required for AutoInstall using an Ethernet, Token Ring, FDDI, or Frame Relay-encapsulated serial interface. With a Frame Relay-encapsulated serial interface, the existing router acts as the BOOTP server. A BOOTP or RARP server is not required for AutoInstall using an HDLC-encapsulated serial interface.
Step 4 Connect the new router to the network.
You can use any of the following types of interfaces:
To set up AutoInstall via a serial line with HDLC encapsulation (the default), you must configure the existing router. Perform the following steps, beginning in global configuration mode:
| Task | Command |
|---|---|
| Step 1 Configure the serial interface that connects to the new router with HDLC encapsulation (the default), and enter interface configuration mode. | interface serial interface-number1 |
| Step 2 Enter an IP address for the interface. The host portion of the address must have a value of 1 or 2. (AutoInstall over Frame Relay does not have this address constraint.) | ip address address mask2 |
| Step 3 Configure a helper address for the serial interface to forward broadcasts associated with the TFTP, BOOTP, and DNS requests. | ip helper-address address2 |
| Step 4 Optionally, configure a DCE clock rate for the serial line, unless an external clock is being used. This step is needed only for DCE appliques. | clock rate bps1 |
| Step 5 Exit configuration mode. | ^Z |
| Step 6 Save the configuration file to your startup configuration. On most platforms, this step saves the configuration to NVRAM. On the Cisco 7000 series, and Cisco 7500 series, this step saves the configuration to the location specified by the CONFIG_FILE environment variable. | copy running-config startup-config |
Router# configure terminal
interface serial 0
 ip address 172.31.10.1 255.255.255.0
 ip helper-address 172.31.20.5
 Ctrl-Z
Router(config)# copy running-config startup-config
To set up AutoInstall using an Ethernet, Token Ring, or FDDI interface, you must modify the configuration of the existing router. Perform the following steps, beginning in global configuration mode:
| Task | Command |
|---|---|
| Step 1 Configure a LAN interface, and enter interface configuration mode. | interface {ethernet | tokenring | fddi} interface-number 1 |
| Step 2 Enter an IP address for the interface. | ip address address mask 2 |
| Step 3 Optionally, configure a helper address to forward broadcasts associated with the TFTP, BOOTP, and DNS requests. | ip helper-address address2 |
| Step 4 Exit configuration mode. | ^Z |
| Step 5 Save the configuration file to your startup configuration. On most platforms, this step saves the configuration to NVRAM. On the Cisco 7000 series, Cisco 7200 series, and Cisco 7500 series, this step saves the configuration to the location specified by the CONFIG_FILE environment variable. | copy running-config startup-config |
Typically, the local-area network (LAN) interface and IP address are already configured on the existing router. You might need to configure an IP helper address if the TFTP server is not on the same network as the new router.
Router# configure terminal
interface Ethernet 0
 ip address 172.31.10.1 255.255.255.0
 ip helper-address 172.31.20.5
 Ctrl-Z
Router(config)# copy running-config startup-config
To set up AutoInstall via a serial line with Frame Relay encapsulation, you must configure the existing router. Perform the following tasks, beginning in global configuration mode:
| Task | Command |
|---|---|
| Step 1 Configure the serial interface that connects to the new router, and enter interface configuration mode. | interface serial 01 |
| Step 2 Configure Frame Relay encapsulation on the interface that connects to the new router. | encapsulation frame-relay1 |
| Step 3 Create a Frame Relay map pointing back to the new router.
or For point-to-point subinterfaces, assign a data link connection identifier (DLCI) to the interface that connects to the new router, and provide the IP address of the serial port on the new router. | frame-relay map ip ip-address dlci2
or frame-relay interface-dlci dlci option [protocol ip ip-address]2 |
| Step 4 Enter an IP address for the interface. This step sets the IP address of the existing router. | ip address address mask3 |
| Step 5 Configure a helper address for the TFTP server. | ip helper-address address3 |
| Step 6 Optionally, configure a DCE clock rate for the serial line, unless an external clock is being used. This step is needed only for DCE appliques. | clock rate bps1 |
| Step 7 Exit configuration mode. | ^Z |
| Step 8 Save the configuration file to your startup configuration. On most platforms, this step saves the configuration to NVRAM. On the Cisco 7000 series, Cisco 7200 series, and Cisco 7500 series, this step saves the configuration to the location specified by the CONFIG_FILE environment variable. | copy running-config startup-config |
You must use a DTE interface on the new router because the network always provides the clock signal.
Router# configure terminal
interface serial 0
 ip address 172.31.20.20 255.255.255.0
 encapsulation frame-relay
 frame-relay map ip 172.31.10.1 255.255.255.0 48
 ip helper-address 172.31.20.5
For AutoInstall to work correctly, the new router must be able to resolve its host name and then download a name-confg or a name.cfg file from a TFTP server. The new router can resolve its host name by using a network-confg or a cisconet.cfg file downloaded from a TFTP server or by using the DNS.
To set up a TFTP server to support AutoInstall, complete the following tasks. Step 2 includes two ways to resolve the new router's host name. Use the first method if you want to use a network-config file to resolve the new router's host name. Use the second method if you want to use DNS to resolve the new router's host name.
| Task | Command |
|---|---|
| Step 1 Enable TFTP on a server. | Consult your host vendor's TFTP server documentation and RFCs 906 and 783. |
Step 2 If you want to use a network-confg or cisconet.cfg file to resolve the new router's name, create the network-confg or cisconet.cfg file containing an IP address-to-host name mapping for the new router. Enter the ip host command into the TFTP config file, not into the router. The IP address must match the IP address that is to be dynamically obtained by the new router. or If you want to use DNS to resolve the new router's name, create an address-to-name mapping entry for the new router in the DNS database. The IP address must match the IP address that is to be dynamically obtained by the new router. |
Contact the DNS administrator or refer to RFCs 1101 and 1183. |
| Step 3 Create the name-confg or name.cfg file, which should reside in the tftpboot directory on the TFTP server. The name part of name-confg or name.cfg filename must match the host name you assigned for the new router in the previous step. Enter configuration commands for the new router into this file. | See the appropriate chapter in this guide for specific commands. |
The name-confg or the name.cfg file can contain either the new router's full configuration or a minimal configuration.
The minimal configuration file is a virtual terminal password and an enable password. It allows an administrator to Telnet into the new router to configure it. If you are using BOOTP or RARP to resolve the address of the new router, the minimal configuration file must also include the IP address to be obtained dynamically using BOOTP or RARP.
You can use the copy running-config tftp command to help you generate the configuration file that you will download during the AutoInstall process.
ip host newrouter 131.108.170.1
The following host configuration file contains the minimal set of commands needed for AutoInstall using SLARP or BOOTP:
enable-password letmein
!
line vty 0
password letmein
!
end
The preceding example shows a minimal configuration for connecting from a router one hop away. From this configuration, use the setup facility to configure the rest of the interfaces. If the router is more than one hop away, you also must include routing information in the minimal configuration.
The following minimal network configuration file maps the new router's IP address, 131.108.10.2, to the host name newrouter. The new router's address was learned via SLARP and is based on the existing router's IP address of 131.108.10.1.
ip host newrouter 131.108.10.2
If the new router is connected to the existing router using an Ethernet, Token Ring, or FDDI interface, you must configure a BOOTP or RARP server to map the new router's MAC address to its IP address. If the new router is connected to the existing router using a serial line with HDLC encapsulation or if you are configuring AutoInstall over Frame Relay, the tasks in this section are not required.
To configure a BOOTP or RARP server, complete one of the following tasks:
| Task | Command |
|---|---|
| If BOOTP is to be used to resolve the new router's IP address, configure your BOOTP server. | Refer to your host vendor's manual pages and to RFCs 951 and 1395 |
| If RARP is to be used to resolve the new router's IP address, configure your RARP server. | Refer to your host vendor's manual pages and to RFC 903 |
interface ethernet 0
ip address 131.108.10.2 255.255.255.0
enable-password letmein
!
line vty 0
password letmein
!
end
Connect the new router to the network using either an HDLC-encapsulated or Frame Relay-encapsulated serial interface or an Ethernet, Token Ring, or FDDI interface. After the router successfully resolves its host name, newrouter sends a TFTP broadcast requesting the file name-confg or name.cfg. The router name must be in all lowercase, even if the true host name is not. The file is downloaded to the new router, where the configuration commands take effect immediately. If the configuration file is complete, the new router should be fully operational. To save the complete configuration to NVRAM, complete the following tasks in privileged EXEC mode:
| Task | Command |
|---|---|
| Step 1 Enter privileged mode at the system prompt on the new router. | enable password1 |
| Step 2 Save the information from the name-config file into your startup configuration. On most platforms, this step saves the configuration to NVRAM. On the Cisco 7000 series, the Cisco 7200 series, and Cisco 7500 series, this step saves the configuration to the location specified by the CONFIG_FILE environment variable. | copy running-config startup-config |
 Caution Verify that the existing and new routers and/or access servers are connected before entering the copy running-config startup-config EXEC command to save configuration changes. Use the ping EXEC command to verify connectivity. If an incorrect configuration file is downloaded, the new router will load NVRAM configuration information before it can enter AutoInstall mode.
If the configuration file is a minimal configuration file, the new router comes up, but with only one interface operational. Complete the following steps to connect to the new router and configure it:
| Task | Command |
|---|---|
| Step 1 Establish a Telnet connection to the existing router. | telnet existing1 |
| Step 2 From the existing router, establish a Telnet connection to the new router. | telnet newrouter |
| Step 3 Enter privileged EXEC mode. | enable password1 |
| Step 4 Enter setup mode to configure the new router. | setup2 |
The setup command facility is an interactive facility that allows you to perform first-time configuration and other basic configuration procedures on all routers. The facility prompts you to enter basic information needed to start a router functioning quickly and uneventfully.
Although the setup command facility is a quick way to "set up" a router, you can also use it after first-time startup to perform basic configuration changes. This section focuses on:
Refer to your hardware platform's user guide for more information on how to use setup for first-time startup.
Whenever you use the setup command facility, be sure that you know the:
You can perform the tasks in the following sections to make configuration changes using the setup command facility. Both tasks are optional.
The command parser allows you to make very detailed changes to your configurations. However, some major configuration changes do not require the granularity provided by the command parser. In these cases, you can use the setup command facility to make major enhancements to your configurations. For example, you might want to use setup to add a protocol suite, to make major addressing scheme changes, or to configure a newly installed interface. Although you can use the command parser to make these major changes, the setup command facility provides you with a high-level view of the configuration and guides you through the configuration change process.
Additionally, if you are not familiar with Cisco products and the command parser, the setup command facility is a particularly valuable tool because it asks you the questions required to make configuration changes.
To enter the setup command facility, perform the following task in privileged EXEC mode:
| Task | Command |
|---|---|
| Enter the setup command facility. | setup |
When you enter the setup command facility after first-time startup, an interactive dialog called the System Configuration Dialog appears on the system console screen. The System Configuration Dialog guides you through the configuration process. It prompts you first for global parameters and then for interface parameters. The values shown in brackets next to each prompt are the default values last set using either the setup command facility or the configure command.
You must run through the entire System Configuration Dialog until you come to the item that you intend to change. To accept default settings for items that you do not want to change, press the Return key.
To return to the privileged EXEC prompt without making changes and without running through the entire System Configuration Dialog, press Ctrl-C.
The facility also provides help text for each prompt. To access help text, press the question mark (?) key at a prompt.
When you complete your changes, the setup command facility shows you the configuration command script that was created during the setup session. It also asks you if you want to use this configuration. If you answer Yes, the configuration is saved to NVRAM. If you answer No, the configuration is not saved and the process begins again. There is no default for this prompt; you must answer either Yes or No.
The following example shows how to use the setup command facility to configure interface serial 0 and to add ARAP and IP/IPX PPP support on the asynchronous interfaces:
Router# setup
         --- System Configuration Dialog ---
At any point you may enter a question mark '?' for help.
Use ctrl-c to abort configuration dialog at any prompt.
Default settings are in square brackets '[]'.
Continue with configuration dialog? [yes]:
First, would you like to see the current interface summary? [yes]:
Interface          IP-Address      OK?  Method    Status                 Protocol
Ethernet0          172.16.72.2     YES  manual    up                     up
Serial0            unassigned      YES  not set   administratively down  down
Serial1            172.16.72.2     YES  not set   up                     up
Configuring global parameters:
  Enter host name [Router]:
The enable secret is a one-way cryptographic secret used
instead of the enable password when it exists.
  Enter enable secret [<Use current secret>]:
The enable password is used when there is no enable secret
and when using older software and some boot images.
  Enter enable password [ww]:
  Enter virtual terminal password [ww]:
  Configure SNMP Network Management? [yes]:
    Community string [public]:
  Configure DECnet? [no]:
  Configure AppleTalk? [yes]:
    Multizone networks? [no]: yes
  Configure IPX? [yes]:
  Configure IP? [yes]:
    Configure IGRP routing? [yes]:
      Your IGRP autonomous system number [15]:
  Configure Async lines? [yes]:
    Async line speed [9600]: 57600
    Configure for HW flow control? [yes]:
    Configure for modems? [yes/no]: yes
      Configure for default chat script? [yes]: no
    Configure for Dial-in IP SLIP/PPP access? [no]: yes
      Configure for Dynamic IP addresses? [yes]: no
      Configure Default IP addresses? [no]: yes
      Configure for TCP Header Compression? [yes]: no
      Configure for routing updates on async links? [no]:
    Configure for Async IPX? [yes]:
    Configure for Appletalk Remote Access? [yes]:
      AppleTalk Network for ARAP clients [1]: 20
      Zone name for ARAP clients [ARA Dialins]:

Configuring interface parameters:
Configuring interface Ethernet0:
  Is this interface in use? [yes]:
  Configure IP on this interface? [yes]:
    IP address for this interface [172.16.72.2]:
    Number of bits in subnet field [8]:
    Class B network is 172.16.0.0, 8 subnet bits; mask is /24
  Configure AppleTalk on this interface? [yes]:
    Extended AppleTalk network? [yes]:
    AppleTalk starting cable range [1]:
    AppleTalk ending cable range [1]:
    AppleTalk zone name [Sales]:
    AppleTalk additional zone name:
  Configure IPX on this interface? [yes]:
    IPX network number [1]:
Configuring interface Serial0:
  Is this interface in use? [no]: yes
  Configure IP on this interface? [no]: yes
  Configure IP unnumbered on this interface? [no]: yes
    Assign to which interface [Ethernet0]:
  Configure AppleTalk on this interface? [no]: yes
    Extended AppleTalk network? [yes]:
    AppleTalk starting cable range [2]: 3
    AppleTalk ending cable range [3]: 3
    AppleTalk zone name [myzone]: ZZ Serial
    AppleTalk additional zone name:
  Configure IPX on this interface? [no]: yes
    IPX network number [2]: 3
Configuring interface Serial1:
  Is this interface in use? [yes]:
  Configure IP on this interface? [yes]:
  Configure IP unnumbered on this interface? [yes]:
    Assign to which interface [Ethernet0]:
  Configure AppleTalk on this interface? [yes]:
    Extended AppleTalk network? [yes]:
    AppleTalk starting cable range [2]:
    AppleTalk ending cable range [2]:
    AppleTalk zone name [ZZ Serial]:
    AppleTalk additional zone name:
  Configure IPX on this interface? [yes]:
    IPX network number [2]:
Configuring interface Async1:
    IPX network number [4]:
    Default client IP address for this interface [none]: 172.16.72.4
Configuring interface Async2:
    IPX network number [5]:
    Default client IP address for this interface [172.16.72.5]:
Configuring interface Async3:
    IPX network number [6]:
    Default client IP address for this interface [172.16.72.6]:
Configuring interface Async4:
    IPX network number [7]:
    Default client IP address for this interface [172.16.72.7]:
Configuring interface Async5:
    IPX network number [8]:
    Default client IP address for this interface [172.16.72.8]:
Configuring interface Async6:
    IPX network number [9]:
    Default client IP address for this interface [172.16.72.9]:
Configuring interface Async7:
    IPX network number [A]:
    Default client IP address for this interface [172.16.72.10]:
Configuring interface Async8:
    IPX network number [B]:
    Default client IP address for this interface [172.16.72.11]:
Configuring interface Async9:
    IPX network number [C]:
    Default client IP address for this interface [172.16.72.12]:
Configuring interface Async10:
    IPX network number [D]:
    Default client IP address for this interface [172.16.72.13]:
Configuring interface Async11:
    IPX network number [E]:
    Default client IP address for this interface [172.16.72.14]:
Configuring interface Async12:
    IPX network number [F]:
    Default client IP address for this interface [172.16.72.15]:
Configuring interface Async13:
    IPX network number [10]:
    Default client IP address for this interface [172.16.72.16]:
Configuring interface Async14:
    IPX network number [11]:
    Default client IP address for this interface [172.16.72.17]:
Configuring interface Async15:
    IPX network number [12]:
    Default client IP address for this interface [172.16.72.18]:
Configuring interface Async16:
    IPX network number [13]:
    Default client IP address for this interface [172.16.72.19]:
The following configuration command script was created:
hostname Router
enable secret 5 $1$krIg$emfYm/1OwHVspDuS8Gy0K1
enable password ww
line vty 0 4
password ww
snmp-server community public
!
no decnet routing
appletalk routing
ipx routing
ip routing
!
line 1 16
speed 57600
flowcontrol hardware
modem inout
!
arap network 20 ARA Dialins
line 1 16
arap enable
autoselect
!
! Turn off IPX to prevent network conflicts.
interface Ethernet0
no ipx network
interface Serial0
no ipx network
interface Serial1
no ipx network
!
interface Ethernet0
ip address 172.16.72.2 255.255.255.0
appletalk cable-range 1-1 1.204
appletalk zone Sales
ipx network 1
no mop enabled
!
interface Serial0
no shutdown
no ip address
ip unnumbered Ethernet0
appletalk cable-range 3-3
appletalk zone ZZ Serial
ipx network 3
no mop enabled
!
interface Serial1
no ip address
ip unnumbered Ethernet0
appletalk cable-range 2-2 2.2
appletalk zone ZZ Serial
ipx network 2
no mop enabled
!
Interface Async1
ipx network 4
ip unnumbered Ethernet0
peer default ip address 172.16.72.4
async mode interactive
!
Interface Async2
ipx network 5
ip unnumbered Ethernet0
peer default ip address 172.16.72.5
async mode interactive
!
Interface Async3
ipx network 6
ip unnumbered Ethernet0
peer default ip address 172.16.72.6
async mode interactive
!
Interface Async4
ipx network 7
ip unnumbered Ethernet0
peer default ip address 172.16.72.7
async mode interactive
async dynamic address
!
Interface Async5
ipx network 8
ip unnumbered Ethernet0
peer default ip address 172.16.72.8
async mode interactive
!
Interface Async6
ipx network 9
ip unnumbered Ethernet0
peer default ip address 172.16.72.9
async mode interactive
!
Interface Async7
ipx network A
ip unnumbered Ethernet0
peer default ip address 172.16.72.10
async mode interactive
!
Interface Async8
ipx network B
ip unnumbered Ethernet0
peer default ip address 172.16.72.11
async mode interactive
!
Interface Async9
ipx network C
ip unnumbered Ethernet0
peer default ip address 172.16.72.12
async mode interactive
!
Interface Async10
ipx network D
ip unnumbered Ethernet0
peer default ip address 172.16.72.13
async mode interactive
!
Interface Async11
ipx network E
ip unnumbered Ethernet0
peer default ip address 172.16.72.14
async mode interactive
!
Interface Async12
ipx network F
ip unnumbered Ethernet0
peer default ip address 172.16.72.15
async mode interactive
!
Interface Async13
ipx network 10
ip unnumbered Ethernet0
peer default ip address 172.16.72.16
async mode interactive
!
Interface Async14
ipx network 11
ip unnumbered Ethernet0
peer default ip address 172.16.72.17
async mode interactive
!
Interface Async15
ipx network 12
ip unnumbered Ethernet0
peer default ip address 172.16.72.18
async mode interactive
!
Interface Async16
ipx network 13
ip unnumbered Ethernet0
peer default ip address 172.16.72.19
async mode interactive
!
router igrp 15
network 172.16.0.0
!
end
Use this configuration? [yes/no]: yes
Building configuration...
Use the enabled mode 'configure' command to modify this configuration.
Router#
The streamlined setup command facility is available only if your router is running from ROM monitor and has RXBOOT ROMs installed. The following routers can have this type of ROM installed:
The streamlined setup command facility permits your router to load a system image from a network server when there are problems with the startup configuration. The Cisco IOS software automatically puts you in the streamlined setup command facility when your router is accidentally or intentionally rebooted (or you are attempting to load a system image from a network server) after any of the following circumstances:
The streamlined setup command facility differs from the standard setup command facility because the streamlined facility does not ask you to configure global router parameters. You are prompted only to configure interface parameters, which permit your router to boot.
The following example shows a router entering the streamlined setup command facility:
         --- System Configuration Dialog ---
Default settings are in square brackets '[]'.
Configuring interface IP parameters for netbooting:
The streamlined setup command facility continues by prompting you for interface parameters for each installed interface. The facility asks if an interface is in use. If so, the facility then prompts you to provide an IP address and subnet mask bits for the interface. Enter the subnet mask bits as a decimal value, such as 5.
The following example shows the portion of the streamlined setup command facility that prompts for interface parameters. In the example, the facility is prompting for Ethernet0 interface parameters and Serial0 interface parameters:
Configuring interface Ethernet0:
  Is this interface in use? [yes]:
  Configure IP on this interface? [yes]:
    IP address for this interface: 192.195.78.50
    Number of bits in subnet field [0]: 5
    Class C network is 192.195.78.0, 5 subnet bits; mask is 255.255.255.248
Configuring interface Serial0:
  Is this interface in use? [yes]:
  Configure IP on this interface? [yes]:
    IP address for this interface: 192.195.78.34
    Number of bits in subnet field [5]:
    Class C network is 192.195.78.0, 5 subnet bits; mask is 255.255.255.248
The configuration information you provide on this screen is temporary and exists only so that you can proceed with booting your system. When you reload the system, your original configuration is left intact. If your startup configuration is corrupted, enter the setup command facility, and configure the basic parameters. Then issue the copy running-config startup-config command to write this configuration to NVRAM.
|
|