|
|

November 4, 1996
This document provides additional information about Cisco Internetwork Operating System (Cisco IOS) support of Cisco CPA1600 series routers and Cisco CPA3600 series routers. Use this document to complement the information contained in the following two documents:
These configuration notes contain the following sections:
Cisco IOS Release 11.1(7)AA supports the following routers and access servers:
Table 1 lists the interfaces supported in Cisco IOS Release 11.1(7)AA:
| Interface | Cisco 1600 | Cisco 3600 |
|---|---|---|
Ethernet (AUI) | Yes | Yes |
Ethernet (10BaseT) | Yes | Yes |
Synchronous serial | Yes | Yes |
Asynchronous serial | Yes | Yes |
Token Ring | No | Yes |
ISDN BRI S/T | Yes | Yes |
ISDN BRI U | Yes | Yes |
ISDN PRI | No | Yes |
Channelized T1 and E1 | No | Yes |
Switched 56 Kbps | Yes | No |
Switched Digital Data Service (DDS) | Yes | No |
Cisco IOS Release 11.1(7)AA adds support for the following new platforms and features:
The documentation in the sections below supplements the Configuring Fundamentals Configuration Guide. Included are configuration tasks and command reference documentation for the new features available on supported platforms. Pointers to chapter titles and sections are included so that you can update your printed manual.
On page 1-68 in the Configuration Fundamentals Configuration Guide, update the "Display System Image and Configuration Information" section with the corresponding new sections:
Perform the following tasks in EXEC mode to display information about system software, system image files, and configuration files:
Refer to the Configuration Fundamentals Command Reference publication for examples of these commands.
You can also use the o command in ROM monitor mode to list the configuration register settings on some models.
The Flash memory content listing does not include the checksum of individual files. To recompute and verify the image checksum when the image has been copied into Flash memory, complete the following task in EXEC mode:
| Task | Command |
|---|---|
Recompute and verify the image checksum when the image has been copied into a Flash memory device. | Enter the following command:
|
You can verify the checksum of individual files on a Flash memory device on Cisco 1600 series and Cisco 3600 series routers. On the Cisco 3600 series, you can verify the checksum of a file located in internal Flash memory (flash:) or in a Flash memory PC card inserted in one of two PCMCIA slots (slot0: or slot1:). On the Cisco 1600 series, you can verify the checksum of a file in internal flash memory (flash:) only. The following Cisco 3600 series example verifies the checksum of the file c3600-i-mz.test, which is in the fourth partition of a Flash memory PC card inserted in PCMCIA slot 0.
Router# verify slot0:

PCMCIA Slot0 flash

Partition   Size    Used      Free      Bank-Size  State          Copy Mode
  1         4096K   3069K     1026K     4096K      Read/Write     Direct
  2         4096K   3069K     1026K     4096K      Read/Write     Direct
  3         4096K      0K     4096K     4096K      Read/Write     Direct
  4         4096K   3826K      269K     4096K      Read/Write     Direct

[Type ?<no> for partition directory; ? for full directory; q to abort]
Which partition? [default = 1] 4


PCMCIA Slot0 flash directory, partition 4:
File  Length   Name/status
  1   2205860  dirt/images/c3600-d-mz
  2   1711128 c3600-i-mz.test
  3   850      alz
[3918032 bytes used, 276272 available, 4194304 total]

Name of file to verify? c3600-i-mz.test

Verifying checksum for 'c3600-i-mz.test' (file # 2)...  OK
On page 1-105 of the Configuration Fundamentals Configuration Guide, update the "Partition Flash Memory" section with the following new section:
To partition Flash memory, perform the following task in global configuration mode:
The device argument enables you to specify which Flash memory device you want to partition. For the Cisco 3600 series, your choices are internal Flash memory (flash) or Flash memory PC cards inserted in one of two PCMCIA slots (slot0 or slot1). On the Cisco 1600 series, partitions can be made only on a Flash memory PC card inserted in a PCMCIA slot, which is specified using the flash device keyword.
For the Cisco 1600 series and Cisco 3600 series, the number of partitions that you create in a single Flash device is equal to the number of banks present in the same device. Enter the show flash: all command to view the number of banks on the Flash memory device. The number of partition size entries you set is equivalent to the number of specified partitions. For example, the partition slot0: 2 8 8 command configures two partitions to be 8 MB large each. The first 8 corresponds to the first partition; the second 8 corresponds to the second partition. For all other platforms, the partition-size argument is equal to 1 or 2.
This task succeeds only if the system has at least two banks of Flash and the partitioning does not split an existing file in Flash memory across two or more partitions.
Update the "Copy a File into a Flash Partition" section on page I-106 of the Configuration Fundamentals Configuration Guide with the following section:
To download a file into a partition in internal Flash memory, perform one of the following tasks in EXEC mode:
Use the device argument on the Cisco 3600 series to specify which Flash memory device you want to serve as the copy destination. Your choices are internal Flash memory (flash) or a Flash memory PC card inserted in one of two PCMCIA slots (slot0 or slot1).
Flash memory on a Cisco 1600 series router runs from a Flash memory PC card, which is inserted in a PCMCIA slot. This card is the only Flash memory that exists on the Cisco 1600 series. You can write Cisco IOS images to the PC card by specifying the flash device. For example, use the copy tftp flash:, copy mop flash:, or copy rcp flash: commands.
The prompts displayed after you execute these tasks indicate the method by which the file can be downloaded into each partition. The possible methods are as follows:
If the image can be downloaded into more than one partition, you are prompted for the partition number. Enter any of the following at the partition number prompt to obtain help:
A Cisco IOS image can be copied with or without its destination partition and filename specified in the initial command line. Both methods are described in this example section.
To copy a Cisco IOS image from a TFTP server to a Flash memory location that is specified in the initial command line, perform the following steps:
Step 1 Enter the copy tftp flash: command, and include the destination partition and destination filename options in the initial command line:
Router# copy tftp flash:1:c3600-i-mz
In this example, the system reports that one partition and one file exist in internal Flash memory:
System flash directory, partition 1:
File  Length   Name/status
  1   1711088  current-ios
[1711152 bytes used, 2483152 available, 4194304 total]
Step 2 Enter or confirm the IP address of the remote TFTP server. The Cisco IOS software may show the IP address of the most recently used remote server in brackets ([]), if a remote server was recently accessed. In this case, press Enter.
Address or name of remote host [171.69.1.129]?
Step 3 Enter or confirm the source filename on the remote server. If you entered a destination filename in the initial command line, this filename is interpreted as the source filename by default. In this case, press Enter. If the source filename exists several directory levels into the UNIX server, you must enter the complete UNIX path name such as newios/3600/c3600-i-mz after the question mark (?).
Source file name [c3600-i-mz]?
Accessing file 'c3600-i-mz' on 171.69.1.129...
Loading c3600-i-mz from 171.69.1.129 (via Ethernet1/0): ! [OK]
Step 4 Decide if you want to erase the existing files in Flash memory during the copy operation. Press Enter to confirm erasing the files. You are asked two times to confirm erasing the Flash twice.
Erase flash device before writing? [confirm]
Flash contains files. Are you sure you want to erase? [confirm]
The system software displays the copy operation to you a final time before the file is copied:
Copy 'c3600-i-mz' from server
  as 'c3600-i-mz' into Flash WITH erase? [yes/no] yes

Erasing device... eeeeeeeeeeeeeeee ...erased
The system software loads, copies, and verifies the file from the remote server into the router. On the Cisco 3600 series routers, this file is copied into an internal Flash memory SIMM. On the Cisco 1600 series router, this file is copied into a Flash memory PC card. Depending on which platform you are using, the same flash keyword specifies two completely different device destination.
Loading c3600-i-mz from 171.69.1.129 (via Ethernet1/0):
!!!!!!!!!!!!!!!!!!!!!!!!!!!!!!!!!!!!!!!!!!!!!!!!!!!!!!!!!!!!!!!!!!!!!!!!!!!!!!!!
!!!!!!!!!!!!!!!!!!!!!!!!!!!!!!!!!!!!!!!!!!!!!!!!!!!!!!!!!!!!!!!!!!!!!!!!!!!!!!!!
!!!!!!!!!!!!!!!!!!!!!!!!!!!!!!!!!!!!!!!!!!!!!!!!!!!!!!!!!!!!!!!!!!!!!!!!!!!!!!!!
!!!!!!!!!!!!!!!!!!!!!!!!!!!!!!!!!!!!!!!!!!!!!!!!!!!!!!!!!!!!!!!!!!!!!!!!!!!!!!!!
!!!!!!!!!!!!!!!
[OK - 1711088/4194304 bytes]

Verifying checksum...  OK (0xF89A)
The duration of the copy operation is displayed in hours, minutes, and seconds:
Flash device copy took 00:00:17 [hh:mm:ss]
To copy a Cisco IOS image from a TFTP server to a Flash memory location that is not specified in the initial command line, unlike the previous example, perform the following steps:
Step 1 Enter the copy tftp flash: command without the destination partition and destination filename options specified in the initial command line:
Router# copy tftp flash:
The contents of the system Flash memory are displayed. In this case, two partitions are present:
System flash

Partition   Size    Used      Free      Bank-Size  State          Copy Mode
  1         4096K   1671K     2424K     4096K      Read/Write     Direct
  2        16384K   1671K    14712K     8192K      Read/Write     Direct
Step 2 Specify which partition on the local device you want to copy the remote file into. The first partition is the default. Press Enter to accept the default setting.
[Type ?<no> for partition directory; ? for full directory; q to abort]
Which partition? [default = 1]
The file c3600-i-mz exists in this partition:
System flash directory, partition 1:
File  Length   Name/status
  1   1711088 c3600-i-mz
[1711152 bytes used, 2483152 available, 4194304 total]
Step 3 Enter or confirm the IP address of the remote TFTP server. In this case, the system software automatically recalls that remote server 171.69.1.129 was the last remote device accessed by the router. Therefore it's displayed in brackets. Press Enter to accept the bracket entry.
Address or name of remote host [171.69.1.129]?
Step 4 Specify the source filename. In this example, the UNIX path name images/3600/c3600-i-mz is entered to copy the file c3600-i-mz.
Source file name? images/3600/c3600-i-mz
By default, the entire source path name is entered as the single destination filename. To shorten or change this filename, enter the new name after the question mark (?) and press Enter.
Destination file name [images/3600/c3600-i-mz]?
The remote file is accessed and loaded using Ethernet 1/0:
Accessing file 'images/3600/c3600-i-mz' on 171.69.1.129...
Loading images/3600/c3600-i-mz from 171.69.1.129 (via Ethernet1/0): ! [OK]
Step 5 Decide if you want to erase the existing files in Flash memory during the copy operation. Press Enter to confirm erasing the files. You are asked two times to confirm erasing the Flash:
Erase flash device before writing? [confirm]
Flash contains files. Are you sure you want to erase? [confirm]
The system software confirms the copy operation with you a final time before the Flash memory is erased and the file is copied:
Copy 'images/3600/c3600-i-mz' from server
  as 'images/3600/c3600-i-mz' into Flash WITH erase? [yes/no] yes

Erasing device... eeeeeeeeeeeeeeee ...erased
Loading images/3600/c3600-i-mz from 171.69.1.129 (via Ethernet1/0):
!!!!!!!!!!!!!!!!!!!!!!!!!!!!!!!!!!!!!!!!!!!!!!!!!!!!!!!!!!!!!!!!!!!!!!!!!!!!!!!!
!!!!!!!!!!!!!!!!!!!!!!!!!!!!!!!!!!!!!!!!!!!!!!!!!!!!!!!!!!!!!!!!!!!!!!!!!!!!!!!!
!!!!!!!!!!!!!!!!!!!!!!!!!!!!!!!!!!!!!!!!!!!!!!!!!!!!!!!!!!!!!!!!!!!!!!!!!!!!!!!!
!!!!!!!!!!!!!!!!!!!!!!!!!!!!!!!!!!!!!!!!!!!!!!!!!!!!!!!!!!!!!!!!!!!!!!!!!!!!!!!!
!!!!!!!!!!!!!!!
[OK - 1711088/4194304 bytes]

Verifying checksum...  OK (0xF89A)
Flash device copy took 00:00:17 [hh:mm:ss]
To copy a Cisco IOS image from a remote rcp server to a Flash memory PC card inserted in PCMCIA slot 0, perform the following steps:
Step 1 Enter the copy rcp slot0: command. Since a destination partition and destination filename are not specified in the initial command line, you are prompted for these values during the copy operation.
Router# copy rcp slot0:

PCMCIA Slot0 flash
The system displays four partitions with read and write permissions in the PC card.
Partition   Size    Used      Free      Bank-Size  State          Copy Mode
  1         4096K   3068K     1027K     4096K      Read/Write     Direct
  2         4096K   1671K     2424K     4096K      Read/Write     Direct
  3         4096K      0K     4095K     4096K      Read/Write     Direct
  4         4096K   3825K      270K     4096K      Read/Write     Direct
Step 2 Specify which partition you want to copy the remote file into. The first partition is the default. Press Enter to accept the default setting:
[Type ?<no> for partition directory; ? for full directory; q to abort]
Which partition? [default = 1]
The file c3600-j-mz exists in partition 1.
PCMCIA Slot0 flash directory, partition 1:
File  Length   Name/status
  1   3142288  c3600-j-mz
[3142352 bytes used, 1051952 available, 4194304 total]
Step 3 Enter or confirm the IP address of the remote rcp server. The address of the last accessed server is displayed in brackets ([]). Confirm the displayed IP address by pressing Enter.
Address or name of remote host [171.69.1.129]?
Step 4 Enter the UNIX path name that leads to the source file, which is c3600-i-mz in this example:
Source file name? /tftpboot/gate/c3600-i-mz
Step 5 Specify the destination filename. The Cisco IOS software uses the entire UNIX path that leads to the source file as the single destination filename by default. To shorten or change this filename, enter a new filename after the question mark (?) then press Enter.
Destination file name [/tftpboot/gate/c3600-i-mz]?
Accessing file '/tftpboot/gate/c3600-i-mz' on 171.69.1.129...
Connected to 171.69.1.129
Loading 1711088 byte file c3600-i-mz: ! [OK]
Confirm erasing the entire contents of the Flash memory in the PC card. You are prompted three times before the copy operation is complete.
Erase flash device before writing? [confirm]
Flash contains files. Are you sure you want to erase? [confirm]

Copy '/tftpboot/gate/c3600-i-mz' from server
  as '/tftpboot/gate/c3600-i-mz' into Flash WITH erase? [yes/no] yes

Erasing device... eeeeeeeeeeeeeeeeeeeeeeeeeeeeeeee ...erased
Connected to 171.69.1.129
Loading 1711088 byte file c3600-i-mz:
!!!!!!!!!!!!!!!!!!!!!!!!!!!!!!!!!!!!!!!!!!!!!!!!!!!!!!!!!!!!!!!!!!!!!!!!!!!!!!!!
!!!!!!!!!!!!!!!!!!!!!!!!!!!!!!!!!!!!!!!!!!!!!!!!!!!!!!!!!!!!!!!!!!!!!!!!!!!!!!!!
!!!!!!!!!!!!!!!!!!!!!!!!!!!!!!!!!!!!!!!!!!!!!!!!!!!!!!!!!!!!!!!!!!!!!!!!!!!!!!!!
!!!!!!!!!!!!!!!!!!!!!!!!!!!

Verifying checksum...  OK (0xF89A)
Flash device copy took 00:00:18 [hh:mm:ss]
To copy a Cisco IOS image from a remote rcp server to a Flash partition, which is specified in the initial command line, perform the following steps:
Step 1 Enter the copy rcp slot0:3 command. The partition structure in your PC card may be different from the structure shown in this example. The 3 specifies the third partition in the PC card, which is used as the copy partition destination.
Router# copy rcp slot0:3
PCMCIA Slot0 flash directory, partition 3:
File  Length   Name/status
  1   426      running-config
[492 bytes used, 4193812 available, 4194304 total]
Step 2 Enter or confirm the IP address of the remote rcp server:
Address or name of remote host [171.69.1.129]?
Step 3 Enter the source UNIX path name that leads to the file you want to copy:
Source file name? /tftpboot/gate/c3600-i-mz
Step 4 Specify the destination filename:
Destination file name [/tftpboot/gate/c3600-i-mz]?
Accessing file '/tftpboot/gate/c3600-i-mz' on 171.69.1.129...
Connected to 171.69.1.129
Loading 1711088 byte file c3600-i-mz: ! [OK]
Step 5 Decide if you want to erase the contents of Flash memory and initiate the copy operation:
Erase flash device before writing? [confirm]
Flash contains files. Are you sure you want to erase? [confirm]

Copy '/tftpboot/gate/c3600-i-mz' from server
  as '/tftpboot/gate/c3600-i-mz' into Flash WITH erase? [yes/no] yes

Erasing device... eeeeeeeeeeeeeeeeeeeeeeeeeeeeeeee ...erased
Connected to 171.69.1.129
Loading 1711088 byte file c3600-i-mz:
!!!!!!!!!!!!!!!!!!!!!!!!!!!!!!!!!!!!!!!!!!!!!!!!!!!!!!!!!!!!!!!!!!!!!!!!!!!!!!!!
!!!!!!!!!!!!!!!!!!!!!!!!!!!!!!!!!!!!!!!!!!
!!!!!!!!!!!!!!!!!!!!!!!!!!!!!!!!!!!!!!!!!!!!!!!!!!!!!!!!!!!!!!!!!!!!!!!!!!!!!!!!
!!!!!!!!!!!!!!!!!!!!!!!!!!!!!!!!!!!!!!!!!!!!!!!!!!!!!!!!!!!!!!!!!!!!!!!!!!!!!!!!
!!!!!!!!!!!!!!!!!!!!!!!!!!!!!!!!!!!!!!!!!!!!!!!!!!!!! [OK]

Verifying checksum...  OK (0xF89A)
Flash device copy took 00:00:16 [hh:mm:ss]
On page 1-68 of the Configuration Fundamentals Configuration Guide, update the "Clear the Configuration Information" section with the following new section:
To erase a saved configuration from a specific Flash memory device on a Cisco 1600 or Cisco 3600 series router, complete the following task in EXEC mode:
| Task | Command |
|---|---|
Erase or delete a specified configuration file on a specified Flash memory device. | erase device:[partition-number] |
For the device: argument on the Cisco 3600 series router, specify which Flash memory device you want to serve as the copy destination. Your choices are internal Flash memory (flash:) or a Flash memory PC card inserted in one of two PCMCIA slots (slot0: or slot1:). The Cisco 1600 series routers support erasing files in the PC card only, which is specied with the flash device keyword. You must include a colon (:) after the device type that you specify, regardless of which platform you are using.
If you attempt to erase or delete the configuration file specified by the CONFIG_FILE or BOOTLDR environment variable, the system prompts you to confirm the deletion. Also, if you attempt to erase or delete the last valid system image specified in the BOOT environment variable, the system prompts you to confirm the deletion.
The following example erases all the file contents in the second partition in internal Flash memory:
Router# erase flash:2


System flash directory, partition 2:
File  Length   Name/status
  1   1711088  dirt/amsingh/c3600-i-mz
[1711152 bytes used, 15066064 available, 16777216 total]

Erase flash device, partition 2? [confirm]
Are you sure? [yes/no]: yes

Erasing device... eeeeeeeeeeeeeeeeeeeeeeeeeeeeeeeeeeeeeeeeeeeeeeeeeeeeeeeeeeeeeeee
...erased
On page 1-73 in the "Loading System Images, Microcode, and Configuration Files" chapter in the Configuration Fundamentals Configuration Guide, update the "Copy a Configuration File Directly to the Startup Configuration" section with the following new section:
You can copy a configuration file directly to your startup configuration without affecting the running configuration. System images are copied from TFTP servers, rcp servers, MOP servers, or Flash memory devices (such as on the Cisco 3600 series).
To copy a configuration file directly to the startup configuration, perform the following task in EXEC mode:
| Task | Command |
|---|---|
Load a configuration file directly into NVRAM or directly into the location specified by the CONFIG_FILE environment variable. |
For the device argument, specify the Flash device from which you are copying the system image to the startup configuration. Possible copy destinations for the Cisco 3600 series router include the internal Flash memory (flash) or a Flash memory PC card inserted in one of two PCMCIA slots (slot0 or slot1). The Cisco 1600 series routers support copying files from the Flash memory PC card inserted in the PCMCIA slot, which is specified using the flash keyword. A colon (:) must be entered immediately following the specified device type, regardless of which platform you are using. If a filename follows the partition number, you must also enter a colon after the partition number.
The following Cisco 3600 series example copies the file IOS-UPGRADE-1 from the Flash memory PC card inserted in PCMCIA slot 0 to the router's startup configuration.
Router# copy slot0:4:IOS-UPGRADE-1 startup-config


Copy 'IOS-UPGRADE-1' from flash device
  as 'startup-config' ? [yes/no] yes

[OK]
The following Cisco 3600 series example copies the file new-ios from the fourth partition in the Flash memory PC card inserted in PCMCIA slot 0 to the router's startup configuration:
Router# copy slot0:4:new-ios startup-config


Copy 'new-ios' from flash device
  as 'startup-config' ? [yes/no] yes

[OK]
On page 1-94 of the Configuration Fundamentals Configuration Guide, add the "Copy System Images Between Flash Memory Devices" section:
System images on Flash memory devices, such as internal Flash memory and Flash memory PC cards inserted in PCMCIA slots, can be copied between devices on Cisco 3600 series routers. Images are copied to create backup copies of working configurations and easily duplicate configurations for other routers. (See Figure 1.)

To copy a configuration file between Flash memory devices on a Cisco 3600 series router, perform the following task in EXEC mode:
| Task | Command |
|---|---|
Step 1. Display the layout and contents of Flash memory. | show device: [all | chips | detailed | err | partition number | summary] |
Step 2. Copy a system image between Flash memory devices. | copy device:[partition-number:][filename] device:[partition-number:][filename] |
Step 3. Verify the checksum of the file you copied. | verify device: [partition-number:][filename] |
Use the copy device:[partition-number:][filename] device:[partition-number:][filename] command to copy system images between Flash memory devices on a Cisco 3600 series router. Optional Flash devices include internal Flash memory (flash) and Flash memory PC cards inserted in one of two PCMCIA slots (slot0 or slot1). In place of the device arguments for the Cisco 3600 series, specify the source Flash memory device and the destination Flash memory device. The first occurrence of the device argument in the copy command is the source file identifier. The second occurrence of the device argument is the destination file identifier. You must enter a colon (:) after each specified device type. If a filename follows the partition number, you must also enter a colon after the partition number.
To copy a Cisco IOS image between Flash devices that are resident on the same router, perform the following steps:
Step 1 Enter the command that specifies the source and destination Flash devices for the copy operation:
Router# copy flash:1 slot0:
The file structure for partition 1 of the internal Flash memory is displayed first.
System flash directory, partition 1:
File  Length   Name/status
  1   3142748  dirt/admin/images/new-ios-1
[3142812 bytes used, 1051492 available, 4194304 total]
The partition structure for the Flash memory PC card inserted in PCMCIA slot 0 is displayed next. In this case, a higher level display of the partitions is shown because no partition number is specified for the PC card in the initial command line.
PCMCIA Slot0 flash

Partition   Size    Used      Free      Bank-Size  State          Copy Mode
  1         4096K   1671K     2424K     4096K      Read/Write     Direct
  2         4096K   3069K     1026K     4096K      Read/Write     Direct
  3         4096K   1671K     2424K     4096K      Read/Write     Direct
  4         4096K   3826K      269K     4096K      Read/Write     Direct
Step 2 Specify which partition you want to copy the file into. The first partition is the default.
[Type ?<no> for partition directory; ? for full directory; q to abort]
Which partition? [default = 1]

PCMCIA Slot0 flash directory, partition 1:
File  Length   Name/status
  1   1711088  /tftpboot/gate/c3600-i-mz
[1711152 bytes used, 2483152 available, 4194304 total]
Step 3 Enter the UNIX path name that leads to the source file, which is new-ios in this example:
Source file name? dirt/admin/images/new-ios
Step 4 Enter the destination filename that is copied on the PC card. The system software uses the specified source path name and filename as the default entry, which is shown in brackts ([]):
Destination file name [dirt/admin/images/new-ios]?
Verifying checksum for 'dirt/admin/images/new-ios' (file # 1)...  OK
Step 5 Decide if you want to erase the existing Flash memory in the PC card:
Erase flash device before writing? [confirm]
Flash contains files. Are you sure you want to erase? [confirm]
Step 6 Confirm that the source filename, destination filename, and erase Flash options are correct:
Copy 'dirt/admin/images/new-ios' from flash: device
  as 'dirt/admin/images/new-ios' into slot0: device WITH erase? [yes/no] yes

Erasing device... eeeeeeeeeeeeeeeeeeeeeeeeeeeeeeee ...erased
!!!!!!!!!!!!!!!!!!!!!!!!!!!!!!!!!!!!!!!!!!!!!!!!!!!!!!!!!!!!!!!!!!!!!!!!!!!!!!!!
!!!!!!!!!!!!!!!!!!!!!!!!!!!!!!!!!!!!!!!!!!!!!!!!!!!!!!!!!!!!!!!!!!!!!!!!!!!!!!!!
!!!!!!!!!!!!!!!!!!!!!!!!!!!!!!!!!!!!!!!!!!!!!!!!!!!!!!!!!!!!!!!!!!!!!!!!!!!!!!!!
!!!!!!!!!!!!!!!!!!!!!!!!!!!!!!!!!!!!!!!!!!!!!!!!!!!!!!!!!!!!!!!!!!!!!!!!!!!!!!!!
!!!!!!!!!!!!!!!!!!!!!!!!!!!!!!!!!!!!!!!!!!!!!!!!!!!!!!!!!!!!!!!!!!!!!!!!!!!!!!!!
!!!!!!!!!!!!!!!!!!!!!!!!!!!!!!!!!!!!!!!!!!!!!!!!!!!!!!!!!!!!!!!!!!!!!!!!!!!!!!!!
!!!!!!!!!!!!!!!!!!!!!!!!!!!!!!!!!!!!!!!!!!!!!!!!!!!!!!!!!!!!!!!!!!!!!!!!!!!!!!!!
!!!!!!!!!!!!!!!!!!!!!!!!!!!!!!!!!!!!!!!!!!!!!!!!!!!!!!!!!!!!!!!!!!!!!!!!!!!!!!!!
!!!!!!!!!!!!!!!!!!!!!!!!!!!!!!!!!!!!!!!!!!!!!!!!!!!!!!!!!!!!!!!!!!!!!!!!!!!!!!!!
!!!!!!!!!!!!!!!!!!!!!!!!!!!!!!!!!!!!!!!!!!!!!!!!
 [OK - 3142748/4194304 bytes]

Flash device copy took 00:00:50 [hh:mm:ss]
Verifying checksum...  OK (0xB732)
To copy a file from internal Flash memory to a PC card without specifying a partition number or filename in the initial command line, perform the following steps:
Step 1 Enter the command that specifies the source and destination Flash devices for the copy operation:
Router# copy flash: slot1:
The contents of internal Flash memory are displayed.
System flash

Partition   Size    Used      Free      Bank-Size  State          Copy Mode
  1         4096K   3070K     1025K     4096K      Read/Write     Direct
  2        16384K   1671K    14712K     8192K      Read/Write     Direct
Step 2 Specify which partition in internal Flash memory contains the source file. The default is the first partition.
[Type ?<no> for partition directory; ? for full directory; q to abort]
Which partition? [default = 1]

System flash directory, partition 1:
File  Length   Name/status
  1   3142748  dirt/network/mars-test/c3600-j-mz.latest
  2   850      running-config
[3143728 bytes used, 1050576 available, 4194304 total]
The contents of the destination Flash memory on the PC card inserted in slot 1 is displayed:
PCMCIA Slot1 flash directory:
File  Length   Name/status
  1   1711088  dirt/gate/c3600-i-mz
  2   850      running-config
[1712068 bytes used, 2482236 available, 4194304 total]
Step 3 Specify the source filename, which is in internal Flash memory:
Source file name? running-config
Step 4 Enter or confirm the destination filename, which is copied to the PC card. The source filename you entered in Step 3 is shown in brackets by default. Unless you specify otherwise, the source filename is used as the destination filename.
Destination file name [running-config]?
Verifying checksum for 'running-config' (file # 2)...  OK
Step 5 Decide if you want to erase the existing Flash memory in the PC card:
Erase flash device before writing? [confirm]
Flash contains files. Are you sure you want to erase? [confirm]

Copy 'running-config' from flash: device
  as 'running-config' into slot1: device WITH erase? [yes/no] yes

Erasing device...
eeeeeeeeeeeeeeeeeeeeeeeeeeeeeeeeeeeeeeeeeeeeeeeeeeeeeeeeeeeeeeee ...erased
!
 [OK - 850/4194304 bytes]

Flash device copy took 00:00:30 [hh:mm:ss]
Verifying checksum...  OK (0x16)
On page 1-58 in the Configuration Fundamentals Configuration Guide, update the "Copy from a TFTP Server to Flash Memory" section with the following new section:
To copy a system image from a TFTP server to Flash memory, complete the following tasks:
For the copy tftp flash, copy tftp device:, and copy tftp file_id commands, the router gives you the option of erasing the existing Flash memory before writing to it. If there is no free Flash memory available, or if the Flash memory has never been written to, the erase routine is required before new files can be copied. The system will inform you of these conditions and prompt you for a response. When you issue the copy tftp flash command, the system prompts you for the IP address or domain name of the TFTP server. This server can be another router serving ROM or Flash system software images. The system then prompts you for the filename of the software image to copy.
The device argument on the copy tftp device:[partition-number:][filename] command specifies a Flash device to serve as the destination of the copy operation. On the Cisco 3600 series, you can choose flash, slot0, or slot1 as the specified Flash memory device. The options slot0 and slot1 correspond to PCMCIA slots 0 and 1. Bootflash memory is not supported on the Cisco 3600 series routers. On the Cisco 1600 series, only the PC card is supported. This card is specified with the flash device keyword, and it's the only Flash memory that exists on the Cisco 1600 series. A colon (:) must be entered immediately following the specified device type, regardless of which platform you are using. If a filename follows the partition number, you must also enter a colon after the partition number.
The file_id argument of the copy tftp file_id command specifies a device and filename as the destination of the copy operation. You can omit the device, entering only copy tftp filename. When you omit the device, the system uses the default device specified by the cd command.
If you attempt to copy a file into Flash memory that is already there, a prompt informs you that a file with the same name already exists. This file is "deleted" when you copy the new file into Flash. The first copy of the file still resides within Flash memory, but it is rendered unusable in favor of the newest version, and is listed with the "deleted" tag when you use the show flash command. If you terminate the copy process, the newer file is marked "deleted" because the entire file was not copied and is not valid. In this case, the original file in Flash memory is valid and available to the system.
The following example shows how to use the copy tftp flash command to copy a system image named gs7-k when Flash memory is too full to copy the file. The filename gs7-k can be in either lowercase or uppercase; the system sees GS7-K as gs7-k. If more than one file of the same name is copied to Flash, regardless of case, the last file copied becomes the valid file.
env-chassis# copy tftp flash

IP address or name of remote host [255.255.255.255]? dirt

Translating "DIRT"...domain server (255.255.255.255) [OK]

Name of file to copy ? gs7-k

Copy gs7-k from 131.108.13.111 into flash memory? [confirm]
Flash is filled to capacity.
Erasure is needed before flash may be written.
Erase flash before writing? [confirm]
Erasing flash EPROMs bank 0

Zeroing bank...zzzzzzzzzzzzzzzz
Verify zeroed...vvvvvvvvvvvvvvvv
Erasing bank...eeeeeeeeeeeeeeee

Erasing flash EPROMs bank 1

Zeroing bank...zzzzzzzzzzzzzzzz
Verify zeroed...vvvvvvvvvvvvvvvv
Erasing bank...eeeeeeeeeeeeeeee

Erasing flash EPROMs bank 2

Zeroing bank...zzzzzzzzzzzzzzzz
Verify zeroed...vvvvvvvvvvvvvvvv
Erasing bank...eeeeeeeeeeeeeeee

Erasing flash EPROMs bank 3

Zeroing bank...zzzzzzzzzzzzzzzz
Verify zeroed...vvvvvvvvvvvvvvvv
Erasing bank...eeeeeeeeeeeeeeee

Loading from 131.108.1.111: !!!!...
 [OK - 1906676/4194240 bytes]
Verifying via checksum...
vvvvvvvvvvvvvvvvvvvvvvvvvvvvvvvvvvvvvvvvvvvvvvvvvvvvvvvvvvvvvvvvvvvvvvvvvvvvvvvvvvvvvv
vvvvvvvvvvvvvvvvvvvvvvvvvvvvvvvvvvvvvvvvvvvvvvvvvvvvvvvvvvvvvvvvvvvvvvvvvvvvvvvvvvvvvv
vvvvvvvvvvvvvvvvvvvvvvvvvvvvvvvvvvvvvvvvvvvvvvvvvvvvvvvvvvvvvvvvvvvvvvvvvvvvvvvvvvvvvv
vvvvvvvvvvvvvvvvvvvvvvvvvvvvvvvvvvvvvvvvvvvvvvvvvvvvvvvvvvvvvvvvvvvvvvvvvvvvvvvvvvvvvv
vvvvvvvvvvvvvvvvvvvvvvvvvvvvv
Flash verification successful. Length = 1906676, checksum = 0x12AD
The exclamation point (!) indicates that the copy process is taking place. Each exclamation point (!) indicates that ten packets have been transferred successfully. A series of "V" characters indicates that a checksum verification of the image is occurring after the image is written to Flash memory.
To copy a Cisco IOS system image from a TFTP server to a Cisco 3600 series or Cisco 1600 series router, which does not have partitioned Flash memory, perform the following steps:
Step 1 Enter the copy tftp flash: command followed by the destination filename. The filename you enter is automatically entered in the source filename field.
Router# copy tftp flash:my-new-ios
The contents of internal Flash memory on the Cisco 3600 series is displayed. If you are using a Cisco 1600 series router, the contents of the Flash memory PC card is displayed.
System flash directory:
File  Length   Name/status
  1   1711088  c3600-j-mz
[1711152 bytes used, 2483152 available, 4194304 total]
Enter or confirm the IP address of the remote TFTP server. The system software automatically displays the IP address of the last accessed remote server by default.
Address or name of remote host [171.69.1.129]?
Step 2 Enter or confirm the UNIX path name leading up to the source file on the remote server. By default the destination filename that you entered in the initial command line is shown in brackets ([]). To confirm this filename as the UNIX path and source filename, press Enter. In this case, a new entry is specified.
Source file name [my-new-ios]? dirt/images/ios-image
The file on the remote server is accessed and loaded on the router through Ethernet port 1/0.
Accessing file 'dirt/images/ios-image' on 171.69.1.129...
Loading dirt/images/ios-image from 171.69.1.129 (via Ethernet1/0): ! [OK]
Step 3 Decide if you want to erase the contents of the internal Flash memory device (Cisco 3600 series) or the Flash PC card (Cisco 1600 series):
Erase flash device before writing? [confirm]
Flash contains files. Are you sure you want to erase? [confirm]
Step 4 Confirm that your copy settings are correct.
Copy 'dirt/gate/ios-image' from server
  as 'my-new-ios' into Flash WITH erase? [yes/no] yes

Erasing device... eeeeeeeeeeeeeeee ...erased
Loading dirt/images/ios-image from 171.69.1.129 (via Ethernet1/0):
!!!!!!!!!!!!!!!!!!!!!!!!!!!!!!!!!!!!!!!!!!!!!!!!!!!!!!!!!!!!!!!!!!!!!!!!!!!!!!!!
!!!!!!!!!!!!!!!!!!!!!!!!!!!!!!!!!!!!!!!!!!!!!!!!!!!!!!!!!!!!!!!!!!!!!!!!!!!!!!!!
!!!!!!!!!!!!!!!!!!!!!!!!!!!!!!!!!!!!!!!!!!!!!!!!!!!!!!!!!!!!!!!!!!!!!!!!!!!!!!!!
!!!!!!!!!!!!!!!!!!!!!!!!!!!!!!!!!!!!!!!!!!!!!!!!!!!!!!!!!!!!!!!!!!!!!!!!!!!!!!!!
!!!!!!!!!!!!!!!
[OK - 1711088/4194304 bytes]

Verifying checksum...  OK (0xF89A)
Flash device copy took 00:00:17 [hh:mm:ss]
The following example shows how to copy a system image named gs7-k into the current Flash configuration in which a file named gs7-k already exists:
env-chassis# copy tftp flash

IP address or name of remote host [131.108.13.111]?
Name of file to copy ? gs7-k

File gs7-k already exists; it will be invalidated!
Copy gs7-k from 131.108.13.111 into flash memory? [confirm]
2287500 bytes available for writing without erasure.
Erase flash before writing? [confirm]n

Loading from 131.108.1.111: !!!!...
[OK - 1906676/2287500 bytes]
Verifying via checksum...
vvvvvvvvvvvvvvvvvvvvvvvvvvvvvvvvvvvvvvvvvvvvvvvvvvvvvvvvvvvvvvvvvvvvvvvvvvvvvvvvvvvvvv
vvvvvvvvvvvvvvvvvvvvvvvvvvvvvvvvvvvvvvvvvvvvvvvvvvvvvvvvvvvvvvvvvvvvvvvvvvvvvvvvvvvvvv
vvvvvvvvvvvvvvvvvvvvvvvvvvvvvvvvvvvvvvvvvvvvvvvvvvvvvvvvvvvvvvvvvvvvvvvvvvvvvvvvvvvvvv
vvvvvvvvvvvvvvvvvvvvvvvvvvvvvvvvvvvvvvvvvvvvvvvvvvvvvvvvvvvvvvvvvvvvvvvvvvvvvvvvvvvvvv
vvvvvvvvvvvvvvvvvvvvvvvvvvvvv
Flash verification successful. Length = 1902192, checksum = 0x12AD
The exclamation point (!) indicates that the copy process is taking place. Each exclamation point (!) indicates that ten packets have been transferred successfully. A series of "V" characters indicates that a checksum verification of the image is occurring after the image is written to Flash memory.
In the following example, the Flash security jumper is not installed, so you cannot write files to Flash memory.
Router# copy tftp flash

Flash: embedded flash security jumper(12V)
       must be strapped to modify flash memory
On page 1-61 of the Configuring Fundamentals Configuration Guide, replace the "Copy from an rcp Server to Flash Memory" section with the following new section:
You can copy a system image from an rcp network server to Flash memory. For the rcp command to execute properly, an account must be defined on the network server for the remote username. You can override the default remote username sent on the rcp copy request by configuring the remote username. For example, if the system image resides in the home directory of a user on the server, you can specify that user's name as the remote username. The rcp protocol implementation copies the system image from the remote server relative to the directory of the remote username if the remote server has a directory structure, as do UNIX systems.
To copy a system image from an rcp server to Flash memory, complete the following tasks:
When you issue the copy rcp flash, copy rcp device:[partition-number:][filename], or copy rcp file_id command, the system prompts you for the IP address or domain name of the server. This server can be another router serving Flash system software images. The system then prompts you for the filename of the software image to copy. With the copy rcp flash command, the system also prompts you to name the system image file that will reside in Flash memory once the copy is complete. You can use the filename of the source file, or you can choose another name. For the device argument on the Cisco 3600 series, you can specify internal Flash memory (flash) or a Flash memory PC card inserted in one of two PCMCIA slots (slot0 or slot1). On the Cisco 1600 series, the only supported device type is the Flash memory PC card, which is specified by the flash keyword. This card is the only Flash memory that exists on the Cisco 1600 series. A colon (:) must be entered immediately following the specified device type, regardless of which platform you are using.
When free space is available in Flash memory, you are given the option of erasing the existing Flash memory before writing onto it. If no free Flash memory space is available, or if the Flash memory has never been written to, the erase routine is required before new files can be copied. The system informs you of these conditions and prompts you for a response. If you accept the erasure, the system prompts you again to confirm before erasing. Note that the Flash memory is erased at the factory before shipment.
If you attempt to copy a file into Flash memory that is already there, a prompt informs you that a file with the same name already exists. The older file is "deleted" when you copy the new file into Flash. The first copy of the file still resides within Flash memory, but it is rendered unusable in favor of the newest version, and is listed with the "deleted" tag when you use the show flash command. If you terminate the copy process, the newer file is marked "deleted" because the entire file was not copied. In this case, the original file in Flash memory is valid and available to the system.
To copy a Cisco IOS image from a rcp server to a Flash memory device on a Cisco 1600 series or Cisco 3600 series router, perform the following steps:
Step 1 Enter the copy rcp flash: command. In this example, the partition number and destination filename is not specified in the initial command line.
Router# copy rcp flash:
The contents of the internal Flash memory (Cisco 3600 series) or the Flash memroy PC card (Cisco 1600 series) is displayed.
System flash directory:
File  Length   Name/status
  1   426      running-config
[492 bytes used, 4193812 available, 4194304 total]
Step 2 Enter the IP address of the remote rcp server. The system software recalls the IP address of the last accessed remote device by default. To accept the IP address shown in the brackets ([]), press Enter:
Address or name of remote host [171.69.1.129]?
Step 3 Enter the UNIX path name leading up to the source file on the remote server. If you enter a destination filename in the initial command line (Step 1), the filename is displayed here in brackets ([]).
Source file name? /images/new-ios
Step 4 Specify the destination filename that will be created in the internal Flash memory (Cisco 3600 series) or the Flash memory PC card (Cisco 1600 series). The source filename you enter in Step 3 is shown here in brackets. In this case, the file is renamed to my-ios.
Destination file name [images/new-ios]? my-ios

Accessing file '/images/new-ios' on 171.69.1.129...
Connected to 171.69.1.129
Loading 1711088 byte file new-ios: ! [OK]
Step 5 Decide if you want to erase the contents of the Flash memory device during the copy operation:
Erase flash device before writing? [confirm]
Flash contains files. Are you sure you want to erase? [confirm]
Step 6 Confirm that the copy settings are correct:
Copy '/images/new-ios' from server
  as 'my-ios' into Flash WITH erase? [yes/no] yes

Erasing device... eeeeeeeeeeeeeeeeeeeeeeeeeeeeeeee ...erased
Connected to 171.69.1.129
Loading 1711088 byte file new-ios:
!!!!!!!!!!!!!!!!!!!!!!!!!!!!!!!!!!!!!!!!!!!!!!!!!!!!!!!!!!!!!!!!!!!!!!!!!!!!!!!!
!!!!!!!!!!!!!!!!!!!!!!!!!!!!!!!!!!!!!!!!!!
!!!!!!!!!!!!!!!!!!!!!!!!!!!!!!!!!!!!!!!!!!!!!!!!!!!!!!!!!!!!!!!!!!!!!!!!!!!!!!!!
!!!!!!!!!!!!!!!!!!!!!!!!!!!!!!!!!!!!!!!!!!!!!!!!!!!!!!!!!!!!!!!!!!!!!!!!!!!!!!!!
!!!!!!!!!!!!!!!!!!!!!!!!!!!!!!!!!!!!!!!!!!!!!!!!!!!!! [OK]

Verifying checksum...  OK (0xF89A)
Flash device copy took 00:00:16 [hh:mm:ss]
In this next Cisco 3600 series example, the destination partition number and filename in PCMCIA slot 0 are specified in the initial command line. In the previous example, the partition number and filename was provided during the copy operation.
Step 1 Enter the copy rcp slot0: command followed by the destination partition and filename options. Include your own partition number and filename where appropriate.
Router# copy rcp slot0:2:c3600-j-mz
The system software accesses partition 2 on the Flash memory PC card and displays its contents.
PCMCIA Slot0 flash directory, partition 2:
File  Length   Name/status
  1   1711128  c3600-i-mz.test
  2   426      running-config
[1711684 bytes used, 2482620 available, 4194304 total]
Step 2 Enter the IP address of the remote rcp server. Press Enter to accept the IP address shown in the brackets ([]).
Address or name of remote host [171.69.1.129]?
Step 3 Enter or accept the UNIX path name that leads up to the source filename on the remote rcp server:
Source file name? [c3600-j-mz]? /tftpboot/gate/c3600-j-mz

Accessing file '/tftpboot/gate/c3600-j-mz' on 171.69.1.129...
Connected to 171.69.1.129
Loading 3141700 byte file c3600-j-mz: ! [OK]
Step 4 Decide if you want to erase the contents of Flash memory on the PC card during the copy operation. Press Enter to erase the existing files.
Erase flash device before writing? [confirm]
Flash contains files. Are you sure you want to erase? [confirm]
Step 5 Confirm that the copy settings are correct:
Copy '/tftpboot/gate/c3600-j-mz' from server
  as 'c3600-j-mz' into Flash WITH erase? [yes/no] yes

Erasing device... eeeeeeeeeeeeeeeeeeeeeeeeeeeeeeee ...erased
Connected to 171.69.1.129
Loading 3141700 byte file c3600-j-mz: !!!!!!!!!!!!!!!!!!!!!!!!!!!!!!!!!!!!!!!!!!
!!!!!!!!!!!!!!!!!!!!!!!!!!!!!!!!!!!!!!!!!!!!!!!!!!!!!!!!!!!!!!!!!!!!!!!!!!!!!!!!
!!!!!!!!!!!!!!!!!!!!!!!!!!!!!!!!!!!!!!!!!!!!!!!!!!!!!!!!!!!!!!!!!!!!!!!!!!!!!!!!
!!!!!!!!!!!!!!!!!!!!!!!!!!!!!!!!!!!!!!!!!!!!!!!!!!!!!!!!!!!!!!!!!!!!!!!!!!!!!!!!
!!!!!!!!!!!!!!!!!!!!!!!!!!!!!!!!!!!!!!!!!!!!!!!!!!!!!!!!!!!!!!!!!!!!!!!!!!!!!!!!
!!!!!!!!!!!!!!!!!!!!!!!!!!!!!!!!!!!!!!!!!!!!!!!!!!!!!!!!!!!!!!!!!!!!!!!!!!!!!!!!
!!!!!!!!!!!!!!!!!!!!!!!!!!!!!!!!!!!!!!!!!!!!!!!!!!!!!!!!!!!!!!!!!!!!!!!!!!!!!!!!
!!!!!!!!!!!!!!!!!!!!!!!!!!!!!!!!!!!!!!!!!!!!!!!!!!!!!!!!!!!!!!!!!!!!!!!!!!!!!!!!
!!!!!!!!!!!! [OK]

Verifying checksum...  OK (0x84E)
Flash device copy took 00:00:30 [hh:mm:ss]
The following example shows how to copy a system image named mysysim1 from the netadmin1 directory on the remote server named SERVER1.CISCO.COM with an IP address of 131.108.101.101 to Flash memory. To ensure that enough Flash memory is available to accommodate the system image to be copied, the Cisco IOS software allows you to erase the contents of Flash memory first.
Router1# configure terminal

Router1(config)# ip rcmd remote-username netadmin1

^Z

Router# copy rcp flash


System flash directory:
File name/status

 1 mysysim1

[2076072 bytes used, 21080 bytes available]

Address or name of remote host[UNKNOWN]? 131.108.101.101

Name of file to copy? mysysim1

Copy mysysim1 from SERVER1.CISCO.COM?[confirm]


Checking for file 'mysysim1' on SERVER1.CISCO.COM...[OK]

Erase Flash device before writing?[confirm]
Are you sure?[confirm]
Erasing device...ezeeze...erased.

Connected to 131.108.101.101


Loading 2076007 byte file mysysim1: !!!!...
[OK]

Verifying checksum... (0x87FD)...[OK]
Router#
The exclamation point (!) indicates that the copy process is taking place. Each exclamation point (!) indicates that ten packets have been transferred successfully.
The following example uses the copy rcp file_id command to copy the router-image file from a network server using rcp to the Flash memory card inserted in slot 0 of the RP or RSP card:
Router1# configure terminal

Router1(config)# ip rcmd remote-username netadmin1

^Z

Router1# copy rcp slot0:router-image
You can copy normal or compressed images to Flash memory. You can produce a compressed system image on any UNIX platform using the compress command. Refer to your UNIX platform's documentation for the exact usage of the compress command.
On page 1-63 in the Configuration Fundamentals Configuration Guide, update the "Copy from a MOP Server to Flash Memory" section with the following new section:
You can copy a system image from a Maintenance Operation Protocol (MOP) server to Flash memory. To do so, perform the following task in EXEC mode:
| Task | Command |
|---|---|
Copy a boot image from a MOP server. | copy mop flash |
In place of the device argument, specify the destination Flash device. On the Cisco 3600 series routers, you can specify the internal Flash memory (flash) or a Flash memory PC card inserted in one of two PCMCIA slots (slot0 or slot1). For the Cisco 1600 series, only the Flash memory PC card (flash) is supported. This card is the only Flash memory device that exists on the Cisco 1600 series routers. You must enter a colon (:) after the specified device type, regardless of the platform you are using. If a filename follows the partition number, you must also enter a colon after the partition number.
The following example shows sample output from the copy mop flash command. In this example, the system image routerimage, which already exists in Flash memory, is copied to Flash memory, and there is enough memory to copy the file without erasing any existing files.
Router# copy mop flash


System flash directory:
File  Length   Name/status
  1   984       router image[deleted]
  2   984       router image
[2096 bytes used, 8386512 available, 8388608 total]
Source file name? routerimage

Destination file name [routerimage]?

Erase flash device before writing? [confirm]
Flash contains files. Are you sure you want to erase? [confirm]

Copy 'routerimage' from server
  as 'routerimage' into Flash WITH erase? [yes/no]yes

Erasing device... eeeeeeeeeeeeeeeeeeeeeeeeeeeeeeee ...erased
Loading routerimage from 1234.5678.9abc via Ethernet0: !
[OK - 984/8388608 bytes]

Verifying checksum...  OK (0x14B3)
Flash copy took 0:00:01 [hh:mm:ss]
On page 1-88 in the Configuration Fundamentals Configuration Guide, update the "Copy from Flash Memory to a TFTP Server" section with the following new section:
You can copy a system image to a TFTP network server. In some implementations of TFTP, you must first create a "dummy" file on the TFTP server and give it read, write, and execute permissions before copying a file over it. Refer to your TFTP documentation for more information.
To copy a system image to a TFTP network server, perform the following task in EXEC mode:
| Task | Command |
|---|---|
Step 1. Know the exact spelling of the system image filename in Flash memory. | |
Step 2. Copy the system image from Flash memory to a TFTP server. | |
Step 3. When prompted, enter the IP address or domain name of the TFTP server. | ip-address or name |
Step 4. When prompted, enter the filename of the system image in Flash memory. | filename |
In place of the device argument, specify the Flash device that contains the source file. On the Cisco 3600 series routers, you can specify copying from internal Flash memory (flash) or a Flash memory PC card inserted in one of two PCMCIA slots (slot0 or slot1). For the Cisco 1600 series routers, only a PC card is supported, which is specified using the flash device keyword. This card is the only Flash memory that exists on the Cisco 1600 series. For each platform, you must enter a colon (:) after the specified device type. If a filename follows the partition number, you must also enter a colon after the partition number.
To copy a system image from a PC card, which is inserted in a Cisco 3600 series router, to a remote TFTP server, perform the following steps:
Step 1 Enter the copy slot0: tftp command. The source file is in a PC card inserted in PCMCIA slot 0.
Router# copy slot0: tftp
The system software displays the contents of the PC card. If the partition number was specified in the initial command line, the software would display the contents of the specified partition only.
PCMCIA Slot0 flash

Partition   Size    Used      Free      Bank-Size  State          Copy Mode
  1         4096K   1671K     2424K     4096K      Read/Write     Direct
  2         4096K   3068K     1027K     4096K      Read/Write     Direct
  3         4096K   1671K     2424K     4096K      Read/Write     Direct
  4         4096K   3825K      270K     4096K      Read/Write     Direct
Step 2 Specify the partition that contains the source file. Partition 1 is the default setting.
[Type ?<no> for partition directory; ? for full directory; q to abort]
Which partition? [default = 1] 1
The file your-ios is shown to exist in partition 1:
PCMCIA Slot0 flash directory, partition 1:
File  Length   Name/status
  1   1711088 your-ios
[1711152 bytes used, 2483152 available, 4194304 total]
Step 3 Enter the IP address of the remote TFTP server. The system software displays the address of the last accessed server enclosed in brackets ([]) by default.
Address or name of remote host [171.69.1.129]?
Step 4 Enter the source filename in partition 4 of the PC card.
Source file name? your-ios
Step 5 Enter the UNIX path name that leads up to the destination filename to be copied to the TFTP server:
Destination file name [your-ios]? dirt/sysadmin/your-ios

Verifying checksum for '/tftpboot/images/ios-1' (file # 1)...  OK
Step 6 Confirm that the copy settings are correct:
Copy '/tftpboot/images/ios-1' from Flash to server
  as 'dirt/sysadmin/ios-2'? [yes/no] yes

!!!!!!!!!!!!!!!!!!!!!!!!!!!!!!!!!!!!!!!!!!!!!!!!!!!!!!!!!!!!!!!!!!!!!!!!!!!!!!!!
!!!!!!!!!!!!!!!!!!!!!!!!!!!!!!!!!!!!!!!!!!!!!!!!!!!!!!!!!!!!!!!!!!!!!!!!!!!!!!!!
!!!!!!!!!!!!!!!!!!!!!!!!!!!!!!!!!!!!!!!!!!!!!!!!!!!!!!!!!!!!!!!!!!!!!!!!!!!!!!!!
!!!!!!!!!!!!!!!!!!!!!!!!!!!!!!!!!!!!!!!!!!!!!!!!!!!!!!!!!!!!!!!!!!!!!!!!!!!!!!!!
!!!!!!!!!!!!!!!!
Upload to server done
Flash device copy took 00:00:23 [hh:mm:ss]
In this next Cisco 3600 series example, the partition number is specified at the initial command line. Use you own partition numbers and filenames where appropriate.
Step 1 Enter the copy slot0:2 tftp command. The PC card inserted in slot 0 contains the source file in partition 2.
Enter the Router# copy slot0:2 tftp


PCMCIA Slot0 flash directory, partition 2:
File  Length   Name/status
  1   3141700 your-ios
[3141764 bytes used, 1052540 available, 4194304 total]
Step 2 Enter or confirm the IP address of the remote TFTP server:
Address or name of remote host [171.69.1.129]?
Step 3 Specify the source filename that resides in partition 2 of the Cisco 3600 series router:
Source file name? your-ios
Step 4 Specify the UNIX path name that leads to the destination file that is created on the TFTP server:
Destination file name [your-ios]? /sysadmin/images/server-ios

Verifying checksum for 'your-ios' (file # 1)...  OK
Copy 'your-ios' from Flash to server
  as '/sysadmin/images/server-ios'? [yes/no] yes

!!!!!!!!!!!!!!!!!!!!!!!!!!!!!!!!!!!!!!!!!!!!!!!!!!!!!!!!!!!!!!!!!!!!!!!!!!!!!!!!
!!!!!!!!!!!!!!!!!!!!!!!!!!!!!!!!!!!!!!!!!!!!!!!!!!!!!!!!!!!!!!!!!!!!!!!!!!!!!!!!
!!!!!!!!!!!!!!!!!!!!!!!!!!!!!!!!!!!!!!!!!!!!!!!!!!!!!!!!!!!!!!!!!!!!!!!!!!!!!!!!
!!!!!!!!!!!!!!!!!!!!!!!!!!!!!!!!!!!!!!!!!!!!!!!!!!!!!!!!!!!!!!!!!!!!!!!!!!!!!!!!
!!!!!!!!!!!!!!!!!!!!!!!!!!!!!!!!!!!!!!!!!!!!!!!!!!!!!!!!!!!!!!!!!!!!!!!!!!!!!!!!
!!!!!!!!!!!!!!!!!!!!!!!!!!!!!!!!!!!!!!!!!!!!!!!!!!!!!!!!!!!!!!!!!!!!!!!!!!!!!!!!
!!!!!!!!!!!!!!!!!!!!!!!!!!!!!!!!!!!!!!!!!!!!!!!!!!!!!!!!!!!!!!!!!!!!!!!!!!!!!!!!
!!!!!!!!!!!!!!!!!!!!!!!!!!!!!!!!!!!!!!!!!!!!!!!!!!!!!!!
Upload to server done
Flash device copy took 00:00:41 [hh:mm:ss]

In this next Cisco 3600 series example, the source device type, source partition number, and source
filename are specified in the initial command line.
Step 1 Enter the copy slot0: tftp command with the source partition and filename options specified:
Router# copy slot0:4:your-ios tftp
The system software does not display any of the Flash memory contents because all the required information is specified in the initial command line.
Step 2 Enter the IP address of the remote TFTP server:
Address or name of remote host [171.69.1.129]?
Step 3 Enter the destination UNIX path name followed by the destination filename, which is copied to the remote server:
Destination file name [dirt/images/c3640-i-mz.test]? dirt/images/c3640-j-mz

Verifying checksum for 'dirt/images/c3640-i-mz.test' (file # 2)...  OK
Copy 'dirt/images/c3640-i-mz.test' from Flash to server
  as 'dirt/images/c3640-j-mz'? [yes/no] yes

!!!!!!!!!!!!!!!!!!!!!!!!!!!!!!!!!!!!!!!!!!!!!!!!!!!!!!!!!!!!!!!!!!!!!!!!!!!!!!!!
!!!!!!!!!!!!!!!!!!!!!!!!!!!!!!!!!!!!!!!!!!!!!!!!!!!!!!!!!!!!!!!!!!!!!!!!!!!!!!!!
!!!!!!!!!!!!!!!!!!!!!!!!!!!!!!!!!!!!!!!!!!!!!!!!!!!!!!!!!!!!!!!!!!!!!!!!!!!!!!!!
!!!!!!!!!!!!!!!!!!!!!!!!!!!!!!!!!!!!!!!!!!!!!!!!!!!!!!!!!!!!!!!!!!!!!!!!!!!!!!!!
!!!!!!!!!!!!!!!!
Upload to server done
Flash device copy took 00:00:20 [hh:mm:ss]
The following example uses the show flash all command to learn the name of the system image file and the copy flash tftp command to copy the system image to a TFTP server. The name of the system image file (xk09140z) is listed near the end of the show flash all output.
Router# show flash all

2048K bytes of flash memory on embedded flash (in XX).
   ROM   socket    code    bytes       name
    0      U42     89BD   0x40000     INTEL 28F020
    1      U44     89BD   0x40000     INTEL 28F020
    2      U46     89BD   0x40000     INTEL 28F020
    3      U48     89BD   0x40000     INTEL 28F020
    4      U41     89BD   0x40000     INTEL 28F020
    5      U43     89BD   0x40000     INTEL 28F020
    6      U45     89BD   0x40000     INTEL 28F020
    7      U47     89BD   0x40000     INTEL 28F020
  security jumper(12V) is installed,
  flash memory is programmable.
file  offset      length        name
 0     0x40        1204637     xk09140z
  [903848/2097152 bytes free]

Router# copy flash tftp
IP address of remote host [255.255.255.255]? 101.2.13.110
filename to write on tftp host? xk09140z

writing xk09140z !!!!...
successful tftp write.
Router#
The exclamation point (!) indicates that the copy process is taking place. Each exclamation point (!) indicates that ten packets have been transferred successfully. To stop the copy process, press Ctrl-^. Refer to the Troubleshooting Internetworking Systems publication for procedures on how to resolve Flash memory problems.
The following example uses the show flash [device:] command on a Cisco 7500 series to display the name of the system image file to copy. In the example, the Flash memory device containing the system image is the second PCMCIA slot. The file to copy is test. The example uses the copy file_id tftp command, to copy test to a TFTP server.
Router#show flash slot1:

-#- ED --type-- --crc--- -seek-- nlen -length- -----date/time------ name
1   .. 1        46A11866 2036C   4    746      May 16 1995 16:24:37 test

Router#copy slot1:test tftp

IP address of remote host [255.255.255.255]? 101.2.13.110
filename to write on tftp host? [test]y

writing test !!!!...
successful tftp write.
Router#
The exclamation point (!) indicates that the copy process is taking place. Each exclamation point (!) indicates that ten packets have been transferred successfully.
Once you have configured Flash memory, you might want to configure the system (using the configure terminal command) with the no boot system flash configuration command to revert to booting from ROM. For example, you might want to revert to booting from ROM if you do not yet need this functionality, if you choose to boot from a network server, or if you do not have the proper image in Flash memory. After you enter the no boot system flash command, use the copy running-config startup-config command to save the new configuration command to the startup configuration.
On page 1-90 in the Configuration Fundamentals Configuration Guide, update the "Copy from Flash Memory to an rcp Server" section with the following new section:
You can also copy a system image from Flash memory to an rcp network server.
The rcp protocol requires that a client send the remote username on each rcp request to the server. When you copy an image from Flash memory to a network server using rcp, the Cisco IOS software sends the remote username associated with the current terminal process, if that name is valid. If the remote username is invalid, the software uses the router host name as both the remote and local usernames.
You can configure a different remote username to be sent to the server. If the network server has a directory structure, as do UNIX systems, the rcp protocol implementation writes the system image relative to the directory associated with the remote username on the network server.
For the rcp command to execute properly, an account must be defined on the destination server for the remote username.
To stop the copy process, press Ctrl-^. Refer to the Troubleshooting Internetworking Systems publication for procedures on how to resolve Flash memory problems.
If you copy the system image to a personal computer used as a file server, the computer must support the rcp protocol.
To copy the system image from Flash memory to a network server, perform the following tasks:
| Task | Command |
|---|---|
Step 1. If you do not already know it, learn the exact spelling of the system image filename in Flash memory. You can learn the spelling of the system image filename on a specified Flash memory device. | |
Step 2. Enter configuration mode from the terminal. This step is required only if you are going to override the default remote username (see Step 3). | configure terminal |
Step 3. Specify the remote username. This step is optional, but recommended. | ip rcmd remote-username username |
Step 4. Exit configuration mode. | ^Z |
Step 5. Using rcp, copy the system image in Flash memory to a network server. |
|
Step 6. When prompted, enter the IP address or domain name of the rcp server. | ip-address or name |
Step 7. When prompted, enter the filename of the system image in Flash memory. | filename |
In place of the device argument, specify the Flash device that contains the source image file. For the Cisco 3600 series, you can specify copying a file from internal Flash memory (flash) or a Flash memory PC card inserted in one of two PCMCIA slots (slot0 or slot1). For the Cisco 1600 series, only a PC card is supported, which is specified with the flash device keyword. This card is the only Flash memory that exists on the Cisco 1600 series. You must enter a colon (:) after the specified device type, regardless of which platform you are using. If a filename follows the partition number, you must also enter a colon after the partition number.
To copy a file from a PC card inserted in the PCMCIA slot 1 on a Cisco 3600 series router, perform the following steps:
Step 1 Enter the slot1: rcp command:
Router# copy slot1: rcp


PCMCIA Slot1 flash directory:
File  Length   Name/status
  1   1711088 your-ios
[1711152 bytes used, 2483152 available, 4194304 total]
Step 2 Enter the IP address of the remote host:
Address or name of remote host [171.69.1.129]?
Step 3 Specify the source file that you want to copy from the Flash memory PC card:
Source file name? your-ios
Step 4 Confirm or rename the UNIX destination path name and filename:
Destination file name [your-ios]? /sysadmin/images/your-ios

Verifying checksum for 'your-ios' (file # 1)...  OK
Step 5 Verify that the copy settings are correct:
Copy 'your-ios' from Flash to server
  as '/sysadmin/images/your-ios'? [yes/no] yes

Writing /sysadmin/images/your-iosj
!!!!!!!!!!!!!!!!!!!!!!!!!!!!!!!!!!!!!!!!!!!!!!!!!!!!!!!!!!!!!!!!!!!!!!!!!!!!!!!!
!!!!!!!!!!!!!!!!!!!!!!!!!!!!!!!!!!!!!!!!!!!!!!!!!!!!!!!!!!!!!!!!!!!!!!!!!!!!!!!!
!!!!!!!!!!!!!!!!!!!!!!!!!!!!!!!!!!!!!!!!!!!!!!!!!!!!!!!!!!!!!!!!!!!!!!!!!!!!!!!!
!!!!!!!!!!!!!!!!!!!!!!!!!!!!!!!!!!!!!!!!!!!!!!!!!!!!!!!!!!!!!!!!!!!!!!!!!!!!!!!!
!!!!!!!!!!!!!!!
Upload to server done
Flash device copy took 00:00:08 [hh:mm:ss]
To copy a system image from a Cisco 3600 series Flash PC card to a remote rcp server, by specifying the source partition number and filename in the initial command line, perform the following steps:
Step 1 Enter the copy slot1: rcp command with the partition number and filename options included:
router# copy slot1:1:your-ios
Use you own partition number and filename where needed.
Step 2 Enter the IP address of the rcp server:
Address or name of remote host [171.69.1.129]?
Step 3 Enter the destination path name and filename:
Destination file name [your-ios]? /sysadmin/images/your-ios

Verifying checksum for 'your-ios' (file # 1)...  OK
Step 4 Confirm that the copy operation information is correct:
Copy 'your-ios' from Flash to server
  as '/sysadmin/images/your-ios'? [yes/no] yes

Writing /sysadmin/images/your-ios
!!!!!!!!!!!!!!!!!!!!!!!!!!!!!!!!!!!!!!!!!!!!!!!!!!!!!!!!!!!!!!!!!!!!!!!!!!!!!!!!
!!!!!!!!!!!!!!!!!!!!!!!!!!!!!!!!!!!!!!!!!!!!!!!!!!!!!!!!!!!!!!!!!!!!!!!!!!!!!!!!
!!!!!!!!!!!!!!!!!!!!!!!!!!!!!!!!!!!!!!!!!!!!!!!!!!!!!!!!!!!!!!!!!!!!!!!!!!!!!!!!
!!!!!!!!!!!!!!!!!!!!!!!!!!!!!!!!!!!!!!!!!!!!!!!!!!!!!!!!!!!!!!!!!!!!!!!!!!!!!!!!
!!!!!!!!!!!!!!!
Upload to server done
Flash device copy took 00:00:08 [hh:mm:ss]
On page I-107of the Configuration Fundamentals Configuration Guide, replace the "Configure a Flash Partition as a TFTP Server" section with the following section:
To configure a Flash partition as a TFTP server, perform one of the following tasks in global configuration mode:
| Task | Command |
|---|---|
Specify a file. | |
Specify a file in the first partition of Flash memory. | tftp-server flash filename1 |
Specify a file in the specified partition of Flash memory. | tftp-server flash [device:][partition-number:]filename |
In place of the device argument specify the Flash device that will be used as a TFTP server. On the Cisco 3600 series, your options include internal Flash memory (flash) or a Flash memory PC card inserted in one of two PCMCIA slots (slot0 or slot1). On the Cisco 1600 series, only a PC card is supported, which is specified by the flash device keyword. This card is the only Flash memory that exists on the Cisco 1600 series. A colon (:) must be entered immediately following the specified device type, regardless of which platform you are using. If a filename follows the partition number, you must also enter a colon after the partition number.
Once you have specified TFTP server operation, exit configuration mode and save the configuration information to your startup configuration.
On page 1-76 of the Configuration Fundamentals Configuration Guide, update the "Load from Flash Memory " section with the following new section:
Refer to the following sections to boot your Cisco 3600 from Flash. With a CSC-MC+ Flash memory card and CSC-MCI controller and appropriate cables, system software images can be written to Flash memory for booting. Depending on the hardware platform, Flash memory might be available as EPROMs, single in-line memory modules (SIMMs), or Flash memory cards. Check the appropriate hardware installation and maintenance guide for information about types of Flash memory available on a specific platform.
In the Cisco 3600 series, you can load a system image from internal Flash memory or a Flash memory PC card inserted in one of two PCMCIA slots.
In the Cisco 1600 series, system images are loaded from a Flash memory PC card, which is inserted in a PCMCIA slot. This card is the only Flash memory that exists on the Cisco 1600 series.
If your router does not find a valid system image or if its configuration file is corrupted at startup, the configuration register is set to enter ROM monitor mode and the system enters ROM monitor mode. Depending on which platform you are using, you can use the ROM monitor to manually load a system image from the following devices:
Cisco 3600 series routers do not use a dedicated boot helper image such as rxboot to assist with the boot process. Instead the first system image in Flash memory is identified as the default boot helper. However, this default can be overriden by setting the BOOTLDR ROM monitor environment variable to point to another system image. The boot helper image is invoked any time the ROM monitor does not recognize a valid Flash memory device (for example, flash:, slot0:, and slot1:) specified by the boot command, whether the boot process is performed manually or automatically.
In Cisco 3600 series, no autobooting occurs and your configuration session is passed over to ROM monitor mode if the bootbits are set to 0 in the configuration register. If the bootbits are set to 1, the ROM monitor automatically boots the default boothelper image, which is the first file in Flash memory. In this case, the BOOTLDR setting is ignored. If this boot attempt fails, the system attempts to boot the first file in the Flash memory PCMCIA card inserted in slot 0. Finally, if the bootbits are set within the range of 2 to 15, the ROM monitor executes the boot commands set by the boot environment variable. This environment variable is set by the boot system command in the Cisco IOS software. If a boot attempt fails, the ROM monitor tries to boot the images in the order they are presented in the environment variable. If all attempts to boot images specified in the boot process fail, the ROM monitor resorts to booting the first image sequentially from the following Flash memory devices: internal Flash memory, slot 0, and slot 1.
To manually boot from Flash memory, complete the following tasks:
| Task | Command |
Step 1. Restart the router. | |
Step 2. Press the Break key during the first 60 seconds while the system is starting up. | Break |
Step 3. Set the configuration register to 0. | config-register 0 |
Step 4. Reset the ROM monitor. | reset |
Step 5. Manually boot the router from Flash. |
|
Replace the device argument on the Cisco 3600 series with Flash device that you want to boot from. Your choices are internal Flash memory (flash) or a Flash memory PC card inserted in a PCMCIA slot (slot0 or slot1). A colon (:) must be entered immediately following the specified device type, regardless of which platform you are using. If a filename follows the partition number, you must also enter a colon after the partition number.
The following example enables the ROM monitor to boot the first file in the first partition of internal Flash memory:
>boot flash:
The following example enables the ROM monitor to boot the first file in the first partition of a Flash memory PC card inserted in the PCMCIA slot 0:
>boot slot0:
The following example enables the ROM monitor to boot the first file in the second partition of a Flash memory PC card inserted in the PCMCIA slot 0:
>boot slot0:2:
In this example, the ROM monitor boots the file called imagename from the third partition of a Flash memory PC card inserted in the PCMCIA slot 0:
>boot slot0:3:imagename
The following command normally boots the first image in Flash memory. However, because a valid device type is not specified for the ROM monitor (for example, flash:, slot0:, or slot1:), the boothelper is incurred to boot the system image.
>boot flash
To manually boot from a network file, complete the following tasks in EXEC mode:
| Task | Command |
Step 1. Restart the router. | |
Step 2. Press the Break key during the first 60 seconds while the system is starting up. | Break |
Step 3. Manually boot the router from a network file. |
In the following example, a router is manually booted from the network file network1:
>boot network1
In the following Cisco 3600 series example, the router netboots the file imagename. To netboot this file, the router invokes the boot helper.
>boot imagename
To configure a router to automatically boot from an image in Flash memory, perform the following tasks:
| Task | Command |
|---|---|
Step 1. Enter global configuration mode. | configure terminal |
Step 2. Enter the filename of an image stored in internal Flash memory or a Flash memory PC card inserted in a PCMCIA slot. | Enter one of the following commands as appropriate for your router:
|
Step 3. Set the configuration register to enable loading of the system image from Flash memory. | config-registervalue2 |
Step 4. Exit configuration mode. | ^Z |
Step 5. Save the configuration file to your startup configuration. This step saves the configuration to NVRAM. | copy running-config startup-config3 |
Step 6. Optionally, verify the contents of the startup configuration. | |
Step 7. Power-cycle and reboot the system to ensure that everything works as expected |
| 1Boot flash memory is not included in Cisco 3600 series routers. Booting from internal Flash memory or a Flash memory PC card inserted in one of two PCMCIA slots is supported. 2Refer to the "Modify the Configuration Register Boot Field" section (of the Configuration Fundamentals Configuration Guide) for more information on systems that can use this command to modify the software configuration register. 3The write memory command also copies the running configuration to the startup configuration. |
If you enter more than one image filename, the router tries them in the order entered.
If a filename already appears in the configuration file and you want to specify a new filename, remove the existing filename with the no boot system flash filename command.
Cisco 3600 series routers do not support booting a Cisco IOS system image from boot flash memory. The possible boot variables correspond to internal Flash memory and Flash memory PC cards inserted in PCMCIA slots 0 or slot 1.
The following example shows how to configure the router to automatically boot from an image in Flash memory.
Router# configure terminal

Router (config)# boot system flash gsnew-image

Router (config)# config-register 0x102

^Z

Router# copy running-config startup-config

[ok]
Router# reload

[confirm]

%SYS-5-RELOAD: Reload requested
System Bootstrap, Version 4.6(0.16), BETA SOFTWARE
Copyright (c) 1986-1995 by cisco Systems
RP1 processor with 16384 Kbytes of memory
F3: 1871404+45476+167028 at 0x1000

Booting gsnew-image from flash memory RRRRRRRRRRRRRRRRRRRRRRRRRR
RRRRRRRRRRRRRRRRRRRRRRRRRRRRRRRRRRRRRRRRRRRRRRRRRRRRRRRRRRRRRRRR
RRRRRRRRRRRRRRRRRRRRRRRRRRRRRRRRRRRRRRRRRRRRRRRRRRRRRRRRRRRRRRRR
RRRRRRRRRRRRRRRRRRRRRRRRRRRRRRRRRRRRRRRRRRRRRRRRRRRRRRRRRRRRRRRR
RRRRRRRRRRRRRRRRRRRRRRRRRRRRRRRRRRRRRRRRRRRRRRRRRRRRRRRRRRRRRRRR
RRRRRRRRRRRRRRRRRRRRRRRRRRRRRRRRRRRRRRRRRR [OK - 1916912/13767448 bytes]
F3: 1871404+45476+167028 at 0x1000

              Restricted Rights Legend

Use, duplication, or disclosure by the Government is
subject to restrictions as set forth in subparagraph
(c) of the Commercial Computer Software - Restricted
Rights clause at FAR sec. 52.227-19 and subparagraph
(c) (1) (ii) of the Rights in Technical Data and Computer
Software clause at DFARS sec. 252.227-7013.

cisco Systems, Inc.
              170 West Tasman Drive
              San Jose, California 95134

GS Software (GS7), Version 10.2,
Copyright (c) 1986-1995 by cisco Systems, Inc.
Compiled Thu 05-Nov-94 14:16 by mlw
When you have successfully configured Flash memory, you might want to configure the system with the no boot system flash command to revert to booting from ROM. You might want to revert to booting from ROM if you do not yet need this functionality, if you choose to boot from a network server, or if you do not have the proper image in Flash memory.
On page 1-111 of the Configuration Fundamentals Configuration Guide, add the following new section:
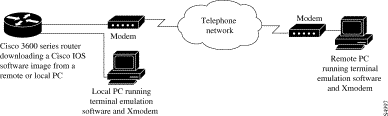
If each system image loaded in the router is somehow damaged or erased and you do not have access to a TFTP server, copy a new Cisco IOS image from a local or remote computer (such as a PC, UNIX, or Macintosh) using the Xmodem or Ymodem protocols. The Cisco 3600 series routers do not support XBOOT functionality, which is a disaster recovery technique for the Cisco IOS software.The Xmodem and Ymodem protocols are used for transferring files and included in the following applications: Windows 3.1 (TERMINAL.EXE), Windows 95 (HyperTerminal), Windows NT 3.5x (TERMINAL.EXE), Windows NT 4.0 (HyperTerminal), and Linux UNIX freeware (minicom).
Perform this file transfer using the Cisco IOS software or the ROM monitor software. The Cisco 1600 series routers support transferring files from the ROM monitor only. If all system images on the router are damaged or erased, you must download a new image using the ROM monitor software. From the Cisco IOS software, the AUX port is recommended for image transfers from a remote or local PC. From the ROM monitor, the console port is used for image transfers from a remote or local PC. With the Cisco IOS software, the Xmodem or Ymodem file transfer occurs on the same port (AUX or console) from which you issue the copy xmodem or copy ymodem command. For example, issuing the copy xmodem command on the console port can not initiate a file transfer through the AUX port. The command must be entered on the AUX port to initiate a transfer through the AUX port. See Figure 2.
Xmodem and Ymodem downloads occur very slowly. Because of this, the preferred method for downloading images quickly over the network is with the copy tftp device: command. If the erase option is specified, all existing files in the Flash memory are replaced with the newer Flash memory image at the successful completion of the download operation.
To copy a Cisco IOS image from a PC to a router using the Xmodem protocol, perform one of the following EXEC or ROM monitor commands:
| Task | Command |
Copy a system image from a PC to Flash memory in EXEC mode. | copy xmodem flash or copy ymodem flash |
Copy a system image from a PC to Flash memory in ROM monitor mode. | xmodem {-c | -y | -r | -x} [filename] or xmodem {-y | -c | -e | -f | -r | -x } [-s baud-rate] [filename] |
Use the copy xmodem flash EXEC command and xmodem ROM monitor command to copy an image if you do not have access to a TFTP or rcp server. Otherwise, use the copy tftp flash command to download a new Cisco IOS software image to your router.
The PC from which you will transfer the Cisco IOS image must be running terminal emulation software and the Xmodem or Ymodem protocol.
Refer to the "Cisco IOS Xmodem Example" and the "ROM Monitor Xmodem Example" in the section "I/O Memory Example" for an example configuration.
To transfer a Cisco IOS image from a remote PC running terminal emulation software and Xmodem software, perform the following steps:
Step 1 Place a Cisco IOS software image on the remote PC's hard drive. You can download an image from Cisco Connection Online or from a CD-ROM.
Step 2 Connect a modem from the AUX port of your Cisco 3600 series router to the standard telephone network. The AUX port is by default set to a speed of 9.6 Kbps, 2 stop bits, and no parity. You must have the modem-inout command configured on the router when using modems.
Step 3 At the EXEC prompt in the terminal emulator window of the remote PC, enter the copy xmodem flash command.
Router# copy xmodem flash

                        **** WARNING ****
x/ymodem is a slow transfer protocol limited to the current speed
settings of the auxiliary/console ports. The use of the auxilary
port for this download is strongly recommended.
During the course of the download no exec input/output will be
available.
                        ---- ******* ----
Step 4 Press the Return key to accept this Cisco IOS warning and specify if you want to use cyclic redundancy block checksumming (CRC), which verifies that your data has been correctly transferred from the PC to the router. If your PC does not support CRC checksumming, specify no at the prompt as shown in the example.
Proceed? [confirm]
Use crc block checksumming? [confirm] no
Step 5 Determine how many times the software receives a bad block of data before it declares the copy operation a failure. The [10] means that the default value is 10 retries. You can configure an unlimited number of retries. A higher number of retries may be needed for noisy telephone lines.
Max Retry Count [10]: 7
Step 6 Decide if you want the software to check if the file is a valid Cisco 3600 series image.
Perform image validation checks? [confirm]
Xmodem download using simple checksumming with image validation
Continue? [confirm]
Once the transfer has begun and if the image is valid, the software then checks to see if enough Flash memory exists in the router to accommodate the transfer.
System flash directory:
File  Length   Name/status
  1   1738244  images/c3600-i-mz
[1738308 bytes used, 2455996 available, 4194304 total]
Step 7 Enter the destination filename. If you want the existing internal Flash memory erased before the file transfer, press the Return key.
Destination file name ? new-IOS-image

Erase flash device before writing? [confirm] n


Copy '' from server
  as 'new-IOS-image' into Flash WITHOUT erase? [yes/no] yes

Ready to receive file...........
Step 8 Start an Xmodem send operation on the PC terminal emulation software. Depending on the type of application you use, the emulation software may display the progress of the file transfer. If the software application supports Xmodem-1k (Xmodem with 1K size data blocks), you may use it for a faster transfer.
To transfer a Cisco IOS image from a local PC, repeat the previous configuration using the AUX port. No modems are used in this file transfer. The AUX speed configured on the router must match the transfer speed configured on the local PC, which is configured within the terminal emulation software.
From within the ROM monitor mode, you can copy a new Cisco IOS image from a remote PC to a Cisco 3600 series or Cisco 1600 series router by performing these steps.
Step 1 Configure transmit and receive speed on the modem to match the speed of your console port. The modem and console port must communicate at the same speed, which can be from 9.6 to 115.2 kbps depending on the speed supported by your modem. Use the confreg ROM monitor command to configure the console port transmission speed for the Cisco 3600 series routers.
Step 2 Connect the modem to the console port of your router. The other end of the modem connects to the standard telephone network. The remote PC dials through the network into the local modem and connects to the router.
Step 3 Issue the xmodem ROM monitor command with any required copy options specified on the router. For example, the -c option specifies CRC16 checksumming, which is supported by the remote PC.
rommon > xmodem -c new-IOS-image

Do not start the sending program yet...
         File size           Checksum   File name
   1738244 bytes (0x1a8604)   0xdd25 george-admin/c3600-i-mz

WARNING: All existing data in flash will be lost!
Invoke this application only for disaster recovery.
Do you wish to continue? y/n  [n]:  yes

Ready to receive file new-IOS-image ...
Step 4 At this point, enable the terminal emulation software that runs on the PC to send the file using the Xmodem protocol. The modem speed cannot be changed while establishing a connection to your modem and running the Xmodem protocol.
The new Cisco IOS image loads into Flash memory by default and executes the image upon completion of the file transfer if the -x option is not specified (for example, the xmodem -x new-ios-image command is not configured). Downloads to DRAM memory are specified with the -r option. See the xmodem command's documentation in the Command
The remote PC maintains control of your console port even after the new Cisco IOS image is up and running.
Step 5 From the remote PC, reconfigure the speed of the router's console port to match the speed of the local terminal. This is done by issuing the speed line configuration command at the router prompt, where XXXX represents the terminal's speed:
Router# configure terminal

Router-conf # line 0

Router-conf-line # speed xxxx
Once this command is issued, the remote PC loses control of the console port. The remote connection is broken, and you can disconnect the modem from the console port and reconnect the terminal line.
In addition to downloading an image from a remote PC, you can download an image from a local PC by following these steps:
Step 1 Connect the PC serial COM port directly to the console port on your router.
Step 2 Run terminal emulation software on the PC and connect to the router console. You should now see a ROM monitor prompt on the terminal emulator. You may need to configure the terminal emulator to ignore RTS/DTR signals.
Step 3 Determine the transfer speed to run between the console port and the local PC carrying the Cisco IOS software image. The console speed on the router must match the transfer speed configured on your PC's terminal emulation software. You can configure the console port transmission speed with the confreg ROM monitor command.
Step 4 From the terminal emulation software window, enter ROM monitor mode:
rommon 1 >
Step 5 Run the Xmodem protocol and enter the xmodem -c filename command. The system software asks you to erase all files stored in internal Flash memory.
rommon 1 > xmodem -c <filename>

Do not start the sending program yet...
         File size           Checksum   File name
   1738244 bytes (0x1a8604)   0xdd25    george-admin/c3600-i-mz

WARNING: All existing data in flash will be lost!
Invoke this application only for disaster recovery.
Do you wish to continue? y/n  [n]:  yes

Ready to receive file new-IOS-image...
Enter the following command on the Cisco 1600 series routers. This command has the -s option specified, which configures the console speed for the duration of the Xmodem file transfer.
rommon 1 > xmodem -s 115200 -c <filename>
Step 6 From the local PC's terminal emulation software, run the Xmodem protocol to transfer the image to the router.
On page I-327 of the Configuration Fundamentals Configuration Guide, add the following new section:
Depending on the number of network interfaces and the size of the Cisco IOS image you are running on a Cisco 3600 series router, you may need adjust the percentage of DRAM allocated to processor memory or packet memory.
The memory-size iomem command performs this function. If more buffers are needed, the packet memory must be increased. To accomodate larger Cisco IOS images, the processor memory must be increased.
To allocate different percentages of DRAM to the packet memory and processor memory, perform the following task in global configuration mode:
| Task | Command |
|---|---|
Set the packet memory and processor memory percentages. | memory-size iomem {packet-memory-percentage}1 |
| 1The default is 25% for packet memory and 75% for processor memory. |
Display your current memory level by entering the show memory command. If the value appearing in the Free(b) column in the I/O row is low, you probably need to allocate more packet memory. To display statistics for the buffers pool, use the show buffers command. If you are dropping packets because you have too few buffers and you already adjusted the buffers using the buffers configuration command, increase the packet memory percentage if you still need more memory.
The memory-size iomem command does not take effect until you save it to NVRAM, using the copy running-config startup-config EXEC command, and reload the router. However, when the command is initially entered at the command line, the Cisco IOS software checks whether the new memory redistribution will cause the currently running image to have insufficient memory. If this is the case, the following message appears:
Warning: Attempting a memory partition that does not provide enough Processor memory for
the current image.If you write memory now, this version of software may not be able to run.
When you enter the reload command to run a new image, the system recalculates the new processor and packet memory split. If the I/O memory percentage is configured too high and leaves insufficient processor DRAM for loading the image, the system automatically changes the percentages to one of the two alternative settings or to the default setting to load the image.
If the default, which has the smallest percentage of I/O memory, is still not sufficient for the image to run, this means you do not have enough DRAM to run that particular subset image. The system will not repartition the memory if you do not configure the percentages to something other than the default.
Take the following steps to allocate 40 percent of the available DRAM to packet memory and the remaining 60 to processor memory. These values can fluctuate according to your configuration needs.
Step 1 Enter the show memory command, to see if you need to reallocate different percentages of packet and processor memory. Refer to the Free(b) column to see how much memory is available.
Router# show memory
               Head   Total(b)    Used(b)    Free(b)  Lowest(b) Largest(b)
Processor  604DDEE0    7479584    1247232    6232352    6227568    6230244
      I/O    C00000    4194304    3442316     51988     751988     743636
--More--
Step 2 Enter global configuration mode and enter the memory-size iomem 40 command:
Router# configure terminal

Enter configuration commands, one per line.  End with CNTL/Z.
Router(config)# memory-size iomem 40

Router(config)# exit

Router#
Step 3 Write the new configuration to NVRAM.
Router# copy running-config startup-config

Building configuration...
[OK]
Step 4 Enter the reload command to run the new image:
Router# reload


rommon 1 > b

program load complete, entry point: 0x80008000, size: 0x32ea24
Self decompressing the image :
################################################################################
################################################################################
################################################################################
###### [OK]

Configured I/O memory percentage was too large; using 30 percent
For service and support for a product purchased from a reseller, contact the reseller. Resellers offer a wide variety of Cisco service and support programs, which are described in the section "Service and Support" in the information packet that shipped with your chassis.
For service and support for a product purchased directly from Cisco, use CCO.
CCO is Cisco Systems' primary, real-time support channel. SMARTnet customers and partners can self-register on CCO to obtain additional content and services.
Available 24 hours a day, 7 days a week, CCO provides a wealth of standard and value-added services to Cisco's customers and business partners. CCO services include product information, software updates, release notes, technical tips, the Bug Navigator, configuration notes, brochures, descriptions of service offerings, and download access to public and authorized files.
CCO serves a wide variety of users through two interfaces that are updated and enhanced simultaneously—a character-based version and a multimedia version that resides on the World Wide Web (WWW). The character-based CCO supports Zmodem, Kermit, Xmodem, FTP, and Internet e-mail, and is excellent for quick access to information over lower bandwidths. The WWW version of CCO provides richly formatted documents with photographs, figures, graphics, and video, as well as hyperlinks to related information.
You can access CCO in the following ways:
For a copy of CCO's Frequently Asked Questions (FAQ), contact cco-help@cisco.com. For additional information, contact cco-team@cisco.com.
Please use CCO to obtain general information about Cisco Systems, Cisco products, or upgrades. If CCO is not accessible, contact 800 553-6387, 408 526-7208, or cs-rep@cisco.com.
![]()
![]()
![]()
![]()
![]()
![]()
![]()
![]()
Posted: Tue Dec 17 18:45:57 PST 2002
All contents are Copyright © 1992--2002 Cisco Systems, Inc. All rights reserved.
Important Notices and Privacy Statement.