|
|

This chapter provides the information you need to prepare for first-time startup. Read it before you power up your server product.
By preparing for first-time startup, you can take advantage of the full range of configurations available on the server product. You are not required to plan your network before sitting at the console and using the setup command facility for the first time, but you must connect to the console port, as described in the chapter titled "Overview," earlier in this publication. By separating the planning tasks from the configuration tasks, you can set up the server in one sitting. You can also tailor the server to meet your needs and to fit within a consistent scheme.
This chapter explains how to fill in the Global Configuration Worksheet and the Interface Configuration Worksheet. The values on these worksheets map to the configuration process of the setup command facility, which is automatically invoked at first-time startup. You specify global or system-wide configuration information on the Global Configuration Worksheet and information about each individual interface on the Interface Configuration Worksheet. Extra configuration worksheets are provided in the "Blank Worksheets" appendix for your convenience.
In the following descriptions of the parameters that you determine, the factory default is marked with the Default: label. The action you need to take to fill in the worksheet is marked with the Action: label.
The Global Configuration Worksheet, if properly filled in, contains all the values you need to enter at the Configuring Global Parameters portion of the setup command facility. Remember, the setup command facility is automatically invoked at first-time startup. You want all your preparations to be complete so that you can get your system up and running quickly and uneventfully.
The worksheet can assist you in gathering and maintaining information about your system. Two levels of information are listed on the worksheet:
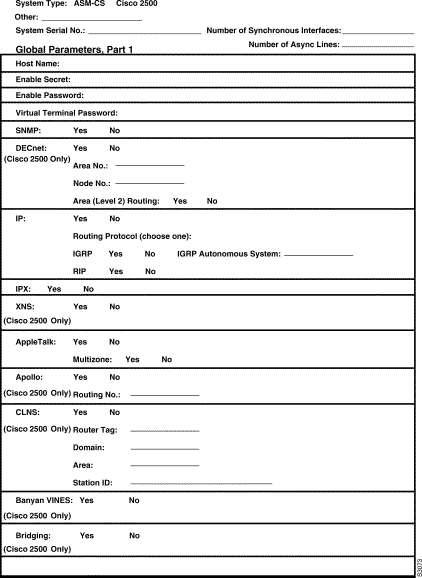
System hardware information is not requested at first-time startup, but is useful to write on the worksheet to complete your records. Global parameters, however, are requested at first-time startup.
Figure 2-1 and Figure 2-2 show the Global Configuration Worksheet. Retrieve the blank Global Configuration Worksheet from the "Blank Worksheets" appendix before continuing. As you proceed through the following descriptions, record your information on it.
The following Global Configuration Worksheet spans two pages. Make sure you record information on both pages before powering up your server product for the first time.

Use this section to record system hardware information on your Global Configuration Worksheet.
Our communication servers accommodate a wide variety of needs. Customers can choose among the following:
All of our systems provide protocol translation. The ASM-CS and 500-CS provide routing capability for IP and IPX. The Cisco 2500 features full routing capability, in addition to its function as a communication server.
Default: None.
Action: Circle your system type on the worksheet, or write it in.
The serial number is on the back or bottom panel. This information is useful in tracking your physical inventory.
Default: None.
Action: Write your system serial number on the worksheet.
Your server product is shipped with a prespecified number of synchronous interfaces, such as Ethernet, Token Ring, or synchronous serial interfaces. If you plan to install a new server product, the server will be preconfigured at the factory; this means the number of interfaces is determined when you order the server.
Check the back of your system to determine the number of synchronous interfaces.
Default: None.
Action: Write the number of interfaces on the worksheet.
The number of asynchronous lines depends on the type of server you have. If you plan to install a new server, the server will be preconfigured at the factory; this means the number of asynchronous lines is determined when you order the server product. If you have a 500-CS or a Cisco 2500, you can have 8 or 16 asynchronous terminal lines. If you have an ASM, you can have 16 to 112 asynchronous lines (in increments of 16).
Check the back of your system to determine the number of asynchronous lines.
Default: None.
Action: Write the number of interfaces on the worksheet.
This section contains information about each global parameter that can be configured through the setup command facility. Use this information to complete the Global Configuration Worksheet.
The host name is the name of the communication server. The name you specify is used in the system prompts and can contain from 1 to 80 uppercase and lowercase alphanumeric characters. The host name is case sensitive.
Use a name that helps you identify the location of the communication server, or to whom it is providing services. If you will be naming more than one host within your network, try to devise a consistent naming scheme so that host identification is easy.
Default: CS (for the 500-CS and ASM-CS) or Router (for the Cisco 2500).
Action: Write the host name on the worksheet the way you want it to appear in the system prompts.
Your system has two levels of security: user and privileged. The commands available at the user level are a subset of those available at the privileged level. Because many privileged commands are used to set operating parameters, these commands should be password-protected to prevent unauthorized use.
The enable password allows users access to the privileged command level. There is no default enable password. However, the enable password you set during first-time startup appears as the default the next time you run the setup command facility.
An enable password can contain from 1 to 80 uppercase and lowercase alphanumeric characters; a number cannot be the first character. Spaces are also valid password characters; for example, "two words" is a valid password. Leading spaces are ignored, though trailing spaces are recognized. For example, " woolly" is interpreted as "woolly" (without the space). On the other hand, "woolly " is recognized as "woolly " (with the space).
For more information about enable passwords, refer to the Access and Communication Servers Configuration Guide or the Access and Communication Servers Command Reference publication.
Default: None.
Action: Write the enable password on the worksheet.
In addition to the enable password, each virtual terminal line can also have an individual password. Virtual terminals require a password. If you do not set a password, the system responds to attempted connections by displaying an error message and closing the connection. (Virtual terminals are used when you access the communication server remotely via the network.)
A virtual terminal password can contain from 1 to 80 uppercase and lowercase alphanumeric characters; a number cannot be the first character. Some spaces are also valid password characters; for example, "two words" is a valid password. Leading spaces are ignored, though trailing spaces are recognized. For example, " woolly" is interpreted as "woolly" (without the space). On the other hand, "woolly " is recognized as "woolly " (with the space).
The virtual terminal password is case sensitive. There is no default virtual terminal password. However, the virtual terminal password you set during first-time startup appears as the default the next time you run the setup command facility.
If desired, you can allow line connections without a password. Refer to the Access and Communication Servers Configuration Guide for more information. Refer to the Cisco Access Connection Guide to make line connections.
Default: None.
Action: Write the virtual terminal password on the worksheet.
The Simple Network Management Protocol (SNMP) is the most widely supported open standard for network management. It provides a means to access and set configuration and run-time parameters of routers and communication servers. SNMP defines a set of functions that can be used to monitor and control network elements.
SNMP is configured on a global basis only; it cannot be specified for individual interfaces.
Default: No.
Action: If you want to configure SNMP on a system-wide basis, circle Yes on the worksheet. At first-time startup, this value configures read-only SNMP with a blank password. If you do not want to run SNMP on your system, circle No.
DECnet is a protocol suite developed and supported by Digital Equipment Corporation. The DECnet protocol associates addresses with machines, not interfaces.
A router can have only one DECnet address. DECnet addresses are specified by area number and node number. For example, in DECnet address 53.6, DECnet node 6 is located in area 53.
An area can span many routers, and many areas can be attached to a single cable. Therefore, if a DECnet host such as a router exists on many cables, its area/node address is the same. This type of addressing is called DECnet Phase IV addressing.
Default: No.
Action: If you plan to use DECnet Phase IV addressing, circle Yes on the worksheet. If you do not want to use DECnet Phase IV, circle No. If you want Phase V addressing, select the Connectionless Network Services (CLNS) protocol in addition to circling No.
If you plan to use DECnet Phase IV addressing, provide the area number and node number of the router, and indicate whether you want area routing. Write in values for the following:
The Internet Protocol (IP) was originally defined by the United States Department of Defense as a standard protocol for interconnecting computers from different manufacturers on a given network. IP is now the de facto standard for vendor-independent networking.
Default: Yes.
Action: Circle Yes if you plan to route IP. If not, circle No.
Select an interior routing protocol for IP. You can specify only one interior routing protocol to operate on your system using the setup command facility: Interior Gateway Routing Protocol (IGRP) or Routing Information Protocol (RIP). These protocols are mutually exclusive.
Novell IPX is the network protocol used by Novell's NetWare products. Your router supports Novell IPX. For detailed information, refer to the Router Products Configuration Guide.
Default: No.
Action: If you plan to configure Novell IPX, circle Yes. If not, circle No.
Xerox Network Systems (XNS) was originally designed to run over Ethernet. XNS can also be routed over FDDI, Token Ring, and point-to-point serial lines. Your router supports the XNS protocol suite. For detailed information, refer to the Router Products Configuration Guide.
Default: No.
Action: If you plan to configure XNS routing on your system, circle Yes. If not, circle No.
AppleTalk is a network protocol developed by Apple Computer. It is a client-server, or distributed, network system. Users share network resources such as files and printers with other users. Interaction with servers is transparent to the user.
Your router supports the AppleTalk network protocol (both extended and nonextended) over FDDI, Ethernet, Token Ring, synchronous serial, and X.25 interfaces. For detailed information, refer to the Access and Communication Servers Configuration Guide.
If you want to enable AppleTalk Remote Access on your server product, you must first configure AppleTalk routing.
Default: No.
Action: If you plan to configure AppleTalk or AppleTalk Remote Access, circle Yes. If not, circle No.
If you plan to configure AppleTalk on your server product, you must also decide whether to have multizone networks.
The Apollo Domain (Apollo) routing protocol is the native-mode networking protocol for Apollo workstations. This protocol enables an Apollo host to have interfaces on more than one physical network. Each physical network is identified by a unique 32-bit address in hexadecimal format. The address consists of a network number followed by a host number.
Your router supports packet forwarding and routing for Apollo on Ethernet, FDDI, and serial interfaces using HDLC and X.25 encapsulation. Direct attachment to the 12-Mbps Domain Token Ring is not supported.
Default: No.
Action: If you plan to configure Apollo, circle Yes. If not, circle No.
If you plan to configure Apollo on your router, you must also determine the Apollo routing number.
The software on your router supports packet forwarding and routing for the Connectionless Network Services (CLNS) protocol, an International Organization for Standardization (ISO) implementation. CLNS provides the basis for DECnet Phase V.
To understand CLNS routing, you need to be familiar with the hierarchical concepts of domain and area. At the top of the hierarchy is a set of routing domains. The domain address uniquely identifies the routing domain. Within each routing domain is one or more areas. The area address uniquely identifies the area. For detailed information about how your router implements CLNS, refer to the Router Products Configuration Guide.
Default: Yes
Action: Circle Yes if you plan to configure CLNS. If not, circle No.
If you plan to configure CLNS on your system, you can provide router tag, domain, area, and station ID information, or you can use default values.
The Banyan Systems Virtual Integrated Network Service (VINES) protocol is designed for PC networks. Your router supports the VINES network protocol over all media types. For detailed information about how your router implements VINES, refer to the Router Products Configuration Guide.
Default: No.
Action: If you plan to configure VINES, circle Yes. If not, circle No.
Your router supports transparent and source-route bridging. However, you can only configure transparent bridging using the setup command facility.
You can configure transparent bridging only if your system has bridging software installed. To determine whether your system has bridging capability, look at the installed hardware banner displayed at the first-time startup. Bridging, like routing, is configured for the system as a whole. That is, if a protocol is being bridged, it must be bridged on all interfaces. You cannot route IP on one interface and bridge it on another.
For more information about bridging, refer to the Router Products Configuration Guide. For more information about bridging commands, refer to the Router Products Command Reference publication.
Default: No
Action: If you plan to configure transparent bridging (and bridging software has been ordered and installed), circle Yes. If not, circle No.
The local area transport (LAT) protocol from Digital Equipment Corporation (Digital) is the protocol used most often to connect to Digital hosts. LAT is a Digital-proprietary protocol. Cisco uses LAT technology licensed from Digital.
With the LAT protocol, you can establish a connection to a host, then pass your keystrokes to the host. A user can establish a LAT connection through the protocol translator to a Digital host, simply by entering the host name.
The protocol translator provides the option of transporting LAT in protocol translation mode. A router with the protocol translation option can translate LAT to Telnet or X.25 for transmission over a WAN, which can be translated back to LAT on the other end of the connection.
You can configure this WAN-to-LAT translation to be transparent to the user. This configuration also avoids LAT time-out problems, which are common in WAN-bridged LAT. For more information about how your protocol translator implements LAT, refer to the Protocol Translation Configuration Guide and Command Reference publication.
Default: Yes.
Action: If you plan to use LAT on this system, write Yes on the worksheet. If not, write No.
You can use the setup command facility to configure the asynchronous (async) lines on your communication server at first-time startup.
Default: Yes.
Action: If you plan to configure your async lines, Circle Yes on the worksheet. If not, circle No.
The parameters that you can configure for async lines at the global level include the following:
We recommend that you globally set each parameter with the setup command facility, then configure the lines individually after you complete this process.
The asynchronous lines on your communication server support several transmission speeds. This parameter sets both the transmit (to terminal) and receive (from terminal) speeds. Table 2-1 lists the available line speeds for each communication server model.
| Communication Server | Line Speeds |
|---|---|
| 500-CS | Any speed between 50 and 38400 |
| ASM-CS standard | 75, 110, 134, 150, 300, 600, 1200, 1800, 2000, 2400, 4800, 9600, 11520, 12800, 14400, 19200, 23,040, 28800, 38400, and 57600 |
| Cisco 2500 | Any speed from 50 to 115200 |
Default: 9600.
Action: Press Return to accept the default of 9600 or write in the terminal line speed of your choice and press Return.
Configure your lines for hardware flow control if an async device (such as a modem) or communications protocol requires it. If you are configuring your lines for AppleTalk Remote Access (ARA), you must enable hardware flow control. ARA does not function with software flow control. SLIP lines explicitly turn off software flow control when a server product enters protocol mode on a line. Choosing this option has the same effect as issuing the flowcontrol hardware command in line configuration mode.
Default: Yes.
Action: If you plan to enable hardware flow control on your lines, circle Yes. If not, circle No.
Your server can be configured to support incoming calls (from modems) and outgoing calls (to modems), or to support just outgoing calls, or just incoming calls. Choosing this option globally enables both incoming and outgoing calls on all async lines. It has the same effect as entering the modem inout command in line configuration mode.
Default: Yes.
Action: If you plan to support incoming or outgoing calls on your async lines, circle Yes on the worksheet. If not, circle No.
The setup command facility assigns a default chat script on a global basis. This chat script can be used in more complex dial-on-demand routing configurations for modem dialing. A chat script must be defined for dialing out on asynchronous lines. Enabling this feature has the same effect as the process of entering global configuration mode on your system; entering a chat-script command at the command prompt; issuing a regular expression; and then entering line configuration mode and issuing a script-dialer command. The following line, which is a chat script named cisco-default, is entered into your system's global configuration:
chat-script cisco-default ABORT ERROR "" "AT Z" OK "ATDT \T" TIMEOUT 30 \c CONNECT
Default: Yes.
Action: If you plan to use the default chat script cisco-default on your system, circle Yes. If not, circle No.
Use the setup command facility to enable dial-in IP access with the Serial Line Internet Protocol (SLIP) or Point-to-Point Protocol (PPP) from within EXEC mode. The alternative is dedicated asynchronous mode, which does not enable use of the slip and ppp from within EXEC mode. Enabling this option has the same effect as issuing the async mode interactive command from within interface configuration mode for each asynchronous interface on your system.
Default: No.
Action: If you plan to permit dial-in SLIP and PPP access from EXEC mode, circle Yes. If not, circle No.
This option specifies that IP addresses are assigned dynamically. That is, a user can specify an IP address (or name) of a remote network host at the EXEC level when making a connection using the slip or ppp EXEC command. Enabling this option is the same as issuing the async dynamic address command from within interface configuration mode.
Default: Yes.
Action: If you plan to permit users to specify IP addresses at connection time, circle Yes. If not, circle No.
This option specifies that a default IP address can be used when a connection is made to a remote network device (such as a PC). That is, the user does not have to enter an IP address when connecting to the device, because the default IP address has been set in the configuration. Selecting this option has the same effect as issuing the async default ip address command from within interface configuration mode. If you set this parameter in global configuration mode of the setup command facility, the Configuring Interface Parameters portion of the setup command facility prompts you for specific default client IP addresses for each interface.
Default: No.
Action: If you plan to have the communication server specify the IP address at connection time, circle Yes. If not, circle No.
Your communication server supports Van Jacobsen TCP header compression on asynchronous lines. On SLIP and PPP lines, this option prevents transmission of compressed packets until one of the following events occurs:
Selecting this command has the same effect as entering the ip tcp header-compression passive command from within interface configuration mode. For more information about this command, refer to the Access and Communication Servers Command Reference publication.
Default: Yes.
Action: If you plan to enable header compression on SLIP and PPP lines, circle Yes. If not, circle No.
Most asynchronous links have very low bandwidth, of which routing updates can use a great deal. Selecting No for this option prevents routing updates from being sent on your async lines. Selecting this option has the same effect as issuing the async dynamic routing command from within interface configuration mode.
Default: No.
Action: If you plan to permit routing updates on your async lines, circle Yes. If not, circle No.
Your communication server supports the Network Computing Device, Inc. XRemote feature on all communication servers and protocol translators. When fonts used by X applications are not included in ROM on the NCD terminal, one or more font servers must be identified from which the communication server and the NCD terminal can obtain fonts from a location other than ROM. You can identify as many XRemote font servers as you need; it is unlikely that you will ever reach the maximum number that the software allows you to identify.
Default: No.
Action: If you want to configure one or more XRemote font servers, circle Yes on the worksheet. If you do not want to configure XRemote font servers on your system, circle No.
If you plan to use one or more XRemote font servers, you must also provide an IP address for each XRemote font server. This step is equivalent to specifying the IP address of a font server using the xremote tftp host configuration command. However, you cannot specify an XRemote host name through the setup command facility because the name service facility is not yet running.
For more information about XRemote configuration and management information, refer to the Access and Communication Servers Configuration Guide. For information about making XRemote connections, refer to the Cisco Access Connection Guide.
Your communication server supports routing of IPX packets across asynchronous lines. If you want to permit routing of IPX packets, enable this option.
Default: Yes.
Action: If you plan to configure your communication server for IPX routing on async lines, circle Yes. If not, circle No.
You can configure your communication server as an AppleTalk Remote Access (ARA) server. Cisco's implementation of ARA gives Macintosh users direct access to information and resources at a remote location. Macintosh users can connect to other Macintosh computers or an AppleTalk network over standard async telephone lines.
Configuring your communication server to act as an ARA server allows remote Macintosh users to dial in, become a network node, and connect to devices on other networks. For additional information about ARA, refer to the Access and Communication Servers Configuration Guide or the Access and Communication Servers Command Reference publication.
Default: Yes.
Action: If you plan to configure your communication server as an ARA server, circle Yes. If not, circle No.
This parameter creates a pseudo network and network number, which exist only inside the communication server. All ARA clients must be placed in this pseudo network. The network number is advertised as if it is an existing AppleTalk network.
Selecting this option is equivalent to entering the arap network [net-number] command in global configuration mode. For more information about this command, refer to the Access and Communication Servers Command Reference publication.
Default: 1.
Action: Specify an AppleTalk network for ARA clients by typing the number and pressing Return.
This parameter specifies the zone name for a pseudo AppleTalk network, which, like the network number, exists only inside the communication server. All ARA clients are automatically placed in the network with this zone name. The zone name is advertised as if it is an existing AppleTalk network.
Selecting this option is equivalent to entering the arap network [zone-name] command in global configuration mode. For more information about this command, refer to the Access and Communication Servers Command Reference publication.
Default: * (asterisk).
Action: Enter a meaningful AppleTalk zone name and press Return.
After you complete the Global Configuration Worksheet, fill in the Interface Configuration Worksheet. The interface parameters depend on the decisions you make about the global parameters. For example, if you have not configured a protocol at the global level, you do not need to configure it at the interface level.
You need to provide this information for each installed interface.
The Interface Configuration Worksheet, if properly filled out, will contain all the values you need to enter at the Configuring Interface Parameters portion of the setup command facility. Because the setup command facility is automatically invoked at first-time startup, you want your preparations to be complete.
Use the Interface Configuration Worksheet to gather and maintain information about the installed interfaces. Two levels of information are listed on the Interface Configuration Worksheet: system hardware information and interface parameters. System hardware information is not requested at first-time startup, but is useful to write on the worksheet to complete your records. Interface parameters, however, are requested at first-time startup.
In the following descriptions of the parameters that you will set, your task for each parameter is marked with the Action: label.
The Interface Configuration Worksheet is shown in Figure 2-3, and a blank worksheet is provided in the "Blank Worksheets" appendix. Record the information on it as you proceed through the following descriptions.

The values for the following system hardware information should be the same as those you indicated on the Global Configuration Worksheet:
Refer to the "Determining Global Parameters" section earlier in this chapter for information about these values.
This section contains information about each interface parameter that can be configured through the setup command facility for the installed network. Use this information to complete the Interface Parameters portion of the worksheet.
The setup command facility automatically presents the installed network interface for you to configure. The interfaces are presented in the same order as they are installed in the chassis. For example, if you have two Ethernet interfaces, you are prompted first to configure interface Ethernet0, and then to configure Ethernet1.
Default: The default is based on the interface installed in the chassis.
Action: Write the interface name on the top of the worksheet in the row labeled "Interface Name."
You can decide whether you want to configure an installed interface at first-time startup. If at first-time startup you accept the configuration script, the system shuts down the interfaces you indicate you will not configure.
Default: Yes.
Action: If you plan to configure a particular interface at first-time startup, write Yes in the column for that interface. If not, write No.
If you have a Token Ring board installed, select a speed for your network. You can enter 4 to set the Token Ring speed to 4 Mbps, or 16 to set the Token Ring speed to 16 Mbps. Once you set this value, the setup command facility does not ask you for it again.
 | Caution If you select the wrong speed, the ring will be brought down. |
Default: 16.
Action: Write the correct Token Ring speed for your network on the worksheet.
Determine whether to use IP routing for a particular interface.
Default: Yes.
Action: If you plan to use IP routing for an interface, write Yes on the worksheet. If not, write No. Repeat this for each installed interface you plan to configure.
If you plan to use IP routing on an interface, provide the IP address and subnet mask bits for that interface. Indicate values on the worksheet as follows:
| First Class | First Byte | Network Bits | Host Bits |
|---|---|---|---|
| A | 1-126 | 8 | 24 |
| B | 128-191 | 16 | 16 |
| C | 192-223 | 24 | 8 |
Determine whether to use DECnet Phase IV addressing on a particular interface.
Default: No.
Action: If you plan to use DECnet Phase IV addressing for the interface, write Yes on the worksheet. If not, write No. Repeat this for each of the installed interfaces you plan to configure.
If you will be using DECnet Phase IV addressing on an interface, you must also provide the route cost for that interface. Indicate a value on the worksheet as follows:
Determine whether to use XNS on a particular interface.
Default: No.
Action: If you plan to use XNS on the interface, write Yes on the worksheet. If not, write No. Repeat this for each installed interface you plan to configure.
If you plan to use XNS on an interface, you must also provide the network number for that interface. Indicate the information on the worksheet as follows:
Determine whether to use Novell IPX on a particular interface.
Default: No.
Action: If you plan to use Novell IPX on the interface, write Yes on the worksheet. If not, write No. Repeat this for each installed interface you plan to configure.
If you will use Novell on an interface, you must also provide the network number for that interface as follows:
Determine whether to use Apollo Domain (Apollo) addressing on a particular interface.
Default: No
Action: If you plan to use Apollo addressing on the interface, write Yes on the worksheet. If not, write No. Repeat this for each installed interface you plan to configure.
If you will use Apollo on an interface, you must also provide the network number for that interface as follows:
Determine whether to use AppleTalk on a particular interface. AppleTalk must be enabled on at least one network interface for AppleTalk Remote Access to function on the asynchronous lines of your communication server.
Default: No.
Action: If you plan to use AppleTalk on the interface, write Yes on the worksheet. If not, write No. Repeat this for each installed interface you plan to configure.
Remember, during configuration of the global parameters, you specified whether you wanted to configure multizone networks. Your answer applies to every interface you configure.
If you plan to use AppleTalk on an interface, you must also provide the other information for that interface as follows.
Determine whether to use CLNS on a particular interface.
Default: Yes.
Action: If you plan to use CLNS on the interface, write Yes on the worksheet. If not, write No. Repeat this for each installed interface you plan to configure.
Determine whether to use Banyan VINES on a particular interface.
Default: Yes.
Action: If you plan to use VINES on the interface, write Yes on the worksheet. If no, write No. Repeat this for each installed interface you plan to configure.
Determine whether to use transparent bridging on a particular interface.
Default: Yes.
Action: If you plan to use transparent bridging on the interface, write Yes on the worksheet. If not, write No. Repeat this for each installed interface you plan to configure.
The local area transport (LAT) protocol from Digital Equipment Corporation (Digital) is the protocol used most often to connect to Digital hosts. LAT is a Digital-proprietary protocol. Cisco uses LAT technology licensed from Digital.
With LAT, you can establish a connection to a host, then pass your keystrokes to the host. A user can establish a LAT connection through the communication server to a Digital host simply by entering the host name.
The communication server provides the option of transporting LAT in protocol translation mode. With communication servers, you can establish a configuration so that the communication server software translates LAT to Telnet or X.25 for transmission over a WAN, which can be translated back to LAT on the other end of the connection. You can configure this WAN-to-LAT translation to be transparent to the user. This configuration also avoids LAT time-out problems, which are common in WAN-bridged LAT. For more information about LAT, refer to the Access and Communication Servers Configuration Guide.
Default: Yes.
Action: If you plan to use LAT on the interface, write Yes on the worksheet. If you do not want to use LAT on the interface, write No. Repeat this for each of the installed interfaces you plan to configure.
Specify the Novell IPX network number for each asynchronous line. A Novell IPX network number is a 32-bit value. Novell requires that a network number be associated with every network segment. It must be a hexadecimal number between 1 and FFFFFFFF.
Default: The default is 3 for the first async line, 4 for the second async line, and so on.
Action: Write the Novell IPX network number on the worksheet for each installed async line you plan to configure.
If you specified on the Global Configuration Worksheet that a default IP address be used for async lines when a connection is made to a remote network device (such as a PC), then in the Interface Configuration Worksheet, you must specify the specific default IP address for each async interface.
A default client IP address means that users do not have to enter an IP address when connecting to a device, because the default IP address has been set in the configuration.
Default: None.
Action: If you plan to limit user access to specific devices from an async interface, enter the IP address to which you want to limit access for each interface. Note that if you enter an address for one async interface, the setup command facility increments the IP address one digit for each subsequent async interface. You can accept the default increments or change the IP addresses as you like.
|
|