|
|

This chapter describes how to make terminal-to-host connections using a remote access server. Specifically, this chapter describes the following topics:
These connection types are described in the following sections.
Digital Equipment Corporation's (Digital's) Local Area Transport (LAT) protocol is most often used to connect remote access servers to Digital hosts. LAT is a Digital-proprietary protocol and your remote access server uses LAT technology licensed from Digital. You can perform the following LAT connection tasks from your remote access server:
These tasks are described in the following sections.
To connect to a LAT host, enter the lat EXEC command at the system prompt. The lat command has the following syntax:
lat name [node nodename | port portname | /debug]| name | Your LAT learned service name. |
| node nodename | (Optional) Specifies a connection to a particular LAT node that offers a service. If you do not include the node option, the node with the highest rating offering the service is used. Use the EXEC command show lat nodes to display information about all known LAT nodes. |
| port portname | (Optional) Specifies a destination LAT port name. This keyword is ignored in most timesharing systems, but is used by remote access servers offering reverse LAT services. Reverse LAT involves connecting to one remote access server from another. In this case, the target remote access server runs the host portion of the protocol. Enter the port name in the format of the remote system in place of the portname argument. |
| /debug | (Optional) A switch that, when enabled, prints parameter changes and other special messages on the screen. |
The LAT protocol must be explicitly specified when your preferred transport is set to none or to another protocol. (If your preferred transport is set to lat, you can use the connect command.) You can quit the connection by entering Ctrl-C, or complete the connection by entering the password for a given service.
The following example establishes a LAT connection from the remote access server named cs to host eng2:
cs> lat eng2
Trying ENG2...Open
         ENG2 - VAX/VMS V5.2
Username: JSmith
Password:
    Welcome to VAX/VMS version V5.2 on node ENG2
    Last interactive login on Friday,  1-APR-1994 19:46
The system informs you of its progress by displaying the messages "Trying <system>..." and then "Open." If the connection attempt is not successful, you receive a failure message.
The following example establishes a LAT connection from the remote access server named cs to our-modems and specifies port 24, which is a special modem:
cs> lat our-modems port 24
The following example establishes a LAT connection from the remote access server named cs to our-modems and specifies a node named eng:
cs> lat our-modems node eng
The following example uses the LAT session debugging capability:
cs> lat Eng2 /debug
Trying ENG2...Open
        ENG2 - VAX/VMS V5.2
 Username: JSmith
 Password:
    Welcome to VAX/VMS version V5.2 on node ENG2
    Last interactive login on Tuesday, 5-APR-1994 19:02
[Set Flow out off, Flow in on, Format 8:none, Speed 9600/9600]
[Set Flow out off, Flow in on, Format 8:none, Speed 9600/9600]
$ set ter/speed=2400
[Set Flow out off, Flow in on, Format 8:none, Speed 2400/2400]
A variety of LAT events are reported, including all requests by the remote system to set local line parameters. The messages within brackets ([ ]) above are the messages produced by the remote system setting line characteristics to operating system defaults.
You can temporarily define the list of services to which you or another user can connect. You do this by defining the group code lists used for connections from specific lines.
You limit the connection choices for an individual line by defining the group code lists for an outgoing connection. When a user initiates a connection with a LAT host, the user's line must share a common group number with the remote LAT host before a connection can be made.
The group code range entered must be a subset of the line's configured group code range. Use the following command:
terminal lat out-group {groupname | number | range}| groupname | Name of the group that has access to the system through the specified line. |
| number | Number of the group that has access to the system through the specified line. |
| range | The range of group numbers. Separate the beginning and end of the range with a hyphen. |
The group code range entered in this command must fall within the group code range already configured for the line.
cs> terminal lat out-group 4, 6-189
You can have several concurrent LAT sessions open and switch back and forth between them.
To open a subsequent session, first enter the escape sequence (Ctrl-^ X) to quit out of the current session. Then open a new session.
To list the available LAT services, issue the following command:
show lat servicesFor sample output to this command, and for information about switching between LAT sessions, refer to the chapter "Monitoring and Managing Connections" later in this publication.
Your remote access server supports a subset of Digital commands, including the following:
| Task | Command |
|---|---|
| List EXEC commands. | help |
| Close the active session. | logout |
You can issue any of the following commands to terminate an active LAT session:
exitTwo Transmission Control Protocol/Internet Protocols (TCP/IP), Telnet and rlogin, are available for making connections to a host.
Telnet, a virtual terminal protocol that is part of the TCP/IP protocol suite, allows for connections to hosts. Telnet is the more widely used protocol.
The rlogin protocol is a remote login service developed for the BSD UNIX system. It provides better control and output suppression than Telnet, but can only be used when the host (typically, a UNIX system) supports rlogin. Our implementation of rlogin does not subscribe to the trusted host model. That is, a user cannot automatically log on to a UNIX system from the remote access server, but must provide a user ID and a password for each connection.
This implementation of Telnet and rlogin provides these connection capabilities:
These tasks are described in the following sections.
To log on to a host that supports Telnet, enter one of the following commands:
connect host [port] [keyword] telnet host [port] [keyword]| host | A host name or an Internet address. |
| port | (Optional) A decimal TCP port number; the default is the Telnet server port (decimal 23) on the host. |
| keyword | (Optional) One of the options listed in Table 3-1. |
| Option | Description |
|---|---|
| /route path | Specifies loose source routing. The path argument is a list of host names or Internet addresses that specify network nodes, ending with the final destination. |
| /line | Enables Telnet line mode. In this mode, the remote access server sends no data to the host until you press Return. You can edit the line using the standard remote access server command editing characters. The /line keyword is a local switch; the remote server is not notified of the mode change. |
| /debug | Enables Telnet debugging mode. |
| /stream | Turns on stream processing, which enables a raw TCP stream with no Telnet control sequences. A stream connection does not process Telnet options, and may be appropriate for connections to ports running UUCP and other non-Telnet protocols. |
With the Cisco implementation of TCP/IP, you are not required to enter the connect or telnet commands to establish a Telnet connection. You can just enter the learned host name--as long as the host name is different from a command word for the remote access server.
To display a list of the available hosts, enter the following command:
show hostsTo display the status of all TCP connections, enter the following command:
show tcpThe remote access server assigns a logical name to each connection and several commands use these names to identify connections. The logical name is the same as the host name, unless that name is already in use, or you change the connection name with the EXEC command name-connection. If the name is already in use, the remote access server assigns a null name to the connection.
The following example routes packets from the source system to kl.sri.com, then to 10.1.0.11, and finally to mathom:
cs> connect mathom /route:kl.sri.com 10.1.0.11 mathom
The following example connects to a host with logical name mathom:
cs> mathom
The Telnet software supports special Telnet commands in the form of Telnet sequences that map generic terminal control functions to operating system-specific functions.
To issue a special Telnet command, enter the escape sequence and then a command character. The default escape sequence is Ctrl-^ (press and hold the Control and Shift keys while pressing the 6 key). You can enter the command character as you hold down Ctrl or with Ctrl released; you can type either uppercase or lowercase letters.
Table 3-2 lists the special Telnet commands.
| Task | Escape Sequence |
|---|---|
| Break | Ctrl-^ B |
| Interrupt Process (IP) | Ctrl-^ C |
| Erase Character (EC) | Ctrl-^ H |
| Abort Output (AO) | Ctrl-^ O |
| Are You There? (AYT) | Ctrl-^ T |
| Erase Line (EL) | Ctrl-^ U |
At any time during an active Telnet session, you can list the Telnet commands by entering the escape sequence followed by a question mark at the system prompt:
Ctrl-^ ?An online table of the special Telnet commands is displayed.
A sample of this list follows.
cs> ^^?
[Special telnet escape help]
^^B  sends telnet BREAK
^^C  sends telnet IP
^^H  sends telnet EC
^^O  sends telnet AO
^^T  sends telnet AYT
^^U  sends telnet EL
You can have several concurrent rlogin connections open and switch back and forth between them.
To open a new connection, exit out of the current connection by typing the escape sequence
(Ctrl-^ X), to return to the system command prompt, then open a new connection.
To log on to a UNIX host using rlogin, enter the following command:
rlogin host [debug]| host | Specifies the host name or Internet address. |
| debug | (Optional) Enables debugging output from the rlogin protocol. |
The following example makes an rlogin connection to a host at address 108.33.21.2 and enables the message mode for debugging:
cs> rlogin 108.33.21.2 debug
You can have several concurrent sessions open and switch back and forth between them. The number of sessions that can be open is defined by the session-limit command, which is described in the publications Communication Server Configuration Guide and Communication Server Command Reference.
You can switch between sessions by escaping out of one session and resuming a previously opened session, as follows:
Step 1 Escape out the current session by pressing Ctrl-^ X and return to the EXEC prompt.
Step 2 List the open sessions using the where command. All open sessions associated with the current terminal line are displayed.
Step 3 Type the resume command and the session number to make the connection.
You can also resume the previous session by pressing the Return key.
The where command has no additional syntax. The resume command has the following syntax when used on the remote access server:
resume [connection] [keyword]| connection | (Optional) The name or number of the connection; the default is the most recent connection. |
| keyword | (Optional) One of the options listed in Table 3-3. |
| Option | Description |
|---|---|
| /debug | Prints parameter changes and messages. On a remote access server, this option displays informational messages whenever the remote host changes an X.3 parameter or sends an X.29 control packet. |
| /echo | Performs local echo. |
| /line | Enables line-mode editing. |
| /nodebug | Cancels printing of parameter changes and messages. |
| /noecho | Disables local echo. |
| /noline | Disables line mode and enables character-at-a-time mode, which is the default. |
| /nostream | Disables stream processing. |
| /set parameter:value | Sets X.3 connection options. Refer to the section "X.3 PAD Connections" later in this chapter for a list of these connection options. |
| /stream | Enables stream processing. |
The Ctrl-^-X, where, and resume commands are available with all supported connection protocols.
The following example shows how to resume connection 2:
cs> resume 2
You can omit the command name and simply type the connection number to resume that connection. The following example illustrates how to resume connection 3:
cs> 3
You can issue any of the following commands to terminate an active Telnet or rlogin session:
exitYou connect to an IBM host using TN3270 terminal emulation. Your system administrator must configure a default terminal emulation file that permits the terminal to communicate correctly with the host. Refer to the publications Communication Server Configuration Guide and Communication Server Command Reference to specify alternate terminal emulations. Your administrator can also specify custom terminal emulations.
Unlike Telnet and LAT connections, you must enter the command tn3270 to make a connection to an IBM 3278 host. To begin a TN3270 session, enter the following command:
tn3270 hostname| hostname | Name of a specific host on a network that is reachable by the remote access server. The default terminal emulation mode allows access using a VT100 emulation. |
The following example establishes a terminal session with an IBM host named finance:
cs> tn3270 finance
To terminate an active TN3270 session, you can issue any of the following commands:
exitYou can make a serial connection to a remote host using the Serial Line Internet Protocol (SLIP). Your system administrator can configure SLIP to expect a specific address or to provide one for you. It is also possible to set up SLIP in a mode that compresses packets for more efficient use of the line.
To make a SLIP connection, enter the following command at the EXEC prompt:
slip {/default | remote-ip-address | remote-name} [@tacacs-server]} [/routing] [/compressed]| /default | (Optional) Makes a SLIP connection when a default address has been configured. |
| remote-ip-address | IP address of the client workstation or PC. |
| remote-name | Name of the client workstation or PC. |
| @tacacs-server | (Optional) The IP address or IP host name of the TACACS server to which your TACACS authentication request is sent. |
| /routing | (Optional) Indicates that the remote system is a router. Line must be configured for asynchronous routing using SLIP encapsulation. |
| /compressed | (Optional) Indicates that IP header compression should be negotiated. Your system administrator must have configured the system with the ip tcp header-compression passive command for this command to be valid in EXEC mode. The command ip tcp header-compression forces header compression on or off. The default is to not compress the packets. The configuration file must have header compression on and the slip /compressed EXEC command must be entered for header compression to occur. |
If you specify an address for the TACACS server using default or tacacs-server, the address must be the first parameter in the command after you type slip. If you do not specify an address or enter default, you will be prompted for an IP address or host name. You can enter default at this point.
If you do not use the tacacs-server argument to specify a TACACS server for SLIP address authentication, the TACACS server specified at login (if any) is used for the SLIP address query.
To allow optimal use of bandwidth on a line, SLIP allows compressing of the SLIP packets using Van Jacobson TCP header compression as defined in RFC 1144.
You can issue any of the following commands to terminate an active SLIP session:
exitThe following example illustrates how to make a connection when a default IP address has been assigned. Once a correct password is entered, you are placed in SLIP mode, and the IP address is displayed.
cs> slip
Password:
Entering SLIP mode.
Your IP address is 192.31.7.28, MTU is 1524 bytes
The following example illustrates the prompts displayed and the response required when dynamic addressing is used to assign the SLIP address:
cs> slip
IP address or hostname? 192.31.6.15
Password:
Entering SLIP mode
Your IP address is 192.31.6.15, MTU is 1524 bytes
In the following example, the address 192.31.6.15 has been assigned as the default. Password verification is still required before SLIP mode can be enabled.
cs> slip default
Password:
Entering SLIP mode
Your IP address is 192.31.6.15, MTU is 1524 bytes
The following example illustrates the implementation of header compression on the interface with the IP address 128.66.2.1:
cs> slip 128.66.2.1 /compressed
Password:
Entering SLIP mode.
Interface IP address is 128.66.2.1, MTU is 1500 bytes.
Header compression will match your system.
In this example, the interface is configured for ip tcp header-compression passive, which permitted the user to enter the /compressed keyword at the EXEC mode prompt. The message "Header compression will match your system" indicates that the user specified compression. If the line was configured for ip tcp header-compression on, this line would read "Header compression is On."
The following example specifies a TACACS server named parlance for address authentication:
cs> slip 1.0.0.1@parlance
Password:
Entering SLIP mode.
Interface IP address is 1.0.0.1, MTU is 1500 bytes
Header compression will match your system.
You can make asynchronous connections using the Point-to-Point Protocol (PPP). To start a PPP connection, enter the following command at the EXEC prompt:
ppp {/default | {remote-ip-address | remote-name} [@tacacs-server]} [/routing]| /default | (Optional) Makes a PPP connection when a default address has been configured. |
| remote-ip-address | IP address of the client workstation or PC. This parameter can only be specified if the line is set for dynamic addresses using the line configuration command async address dynamic. |
| remote-name | Name of the client workstation or PC. This parameter can only be specified if the line is set for dynamic addresses using the line configuration command async address dynamic. |
| @tacacs-server | (Optional) Specifies an IP address or IP host name of the TACACS server to which the user's TACACS authentication request is sent. |
| /routing | (Optional) Indicates that the remote system is a router and that routing messages should be exchanged over the link. The line must be configured for asynchronous routing using PPP encapsulation. |
If you specify an address for the TACACS server, either default or tacacs-server, the address must be the first parameter in the command after you type ppp. If you do not specify an address or enter default, you will be prompted for an IP address or host name. You can enter default at this point.
Any of the following commands will terminate a PPP session:
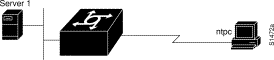
exitThe following example shows a line that is in asynchronous mode using PPP encapsulation (see Figure 3-1). The PC's name is ntpc (assuming that the name ntpc is in the DNS so that it can be resolved to a real IP address). The PC must be running a terminal emulator program.
cs> ppp ntpc@server1
The XRemote protocol lets you connect to remote hosts via TCP/IP and LAT using an X display station and modem. You make connections in one of the following ways:
The following sections outline the steps for starting up XRemote in several typical environments. When possible, use the automated processes. Be sure your system administrator has already configured a path for loading fonts.
If your host computer supports a server for XDMCP (such as the xdm program included in X11R4 or later), you can use automatic session startup to make an XRemote session connection. To do so, enter the following command:
xremote xdm [hostname]| hostname | (Optional) Host computer name. |
This command causes an XDMCP session startup request to be made to the host computer. If you do not specify a host name, a broadcast message is sent to all hosts. The first host to respond by starting up a session is used.
The remote access server and X terminal stay in XRemote mode until either the display manager terminates the session or a reset request is received from the X terminal.
The following example starts a session with a remote host named star.
cs> xremote xdm an
If your host computer supports DECwindows login sessions, you can use automatic session startup to make an XRemote session connection. Once the system administrator at the remote host has configured support for DECwindows over LAT, you can use the EXEC command xremote lat to initiate the connection. The command has the following syntax:
xremote lat service| service | Name of the desired LAT service. |
After you issue this command, expect the following to occur:
Log on to the system. Upon completion of login, more fonts are loaded, and the remote session begins.
The following example begins connection with a LAT service named WHIRL:
cs> xremote lat WHIRL
If you are not using a host computer that supports XDMCP or LAT, you must use manual session startup. Manual session startup involves several steps:
Step 1 Enable XRemote manually on the remote access server port.
Step 2 Connect to the host computer.
Step 3 Set the location of the X display.
Step 4 Start up client applications.
Step 5 Return to the EXEC prompt.
Step 6 Enable XRemote manually again on the remote access server port.
The following sections describe these tasks.
To prepare the remote access server for manually starting an XRemote session, enter the xremote EXEC command at the system prompt.
xremoteThis command begins the instructions that prompt you through the connection.
The following example illustrates how a successful manual XRemote session begins:
dialup> xremote
XRemote enabled; your display is dialup:2006
Start your clients and type XRemote again
The system replies with a message informing you of your X display location This information will be used to inform the host of the location of your X display server.
If no clients are found, you see the following message:
No X clients waiting - check that your display is darkstar:2006
Check your hosts to determine if an error was made when starting the session. The most likely cause is an improperly specified display location. Another possible cause is the host computer not recognizing the name of your remote access server.
You can connect to a host using one of the following connection commands, and log on as usual:
telnetAt this point, you are logged in to the remote host.
Inform the host computer of your X display location, which was provided to you by the remote access server when you enabled XRemote manually.
For most versions of the UNIX operating system, the X display location is set by using the setenv command to set the environment variable DISPLAY. Refer to your UNIX system's online X(1) manual page for more information.
On VAX/VMS systems, use the SET DISPLAY command to set the X display location. For more information, refer to the VMS DCL Dictionary.
Now you start your client applications for your host operating system.
The remote access server accepts the X connection attempt from the client application and places the client in a dormant state.
If it is possible to log off the host computer and keep your X clients running in the background, you can do so now. This conserves resources on both the host and the remote access server that would otherwise be inaccessible until you exited from XRemote state.
If you cannot log off the host computer and keep your clients running, escape back to the remote access server prompt using the escape sequence (Ctrl-^ X by default).
Begin a manual remote session again (refer to the section "Enable XRemote Manually" earlier in this chapter). If the X clients connected successfully, the session is put into XRemote mode, and the clients complete their startup.
If no clients are found, you will see the following message:
No X clients waiting - check that your display is darkstar:2018
Check your hosts to determine if an error was made when starting the session. The most likely cause is an improperly specified display location. Another possible cause is the host computer not recognizing the name of your remote access server.
In manual operation, the remote access server and X terminal remain in XRemote mode until all clients disconnect or a reset request is received from the X terminal.
A session might terminate during startup because you invoked transient X clients that set some parameters and then disconnected (such as xset or xmodmap). There must always be one session open or the connection will be reset.
A remote access server allows a user of an X display server that does not support XRemote to run the XRemote protocols. An X display server (such as a PCX, MACX or UNIX workstation) connected to an Ethernet network can dial out through a remote access server on a conventional modem to access an X client program on a host residing on another network. The remote access server provides the server-side helper process.
To run XRemote, connect to one of the XRemote ports.
Find out from your administrator whether the connection from your X display terminal is configured as an individual line or a rotary connection.
For information about how to configure individual lines and rotary connections, refer to the Communication Server Configuration Guide and the Communication Server Command Reference.
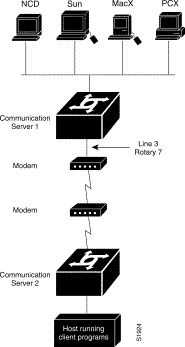
Figure 3-2 illustrates a configuration in which a display server is not running XRemote. In this configuration, the server-side XRemote helper is running on Communication Server 1, and the client-side XRemote helper is running on Communication Server 2.
You can issue any of the following commands to terminate a terminal session:
exitUse the examples in this section to understand how to make XRemote connections.
The following example shows a connection from an X display terminal through a remote access server to a host running client programs.
dialup> xremote
XRemote enabled; your display is dialup:2006
Start your clients and type XRemote again
dialup> telnet eureka
Trying EUREKA.NOWHERE.COM (252.122.1.55)... Open
SunOS UNIX (eureka)
login: deal
Password:
Last login: Fri Apr 1 17:17:46 from dialup.nowhere.com
SunOS Release  (SERVER+FDDI+DBE.patched) #14: Fri Apr 8 10:37:29 PDT 1994
eureka% setenv DISPLAY dialup:2006
eureka% xterm &
[1] 15439
eureka% logout
[Connection to EUREKA closed by foreign host]
dialup> xremote
Entering XRemote
The remote access server and X terminal stay in XRemote mode until either the display manager terminates the session or a reset request is received from the X terminal:
Connection closed by foreign host.
eureka%
This section provides two examples of XRemote connections between remote access servers.
The following steps show how an XRemote connection is established for a configuration like the one shown in Figure 3-2. These steps assume that the administrator has set the user's display environment variable to identify the user's X display terminal.
The following example shows the steps to make an XRemote connection between remote access servers. The number 9016 in the first line of the display indicates a connection to individual line 16. If the administrator had configured a rotary connection, the user would enter 10000 plus the number of the rotary instead of 9016.
Step 1 Enter the telnet command to make the connection:
telnet golden-road 9016
Step 2 Supply the password for TACACS verification:
Step 3 Dial in to the remote system using the modem, and then log on:
atdt 13125554141
deal
Step 4 Enter the xremote command at the EXEC prompt, then follow the instructions from the host:
xremote
Step 5 Connect to the client:
telnet sparks
deal
Step 6 At the client prompt, enter the display name from step 4 and the xterm command:
setenv DISPLAY dialup:2006
xterm &
Step 7 Disconnect from the client:
logout
Step 8 Begin the XRemote session:
xremote
Once the connection is closed by the foreign host, the Xterm window appears on the local workstation screen:
Connection closed by foreign host.
sparks%
This section describes the methods you can use to connect from a host running one protocol (such as Telnet with TCP/IP) to a host running another protocol (such as LAT). This process is called protocol translation, and allows devices running dissimilar protocols--such as X.25 and
TCP/IP--to communicate. Protocol translation does not permit translation between other services such as file transfer protocols.
You can make a protocol translation connection using any of the protocols listed in earlier in this chapter, as well as with X.3 PAD, which is described in the section "X.3 PAD Connections" later in this chapter. The commands you use to make these connections and exit from them are listed in earlier in this chapter. This section describes the additional tasks required to perform protocol translation from one host to another using a communication server, or a router with protocol translation. Specifically, it contains the following information:
The router configured as a remote access server supports virtual terminal connections in both directions between the protocols in the following list. You can configure the remote access server to translate automatically between them. This is called the one-step translation method.
The remote access server supports limited connections in both directions between the following protocols. Connecting between these protocols requires that you tell the remote access server to translate each time you make a connection. This is called the two-step translation method.:
The following sections describe the two-step and the one-step translation methods.
In general, you use the two-step process when you want to use protocol translation for one-time connections. Your network administrator must first have configured the remote access server for the transmission protocols you will be using.
With the two-step connection process, you can modify the parameters of either network connection, even while a session is in process. This process is similar to connecting a group of terminal lines from a PAD to a group of terminal lines from a TCP remote access server. The difference is that you do not encounter the wiring complexity, unreliability, management problems, and performance bottlenecks that occur when two devices are connected via asynchronous serial lines.
Also, the two-step process allows another level of security over the one-step translation method when TACACS and password protection is enabled. These security features are described in the configuration guide for your server product.
To connect to the remote network host running a foreign protocol, follow this procedure:
Step 1 Make a network connection to a remote access server using the EXEC command for the protocol running at your local terminal.
These commands are listed earlier in this chapter. X.3 PAD connections are described later in this chapter.
Step 2 When the remote access server prompt appears, connect to the remote host using the EXEC command for the protocol running on the remote host.
In the following example, the local terminal is an IBM 3278 host running TN3270 and the remote network host is running rlogin. The name of the remote access server is ganges, and the remote UNIX host is krishna.
tn3270 ganges
If the remote access server named sankara is accessible, it returns a login message and you enter your login name and password. After you enter your name and password, connect to the remote host.
rlogin krishna
In general, you use the one-step method when network users repeatedly log on to the same remote network hosts through a remote access server. This connection is more efficient and allows the remote access server to act upon greater knowledge of the protocols in use because the remote access server acts as a network connection rather than as a terminal.
The one-step method provides transparent protocol conversion. When connecting to the remote network host, the user enters the connection command to the remote network host, but does not need to specify protocol translation. The network administrator creates a configuration that defines a connection and the protocols to be translated.The user performs one step to connect with the host.
When you make a one-step connection to the remote access server, the remote access server determines which host the connection is for and which protocol that host is using. It then establishes a new network connection using the protocol required by that host.
To support connections in each direction, the network administrator must include translate command statements in the configuration file. Refer to the Protocol Translator Configuration Guide and Command Reference for information about configuring a remote access server for one-step connections and for information about the translate command.
A disadvantage of the one-step method is that the initiating computer or user does not know that two networking protocols are being used. This means that parameters of the foreign network protocols cannot be changed after connections are established. The exception to this limitation is the set of parameters common to both networking protocols. Any parameter in this set can be changed from the first host to the final destination.
This section describes the following tasks:
A PAD is a packet assembler/disassembler, which is a device that receives a character stream from one or more terminals, assembles the character stream into packets, and sends the data packets out to a host. A PAD can also do the reverse. It can take data packets from a network host and translate them into a character stream that can be understood by the terminals. A PAD is defined by CCITT Recommendations X.3, X.28, and X.29.
You can have several concurrent PAD connections open and switch back and forth between them. You can also exit out of a connection and return to the user EXEC prompt at any point.
To open a new connection, first exit out of the current connection by typing the escape sequence to return to the system command prompt, then open the new connection.
To log on to a PAD, enter the following command:
pad {X.121-address | hostname} [/cud text] [/debug] [/reverse]| X121-address | Specifies the X.121 address of the X.25 host. |
| hostname | Specifies the X.25 host name if the host-to-address mapping has been set with the X.25 host command. (The pad command supports one-word connections. You don't have to enter the pad command; just the address is enough to start connection.) |
| /cud text | (Optional) Includes the specified text in the Call User Data field of the outgoing Call Request Packet. |
| /debug | (Optional) Causes the informational level of logging messages to be printed whenever the remote host changes an X.3 parameter setting or sends any other X.29 control packet. |
| /reverse | (Optional) Causes reverse charge calls to be accepted on a per-call, rather than a per-interface, basis. |
To display information about packet transmission and X.3 PAD parameter settings, enter the show x25 pad command. This command is described in the chapter "Monitoring and Managing Connections."
You can have several concurrent connections open and switch back and forth between them. The number of connections that can be open is defined by the session-limit command, which is described in the publication Protocol Translator Configuration Guide and Command Reference.
You can switch between connections by escaping out of one connection and resuming a previously opened connection, as follows:
Step 1 Type Ctrl-^ X to escape out of the current connection and return to the EXEC prompt.
Step 2 Use the where command to list the open connections. The system displays information about all open connections associated with the current terminal line.
Step 3 Type the resume command and the connection number.
You can also resume the previous connection by pressing the Return key.
The where command has no additional syntax. The resume command has the following syntax when used on the remote access server:
resume [connection] [keyword]| connection | (Optional) The name or number of the connection; the default is the most recent connection. |
| keyword | (Optional) One of the options listed in Table 3-4. |
Local X.3 parameters can also be changed when resuming a connection. Refer to "Set X.3 PAD Parameters" in the chapter "Monitoring and Managing Connections" later in this publication.
| Option | Description |
|---|---|
| /debug | Prints parameter changes and messages. On a remote access server, this option displays informational messages whenever the remote host changes an X.3 parameter or sends an X.29 control packet. |
| /echo | Performs local echo. |
| /line | Enables line-mode editing. |
| /nodebug | Prevents parameter changes and messages from being printed. |
| /noecho | Disables local echo. |
| /noline | Disables line mode and enables character-at-a-time mode, which is the default. |
| /nostream | Disables stream processing. |
| /set | Sets X.3 connection options. Refer to "Set X.3 PAD Parameters" in the chapter "Monitoring and Managing Connections" for a list of connection options. |
| /stream | Enables stream processing. |
The Ctrl-^ X, where, and resume commands are available with all supported connection protocols.
You can issue any of the following commands to terminate a terminal session:
exitThis section illustrates how to make connections for protocol translation using the two-step and one-step methods.
In the following example, the user connects directly from a terminal or workstation on a TCP/IP network to a remote access server, and then to a database called Information Place on an X.25 packet data network. The database has a service address of 71330.
Step 1 Make the following connection requests at a UNIX workstation as a first step to logging into the database Information Place:
If the remote access server named orion is accessible, it returns a login message and you enter your login name and password.
Step 2 Connect from the remote access server to the database Information Place, which is on an X.25 host. You connect to an X.25 host using the pad EXEC command followed by the service address:
Once the connection is established, the remote access server immediately sets the PAD to single character mode with local echoing, since this is the behavior the remote access server expects. The PAD responds with its login messages and a prompt for a password:
Because the password should not echo on your terminal, the PAD requests remote echoing so that characters will be exchanged between the PAD and the remote access server, but not echoed locally or displayed. After the password is verified, the PAD again requests local echoing from the remote access server.
Step 3 To complete this sample session, you log off, which returns you to the remote access server system EXEC prompt.
Step 4 Execute the EXEC quit command and the remote access server drops the network connection to the PAD.
The following is an example of one-step protocol translation. A UNIX workstation user makes a connection to a remote X.25 host named host1 over an X.25 PDN. The remote access server automatically converts the Telnet connection request to an X.25 connection request and transmits it as specified in the system configuration.
Step 1 Establish a connection by entering the telnet EXEC command at the UNIX workstation system prompt, as follows:
The remote access server accepts the Telnet connection and immediately forms an outgoing connection with remote host1 as defined in a translate command in your remote access server's active configuration file.
The system host1 sets several X.3 parameters, including local echo. Because the Telnet connection is already set to local echo (at the UNIX host), no changes are made on the TCP connection.
Step 2 Enter a username, then a password when the host1 connection prompts for them. The remote access server converts this to a Telnet option request on the UNIX host, which then stops the local echo mode.
At this point you are connected to the PAD application that will set the X.3 PAD parameters (although they can always be overridden using the resume or x3 commands).
Step 3 When you are finished with the connection, enter the escape character to exit back to the host connection, then enter the appropriate command to close the connection.
The host1 system immediately closes the X.25 connection. The remote access server then drops the TCP connection, leaving the user at the UNIX system prompt.
The following example shows how to make a dynamic change during a session. This example presumes a need to edit information on a remote host and change the X.3 PAD parameters that define the editing characters from the default Delete key setting to the Ctrl-D sequence. (Refer to Appendix A for a list of ASCII characters.)
Step 1 Enter the escape sequence to return to the system EXEC prompt:
Ctrl-^ x
Step 2 Enter the resume command with the /set keyword and the desired X.3 parameters.
X.3 parameter 16 sets the Delete function. ASCII character 4 is the Ctrl-D sequence.
resume /set 16:4
The session resumes with the new settings. If the information is not displayed correctly, you can set the /debug switch to check that your parameter setting has not been changed by the host PAD.
Step 3 Enter the escape sequence to return to the system EXEC prompt, then enter the resume command with the /debug switch.
resume /debug
The /debug switch provides helpful information about the connection.
You can also set a packet dispatch character or sequence using the terminal dispatch-character command, as shown in the following example:
Step 1 Set the ESC key (ASCII character 27) to a dispatch character by entering the following command:
Step 2 Return to the PAD connection by entering the following command:
The ESC key has been set to a dispatch character and the original PAD connection has been resumed.
|
|