cc/td/doc/product/sn5000/file_eng/fe_511
hometocprevnextglossaryfeedbacksearchhelp
PDF

Table Of Contents

Quick Installation Guide
for ActaStor Software 2.5

About the Example Network

Network Setup Overview

Unpacking the Hardware

Connecting and Powering On the System

Configuring the Client Installation Console

Accessing the Setup Wizard

Configuring the CoreServer Using the Setup Wizard

Configuring the EdgeServer Using the Setup Wizard

ActaStor Central Manager Access

Client-to-EdgeServer Connection

Obtaining Technical Assistance


Quick Installation Guide
for ActaStor Software 2.5


This document provides a step-by-step guide for setting up an ActaStor network, using an example network as a guide. Use this document in either of the following situations:

You are installing and configuring your ActaStor network from scratch.

Your network is already installed, but there is a problem (for example, the network does not boot or the software is corrupted). In this case, if you have a backup of the configuration, use that to restore your settings. Otherwise, reinstall the ActaStor software, which takes about 7 minutes. Then skip to the "Configuring the Client Installation Console" section and follow the steps to reconfigure your ActaStor network.

About the Example Network

In this example, an organization has a network consisting of two gateways:

A CoreServer resides next to a file server in the organization's data center.

An EdgeServer resides in one of the organization's remote (or branch) offices.

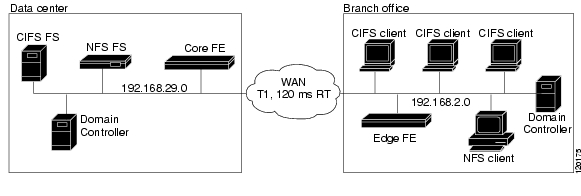
Figure 1 shows the example network setup.

Figure 1 Example Network Setup

The organization has a single DNS domain (us.actona.com) and a single Windows domain (actona-us), where each location is a separate site within the active directory. The CoreServer is connected at the data center to two file servers—Neptune, a Windows 2000 server, and Saturn, a Solaris 2.8 server. The clients at the branch office are connected to the EdgeServer.


Note You can also set up multiple EdgeServers using the instructions in the "Configuring the EdgeServer Using the Setup Wizard" section.


Table 1 specifies the different parameters and data needed to set up and configure the ActaStor gateways. The sample values are for demonstration purposes only and should not be used. When configuring your network, use your own values. For convenience, you can enter your values in the Your Values column.

Table 1 ActaStor Network System Parameters

Parameter
Data Center
Branch Office
 
Sample Values
Your Values
Sample Values
Your Values

Network IP

192.168.29.0


192.168.2.0


Subnet mask

255.255.255.0


255.255.255.0


Default gateway

192.168.29.1


192.168.2.1


Primary DNS

192.168.29.2


192.168.29.2


Secondary DNS

None


None


DNS domain

us.actona.com


us.actona.com


WINS server

Pluto

192.168.29.2


Mars

192.168.2.2


ActaStor gateway
(Host name and IP address)

ActaStor1

192.168.29.50


ActaStor2

192.168.2.18


Windows domain controller

Pluto

192.168.29.2


Mars

192.168.2.2


Windows file server

Neptune

192.168.29.5


N/A


UNIX file server

Saturn

192.168.29.6


N/A


Windows clients

N/A


DHCP


UNIX clients

N/A


DHCP


Windows domain

actona-us


actona-us


Network Setup Overview

The following sections describe how to set up a network similar to the one shown in the example. For some hardware details, you may need to refer to the Cisco Content Engine 511 and 566 Hardware Installation Guide. For some software details, you may need to refer to the ActaStor User's Guide. The most current versions of these documents can be accessed on Cisco.com, at this URL:

http://www.cisco.com/univercd/home/home.htm


Note The ActaStor User's Guide is also available by clicking the Help button in the ActaStor software.


To set up a network similar to the one shown in the example, perform the steps in the following sections.

Unpacking the Hardware

Connecting and Powering On the System

Configuring the Client Installation Console

Accessing the Setup Wizard

Configuring the CoreServer Using the Setup Wizard

Configuring the EdgeServer Using the Setup Wizard

ActaStor Central Manager Access

Client-to-EdgeServer Connection

Unpacking the Hardware

Prior to installing the ActaStor gateway on your local area network, verify you have all of the following items:

CD-ROM containing ActaStor software and the license key file

RJ-45 Category 5 Ethernet cable (customer-supplied)

Ribbon Ethernet cable, crossover (orange)

Power cord

Rack-mounting kit

Documentation (Regulatory Compliance and Safety Information, Site Preparation Guide, Quick Installation Guide)


Note There may be additional cables and other items included in the accessory kit. The above items are the only ones required for installing and configuring your ActaStor network.


To unpack the hardware, follow these steps:


Step 1 Open the carton and remove the File Engine.

Step 2 Remove the Ethernet crossover cable (orange).

Step 3 If you are mounting the File Engine onto a rack, follow the mounting instructions in the attached pamphlet.


Connecting and Powering On the System

Figure 2 shows the system back end connectors for a Cisco File Engine FE-511.

Figure 2 System Back End Connectors - Cisco File Engine FE-511


1

AC power receptacle

5

Onboard video port

2

Keyboard port

6

Ethernet 1 receptacle (network)

3

Mouse port

7

Ethernet 2 receptacle (management)

4

Serial port


To connect and power on the Cisco File Engine FE-511, follow these steps:


Step 1 Connect the AC power cable to the power socket on the left side of the rear panel of the File Engine (1). Connect the other end of the cable to a grounded power supply.

Step 2 Connect one end of the orange Ethernet crossover cable to the management port (7). Connect the other end of the Ethernet crossover cable to the RJ-45 Ethernet port on the installation console.

Step 3 Connect one end of the straight-through Ethernet cable (customer supplied) to the network port located at the back of the File Engine (6). The other end of this cable should be connected to your local network.

Step 4 Turn on the File Engine by pressing the On switch on the front panel.


Configuring the Client Installation Console

To configure the client installation console on your Windows 2000/XP client, configure the Ethernet port to use DHCP (if it is not configured already). Because a DHCP server is configured on the management port, the File Engine assigns an IP address to your client.

Accessing the Setup Wizard

To access the Setup Wizard, follow these steps:


Step 1 Open Microsoft Internet Explorer 5.5 or later.

Step 2 Enter the ActaStor Management address in the address bar:
http://172.30.30.172/mgr

You see the Login page.

Step 3 Enter the default user name (admin) and password (actona) in the fields provided, and click the Login button.


Note When logging in for the first time to an uninitialized gateway, you see the first page of the Setup Wizard.


Configuring the CoreServer Using the Setup Wizard

Follow the screens in the Setup Wizard and provide the required information. Remember to set up the CoreServer first, and designate it as the Central Manager.

To configure the CoreServer, follow these steps:


Step 1 In the in the Local Area Connection Properties screen, uncheck the DHCP checkbox and enter the appropriate information in the fields. For the IP address, enter the value you have in Table 1 for your Data Center ActaStor gateway. Enter a secondary DNS if you have one. See Table 1 for example network values.

If you are using DHCP, create a reservation record for the CoreServer or contact your network administrator.

Click Next.

Step 2 In the Time Zone Selection screen, check the time zone, date, and time. If the time zone is incorrect, select the proper time zone from the pull-down menu. If the time is incorrect, enter the proper date and time.

Click Next.

Step 3 In the Role Selection screen, check the boxes labeled CoreServer and Central Manager.

Click Next.

For the next two screens, the CIFS Configuration screen and the NFS Configuration screen, you configure the CoreServer to make the source servers' shares visible to the CoreServer. Any available share on a server becomes visible to the connected EdgeServers.

Step 4 In the CoreServer Configuration - CIFS (Common Internet File System) screen, enter the following information:

(Optional) Provide the WINS server address if WINS is used within the organization.

Provide a file server access username and password. Use any user account with browsing capabilities. This is required for proper operation of pre-position policies and for browsing the shares when creating Coherency Policies.

Add the Neptune server in the List of CIFS Servers box. To add a server, click the Add button, enter the server name in the provided space, and click OK.

Click Next.

Step 5 In the CoreServer Configuration - NFS (Network File System) screen, enter the following information:

File server access User ID (UID) and Group ID (GID): The default values should work in most cases.

In the List of NFS Servers box, add the Saturn server. To add a server, click the Add button, enter the server name in the provided space, make sure to check both the TCP and UDP check boxes, and click OK.

Click Next.

Step 6 The Notification Setting screen is optional. If you want notification capability, enter the following information:

a. Enter the intended alert recipient e-mail address.

b. Enter the mail-server hostname or IP address.

c. In the SNMP notification host field, enter the name or address of the SNMP manager that will receive traps and notifications from the File Engines in the ActaStor network.

Click Next.

Step 7 In the Connection to Central Manager screen, enter the following information:

a. Gateway name: Enter the logical name for the CoreServer (in the example, ActaStor1) as you would like it to appear in the Central Manager.

b. Central host: Enter the IP address of the Central Manager. In the example, the CoreServer is also the Central Manager, which is 192.168.29.50.

c. Register with central: Verify that this box is checked to ensure the gateway registers with the Central Management Console.

Step 8 Click Finish to end the setup process.

The Setup Wizard finishes and, after a few moments, displays a successful registration screen. After clicking the Close button, you see the Components tab of the Gateway Control page as shown in Figure 3.


Note If you have changed the time zone or the date and time, you will see a Return button instead of the Close button. Click the Return button to complete the configuration process and log out. To verify that your configuration changes have been made, wait 1-2 minutes for the service to restart and then log in again. After you log in, you see the Components tab of the Gateway Control page as shown in Figure 3.


The recently configured CoreServer is marked as Not Licensed. Once licenses are distributed from the Central Manager, it is enabled. For more information, see the "Distributing Licenses" section.

Figure 3 Gateway Control Page - Components Tab


Configuring the EdgeServer Using the Setup Wizard

Now that the Central Manager is running, you need to set up and configure the remaining gateway as an EdgeServer. Unpack another File Engine and connect it to an installation console, as described earlier in this document.

If this gateway is to be set up remotely, ensure that the remote location contacts the administrator to verify the setup and configuration after you have connected the File Engine to an installation console.

Before you begin this section, access the setup wizard as described in the "Accessing the Setup Wizard" section.

Follow the screens in the Setup Wizard and provide the required information.

To configure the EdgeServer, follow these steps:


Step 1 In the Local Area Connection Properties screen, uncheck the DHCP checkbox and enter the appropriate information in the fields. For the IP address, enter the value you have in Table 1 for your Branch Office ActaStor gateway. Enter a secondary DNS if you have one. See Table 1 for example network values.

If you are using DHCP, create a reservation record for the EdgeServer or contact your network administrator.

Click Next.

Step 2 In the Time Zone Selection screen, check the time zone, date, and time. If the time zone is incorrect, select the proper time zone from the pull-down menu. If the time is incorrect, enter the proper date and time.

Click Next.

Step 3 In the Role Selection screen, check the box labeled EdgeServer.

Click Next.

Step 4 In the EdgeServer Configuration screen, enter the following information.

a. Exported servers workgroup name: This is where the EdgeServer is associated with a particular Windows domain. Because all locations belong to the same domain (see Table 1), enter actona-us.

b. WINS: Enter your WINS server address if WINS is used within your organization.

c. DFS: The DFS site name allows for DFS (MS Distributed File System) integration. If DFS is implemented in the organization, enter the site name.

Click Next.

Step 5 The Notification Setting screen is optional. If you want notification capability, enter the following information:

a. Enter the intended alert recipient e-mail address.

b. Enter the mail-server hostname or IP address.

c. In the SNMP notification host field, enter the name or address of the SNMP manager that will receive traps and notifications from the File Engines in the ActaStor network.

Click Next.

Step 6 In the Connection to Central Manager screen, enter the following information:

a. Gateway name: Enter the logical name for the EdgeServer (in the example, ActaStor2) as you would like it to appear in the Central Manager.

b. Central host: Enter the IP address of the Central Manager (in the example, 192.168.29.50).

c. Register with central: Verify that this box is checked to ensure the gateway registers with the Central Management Console.

Step 7 Click Finish to end the setup process.

The Setup Wizard finishes and, after a few moments, displays a successful registration screen. After clicking the Close button, you see the Components tab of the Gateway Control page as shown in Figure 4.


Note If you have changed the time zone or the date and time, you will see a Return button instead of the Close button. Click the Return button to complete the configuration process and log out. To verify that your configuration changes have been made, wait 1-2 minutes for the service to restart and then log in again. After you log in, you see the Components tab of the Gateway Control page as shown in Figure 4.


The recently configured EdgeServer is marked as Not Licensed. Once licenses are distributed from the Central Manager, it is enabled. See the "Distributing Licenses" section.

Figure 4 Gateway Control Page - Components Tab


Congratulations - you have completed setting up two ActaStor gateways. You now need to establish connectivity between the CoreServer and EdgeServer, define coherency policies, and test the ActaStor network. These procedures are described in the following sections.

ActaStor Central Manager Access

After the gateway designated as the Central Manager has been deployed, you can launch the Central Manager remotely from any location on the ActaStor network through Internet Explorer. Refer to the Central Management chapter in the ActaStor User's Guide.

To launch the Central Manager, follow these steps:


Step 1 If you are not already logged in, open Internet Explorer 5.5 or later and enter the ActaStor Management address:
http://actastor1/mgr

You see the Login page.

Step 2 Enter the default user name (admin) and password (actona) in the fields provided, select the Central Manager option, and click the Login button.

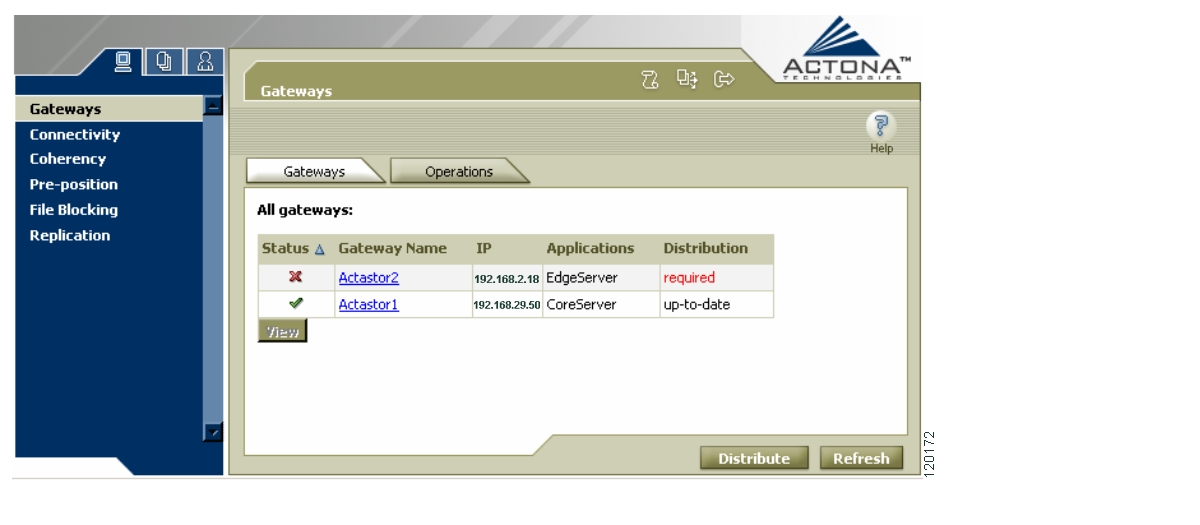
If this is the first time you are logging in, you see the license agreement. After you accept, you see the Central Manager interface. The Central Manager includes three main views: Tasks, Groups, and Users. These views are accessible by clicking on their icons at the top of the blue area (left pane) of the Central Manager interface. By default, you see the Gateways page when you first access the Central Manager, as shown in Figure 5. You can navigate to the different views and management screens using the navigation tabs.

Step 3 Update all gateways by clicking the Distribute button at the bottom of the screen.

Step 4 Close the update window.

Figure 5 Tasks View


Distributing Licenses

To distribute licenses, follow these steps:


Step 1 Click the License button () in the Gateway view.

Step 2 You see the License Installation dialog box. Use the Browse button to browse the directory tree and select the license key file (for example, actonavfn.lic) that is on the CD-ROM included in the accessory kit shipped to you with the system. License properties, such as expiration date and licensed components, can be seen in this screen once a license file is loaded (see Figure 6).

Step 3 Distribute the license by checking the gateway names and clicking the Install License button.

You see a Distribution Status window that provides you with the status of this operation.


Note If the licensing distribution process fails, refer to the Troubleshooting chapter in the ActaStor User's Guide.


Figure 6 License Installation Window


Starting a Gateway

With the licenses installed on each gateway, components can be started.

Refer to the Central Management chapter in the ActaStor User's Guide.

To start a gateway, follow these steps:


Step 1 In the left pane of the Tasks view, click Gateways. You see a list of all the registered gateways in the display area (right pane).

Step 2 Click the Operations tab to display management options.

Step 3 Click Start All to start all the enabled components in both registered gateways. You see a distribution window indicating the progress of the command.


Defining a New Connection:

After distributing the license to the two gateways and starting their components, use the Connectivity option in the Central Manager to connect the gateways to each other according to their assigned roles.

For more information on connectivity policies, refer to the Central Management chapter in the ActaStor User's Guide.

To define a new connection, follow these steps:


Step 1 Click Connectivity in the navigation area to display the Connectivity page.

Step 2 Click Add to display the Connectivity details page (see Figure 7).

Step 3 Select ActaStor1 in the CoreServer tab.

Step 4 Select ActaStor2 in the EdgeServers tab.

Step 5 In the Alias tab (CIFS only), verify that the prefix is AS-.

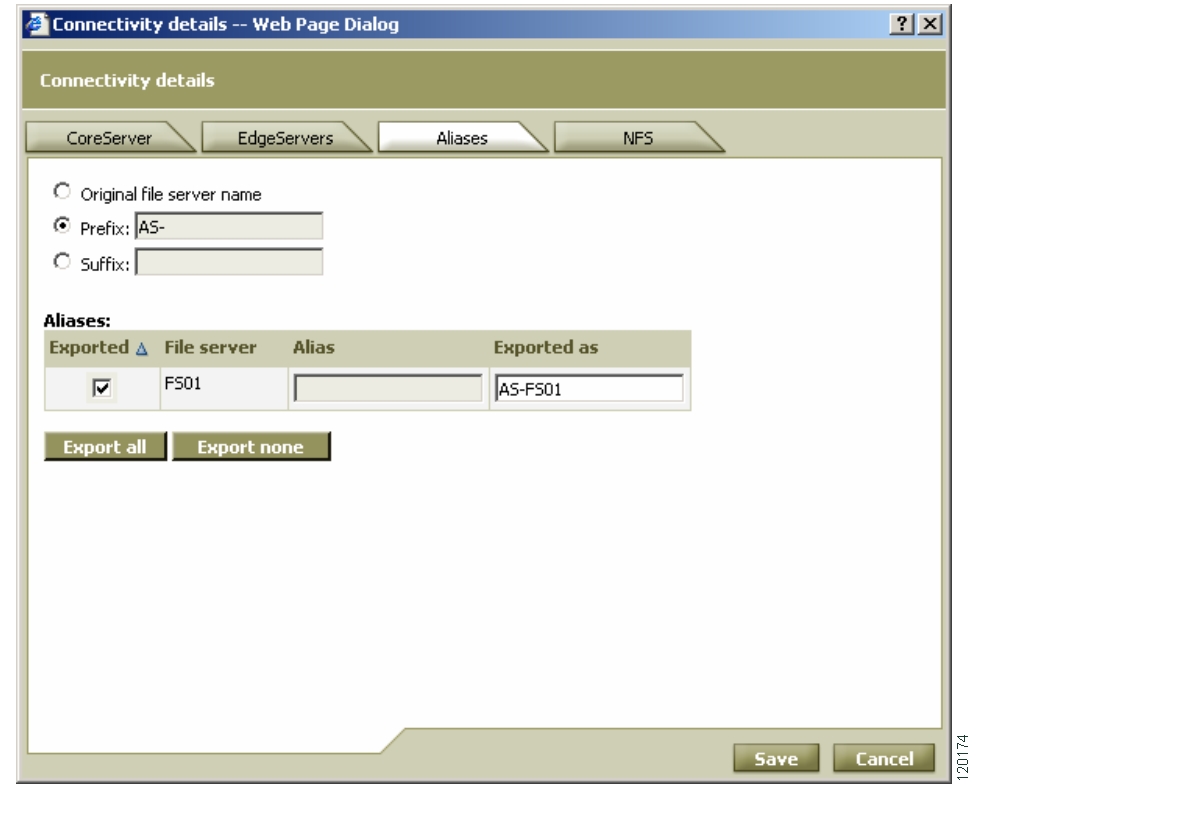
The prefix allows you to give each EdgeServer a unique identifier, thus eliminating name conflicts. The prefix is placed before each exported Windows server name; thus the server named Neptune is seen as AS-Neptune when browsing the network neighborhood (see Figure 7).

Step 6 In the NFS tab, do the following:

a. Check the Is root squash enabled on file servers checkbox.

b. Change the default values (-2) to 60001 in both the UID and GID fields.

Step 7 Click Save to save the new connection. Connection details are displayed on the Connectivity page.

Step 8 Click Distribute to distribute the new connections to the gateways.

Figure 7 Connectivity Details Page—Alias Tab


Defining Coherency Policies

Coherency policies determine the overall coherency between the files in the EdgeServer cache and the files located on the original file server. For more information on defining coherency policies, refer to the Central Management chapter in the ActaStor User's Guide.

Client-to-EdgeServer Connection

The EdgeServer behaves simply as another node on your network. Clients can access it using the same methods used to access NFS or Windows file servers, such as UNC, drive mapping, share mounting, and more.


Note In Windows environments, we recommend that clients map a network drive to the EdgeServer.


Accessing an EdgeServer Using a Mapped Drive

To access the EdgeServer through a mapped drive, follow these steps:


Step 1 Open Windows Explorer.

Step 2 Select Map Network Drive from the Tools menu.

Step 3 In the Drive field, browse to the desired drive letter. On the Neptune server, actona-us is the share. In the Folder field enter \\as-neptune\actona-us, and click OK. Soon you see the selected mapped drive in a new window.


Accessing an EdgeServer Using UNC Pathing

To access the EdgeServer through UNC, follow these steps:


Step 1 Select Run from the Windows Start menu.

Step 2 In the Open field, enter \\as-neptune and click OK. Soon you see a new window open. This window shows the available network shares on Neptune as they are exported through the local EdgeServer.


Mounting a UNIX Shared Directory

To mount a UNIX share, follow these steps:


Step 1 Display the available exported shares on the EdgeServer by entering the following command:
showmount -e ActaStor1.

The naming convention is as follows:
/<CoreServer-name>/<FileServer-name>/<Share-name>.

Step 2 Mount the share by entering the following command:
mount actastor2:/actastor1/Saturn/public /mnt/public

Step 3 Change the directory to the mounted share by entering the following command:
cd /mnt/public


Congratulations - you have connected a client to the EdgeServer. For more information on any aspect of the installation, setup, and configuration process, refer to the ActaStor User's Guide.

Obtaining Technical Assistance

Cisco Technical Support provides 24-hour-a-day, award-winning technical assistance. Cisco has a special technical support team trained to support File Engine products. For assistance, you can contact this team using one of the following numbers:

General: 1 866 282 3068

USA: 1 408 527 6860

EMEA: +32 2 704 56 72

Asia-Pacific: +6 12 8448 7162

You can also contact the File Engine support team using the following e-mail alias:

tac@cisco.com


hometocprevnextglossaryfeedbacksearchhelp

Posted: Fri Jul 22 14:36:36 PDT 2005
All contents are Copyright © 1992--2005 Cisco Systems, Inc. All rights reserved.
Important Notices and Privacy Statement.