|
|

Setup is an installation and configuration program that is copied to your system when you install TrueView management applications for TrueView.
Setup allows you to:
When you install TrueView applications for the first time, check the minimum system requirements in the section "System Requirements" in "About This Guide."
The first time you install applications that run under TrueView, the TrueView management platform is automatically installed from the same disks.
To install TrueView applications:
Step 1 Insert the installation disk.
Step 2 In Program Manager, select the Run command from the File menu.
The Run dialog box is displayed.
Step 3 Type A:\SETUP and click on the OK button.
The TrueView Install dialog box (see Figure 2-1) is displayed.
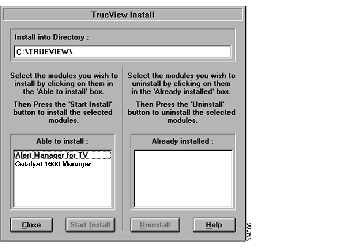
Step 4 In the Install into Directory text box, type the destination directory. If you specify a directory that does not exist, it is created for you.
If you have already installed TrueView management applications, the directory automatically appears in the text box. When you install TrueView applications for the first time, the default directory is TRUEVIEW on the same drive as the Microsoft Windows program files.
Step 5 In the Able to install list box, select the applications that you want to install.
Step 6 To install the applications selected in the Able to install list box, click on the Start Install button.
The Install Confirm dialog box lists the applications that you selected and indicates the amount of disk space required to perform the installation. If there is insufficient disk space to perform the installation, the screen displays a warning and you can choose to continue, or return to the TrueView Install dialog box.
Step 7 To install the applications listed in the Install Confirm dialog box, click on the OK button. To return to the TrueView Install dialog box without installing any applications, click on the Cancel button.
When you continue with the installation, a dialog box displays information about the status of the installation process. To abort the installation, click on the Abort button.
When the installation is complete, the Install option dialog box requests whether Setup should add program items for installed applications to Program Manager.
Step 8 To create a TrueView program group with program items for installed applications, click on the OK button.
When the installation is complete, you are asked whether you want to restart Windows to allow changes to take effect.
Step 9 Click on the Restart Windows button to restart Windows, or the Continue button to continue using Setup.
You must restart Windows for changes to take effect.
Step 10 You are returned to the TrueView Install dialog box. You can install more applications, uninstall applications (see the section "Uninstalling Applications" later in this chapter) or exit Setup.
To exit Setup, click on the Close button.
Setup allows you to change the configuration of installed applications, and delete database information, by running the program from the TrueView program group in Program Manager after installation is complete.
To configure applications using Setup:
Step 1 In Program Manager, double-click on the Setup icon (see Figure 2-2).
The TrueView Configure dialog box is displayed.

Step 2 Select the application you want to configure and click on the Configure button.
The Settings dialog box is displayed. The dialog box allows you to configure the application you selected (see the section "TrueView Settings" later in this chapter).
Step 3 Make your changes to the configuration information.
Step 4 Click on the OK button to return to the TrueView Configure dialog box and save the changes you have made, or click on the Exit button to discard changes. You cannot undo changes that you have made to the database information.
The TrueView Settings dialog box allows you to edit the startup password requested when TrueView starts up. If no password is specified, the user is not required to enter a password to start TrueView.
The Alert Manager Settings dialog box allows you to specify whether Alert Manager is included in TrueView and delete all saved alert data. See Table 2-1.
| Setting | Description |
|---|---|
| Include Alert Manager in TrueView. | Specifies whether Alert Manager is included in TrueView. |
| Delete Alert database. | Deletes all saved alert data. |
The Catalyst 1600 Manager Settings dialog box allows you to specify whether Catalyst 1600 Manager is included in TrueView. See Table 2-2.
| Setting | Description |
|---|---|
| Include Catalyst 1600 Manager in TrueView. | Specifies whether Catalyst 1600 Manager is included in TrueView. |
Setup allows you to install applications that are already installed in the same way as when you first install applications. You can reinstall applications to return the settings to the default values, or to replace old versions with new versions of the software.
When you reinstall applications, the required disk space may not be reported accurately. This is because the program deletes old files and does not attempt to overwrite files that have not changed since the last installation.
When you replace previous versions of applications, Setup displays a dialog box warning you that your existing databases may not be compatible with the new version.
If you experience difficulties running an application after the installation:
Step 1 In Program Manager, double-click on the Setup icon (see Figure 2-2) in the TrueView program group.
Step 2 Select the application you have replaced and click on the Configure button.
Step 3 Click on the Delete database button.
Setup allows you to uninstall applications that you want to remove from your system. When you uninstall an application, the setup program deletes program items in Program Manager that relate to the application, and removes relevant entries in WIN.INI, SYSTEM.INI, and files that relate to the management application.
To uninstall TrueView applications:
Step 1 Insert the disk that you used to install the application you want to remove.
Step 2 In Program Manager, select the Run command from the File menu.
The Run dialog box is displayed.
Step 3 Type A:\SETUP and click on the OK button.
The TrueView Install dialog box is displayed.
Step 4 In the Install into Directory text box, type the location of the installed files to display a list of installed applications in the Already installed list box.
Step 5 In the Already installed list box, select the applications that you want to uninstall. You can only select applications that were installed using the disk that is currently in the floppy drive.
Step 6 Click on the Uninstall button.
The Uninstall Confirm dialog box lists the applications that you have selected, and indicates the amount of disk space to be freed.
Step 7 To uninstall the applications listed in the Uninstall Confirm dialog box, click on the OK button. To return to the TrueView Install dialog box without installing any applications, click on the Cancel button.
When the uninstall process is complete, the Uninstall option dialog box requests whether Setup should delete program items for uninstalled applications from Program Manager.
Step 8 To delete program items for installed applications from the TrueView program group, click on the OK button.
When the uninstall process is complete, you are asked whether you want to restart Windows to allow changes to take effect.
Step 9 Click on the Restart Windows button to restart Windows, or the Continue button to continue.
When you continue, you are returned to the TrueView Install dialog box.
Step 10 To exit Setup, click on the Close button.
|
|