|
|

October 3, 2002
These release notes contain platform and system requirements and instructions for installing and setting up Version 2.0 of the Cisco MPLS Tunnel Builder.
Cisco MPLS Tunnel Builder is a web-based graphical application for configuring and visualizing Multiprotocol Label Switching (MPLS) tunnels as well as viewing performance statistics using the Service Assurance Agent (SAA) on supported Cisco IOS platforms.
For an online copy of these release notes, go to the following URL:
http://www.cisco.com/univercd/cc/td/doc/product/rtrmgmt/tnlbldr/tb2_0/tbreln20.htm
These release notes contain the following sections:
Cisco MPLS Tunnel Builder displays a Traffic Engineering (TE) topology map on the right of the browser window and a series of tabs on the left side. A status message window is provided on the right side at the bottom that displays server and device information messages. The user may interact with the network map using the mouse as well as view information about the nodes, links, and tunnels on the network map using the tabs.
The left side of the browser window consists of the following tabs:
Cisco MPLS Tunnel Builder can be used on any hardware platform that supports MPLS Traffic Engineering (TE). For Version 2.0, these platforms include the following:
The installation of the Cisco MPLS Tunnel Builder Version 2.0 requires that you have at least 90 MB of free disk space.
Disk space requirements for the operation of Tunnel Builder depend on the network size.
The Tunnel Builder server must be running on a web server that can handle Java and provide the Cisco MPLS Tunnel Builder Java applet to a web browser. For Tunnel Builder Version 2.0, the Tunnel Builder server can run on the following:
For Cisco MPLS Tunnel Builder Version 2.0, the Tunnel Builder client can run on the following:
Cisco MPLS Tunnel Builder Version 2.0 requires one of the following web browsers and the Java Plug-in specified below:
Windows 2000 and Windows NT—If you are using Netscape Version 4.7, you need to install the Java Plug-in Version 1.3 before running Tunnel Builder.
Solaris—If you run the Solaris Version 2.8 client, use the Netscape browser Version 4.79 with the Java Plug-in Version 1.3.1.01. In the .cshrc file, set the plugin path. For example:
setenv NPX_PLUGIN_PATH=~java/j2rel_3_1_01/plugin/sparc/ns4
export NPX_PLUGIN_PATH=~java/j2rel_3_1_01/plugin/sparc/ns4
The Tunnel Builder application supports devices running the following Cisco IOS releases:
 |
Note Before you download theTunnel Builder kit, make sure you have your licence key and Right to Use document from your Cisco representative or product manager. |
 |
Note If you are interested in an evaluation kit, make sure that you have a license key from your Cisco representative or product manager before you download the files. |
To download the Tunnel Builder images and readme file, perform the following steps.
Step 1 For the Cisco MPLS Tunnel Builder product kit, enter the following URL:
http://www.cisco.com/cgi-bin/tablebuild.pl/tb
For an evaluation kit, enter the following URL:
http://www.cisco.com/pcgi-bin/tablebuild.pl/tb-eval
If you are a Cisco registered customer, you can get an evaluation kit by entering this URL:
http://www.cisco.com/cgi-bin/tablebuild.pl/tb-eval
Step 2 Select a file. On the next screen, read the Software License agreement and download the file.
For the Tunnel Builder product or evaluation kit download the following files, one at a time, where the x represents the version build number:
 |
Note The evaluation kit names start with tb-2.0.x.y- where x = 1 and y = .024. |
Now you ready to copy your files to the web server doc directory.
This section includes the following topics:
To install and start the Tunnel Builder application on Solaris systems, perform the following steps:
Step 1 Copy the tb-2.0.x-kit-sol.tar and tb-2.0.x-setup-sol.sh files to a temporary directory or a directory under your web server doc directory in which you plan to install the application, for example, /scratch/suitespot/docs/TunnelBuilder.
Step 2 Make sure that you can execute the tb-2.0.x-setup-sol.sh script:
chmod 755 tb-2.0.x-setup-sol.sh
The x completes the version number. For example, the version number might be 2.0.1.
Step 3 Log in as root.
$ su root

password: <password>
Step 4 Run the tb-2.0.x-setup-sol.sh file.
web-server-doc-dir% ./tb-2.0.x-setup-sol.sh
The setup file, tb-2.0.x-setup-sol.sh, runs a script that asks you where you want to locate the Cisco MPLS Tunnel Builder files. Enter the full path of your web server doc directory.
Where (in what directory) would you like the Tunnel Builder client and server to be
installed?

/scratch/suitespot/docs/TunnelBuilder
After the Cisco MPLS Tunnel Builder files are copied and installed, you are asked to enter a license key and configure several options, as follows:
Please enter the license key
license-key
 |
Note Enter none in response to the following prompt. |
Please enter (eval) for evaluation version of BRG, (perm) for permanent version of BRG, or
(none) for Non-BRG version.
None


What port would you like to use for the Tunnel Builder client and server communication?
[7271]

Would you like to receive SNMP trap notification of links and tunnels changing status?
[no]

What port would you like to use for receiving UDP datagrams? [162]
 |
Note If port 162 conflicts with other network management options, then enter another port number. Port 162 is the standard port for UDP communication. |
What SNMP community string would you like to use? [public]

Would you like to run the Tunnel Builder server in debug mode? [no]

Would you like to enable logging of Tunnel Builder commands and logging of commands sent
to the router? [no]
Step 5 When the installation script is complete, you are asked if you want to run the server automatically.
To start the server manually, you execute a startTopoServer command from your web server doc directory.
cd /scratch/suitespot/docs/TunnelBuilder/serverkit

web-server-doc-dir% ./startTopoServer
Step 6 To start the Tunnel Builder application, use your web browser to find and select the ServerControl.html file, for example, http://< server-host-name>/TunnelBuilder/clientkit/ServerControl.html.
To access the Tunnel Builder application from your laptop, use your web browser to find and select the ServerControlLaptop.html file, for example, http://< server-host-name>/TunnelBuilder/clientkit/ServerControlLaptop.html.
 |
Note If you have not previously downloaded and installed the Java Plug-in Version 1.3, you may be prompted to do so at this point. |
The Tunnel Builder application is displayed in your browser window.
Step 7 To access Cisco MPLS Tunnel Builder online help, click the Help button.
To install and start the Tunnel Builder application on Microsoft Windows NT or Windows 2000 systems, perform the following steps:
Step 1 Copy the tb-2.0.x-setup-win32.exe file to a directory on your Windows NT or Windows 2000 system.
Step 2 Double-click the tb-2.0.x-setup-win32.exe file to install the Cisco MPLS Tunnel Builder application. The x completes the version number. For example, the version number might be 2.0.1.
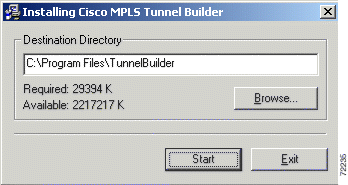
The Installing Cisco MPLS Tunnel Builder dialog box appears (see Figure 1). You can choose to install the application in the default location C:\Program Files\TunnelBuilder or click Browse to set up an alternate destination directory for Tunnel Builder.
 |
Note If you are not running the browser and the Tunnel Builder server on the same machine, then install Tunnel Builder in your web server's document directory. |
Click Start to continue the installation. After the Tunnel Builder files are copied to your directory, an Installing Cisco MPLS Tunnel Builder dialog box appears (see Figure 2).
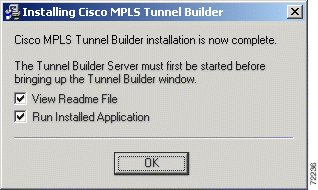
Step 3 Check either, both, or neither of the following: View Readme File or Run Installed Application. If you check both and click OK, the following occurs:
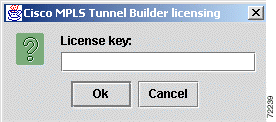
Step 4 Enter your License key in the space provided and click OK. The Cisco MPLS Tunnel Builder Server configuration dialog box appears.
Step 5 In the Cisco MPLS Tunnel Builder Server configuration dialog box:
 |
Note If port 162 conflicts with other network management options, then enter another port number. Port 162 is the standard port for UDP communication. |
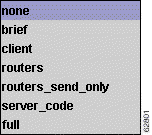
After making your choices, click OK. The installation creates a TBConfig.txt file that contains your choices. An HTML file that sets up communication between the Cisco MPLS Tunnel Builder server and client is also updated with the port numbers to use for communications.
Step 6 If you did not start the Tunnel Builder server during the installation, choose Start > Programs > TunnelBuilder > start Tunnel Builder Server to start the Tunnel Builder server. Figure 5 shows an example of the Tunnel Builder server execution commands.
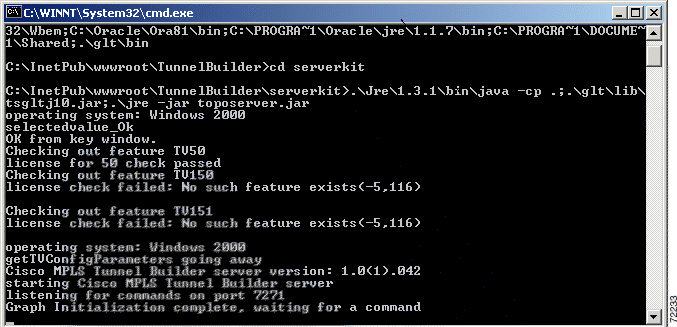
The Tunnel Builder Server configuration dialog box appears if you did not already start the Tunnel Builder server during installation.
Step 7 Choose Start > Programs > TunnelBuilder > Tunnel Builder Window to start the Tunnel Builder application in your browser window.
Step 8 To access Tunnel Builder online help, click the Help button.
To uninstall Cisco MPLS Tunnel Builder, perform the following steps:
Step 1 Choose Start > Programs > TunnelBuilder > Uninstall. You are asked to verify that you want to uninstall Cisco MPLS Tunnel Builder (see Figure 6).
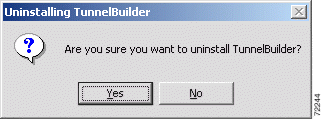
Step 2 Click Yes if you want to uninstall Cisco MPLS Tunnel Builder. The Uninstalling TunnelBuilder window appears (see Figure 7).
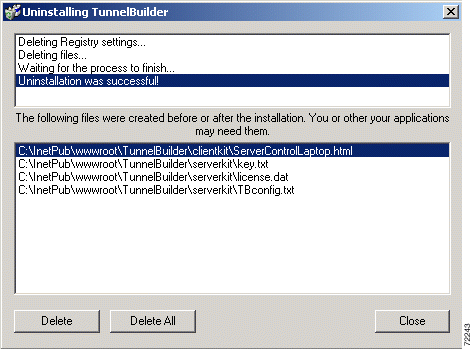
Step 3 Select the HTML files and the TBConfig.txt files. Click Delete. If you have added seed routers and want to save them, do not select them, and do not click Delete All.
 |
Note If you are reinstalling the Cisco MPLS Tunnel Builder application, make sure that you remove the TBConfig.txt file. Otherwise, the reinstallation does not update the HTML file with the correct ports for server and client communication. |
Step 4 Click Close to exit from the Uninstalling Tunnel Builder window.
You need to reinstall the Cisco MPLS Tunnel Builder software to do any of the following upgrades:
This section describes the features for Cisco MPLS Tunnel Builder Version 2.0. The Tunnel Builder application includes a network map and features for managing tunnels as well as for managing links and devices. Specific features are described in the following sections:
The network map includes topologies based on Multiprotocol Label Switching (MPLS) and the Cisco Discovery Protocol (CDP). The network map also contains tunnel information obtained directly from each device through MPLS or CDP. When a network map is generated, the Tunnel Builder application obtains all the MPLS information, CDP information, traffic engineering (TE) information, and device configuration by directly accessing the devices. Cached data for this information can also be accessed from the server.
The Tunnel Builder application references network maps based on a seed router. The seed router provides the MPLS-based topology information and is the device through which the search for CDP neighbors begins. The Tunnel Builder application maintains a list of known seed routers. You can add or delete seed routers from the Seed Routers List.
The Tunnel Builder application generates a list of network nodes and links based on the MPLS topology read from the seed router. Based on the generated list, the Tunnel Builder application accesses each device to read device configuration information. Using the gathered information, the Tunnel Builder application can manage the devices, links, and MPLS TE tunnels that make up the network map.
The Tunnel Builder map contains network nodes and links found by CDP. The Tunnel Builder application accesses these devices to obtain and manage the device's configuration information. If the devices are not running CDP, the network map includes only those devices listed in the MPLS topology information.
You can view these subsets of the network topology:
The network topology is read any time that a new seed router is specified and you request a map. You can also request an update to the map for a given seed router. You can update the map with the present seed router by clicking Fetch from Network. After specifying a new seed router, you can update the map by clicking either Fetch button.
Most of Tunnel Builder features described in the following section relate to the configuration of a single device. However, the Tunnel Builder application provides as much information as it can about all devices in the network map. The following features allow you to manage devices.
The Tunnel Builder application gathers and displays the following configuration information about each device in the network map:
The Tunnel Builder application provides you with a list of MPLS tunnels headed by a specific device.
The Tunnel Builder application allows you to save changes to the configuration information of the device and write the current running configuration into nonvolatile memory. You accomplish this by clicking "Commit changes" in the Setup tab.
The following features of the Tunnel Builder application allow you to monitor links.
The Tunnel Builder application gathers and displays the following information about the interfaces for each link in the network map:
The Tunnel Builder application provides timely notification to the user of interface up or interface down events that affect any of the links in a network map.
The Tunnel Builder application supplies bandwidth information (allocated, global pool, and subpool numbers) on a per-priority basis for every link in the network. The application reads this information from the output of the show mpls traffic topology command. The bandwidth information is accurate as of the last Interior Gateway Protocol (IGP) update that occurred on the network.
The IGP update process is completely separate from the Tunnel Builder application and any Tunnel Builder map updates that occurs. The time between IGP updates is determined by a router configuration setting and by a router threshold that is triggered when a tunnel tries to come up, but does not have the bandwidth.
The Tunnel Builder application provides an update button that causes the Tunnel Builder server to go out to the seed router, get the MPLS topology, and update the bandwidth information for every link in the map. This button allows you to get bandwidth information that is accurate as of the last IGP update.
The following features of the Tunnel Builder application allow you to manage tunnels.
The Tunnel Builder application gathers and displays the following configuration information about the MPLS tunnels found in a network map:
The Tunnel Builder application provides you with timely notification of a link up or link down event that affects any tunnels in a network map.
You can create MPLS tunnels with a wide variety of configurations with the Tunnel Builder application. You must use the following configuration parameters:
Using the parameters described below, you can create one or more identically configured tunnels.
 |
Note The maximum number of tunnels that you can create in a batch depends upon Cisco IOS support for the platform as a tunnel head or midpoint. For details, see MPLS Traffic Engineering (TE) —Scalability Enhancements. |
A tunnel may have more than one path option. Path options are numbered. The lowest numbered option is used first, if available.You can specify the following types of path options with the Tunnel Builder application:
The settings for the following MPLS tunnel parameters are optional. If you do not specify a value for these parameters, the default values are used.
To direct traffic into an MPLS tunnel with the Tunnel Builder application, you create a tunnel with autoroute enabled. Traffic can also be directed into an MPLS tunnel by defining a static route on the head device. You can create and delete static routes from the Nodes tab.
You can modify the following parameters for a specified tunnel using the Tunnel Builder application:
You can use the Tunnel Builder application to delete an existing tunnel based on the head device and tunnel number. You can select multiple tunnels for deletion in a single operation.
 |
Note When a tunnel is deleted that uses an explicit path, the explicit path is not automatically removed. When a tunnel is deleted that uses a static route, the static route is not automatically removed. |
You can define an explicit path on a specified device using the Tunnel Builder application. You can use explicit paths in conjunction with defining the path options of an MPLS tunnel.
To create an explicit path, you must specify the following information:
The Tunnel Builder application provides information about the bandwidth available along with an explicit path. The bandwidth available on an explicit path is equal to the bandwidth available on the link within the explicit path that has the least available bandwidth.
You can delete an existing explicit path on a specified device based on the explicit path name.
The Cisco MPLS Tunnel Builder application provides means to ensure security when accessing routers. The application uses a combination of a user name, login password, and enable password to authenticate a user on a selected seed router (see Figure 8). Tunnel Builder uses the user name, password, and enable password combination that you entered as the default authentication information for all other routers in the network map. All routers are accessed using the same user name. If a router does not require a user name when you log in, then the user name is not sent to the router. However, the server uses the user name for client identification.
You are allowed to use different login and enable passwords on different routers through the use of a separate password file. This password file contains one line for each router using any passwords that are different from those in the default authentication information. You have the option of creating this password file when you access the Tunnel Builder application. Figure 8 shows the Authentication dialog box for the seed router that contains a Create password file check box.
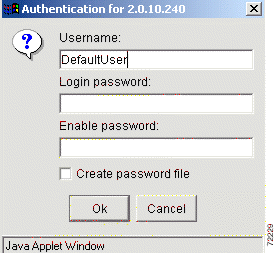
To create a password file, check the Create password file check box. The Create Password File dialog box appears for the seed router for the username (see Figure 9).
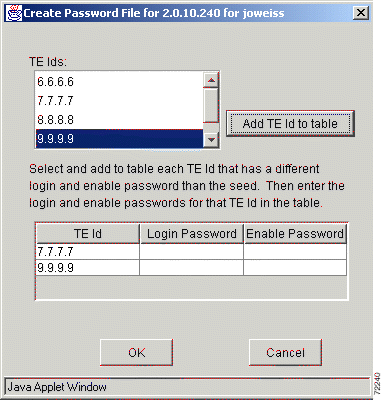
The routers are defined in the password file using their TE Ids. You can select and add a TE Id and enter its associated login password and enable password in the Create Password File dialog box. The format of the file is as follows:
#comment - the passwords for node 2.2.2.2
TEId:2.2.2.2:password:red:enablepw:blue
# the passwords for node 3.3.3.3
TEId:3.3.3.3:password:yellow:enablepw:green
# this router uses the same enable password as the default
TEId:4.4.4.4:password:brown
# if the router requires a null password
TEId:5.5.5.5:password::enablepw:gray
The password file uses the filename username_1_2_3_4.txt, where username is the user name and 1.2.3.4 is the IP address of the seed router.
The Tunnel Builder server performs this authentication process and returns a message to the Tunnel Builder client indicating if the authentication was successful or not. Only users that are successfully authenticated are allowed to fetch the MPLS and CDP topologies to construct a network map.
When you perform a command that changes the configuration of a router, for example, create tunnel, modify tunnel, delete tunnel, modify link, and start rtr, Tunnel Builder uses your authentication information and the additional passwords found in the password file to make the change. If another user performs a fetch from server on the same seed router, they are authenticated and receive the cached network map that was actually read from the network using the first user's authentication information and password file.
You cannot make changes to a router without having valid password information.
To install Cisco MPLS Tunnel Builder Version 1,0, you must enter an authorized license key. This license key is specified on your Right to Use document included in your product. This license key authorizes a maximum number of traffic engineering (TE)-enabled routers in the TE topology for any single seed router, dependent on your order.
On Windows systems, the first time the server is started after the installation completes, the application displays a Cisco MPLS Tunnel Builder licensing dialog box. After you enter your license key in this dialog box and click OK, the application creates a license.dat file. If a license.dat file exists in the server kit directory, you do not get the dialog box to enter the license key.
On Solaris systems, the application prompts you for a license key during setup.
Once you approach the limit of the license, you are notified by a message, like the following:
Number of TE routers (xxx) in the 1.2.3.4 network exceeds the number allowed by your
Tunnel Builder license (yyy). Please contact your administrator.
Where:
You can choose to upgrade the maximum number of TE-enabled routers supported for any single seed router in Tunnel Builder. You will need a new Right to Use document and a new authorized license key(s) for each level through which you upgrade.
Right to Use documents and authorized license keys are available for the following levels:
The Tunnel Builder online help system uses your default web browser. Supported browsers are Netscape Navigator (Version 4.5 or later) and Internet Explorer (Version 5 or later).
You must install the Java Plug-in Version 1.3 before attempting to run the Cisco MPLS Tunnel Builder Version 2.0 client on a Microsoft Windows machine using the Netscape Communicator Version 4.7 browser. Alternatively, you can use the Netscape Version 4.5 browser or Internet Explorer Version 6.0 browser where you are prompted to download Java Plug-in Version 1.3, if it is not already installed.
Displaying a topology map with a large number of nodes makes the map less readable. You can use the "+" button to zoom in on specific areas of the map for a more readable view.
Caveats describe unexpected behavior in Cisco MPLS Tunnel Builder software releases. Severity 1 caveats are the most serious; severity 2 caveats are less serious. Severity 3 caveats are moderate caveats, and only selected severity 3 caveats are included in the caveats document.
This section contains open and resolved caveats for the current Cisco MPLS Tunnel Builder release.
This section describes possibly unexpected behavior by Cisco MPLS Tunnel Builder Version 2.0. This section describes only severity 1, severity 2 and selected severity 3 caveats.
Error:Interface 0.0.0.0 not found in topology for seed 172.27.232.160
These sections explain how to obtain documentation from Cisco Systems.
You can access the most current Cisco documentation on the World Wide Web at this URL:
Translated documentation is available at this URL:
http://www.cisco.com/public/countries_languages.shtml
Cisco documentation and additional literature are available in a Cisco Documentation CD-ROM package. The Documentation CD-ROM is updated monthly and may be more current than printed documentation. The CD-ROM package is available as a single unit or through an annual subscription.
You can order Cisco documentation in these ways:
You can submit comments electronically on Cisco.com. In the Cisco Documentation home page, click the Fax or Email option in the "Leave Feedback" section at the bottom of the page.
You can e-mail your comments to bug-doc@cisco.com.
You can submit your comments by mail by using the response card behind the front cover of your document or by writing to the following address:
Cisco Systems
Attn: Document Resource Connection
170 West Tasman Drive
San Jose, CA 95134-9883
We appreciate your comments.
Cisco provides Cisco.com as a starting point for all technical assistance. Customers and partners can obtain online documentation, troubleshooting tips, and sample configurations from online tools by using the Cisco Technical Assistance Center (TAC) Web Site. Cisco.com registered users have complete access to the technical support resources on the Cisco TAC Web Site.
Cisco.com is the foundation of a suite of interactive, networked services that provides immediate, open access to Cisco information, networking solutions, services, programs, and resources at any time, from anywhere in the world.
Cisco.com is a highly integrated Internet application and a powerful, easy-to-use tool that provides a broad range of features and services to help you with these tasks:
If you want to obtain customized information and service, you can self-register on Cisco.com. To access Cisco.com, go to this URL:
The Cisco Technical Assistance Center (TAC) is available to all customers who need technical assistance with a Cisco product, technology, or solution. Two levels of support are available: the Cisco TAC Web Site and the Cisco TAC Escalation Center.
Cisco TAC inquiries are categorized according to the urgency of the issue:
The Cisco TAC resource that you choose is based on the priority of the problem and the conditions of service contracts, when applicable.
You can use the Cisco TAC Web Site to resolve P3 and P4 issues yourself, saving both cost and time. The site provides around-the-clock access to online tools, knowledge bases, and software. To access the Cisco TAC Web Site, go to this URL:
All customers, partners, and resellers who have a valid Cisco service contract have complete access to the technical support resources on the Cisco TAC Web Site. The Cisco TAC Web Site requires a Cisco.com login ID and password. If you have a valid service contract but do not have a login ID or password, go to this URL to register:
http://www.cisco.com/register/
If you are a Cisco.com registered user, and you cannot resolve your technical issues by using the Cisco TAC Web Site, you can open a case online by using the TAC Case Open tool at this URL:
http://www.cisco.com/tac/caseopen
If you have Internet access, we recommend that you open P3 and P4 cases through the Cisco TAC Web Site.
The Cisco TAC Escalation Center addresses priority level 1 or priority level 2 issues. These classifications are assigned when severe network degradation significantly impacts business operations. When you contact the TAC Escalation Center with a P1 or P2 problem, a Cisco TAC engineer automatically opens a case.
To obtain a directory of toll-free Cisco TAC telephone numbers for your country, go to this URL:
http://www.cisco.com/warp/public/687/Directory/DirTAC.shtml
Before calling, please check with your network operations center to determine the level of Cisco support services to which your company is entitled: for example, SMARTnet, SMARTnet Onsite, or Network Supported Accounts (NSA). When you call the center, please have available your service agreement number and your product serial number.

Copyright © 2002, Cisco Systems, Inc.
All rights reserved.
![]()
![]()
![]()
![]()
![]()
![]()
![]()
![]()
Posted: Thu Oct 3 13:27:17 PDT 2002
All contents are Copyright © 1992--2002 Cisco Systems, Inc. All rights reserved.
Important Notices and Privacy Statement.