|
|

This document describes how to connect and configure Cisco 9100 Series LAN/WAN SwitchProbe devices. These devices are available in four models, and each includes a half-duplex 10/100 BaseTX interface for monitoring a LAN switch port. Depending on the model purchased, the LAN/WAN SwitchProbes include one of the following interfaces:
 |
Note When the IMUX is connected, no other monitoring interfaces on the SwitchProbe device can be used. |
Each WAN interface can monitor traffic of each learned (or configured) DLCI. The device can monitor up to 255 DLCIs aggregated from all interfaces of the device (for example, interface 1—100 DLCIs, interface two—20 DLCIs, interface 3—123 DLCIs, and interface 4—12 DLCIs).
This document includes the following sections:
This document uses the following conventions:
| Item | Convention |
|---|---|
Commands and keywords | boldface font |
Variables for which you supply values | italic font |
Displayed session and system information | screen font
|
Information you enter | boldface screen font
|
Variables you enter | italic screen font
|
Menu items and button names | boldface font |
|
Note Means reader take note. Notes contain helpful suggestions or references to material not covered in the publication. |
 |
Caution Means reader be careful. In this situation, you might do something that could result in loss of data. |
 |
Tip Means this information might help you solve a problem. |
 |
Warning This warning symbol means danger. You are in a situation that could cause bodily injury. Before you work on any equipment, you must be aware of the hazards involved with electrical circuitry and familiar with standard practices for preventing accidents. To see translated versions of the warnings, refer to the translated safety warnings appendix in the Cisco SwitchProbe Installation and Configuration Guide. |
Cisco LAN/WAN SwitchProbe devices are designed to operate in a standard office environment and can be placed on a table or mounted in an equipment rack near the network segment it serves. The site must be equipped with the following:
|
Warning This product relies on the building's installation for short-circuit (overcurrent) protection. Ensure that a fuse or circuit breaker no larger than 120 VAC, 15A U.S. (240 VAC, 10A international) is used on the phase conductors (all current-carrying conductors). |
|
Note EIA/TIA-232 and EIA/TIA-449 were known as recommended standards RS-232 and RS-449 before their acceptance as standards by the Electronics Industries Association (EIA) and Telecommunications Industry Association (TIA). |
Before beginning the installation process, read the following installation cautions and warnings:
|
Note To see the warnings in multiple languages, see the appendix "Translated Safety Warnings" in the Cisco SwitchProbe Installation and Configuration Guide. |
|
Warning The safety cover is an integral part of the product. Do not operate the unit without the safety cover installed. Operating the unit without the cover in place will invalidate the safety approvals and pose a risk of fire and electrical hazards. |
|
Warning Read the installation instructions before you connect the system to its power source. |
|
Warning Only trained and qualified personnel should be allowed to install, replace, or service this equipment. |
|
Warning This equipment is to be installed and maintained by service personnel only as defined by AS/NZS 3260 Clause 1.2.14.3 Service Personnel. |
|
Warning Ultimate disposal of this product should be handled according to all national laws and regulations. |
|
Warning The device is designed to work with TN power systems. |
|
Warning Before opening the chassis, disconnect the telephone-network cables to avoid contact with telephone-network voltages. |
|
Warning Before working on a system that has an on/off switch, turn OFF the power and unplug the power cord. |
|
Warning Before working on equipment that is connected to power lines, remove jewelry (including rings, necklaces and watches). Metal objects will heat up when connected to power and ground and can cause serious burns or weld the metal object to the terminals. |
|
Warning To prevent bodily injury when mounting or servicing this unit in a rack, you must take special precautions to ensure that the system remains stable. The following guidelines are provided to ensure your safety: |
|
Warning This product relies on the building's installation for short-circuit (overcurrent) protection. Ensure that a fuse or circuit breaker no larger than 120 VAC, 15A U.S. (240 VAC, 10A international) is used on the phase conductors (all current-carrying conductors). |
|
Warning Never defeat the ground conductor or operate the equipment in the absence of a suitably installed ground conductor. Contact the appropriate electrical inspection authority or an electrician if you are uncertain that suitable grounding is available. |
|
Warning To prevent the device from overheating, do not operate it in an area that exceeds the maximum recommended ambient temperature of 104° F (40° C). To prevent airflow restriction, allow at least 3 inches (7.6 cm) of clearance around the ventilation openings. |
|
Warning Do not work on the system or connect or disconnect cables during periods of lightning activity. |
|
Warning Blank faceplates and cover panels serve three important functions: they prevent exposure to hazardous voltages and currents inside the chassis; they contain electromagnetic interference (EMI) that might disrupt other equipment; and they direct the flow of cooling air through the chassis. Do not operate the system unless all cards, faceplates, front covers, and rear covers are in place. |
|
Warning This unit is intended for installation in restricted access areas. A restricted access area is where access can only be gained by service personnel through the use of a special tool, lock and key, or other means of security, and is controlled by the authority responsible for the location. |
|
Warning To reduce the risk of fire, use only No. 26 AWG or larger telecommunication line cord. |
Before unpacking the shipping carton, ensure that there is no visible damage to the carton. If there is damage, notify the carrier representative, and arrange for a representative to be present while you unpack the carton.
After opening the shipping carton and removing the unit, inspect it for any obvious damage that might have occurred during shipment. If any damage is present, file a claim with the carrier.
Inspect the shipping carton contents and verify that you have received:
This section describes the physical features of the LAN/WAN SwitchProbe devices.
|
Note Before connecting the device to the network, you must configure it with an IP address, subnet mask, and default gateway address. For more information, see the chapter "Initializing a SwitchProbe Device" in the Cisco SwitchProbe Installation and Configuration Guide. To connect this device to the network, see "Connecti ng LAN/WAN SwitchProbe Devices to a Network Segment" in this document. |
The following Cisco LAN/WAN SwitchProbe devices are available:
| This Device Type... | Monitors These Types of Segments |
|---|---|
T1/E1 WAN single-interface | |
DS-3 Frame | DS-3 Frame and Ethernet or Fast Ethernet |
The LAN/WAN SwitchProbe device is housed in a front-access chassis that measures 17 inches wide, by 18 inches deep, by 5.25 inches high (43.18cm wide by 45.72cm deep by 13.34cm high). You can mount this device in a 19-inch equipment rack.
For instructions on mounting the device in a rack, see "Installing SwitchProbe Devices in an Equipment Rack".
The following sections describe each area of the LAN/WAN SwitchProbe device:
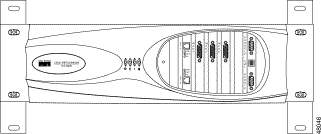
Figure 1 shows the front panel of the LAN/WAN SwitchProbe device.

The following sections describe the elements on the front panel of the LAN/WAN SwitchProbe device:
Table 1 describes the LEDs on the chassis front panel.
| LED Symbol | LED Name | LED Color | Status | Meaning |
|---|---|---|---|---|
| POWER | Green | On | Proper power is being supplied to the device. This LED is normally on. |
Off | Proper power is not being supplied to the device. | |||
| FAULT | Red | On or | Hardware or software error in the device. |
Off | Device is working properly. | |||
| DIAG | N/A | N/A | Reserved for future diagnostic use. |
| ACTIVITY | Amber | On | Heavy network traffic. |
Blinking | Moderate network traffic. | |||
Off | No network traffic. |
There is a small pin hole (Figure 1) to the right of chassis LEDs that provides access to the manual reset button. To manually reboot the device, insert a small object such as the tip of a pen, and push inward. A slight press of the manual reset button reboots the device.
|
Note When you reset a SwitchProbe device, all counters are cleared to
zero. Any changes you made to the device settings (using the Agent
Configuration Utility) since the previous reset take effect. You can also reset the device using the Reset Agent option of the Agent Configuration Utility. For more information about this option, see the chapter "Initializing a SwitchProbe Device" in the Cisco SwitchProbe Installation and Configuration Guide. |
The following sections describe the interfaces on the LAN/WAN SwitchProbe devices:
|
Warning To avoid electric shock, do not connect safety extra-low voltage (SELV) circuits to telephone-network voltage (TNV) circuits. LAN ports contain SELV circuits, and WAN ports contain TNV circuits. Some LAN and WAN ports both use RJ-45 connectors. Use caution when connecting cables. |
LAN/WAN SwitchProbe devices contain the following two network interface cards (NICs).
|
Note The interface location is a logical representation, not always the physical slot location in the chassis. |
Ethernet and Fast Ethernet NICs (Interfaces 1 and 3)
The default mode of interface 1 (manage) allows the SwitchProbe device to communicate on the network. You can change the mode of the Ethernet interface using the Agent Configuration Utility.
|
Note To ensure optimum performance, it is recommended that you maintain the interface in manage mode. |
The dual-interface Fast Ethernet network interface card (located in the slot second from the left) contains two interfaces:
Interface 1 is designed to communicate with the TrafficDirector application in manage mode, but you can configure the interface to simultaneously track network traffic and communicate with the TrafficDirector application in manage and monitor mode.
|
Note The 10/100 interface can be used to monitor a half-duplex Ethernet or Fast Ethernet segment only. |
For information about configuring network interfaces, see the chapter "Configuring SwitchProbe Devices" in the Cisco SwitchProbe Installation and Configuration Guide.
For information about the Agent Configuration Utility, see:
Additional NICs (Interface 4, 5, and 6)
There might be additional interfaces in your device, depending on the model:
The Peripheral Controller Card (PCC), in the far right slot, has these external components:
Remote (SLIP) Port
This 9-pin, male, D-type connector supports RS-232 signals.
Table 2 shows the console and remote port specifications.
| Port Setting | Specification |
|---|---|
Line rate | 9600 bps (default) |
Line code | ASYNC |
Line interface | EIA/TIA-232 |
No. of bits | 8 |
No. of stop bits | 1 |
Parity | None |
You can only use the remote port to exchange management data to and from an attached device such as a management station or a modem. You must configure the remote port to manage mode. You can use the remote port as the secondary management port if communication with the primary management port is lost.
|
Note You cannot use the remote port to monitor a network segment. |
To adjust the baud rate of the remote port, see the chapter "Physical Description" in the Cisco SwitchProbe Installation and Configuration Guide.
Console (Configuration) Port
The port has a 9-pin male, D-type connector that supports RS-232 signals. When you configure the device (set IP address, gateway address, network mask, and so on) using an ASCII terminal, you must connect that terminal to this port. For more information about configuring the device using an ASCII terminal, see the chapter "Initializing a SwitchProbe Device" in the Cisco SwitchProbe Installation and Configuration Guide.
|
Note You cannot use the console port to monitor a network segment. |
Use the null-modem cable to connect the console port to the ASCII terminal. For a sample wiring diagram, see the appendix "Cable Pinouts" in the Cisco SwitchProbe Installation and Configuration Guide.
|
Note EIA/TIA-232 and EIA/TIA-530 were known as recommended standards RS-232 and RS-530 before acceptance as standards by the Electronic Industries Association (EIA) and Telecommunications Industry Association (TIA). |

DIP Switches (SW1)
Use the configurable DIP switches (labeled SW1) between the console and remote ports to adjust the baud rate of the console port and set the boot mode of the device.
Table 3 shows the DIP switch settings.
| Switch | Setting | Result |
|---|---|---|
1 | Off (default) | Boot from flash memory. |
2 | Off (default) | Reserved. |
3, 4 | 3 = off | Console port = 1200 bps. |
3 = off | Console port = 2400 bps. | |
3 = on (default) | Console port = 9600 bps. | |
3 = on | Console port = 19200 bps. |
|
Note Cisco SwitchProbe devices ship with the latest version of agent
firmware loaded in both EPROM and flash memory. If an updated
version becomes available, you might need to upgrade the agent
firmware. For information about updating the firmware, see the
chapter "Configuring SwitchProbe Devices" in the Cisco
SwitchProbe Installation and Configuration Guide. Because SwitchProbe devices boot from flash memory by default, all upgraded agent firmware is written to flash memory. Regardless of any upgrades, the factory-installed, original version of agent firmware remains in the EPROM. Therefore, if a firmware upgrade fails, you can force the device to boot from the EPROM by setting DIP switch 1 to on. The agent will boot from the EPROM and use the original version of firmware. If the flash becomes corrupted, the agent automatically boots from EPROM, regardless of the setting of DIP switch 1. |
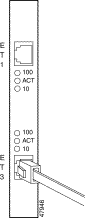
Table 4 describes the LEDs on the Ethernet interface.
| LED Position | LED Color | Status | Meaning |
|---|---|---|---|
100 | Green | On | Port is active and monitoring a 100 Mbps Fast Ethernet network. |
ACT | Amber | On | Heavy traffic on the network. |
10 | Green | On | Port is active and monitoring a 10 Mbps Ethernet network. |
Figure 2 shows the Ethernet interface LEDs.

Figure 3 shows the rear panel of a LAN/WAN SwitchProbe device.
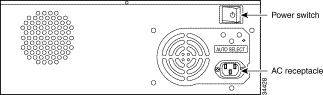
The power switch is on the upper right of the rear panel of the device.
|
Caution To avoid damaging the device, you cannot turn the power off for four seconds after you turn the power on. |
The power socket is located on the lower right rear panel of the LAN/WAN SwitchProbe device. The power socket has three metal prongs.
Each LAN/WAN SwitchProbe device is equipped with an AC power cord for connection to an appropriate power source. To connect the device to a power source, see "Connecting a LAN/WAN SwitchProbe Device to a Power Source".
|
Note The power supply automatically adjusts to the applied voltage. There is no switch to change input voltage if the device is moved from the United States to Europe. |
The T1/E1 WAN single-interface device (Figure 4) contains two network interface cards and a PCC card.

Table 5 describes the interfaces of the T1/E1 WAN single-interface SwitchProbe device.
| Interface Number | Interface Type | Connection Type | Interface Mode |
|---|---|---|---|
1 | Ethernet/Fast Ethernet (auto-sensing) | Unshielded twisted pair (RJ-45). | Manage |
2 | Serial | Remote (DB-9) port. | Manage |
3 | Ethernet/Fast Ethernet (auto-sensing) | Unshielded twisted pair (RJ-45). | Monitor |
4 | WAN | DB-26 port supports connections to RS-449, V.35, X.21, and EIA-530 using an adapter cable and a multi-interface T1/E1 WAN tap. | Monitor |
To connect this device to the network, see "Making Connections to a WAN Interface" and "Connecting a LAN/WAN SwitchProbe Device to a Power Source".
The T1/E1 WAN dual-interface device (Figure 5) contains three network interface cards and a PCC card.
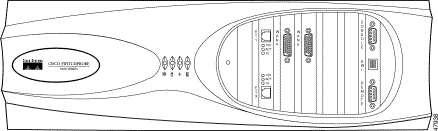
Table 6 describes the interfaces of the T1/E1 WAN dual-interface SwitchProbe device.
| Interface Number | Interface Type | Connection Type | Interface Mode |
|---|---|---|---|
1 | Ethernet/Fast Ethernet (auto-sensing) | Unshielded twisted pair (RJ-45). | Manage |
2 | Serial | Remote DB-9 port. | Manage |
3 | Ethernet/Fast Ethernet (auto-sensing) | Unshielded twisted pair (RJ-45). | Monitor |
4, 5 | WAN | DB-26 port supports connections to RS-449, V.35, X.21, and EIA-530 using an adapter cable and a multi-interface T1/E1 WAN tap. | Monitor |
To connect this device to the network, see "Making Connections to a WAN Interface" and "Connecting a LAN/WAN SwitchProbe Device to a Power Source".
The T1/E1 WAN triple-interface device (Figure 6) contains four network interface cards and a PCC card.
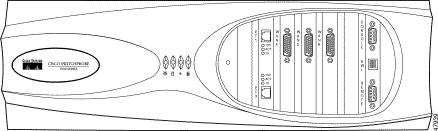
Table 7 describes the interfaces of the T1/E1 WAN triple-interface SwitchProbe device.
| Interface Number | Interface Type | Connection Type | Interface Mode |
|---|---|---|---|
1 | Ethernet/Fast Ethernet (auto-sensing) | Unshielded twisted pair (RJ-45). | Manage |
2 | Serial | Remote DB-9 port. | Manage |
3 | Ethernet/Fast Ethernet (auto-sensing) | Unshielded twisted pair (RJ-45). | Monitor |
4, 5, 6 | WAN | DB-26 port supports connections to RS-449, V.35, X.21, and EIA-530 using an adapter cable and a multi-interface T1/E1 WAN tap. | Monitor |
To connect this device to the network, see "Making Connections to a WAN Interface" and "Connecting a LAN/WAN SwitchProbe Device to a Power Source".
The DS-3 Frame SwitchProbe device (Figure 6) contains two network interface cards and a PCC card.
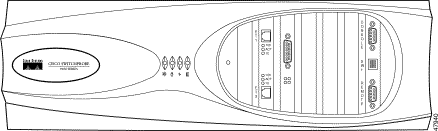
Table 8 describes the interfaces of the DS-3 Frame SwitchProbe device.
| Interface Number | Interface Type | Connection Type | Interface Mode |
|---|---|---|---|
1 | Ethernet/Fast Ethernet (auto-sensing) | Thicknet (10Base5), Thinnet (10Base2), or Unshielded Twisted Pair (RJ-45). | Manage |
2 | Serial | Remote DB-9 port. | Manage |
3 | Ethernet/Fast Ethernet (auto-sensing) | Thicknet (10Base5), Thinnet (10Base2), or Unshielded Twisted Pair (RJ-45). | Monitor |
4 | DS-3 Frame | DB-15 port supports connections to tap unit. | Monitor |
To connect this device to the network, see "Connecting DS-3 Frame Device to the Network" and "Connecting a LAN/WAN SwitchProbe Device to a Power Source".
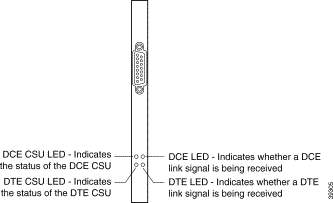
Each DS-3 Frame network interface card (Figure 8) has four amber LEDs (Table 9).
| LED Position | Status | Meaning |
|---|---|---|
Upper left | On | CSU of network DCE device is normal. |
Lower left | On | CSU of network DTE device is normal. |
Upper right | On | Interface receiving normal link signal from network DCE device. |
Lower right | On | Interface receiving normal link signal from network DTE device. |
Depending on the model of SwitchProbe device you purchased, you received one of these tap and tap rack combinations:
This section describes:
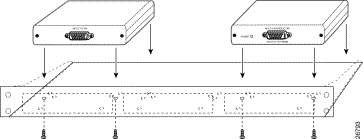
To install a DS-3 tap rack panel, it is recommended that you:
Step 2 Align the tap rack panel mounting holes with the desired holes on the equipment rack.
Step 3 Insert the four screws (included with the rack) into the desired holes.
Step 4 Tighten each screw until the rack panel is secured to the equipment rack.
Figure 9 shows the tap rack panel mounted in an equipment rack (above a DS-3 Frame SwitchProbe device).

To install a DS-3 Frame tap into a tap rack panel that is already mounted in a standard equipment rack (Figure 10):
Step 2 Secure the tap to the tap rack panel by turning the two tap fastener screws (only one-quarter turn of each screw is needed) into their respective holes on the rack panel.

|
Note For instructions about connecting the DS-3 interface on the SwitchProbe device to the network using the tap, see "Connecti ng DS-3 Frame Device to the Network". |
To install a WAN tap rack panel, it is recommended that you:
Step 2 Remove these screws and set them aside.

Step 3 Turn the tap upside down so that the printing on the faceplate is facing you.
Step 4 Place the tap into the WAN tap rack panel.
|
Note Either side of the tap can face out through the rack panel. |
Step 5 From the underside of the rack panel, align the holes on the bottom of the tap (from where you removed the screws) with the holes in the tap rack panel (Figure 12).
Step 6 Secure the tap to the rack panel by replacing the two screws you removed in Step 2 into the two holes of the rack panel and tap (Figure 12).
|
Note The orientation of the tap in the rack panel determines which rack panel holes you should use. |
Step 7 Repeat Steps 1 through 6 for each WAN tap you want to secure to the tap rack panel.
To mount the populated tap rack panel to a standard 19-inch equipment rack:
Step 2 Align the tap rack panel mounting holes with the desired holes on the equipment rack.
Step 3 Insert the four screws (included with the rack) into the desired holes.
Step 4 Tighten each screw until the rack panel is secured to the equipment rack.
Figure 13 shows a populated tap rack panel mounted in an equipment rack.

|
Note For instructions on connecting the WAN interfaces on the SwitchProbe device to the network using a tap, see "Making Connections to a WAN Interface". |
An accessory kit is shipped with each Cisco 9100 Series LAN/WAN SwitchProbe device. This kit includes 4 mounting brackets and 16 screws.
The following sections describe how to attach the mounting brackets to the device and install the device in a standard 19-inch equipment rack and how to install an optional tap rack bracket.
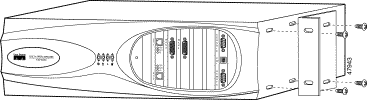
To attach the mounting brackets to the SwitchProbe chassis, see Figure 14 and follow these steps:
Each mounting bracket has eight holes on the large section and two holes on the small section.
Step 2 Place the large section of the bracket against the right side of the SwitchProbe device.
Step 3 Align four holes of the mounting bracket with the four holes on the right side of the probe (you can use whichever holes in the bracket you want).
|
Note The small section of the bracket should not cover the front panel of the SwitchProbe device. |
Step 4 Insert four flat-head screws (included in the accessory kit) into the holes on the bracket and SwitchProbe device.
Step 5 Use a Phillips-head screwdriver to tighten the screws until the mounting bracket is securely attached to the SwitchProbe device.
Step 6 Stand the device on its right side with the front facing you.
Step 7 Align four round holes of the mounting bracket with the four holes on the left side of the device (the holes you use must be consistent with the holes you selected in Step 3).
Step 8 Insert the remaining four flat-head screws into the holes on the bracket and SwitchProbe device.
Step 9 Tighten the screws until the mounting bracket is securely attached to the device.
|
Note Two additional brackets and eight additional screws are provided in the accessory kit. You can attach these brackets to the sides of the SwitchProbe device that abut the back panel (F igure 15). |

Step 2 Attach the mounting brackets to the SwitchProbe device (Figure 14).
Step 3 With the front panel facing you, slide the device into the equipment rack.
Step 4 Align the holes on the small section of the mounting bracket with the desired holes on the equipment rack.
Step 5 Insert the round-head screws (included in the accessory kit) into the holes of the mounting bracket and equipment rack.
Step 6 Tighten each screw until the device is securely attached to the equipment rack. (Figure 16).
|
Note Before connecting these devices to the network, you must configure them with an IP address, subnet mask, and default gateway address. For more information, see the chapter "Initializing a SwitchProbe Device" in the Cisco SwitchProbe Installation and Configuration Guide. |
Before connecting these devices to the network, note the following warnings.
|
Note To see the warnings in multiple languages, see the appendix "Translated Safety Warnings" in the Cisco SwitchProbe Installation and Configuration Guide. |
|
Warning Hazardous network voltages are present in WAN ports regardless of whether power to the unit is OFF or ON. To avoid electric shock, use caution when working near WAN ports. When detaching cables, detach the end away from the unit first. |
|
Warning This equipment is to be installed and maintained by service personnel only as defined by AS/NZS 3260 Clause 1.2.14.3 Service Personnel. |
|
Warning The telecommunications lines must be disconnected 1) before unplugging the main power connector and/or 2) while the housing is open. |
|
Warning Do not work on the system or connect or disconnect cables during periods of lightning activity. |
The dual-interface Fast Ethernet network interface card located in the second-from-left slot contains two interfaces.

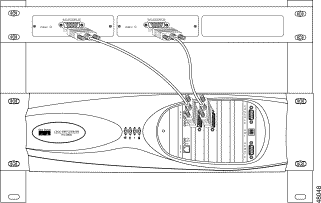
Each WAN interface has a single 26-pin D-type connector. This connector supports connections to V.35, X.21, RS-449, and EIA-530. For each supported connection, you must use an appropriate adapter cable.
The multi-interface T1/E1 WAN tap kit consists of:
The tap unit monitors the DTE and DCE circuits of a link between a router and a CSU/DSU. The tap is a totally passive device that presents high impedance to the link and has minimal impact on the cabling limits of the link. Therefore, you can connect and disconnect the WAN device without disrupting the link between the router and the CSU/DSU.
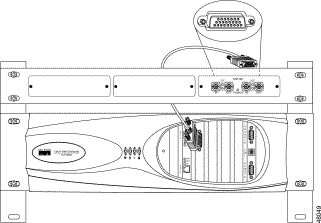
To connect the tap to a WAN interface, see Figure 19 and follow these steps:
Step 2 Insert the other end of the cable into a WAN interface on the SwitchProbe device.
To connect a multi-interface T1/E1 WAN tap to a network segment, see Figure 20 and follow these steps (the procedure uses a V.35 adapter cable):
Step 2 Unplug this cable from the CSU/DSU.
Step 3 Connect the end of the cable (that you just unplugged) to the female end of the one-foot Y-shaped tapping cable (that was included with the SwitchProbe device).
Step 4 Connect the male end of the one-foot Y-shaped tapping cable to the CSU/DSU.
Step 5 Connect the male DB-26 connector of the six-inch section of the Y-shaped tapping cable to the Input to Tap port of the tap.
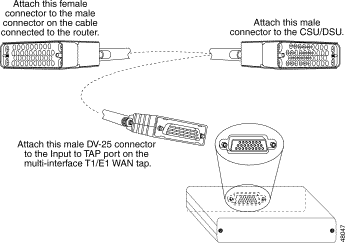
Figure 21 shows a network segment connected to a WAN interface on a WAN SwitchProbe device.

|
Note Each WAN interface has a factory default speed of 64 Kbps. If the
WAN segment connected to that interface has a different speed, you
must change the interface speed to match the speed of the segment. Each WAN interface also has a factory-established default encapsulation protocol (Cisco_HDLC). If the WAN segment to be connected to that interface has a different encapsulation protocol, you must change the interface encapsulation protocol to match the encapsulation protocol of the segment. For more information about changing the interface speed and encapsulation protocol, see the Cisco SwitchProbe Installation and Configuration Guide. |
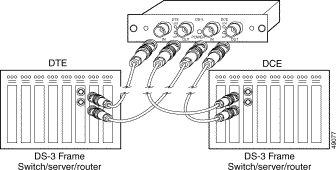
To connect the DS-3 Frame interface to a full-duplex network segment:
1. Connect a DS-3 Frame tap (shipped with the device) to the DS-3 Frame interface.
2. Connect two DS-3 Frame devices to the DS-3 tap (to accumulate statistics as data travels across the network segment).
|
Note The DS-3 Frame tap is a totally passive device that presents high impedance to the link. Therefore, you can connect and disconnect the DS-3 Frame SwitchProbe device from the tap without disrupting the integrity of the link being monitored. |
To connect the DS-3 Frame interface to the tap, see Figure 22 and follow these steps:
Step 2 Plug the female connector of this cable into the DS-3 Frame interface.
Step 3 Plug the other end of the 15-foot cable (the end with the male DB-15 connector) into the female DB-15 port of the DS3 Frame Tap.
The resulting connections should look similar to those shown in Figure 22.
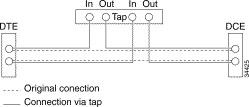
After you have connected the DS-3 Frame interface to the tap, connect the tap to the network segment. See Figures 23 through 25 and follow these steps:
Step 2 Unplug the ends of the cables that connect to the second device.
Step 3 Plug the ends of these two cables (that you just unplugged) into the two IN ports of the DS-3 Tap.
The device plugged into the two IN ports of the tap is the DTE device.
Step 4 Locate two 6-foot cables (with BNC connectors at each end) that are shipped with the device.
Step 5 Plug one end of each cable into the two OUT ports on the DS-3 tap.
Step 6 Plug the remaining connector of each cable into the second DS-3 Frame device (from which you unplugged cables in Step 2).
The device plugged into the two OUT ports of the tap is the DCE device.
|
Note Make sure the resulting cabling reestablishes the previous connections. |

To connect a Cisco 9100 Series LAN/WAN SwitchProbe device to a power source:
|
Warning This equipment is intended to be grounded. Ensure that the host is connected to earth ground during normal use. |
Step 2 Connect the other end of the AC power cord to a suitable power source.
Step 3 Turn the device on.
|
Note Depending on the voltage applied from the power source, the power supply automatically switches to the appropriate condition. |
You can connect a management device to a LAN/WAN SwitchProbe device:
LAN/WAN SwitchProbe devices support out-of-band management through the serial port (labeled Remote) using SLIP or through the Ethernet interface.
You can use the SLIP connection as a secondary connection through which you access all network statistics. The SLIP link is normally used as a backup link when the network is not operational or when the agent is not accessible.
To perform out-of-band management through the active Ethernet interface:
Step 2 Configure the interface mode to manage.
LAN/WAN SwitchProbe devices support side-band management (manage and monitor mode on the same interface) through the active Ethernet interface of the device.
Step 2 Configure the interface mode to manage and monitor.
The Cisco SwitchProbe Installation and Configuration Guide (shipped with all Cisco SwitchProbe devices) explains the basic configuration process. Read and follow the instructions in that guide to configure the agent firmware in your SwitchProbe device.
However, the following sections in this document contain specific configuration instructions for the Cisco LAN/WAN SwitchProbe devices:
To configure a LAN/WAN SwitchProbe device using the Agent Configuration Utility:
Step 2 To select the interface, enter 3 and press Enter.
Step 3 From the first page of the menu, enter 31 and press Enter to go to the next page.
The second page of the Agent Configuration Utility menu is displayed.
Step 4 To configure interface options, enter 14 and press Enter.
The Interface Options menu for the interface is displayed (Figure 26).
|
Note You can also use command-line objects to set values in the special interface-specific parameters. For more information, see " Configuring LAN/WAN SwitchProbe Devices with Command-Line Objects". |
Step 5 To return to the Agent Configuration Utility main menu, enter 18 and press Enter.
Interface Options Menu.

Interface number : 3


[1]  Toggle dlci_mode                on
[3]  Toggle nrzi_dte                 off
[4]  Toggle nrzi_dce                 off
[5]  Toggle crc_16		                   on
[6]  Toggle crc_disable              off
[8]  Toggle rawhdr_capture           on
[9]  Toggle pvc_discovery            on
[10] Toggle mod_128_lapb 		            off
[17] Toggle Manage mode              off
[18] Toggle Monitor mode             on

[19] Go Back to Main Menu

Selection#:
Table 10 describes the options in the Interface Options menu.
|
Note All changes take effect immediately without resetting the device. |
This section explains the special command-line objects for configuring the LAN/WAN interface options (if_options). For more information about command-line mode, see the chapter "Using Command-Line Mode to Customize SwitchProbe Devices" in the Cisco SwitchProbe Installation and Configuration Guide.
You can also configure the interface using the Interface Options menu of the Agent Configuration Utility. The syntax for viewing or changing these special commands is:
get if_options option_name
set if_options option_name { on | off }
|
Note The command-line syntax is case-sensitive. |
Table 11 describes the command-line objects.
Table 12 lists the technical specifications for the Cisco 9100 Series LAN/WAN SwitchProbe devices.
Standards compliance for all 9100 Series LAN/WAN SwitchProbe devices is
as follows:
| Item | Specification | |
|---|---|---|
Power consumption | 300w maximum. | |
Power input | 100/240 Vac, 7.0/4.0 A, 50-60 Hz (auto-switching). The device can operate in a range of AC power from 100 to 240 Vac (110, 115, 120, 200, 209, 220, and 230 Vac—common voltages in different countries). As the voltage varies, so does the current (between 9 and 5 amp, depending on operating voltage and number of NICs installed). | |
Operating temperature | 50º to 122ºF (10º to 50ºC) | |
Humidity | 5% to 95% rel. humidity (noncondensing) | |
Dimensions | 5.25 x 17 x 18 in. (excluding 1 in.-wide rack-mount clips) | |
Weight | 25 pounds (11.34kg) | |
Port type |
| |
| Ethernet/ | Unshielded twisted pair (RJ-45) |
| Console and remote | Connector style—DB-9 male connector |
| DS-3 Frame | DB-15 (supports connection to DS-3 tap) |
| T1/E1 WAN | DB-26 (supports connections to V.35, X.21, RS-449, and EIA-530 using adapter cable and multi-interface T1/E1 WAN tap). |
Network management standards
| SNMP V1 | |
Manage/monitor interfaces and available modes | Interface 1, Ethernet—Mode: Manage/Monitor | |
The Cisco 9100 Series LAN/WAN SwitchProbe devices support the following licensed software options (licenses can be purchased from Cisco Systems):
| Option | Description |
|---|---|
Resource Monitor | This option allows the device to perform IP ping requests and SNMP get statements to relay this network information to management applications (for example, the TrafficDirector Round Trip Delay and Proxy SNMP applications). This information is collected in a private MIB. |
ART MIB Support | The ART MIB Support option is an extension of RMON2. This option allows a SwitchProbe device to collect a variety of application response time (ART) statistics for many well-known server applications. These statistics include traffic volume, number of retries, number of rejections by the server for client requests, number of timeouts, and minimum, maximum, and average response times for all client/server applications. |
HTTP Content Response Time MIB Support | The Content Response Time Monitor software option allows you to collect information about how your web site is performing and to set alarms to notify you when certain web site conditions occur. This option enables you to leverage information regarding access to and from your web site. |
VLAN Monitor | This option allows the device to collect full RMON2 statistics for each VLAN on a network link between two switches. VLAN Monitor enhances your view of Fast Ethernet network links by segregating the activity of each VLAN (as a separate virtual interface). It provides additional statistics for any VLAN using the SMON MIB. The VLAN Monitor option also directs the selected Fast Ethernet interface to read the protocol headers and determine the VLAN ID number of each packet that passes through the interface. Each incoming Ethernet ISL packet is reassembled:
VLAN monitor can collect RMON1 traffic (hosts and conversations segregated by VLAN ID) of the entire monitored segment. If the VLAN Monitor option is disabled, each incoming Ethernet ISL packet is reassembled as a simple Ethernet packet:
|
Cisco WAN SwitchProbe devices provide powerful support for monitoring Frame Relay PVCs. These devices allow you to monitor Frame Relay traffic two ways:
If the segment connected to a WAN interface uses a Frame Relay management protocol such as LMI or Annex D, PVC discovery and DLCI virtual interface creation is fully automated. For each DLCI that the WAN interface discovers on the network, a distinct virtual interface is automatically created. You can monitor each of these virtual interfaces as a separate network.
The automatic discovery of DLCIs is a feature enabled by default in Cisco WAN SwitchProbe devices; therefore, in most cases you simply connect the device to the network, specify Frame Relay as the WAN encapsulation protocol and start monitoring any DLCIs that the device discovers.
If the segment connected to a WAN interface does not use a Frame Relay management protocol, you can manually specify which DLCIs you want to monitor.
See the Cisco SwitchProbe Installation and Configuration Guide for more information.
The following sections provide sources for obtaining documentation from Cisco Systems.
You can access the most current Cisco documentation on the World Wide Web at the following sites:
Cisco documentation and additional literature are available in a CD-ROM package, which ships with your product. The Documentation CD-ROM is updated monthly and may be more current than printed documentation. The CD-ROM package is available as a single unit or as an annual subscription.
Cisco documentation is available in the following ways:
If you are reading Cisco product documentation on the World Wide Web, you can submit technical comments electronically. Click Feedback in the toolbar and select Documentation. After you complete the form, click Submit to send it to Cisco.
You can e-mail your comments to bug-doc@cisco.com.
To submit your comments by mail, for your convenience many documents contain a response card behind the front cover. Otherwise, you can mail your comments to the following address:
Cisco Systems, Inc.
Document Resource Connection
170 West Tasman Drive
San Jose, CA 95134-9883
We appreciate your comments.
Cisco provides Cisco.com as a starting point for all technical assistance. Customers and partners can obtain documentation, troubleshooting tips, and sample configurations from online tools. For Cisco.com registered users, additional troubleshooting tools are available from the TAC website.
Cisco.com is the foundation of a suite of interactive, networked services that provides immediate, open access to Cisco information and resources at anytime, from anywhere in the world. This highly integrated Internet application is a powerful, easy-to-use tool for doing business with Cisco.
Cisco.com provides a broad range of features and services to help customers and partners streamline business processes and improve productivity. Through Cisco.com, you can find information about Cisco and our networking solutions, services, and programs. In addition, you can resolve technical issues with online technical support, download and test software packages, and order Cisco learning materials and merchandise. Valuable online skill assessment, training, and certification programs are also available.
Customers and partners can self-register on Cisco.com to obtain additional personalized information and services. Registered users can order products, check on the status of an order, access technical support, and view benefits specific to their relationships with Cisco.
To access Cisco.com, go to the following website:
The Cisco TAC website is available to all customers who need technical assistance with a Cisco product or technology that is under warranty or covered by a maintenance contract.
If you have a priority level 3 (P3) or priority level 4 (P4) problem, contact TAC by going to the TAC website:
P3 and P4 level problems are defined as follows:
In each of the above cases, use the Cisco TAC website to quickly find answers to your questions.
To register for Cisco.com, go to the following website:
http://www.cisco.com/register/
If you cannot resolve your technical issue by using the TAC online resources, Cisco.com registered users can open a case online by using the TAC Case Open tool at the following website:
http://www.cisco.com/tac/caseopen
If you have a priority level 1(P1) or priority level 2 (P2) problem, contact TAC by telephone and immediately open a case. To obtain a directory of toll-free numbers for your country, go to the following website:
http://www.cisco.com/warp/public/687/Directory/DirTAC.shtml
P1 and P2 level problems are defined as follows:

![]()
![]()
![]()
![]()
![]()
![]()
![]()
![]()
Posted: Thu Jul 25 00:13:28 PDT 2002
All contents are Copyright © 1992--2002 Cisco Systems, Inc. All rights reserved.
Important Notices and Privacy Statement.
