|
|

Threshold Manager provides an easy-to-use interface to access device-specific threshold settings. Using Threshold Manager, you can set thresholds for network devices using Cisco-provided, predefined default policies. These policies can be applied automatically to target devices. Threshold Manager also supports detailed customization of threshold settings.
For a list of supported devices, refer to the README file and the release note. Threshold Manager also has an online help system.
This chapter provides the following sections:
To access Threshold Manager from CiscoView, complete the following steps:
Step 2 Select File>Open Device.
Step 3 Enter the IP address or host name of the Threshold Manager in the Host field.
Step 4 Enter the Read Community string.
Step 5 Enter the Write Community string.
Step 6 Click OK.
Step 7 Select Tools>Threshold Manager from the CiscoView menu bar.
The Threshold Manager Events List window appears.
You can also start Threshold Manager from the command line as a standalone application.
Step 2 Start Threshold Manager using one of the two methods:
(a) On Windows 3.1 and 3.51, select File>Run and in the command field enter
where:
-I IP-address | is the IP address of the device you want to monitor |
-n host_name | is the host name of the device. The default is the local machine. |
Other supported runtime arguments are:
-p | is the directory where Threshold Manager is installed. |
-r read_community_string | is an SNMP password. The default is public. |
-w write_community_string | is an SNMP password. The default is public. |
-e retry count | is the number of times Threshold Manager sends a request to an unreponsive device. The default is 3. |
-m timeout | is the amount of time, in seconds, Threshold Manager waits before issuing another retry. The default is 10 seconds. |
-f refresh_interval | is the time, in seconds, the Events List window refreshes. The default is 360 seconds. |
(b) On Windows 95 and Windows NT 4.0, select File>Open.
Thresholds define the range in which you expect your network to perform. If these thresholds exceed or go below the expected bounds, you examine these areas for potential problems. You can create thresholds for a specific device.
A policy is a set of predefined configuration data that specifies the condition for triggering a threshold event. Threshold Manager uses policies to set thresholds in a Cisco router or switch.
A policy file is a collection of one or more policies that defines threshold values for specific MIB variables. Each threshold policy is associated with a single SNMP MIB variable type. If a policy specifies an interface type, Threshold Manager applies the threshold policy to the matching device interface. If the policy does not specify an interface type, the application applies the threshold value to all device interfaces. Multiple policy files can be enforced in a device or against a specific interface on a device.
There are two types of policy files available in Threshold Manager:
Alarms and events go hand in hand. An event defines what action is triggered as result of an alarm. For example, when the number of collisions on an Ethernet segment exceeds 60 per second, the corresponding event can cause a trap message to be sent to one or more management stations. Events are defined by the RMON event group.
An event is generated by the RMON agent, which could be triggered by a threshold crossing. An event can be signaled as a trap, a new entry in the RMON MIB log table, both, or neither. Threshold Manager displays all events captured from the log table of the RMON agent and correlates threshold-related events to the user-configured threshold policies.
An agent is a process in the device that handles SNMP requests.
When you start Threshold Manager, the Threshold Manager events list window appears, as shown in Figure 5-1. The Threshold Manager Events List window is a view of threshold events stored as RMON log records in the managed device. This window also indicates the name of the target device. The name of the device is displayed as either the host name or IP address depending on how you identified the device when you launched Threshold Manager or CiscoView.
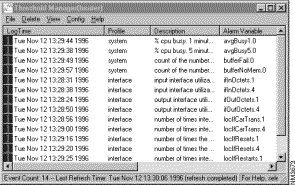
Threshold Manager correlates the information from the event with an existing policy by comparing the object identifier (OID) of the event with the value of the alarm variable in the policy configuration file. If a match occurs, Threshold Manager complements the event display fields of the logged entry with information from the policy file. If no match occurs between a logged event and a policy file, Threshold Manager displays a value of undefined in those fields that would be completed by the policy.
Each event occupies a single line in the Events List window and is displayed until one of the following situations occurs:
This section covers the following topics:
Select View>Retrieve Events.
The threshold event list contains the logged events retrieved from the agent. Threshold manager retrieves events at startup time and when the refresh timer reaches a specified interval. For more information on the refresh timer, see "Retrieving Events."
Table 5-1 shows the fields and associated policy for each entry threshold in the event list.
| Field | Policy |
|---|---|
Capture of Event Priority Icon | |
Time the event was logged. The RMON agent in the managed device generates this value. | |
The profile to which the threshold belongs. A profile is a group of policies. There are four profiles: system, interface, mon_EtherStats, and customize. | |
Threshold policy description. | |
Alarm Variable | Name of the MIB variable. |
Priority | Priority of the event. Values are 1 (highest) to 3 (lowest). The predefined threshold policies have default priority value, but you can change the value according to the importance of the information to you. If Threshold Manager cannot correlate the event with a policy file, it assigns the event a priority of 3. |
Alarm OID | Object identifier of the particular variable to be sampled. |
Log Description | Description of the event as defined in the RMON event entry that corresponds to this event. |
Event Index | Index of the RMON event entry that corresponds to this event. |
Log Index | Index of the RMON log entry. |
Owner | A text string that identifies the network management station or person to contact regarding the policy file associated with the event. |
You can sort the event list by clicking on the field headers. You can also change the width of the columns by clicking on the dividers between the field headers and stretching the column to the desired size. Press the Shift key and click the middle mouse button while dragging the divider.
To view a single event, go to the Events List window and double-click on the event you want to see.
The Single Event View window appears, as shown in Figure 5-2. It allows you to easily view all information pertaining to a specific event. You use the Single Event View window to determine what threshold settings in the RMON agent generated the event.
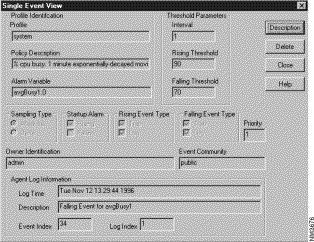
The Single Event View window is divided into two panes: Profile Identification and Agent Log Information.
Profile | Contains the name of the profile to which the policy file belongs. |
Description | Contains a description of the policy. This is the MIB variable name. |
Interval in seconds over which the data is sampled and compared with rising and falling thresholds. | |
Threshold for the sampled statistic. When the current sampled value is greater than or equal to this threshold, a single event is generated. A single event is also generated if the first sample after this entry becomes active is greater than or equal to this threshold, and the associated Startup Alarm is equal to rising. After a rising event is generated, another such event is not generated until the sampled value falls below this threshold and reaches Falling Threshold. See "Creating a New Policy File to Create New Thresholds." | |
|
After a falling event is generated, another such event is not generated until the sampled value rises above this threshold and reaches Rising Threshold. See "Creating a New Policy File to Create New Thresholds." | |
Sampling Type | Method of sampling the selected variable and calculating the value to be compared against the thresholds. If the value of this object is Absolute, the value of the selected variable is compared directly with the thresholds at the end of the sampling interval. If the value of this object is Delta, the value of the selected variable at the last sample is subtracted from the current value, and the difference compared with the thresholds. |
Alarm that can be sent when this entry first becomes active. If the first sample after this entry becomes active is greater than or equal to Rising Threshold, and Startup Alarm is equal to rising, then a single rising alarm is generated. If the first sample after this entry becomes active is less than or equal to Falling Threshold, and Startup Alarm is equal to falling, then a single falling alarm is generated. | |
The box indicates the event priority. | |
Specifies the SNMP community to which an SNMP trap is sent. Can be any text string; default is public. |
If the threshold settings were created by a Threshold Manager policy file, the values from that policy file are displayed. If no policy file is associated with the threshold settings, the fields remain blank.
Because the Agent Log Information contains information from the RMON agent log in the managed device, these values display whether a Threshold Manager policy file can be associated with the event.
Table 5-2 provides a description of the action buttons.
| Button | Action |
|---|---|
Description | Click Description to see a more detailed description of the event. |
Delete | Click Delete to delete the event from the event log. This has the same effect as selecting the event in the Events List window and selecting Delete>Selected Events. You might want to delete events after you have finished analyzing a particular event type and no longer need to view it, or you want to decrease the number of events displayed in the events list window. |
Close | Click Close to close the window. |
Help | Click Help to get online help about this window. |
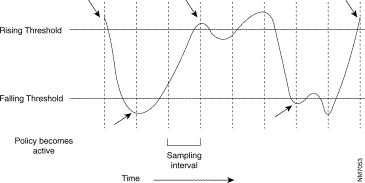
Figure 5-3 shows when rising and falling events occur with the Startup Alarm set to Rising and Falling.
Select View>Retrieve Events to force a retrieve event action from the Events List window.
Threshold Manager retrieves events from the RMON agent log in the following situations:
When the application is operational, Threshold Manager automatically retrieves events from the RMON log at regular intervals. This interval is defined by the refresh timer parameter associated with that instance of Threshold Manager. This parameter is defined when you initiate a Threshold Manager session. The default value is 360 seconds. If the refresh timer is set to 0, the Threshold Manager will not automatically retrieve events from the RMON agent.
Threshold Manager allows you to change the order in which you view events in the Events List window. This capability permits you to view events in a manner that is most meaningful to you. You can reorder the following fields:
To print events, do the following:
Step 2 Make sure your printer is set up properly for the host system.
Step 3 Select File>Print to print out events in the window.
Step 4 Enter the name of the printer in the Print dialog box.
Step 5 Click OK.
Because events can be deleted from the log, printing lets you maintain a history log of device activity. This log is also helpful in accumulating data to determine your network baselines and performance trends. The printed version of the Event List window contains the information described in "Viewing Threshold Events."
You can remove events from the RMON log in the managed device. You delete events because you
Because events are physically removed from the RMON agent log, deleting events also improves the performance of Threshold Manager when retrieving and displaying new events.
To delete a selected event from the RMON agent log:
Step 2 Select Delete>Delete Selected Events.
To delete all events from the RMON agent log, select Delete>Delete All Events.
You can also delete selected events from the Single Event View window.
Any user who has launched an instance of Threshold Manager against a device can delete events from that RMON agent log. This means that your Events List window might not display the current contents of the RMON agent log of a device if that device is being managed by more than one Threshold Manager. Your Events List window reflects the change when
Threshold Manager allows you to delete selected events or all events in the log. When you delete a selected event, all events with the same eventIndex value are removed from the RMON log.
Table 5-3 shows examples of event tasks that you can use to help manage your network.
| Task Description | Solution | Operations |
|---|---|---|
A network segment is having congestion problems. | Check whether any threshold events have occurred in the device close to the segment. | Open the Threshold Manager window. Select View>Retrieve Events. View all of the displayed events. Click on the header of any column in the main window to sort the events to investigate the correlation between threshold events and the network problem. Double-click on an interesting event to bring up the Single Event View window to investigate the threshold setting that caused the event to occur. Click Description to read the description of why this event was generated. |
Sort the tasks by priority. | N/A | Open the Threshold Manager window. Sort the events by priority by clicking on the header of the Priority column. |
Finished investigating the displayed events. | Delete some events in the box to reduce memory use in the agent. | Open the Threshold Manager window. Select the events and use Delete> Selected Events to delete the selected ones; or Use Delete>All Events to delete all the events. |
The Managing Thresholds section covers the following topics:
To access the Configure Thresholds dialog box, select Config>Thresholds...
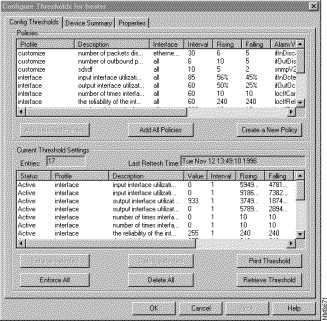
The Configure Thresholds dialog box defaults to the Config Threshold tab. You access these subsequent windows from the Config pulldown menu. Figure 5-4 shows the Configure Thresholds tab.
The content of this pane is specific to the instance of Threshold Manager and is visible only at your local machine.
This pane also allows you to
For more information on the policies, see "Using Policy Files" later in this chapter.
If Threshold Manager created the threshold settings, the fields displayed in the Current Threshold Settings pane will contain data provided by the policy file. If Threshold Manager did not create the policy or Threshold Manager cannot associate a policy with an event, then only the information provided by the RMON agent will be displayed.
To access the Configure Threshold dialog box, select Config>Thresholds...
The Device Summary tab, shown in Figure 5-5, displays summary information about the device and the RMON MIB. The Device Summary dialog box provides you with information about the device currently managed by Threshold Manager. This is helpful if you want to determine the class of the target device or if you want to obtain information about the device interfaces. Go to the Events List window and select Config>Device Summary to access the Device Summary tab.
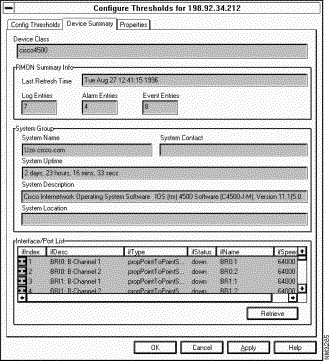
Table 5-4 provides a description of the fields in the Device Summary tab.
| Field | Description |
Device Class | |
Last Refresh Time | Last time events were retrieved by the agent. |
Log Entries | |
System Name | Information about the system. One or more fields may be blank depending on the device configuration. |
Interface/Port List |
The list of ports and interfaces for the device provides you with information regarding the individual interfaces. This is helpful when designing and applying policies for specific interfaces. You can sort on the fields within this window to present the information in a manner that is most meaningful to you. |
Click Retrieve to get the latest Interface/Port information.
There is a one-to-one relationship between a single instance of Threshold Manager and the managed device. Also, when Threshold Manager is launched from CiscoView, the application receives default run-time arguments used for operations. Threshold Manager allows you to alter both the target device and the run-time parameters from within the application. This is particularly useful if you want to use a single instance of Threshold Manager to apply threshold settings in multiple devices or if you started the application with the wrong run-time parameters.
This device information is changed from the Properties dialog box. The Properties dialog box lets you
Go to the Event List window and select Config>Properties to access the Properties dialog box.
The Config Thresholds tab of the Configure Thresholds window, shown in Figure 5-6, allows you to modify and create policies and work with threshold settings.
This window consists of two panes: the Policies pane and the Current Threshold Settings pane, which are described in "Managing Thresholds." For information on changing policies, see "Using Policy Files" later in this chapter. When Threshold Manager is installed, 18 policy files appear in this window. You can select one or all to use as thresholds.
Before you can set a threshold in the RMON agent, you first add the settings to the Current Threshold Settings pane. You can add all policies as threshold settings or you can add specific policies. A policy can result in multiple threshold settings in the Current Threshold Settings pane. The number of times Threshold Manager adds the policy to the Current Threshold Settings pane depends on the target type and number of interfaces defined in the policy file.
To add all policies in the Policies pane to the Current Threshold Settings pane, click Add All Policies.
To add selected policies to the Current Threshold Settings pane:
To add multiple selected policies:
A policy added to the Current Threshold Settings pane retains a pending status. The pending status does not change until you enforce the threshold settings to the RMON agent. Threshold settings with a pending status are viewable only from your local machines.
Step 2 Go to the Current Threshold Settings pane.
Step 3 Double-click on the selected threshold setting.
The Modify Threshold Settings dialog box appears. From this dialog box you can do the following:
Threshold Manager lets you modify existing threshold settings. This feature lets you temporarily alter threshold settings for an Alarm object instance. This is useful when you want to monitor network performance for a specific period of time or to fine-tune threshold settings before permanently applying them. Changes to existing threshold settings are not saved in the associated policy file. Therefore, if the device loses power or is shut down, the modifications to the threshold settings are lost. If you want to make permanent changes to the threshold settings, alter the associated policy file and add the new threshold settings to the Current Threshold Settings pane.
You can alter a threshold setting that has a pending or active status. A threshold setting with a failed status indicates the threshold setting was rejected by the RMON agent and cannot be altered.
To delete a selected threshold setting, regardless of status:
To delete more than one threshold setting, regardless of status:
Click Delete All to remove all threshold settings, regardless of status.
Threshold settings with a pending status are removed from the Current Threshold Setting pane when you
Table 5-5 describes common Threshold Manager tasks.
| Task Description | Operations |
|---|---|
When viewing the events, there are too many occurrences of a particular kind of event. | Modify the threshold parameters because they are set too low or too high with respect to the network baseline by performing the following steps: Open the Threshold Manager window. Double-click on the threshold. Modify the rising and/or falling threshold parameter(s) to adjust to network baseline so that the events are generated only on exceptions. |
Delete some thresholds to reduce load added by threshold monitoring. | Open the Threshold Manager window. Select Config>Thresholds to bring up Configure Thresholds window. Click Retrieve Thresholds to retrieve the current active thresholds from the managed agent. Check the count of the current thresholds setting to see how many thresholds are active. Select the threshold rows that are less critical to monitor. Click Delete Selected to delete the thresholds from the agent. The events associated with these deleted thresholds are removed as well. |
Open the Threshold Manager window. Select Config>Thresholds to bring up Configure Thresholds window. Double click on a threshold row in the lower pane of the window. Modify the threshold parameters in the Modify Threshold Setting window. Click Enforce to enforce to the agent. Double-click on another threshold, and repeat the steps until the threshold setting for each interface is configured properly. | |
Open the Threshold Manager window. Select Config>Threshold Properties to bring up the Properties window. Set the Refresh Timer to a larger number. Click OK. |
This section covers the following topics:
Many predefined policy files are shipped with Threshold Manager. A policy file is a plain text file; it is defined by keywords that are used by Threshold Manager to scan the file. Each policy file defines a Alarm variable to be monitored by a device RMON agent, as well as one or more threshold policies to be set to the device agent for monitoring purposes.
To understand the meaning of policies and to simplify file parsing, Threshold Manager imposes strict rules whenever a policy file is created either manually or through the Create Policy dialog in Threshold Manager. It is strongly recommended that you create customized policy files by using the Threshold Manager graphical user interface.
A policy file is composed of many keyword-value pairs. A keyword and its value are separated by an equal sign (=). If the keyword requires more than one value, each value is separated by a colon (:). Each line of a policy profile contains only one keyword-value pair, for example:
Target_Type = etherStats

Rising_Threshold = 200

Falling_Threshold = 20

Sample_Interval = 60:0:300
The order of the keyword-value pair is not important. All white spaces are ignored by the Threshold Manager during file parsing. If a keyword appears more than once, the last keyword-value pair takes effect. The only exception to this rule is keyword Interface_Threshold.
An interface-specific policy is defined by the keyword Interface_Threshold. There can be multiple Interface_Threshold keyword-value pairs in a policy profile, each of which defines specific threshold policy (value) for a particular interface type, for example:
Interface_Threshold = ethernetCsmacd:375000000:187500000:100000000

Interface_Threshold = ethernetCsmacd:37500000:18750000:10000000
The syntax of this special keyword-value pair is as follows:
Interface_Threshold=interface_type:rising_thresh_value:falling_thre
sh_value:interface_speed
where interface_speed is optional.
Threshold Manager uses the interface-specific policy to set thresholds for the interface type involved. If the interface speed is specified in the policy, the policy is applied to interfaces that match both the interface type and speed. If interface speed is not present, the policy is applied to the interface that matches the specified interface type, regardless of its speed. The default policy is used to set thresholds for interfaces without an interface-specific policy defined.
Policy files are grouped into three types: global, device class, and host. All policy files are saved under the config directory of the Threshold Manager. Policy files under the config directory are global policy files and are used for all devices. Policy files under the device class subdirectory apply to devices that belong to the same device class family. Policy files that are saved in the host subdirectory are used to set thresholds against only the specific host.
When reading policies for a given device, Threshold Manager first searches that host subdirectory to locate any host-specific policy files defined for that device, then it scans the device class subdirectory for policy files defined for that device class, and finally it picks up any policy files not defined elsewhere.
Table 5-6 contains a brief description of the policy files.
| Policy File | Description | Default Threshold |
|---|---|---|
Average CPU busy in the last 5 minutes. See note in next entry. | 90% | |
Average CPU busy in the last minute. Both policies 1 and 2 are used so that the user gets at least 2 events (traps and/or logs) in case the CPUs load keeps increasing. | 70% | |
Ethernet segment utilization (RMON Ethernet statistic group). | 50% | |
Free memory. | Falling threshold (absolute): 500K | |
Interface input utilization. | 50% | |
Interface output utilization. | 50% | |
Carrier transitions. | 10/minute | |
Reliability of the interface. | Falling threshold: 240 | |
Number of resets. | 10/minute | |
Number of restarts. | 10/minute | |
Buffer allocating failures. | 5/30 seconds | |
Buffer creation failures. | 5/30 seconds | |
Ethernet segment tuilization (RMON Ethernet statistic group). | 500/second | |
etherStatsCRCAlignErrors | Ethernet segment alignment error (RMON Ethernet statistic group). | 50/minute |
Ethernet segment collision errors (RMON Ethernet statistic group). | 50/minute | |
Ethernet segment size errors (RMON Ethernet statistic group). | 50/minute | |
Ethernet segment size errors (RMON Ethernet statistic group). | 50/minute | |
Ethernet fragmentation errors (RMON Ethernet Statistic group). | 50/minute |
Double-click the selected policy in the Policies pane to activate the Modify Threshold Policy dialog box. From this window, you can
When you complete the modifications to the policy file, you can save the changes in the host-specific, device class, or global directories. Saving a policy file automatically updates the existing policy file in the Policies pane. Clicking Continue directly applies the altered policy to the Current Threshold Settings pane without saving the changes.
You create new threshold policies to
Cisco maintains a list of all SNMP MIBs supported by Cisco IOS Release 10.2 and later. This list is found at:
ftp://ftp.cisco.com/pub/mibs/supportlists/
The SNMP MIBs are organized by device class for both routers and switches.
The Create Threshold Policy dialog box contains the following fields:
The Create Threshold Policy dialog box lets you define the
The policy configuration file is a text file that sets the parameters of the threshold for a specific MIB variable. The data in the configuration file is composed of keyword-value pairs in the form of <item name> = <item value>. The keywords contained in the configuration file are as follows:
Interface_Threshold = ethernet Csmacd:375000000:187500000:100000000
Policy configuration files are secured using the standard file security procedures in the host operating system.
After you create a policy file, you can:
You can save a threshold policy file in the host-specific, device class, or global directory. Remember that the host-specific directory takes on the name of the managed device. This name can be the host name or IP address of the device, depending on how you identified the device when you launched Threshold Manager. Policy files previously saved under the host name of a device will not appear in the Policies pane if you specify the IP address of the managed device when you launch Threshold Manager.
You cannot save a policy file that has a customized target type.
If the policy file is of an interface variable type, you can apply the threshold settings to one or more interfaces.
You can also add a policy file directly as a threshold setting without saving it to disk. This feature lets you create and add temporary threshold settings. However, there is no permanent record of these policies. The threshold settings are lost when the managed device is turned off or goes down, or when you delete the threshold settings from Threshold Manager.
Click Continue after creating the policy file to add it to the Current Threshold Settings pane as a threshold setting. The new threshold setting will have a status of pending.
To add multiple interface threshold settings within a single policy file
Step 2 Select the interface type of the target interface.
Step 3 Click Add to add the interface type with its configured threshold settings to the Interface List.
Step 4 Define the next set of threshold parameters.
Step 5 Select the target interface type and add it to the interface list.
Repeat Step 3 and Step 4 as many times as necessary to add interface threshold settings.
After you have defined each specific threshold setting, you can apply it to one or more physical interfaces. Click Continue to access the Interface Selection dialog box. This dialog box displays all available interfaces in an up state for that device. Select the desired interfaces and click OK to apply the threshold settings to the physical interfaces. This action also places the threshold settings in the lower pane of the Configure Threshold window with a status of pending.
The policies are located in the Threshold-Mgr/config directory. Depending on how you saved the policy file, it can be found in one of the following subdirectories:
All default policies in this release of Threshold Manager are found in the global directory.
Table 5-7 describes common Threshold Manager policy tasks.
| Task Description | Operations |
|---|---|
Open the Threshold Manager window. Select Config>Thresholds to bring up the Configure Thresholds window. Click Add All Policies. The thresholds are populated in the lower pane of the window based on the device configuration. Click Enforce All. All pending thresholds are downloaded to the agent and become active thresholds. | |
Do not want to overload the agent with too many active thresholds by leveraging only the interface profiles. | Open the Threshold Manager window. Select Config>Thresholds to bring up the Configure Thresholds window. Click on the Profile title to sort the polices by profile name. Select all of the policy rows in the interface profile to be monitored. Click Add Selected Policies. The selected thresholds are populated in the lower pane of the window for all currently Up interfaces, and are marked "Pending" in the Status column. Click Enforce All. All the pending thresholds are downloaded to the agent, and become active thresholds, marked "Active" in the Status column. |
Open the Threshold Manager window. Select Config>Thresholds to bring up the Configure Thresholds window. Click Create New Policy. Choose the appropriate target type for the threshold to be defined. Set up all parameters for this customized threshold policy. Save this policy to the desired location by clicking the button representing the destination (global, device class, or host) on the right hand side of the window. | |
Customize the threshold parameters for predefined thresholds. | Open the Threshold Manager window. Select Config>Thresholds to bring up the Configure Thresholds window. Double-click on the threshold policy you want to modify. Set up the parameters to fit your network baseline. Save the changes to disk. The changes can be saved at the global level, which can be used by all devices; saved at the device class level, which can be used by all devices of the same device type; or saved at the device instance level, which can be used again only for this particular device. |
Open the Threshold Manager window. Select Config>Thresholds to bring up the Configure Thresholds window. Double-click on a threshold policy that you want to learn more about. Click Description in the Modify Threshold Policy window. Threshold Manager provides help text on what this policy means. | |
Apply an interface-specific threshold only to a particular interface, instead of all interfaces. | Open the Threshold Manager window. Select Config>Thresholds to bring up the Configure Thresholds window. Double click on the threshold policy you wish to enforce to the agent. Click Continue in the Modify Threshold Policy window. Select the interface for setting the threshold from the Interface Selection dialog. Click OK to push it to the staging area. Click Enforce All to download the changes to the agent. |
Open the Threshold Manager window. Select Config>Profiles to hide profiles other than system. In the Filter Profiles window, select profiles other than system and click on the arrow to move the profiles to the Hide Profiles box. Select Config>Thresholds to bring up Configure Thresholds window. The upper window now shows only the system policies. |
You can run multiple instances of Threshold Manager simultaneously to manage thresholds on several devices. From the pulldown menu, select File>New Threshold Manager to open the dialog box shown in Figure 5-7.
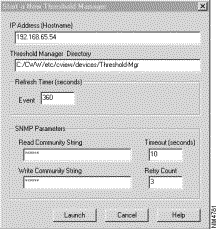
The defaults in this dialog box apply to the current device configuration. You need to set the host address of the device to be managed. You also need to specify the Threshold Manager directory if it is not installed in the default location. The Threshold Manager directory is under the Threshold directory called Threshold-Mgr. For example:
/CWW/etc/cview/devices/Threshold-Mgr/
For descriptions of the other input fields in this window, see the section "Starting Threshold Manager from CiscoView" earlier in this chapter.
Threshold Manager lets you filter out profiles. A profile is a set of policy files that belong to a specific management area. When you filter a profile, all the policy files contained in that profile are no longer available to this instance of Threshold Manager. Filtering profiles is useful when you want to limit the number or focus on the type of policies available to an RMON agent. You can also use it when you want to set interface-related thresholds. By disabling all other profiles, only the interface policies are shown in the windows that manage policies. To access the Filter Profiles dialog box, select Config>Profiles to open the dialog box shown in Figure 5-8.
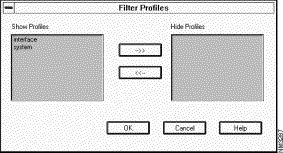
To filter one or more profiles:
Profiles appearing in the Hide Profiles panes are no longer available to this instance of Threshold Manager, and policy files contained in these profiles will not be displayed in the Policies pane of the Config Thresholds tab of the Configure Thresholds window. However, any threshold settings active in the RMON agent that belong to the filtered profile are not affected.
Table 5-8 provides a description of known problems and an explanation of how to correct them.
| Problem | Explanation |
|---|---|
Cisco 7000 devices do not display Threshold Manager in the CiscoView pulldown menu. | Edit the c7com.dd file located in $NMSROOT/etc/cview/devices/7000/dd/c7com.dd Change: |
Exit the Configure Thresholds window, then reopen it. | |
Use hostname instead of IP address when saving host-specific policies. | |
Threshold Manager shows undefined fields in the Event List window. | The Threshold Manager directory is incorrect. Go to the directory where the policy files that you want to use are defined. |
Duplicate global/device/host policies may be allowed, depending on which window is used. | When creating a custom policy, you can only save it once, either as global, device, or host. But after saving the policy, you can use the Modify Threshold Policy window to modify the saved custom policy and save it as all three. |
The policy that you are using was not created by this Threshold Manager. | Create the policy on this instance of Threshold Manager or copy it from the Threshold Manager where it is defined. |
![]()
![]()
![]()
![]()
![]()
![]()
![]()
![]()
Posted: Wed Jul 24 08:15:15 PDT 2002
All contents are Copyright © 1992--2002 Cisco Systems, Inc. All rights reserved.
Important Notices and Privacy Statement.