|
|

As your network inventory and user base grow, you need to perform certain system administration tasks to accommodate that growth. This chapter describes some of the features this product provides to help you with these tasks.
The following sections are presented in this chapter:
For detailed information on system administration, refer to the online help.
Use a directory naming scheme that indicates your backup dates in case you need to restore the database. You should create a separate directory for each backup. The backup directory must be writeable by the user bin on Solaris systems. The backup process creates three files:
The px.db file is your database backup. The syslog.db file is a log of database transactions. Without the syslog.db file, you cannot restore your database. The CRM_filebackup.tar file contains a collection of backup files created by Y2K Compliance Assessment Tool applications.
You can back up your database immediately or you can schedule it for later.
You should create a separate directory for each backup. Store a single set of backup files in each directory. Each time you perform a backup, the Y2K Compliance Assessment Tool stores the most current db files and other files specified by the Y2K Compliance Assessment Tool components in that directory.
To back up the database immediately, perform the following steps:
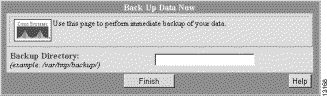
Step 1 Select Admin > System Admin > Back Up Data Now.
The Back Up Data Now dialog box appears. (See Figure 6-1.)
 | Caution It is recommended that you store backups in a partition other than the one hosting the run-time database. |
Step 2 Enter the fully qualified path name of the backup directory, then click Finish.
A confirmation message appears.
To schedule regular backups, perform the following steps:
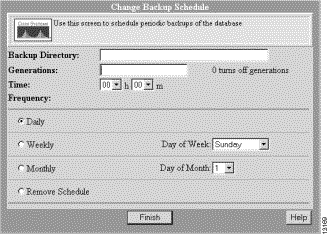
Step 1 Select Admin > System Admin > Schedule Backup.
The Set Backup Schedule dialog box appears. (See Figure 6-2.)
| Caution It is recommended that you store backups in a partition other than the one hosting the run-time database. |
Step 2 Enter information in the fields as required, then click Finish.
| Caution Restoring the database from a backup permanently replaces your database with the backed up version. |
You can restore your database only by running a script from the command line.
| Caution As part of restoration, the entire product, except the web server, is shut down and restarted. Ensure that you are not running any critical tasks. Otherwise, you might lose data. |
Restoring a database requires you to stop all processes and then restart them. To restore the database, perform the following steps:
At the command line, ensure that you have the correct permissions, then perform the following steps:
Step 1 Stop all processes by entering:
net stop crmdmgtd
Step 2 Restore the database by entering:
%NMSROOT%\bin\restorebackup.pl backup directory
where %NMSROOT% is the installation directory.
For example, if the backups were stored in a \var\backup directory with a retention cycle of 3, there might be a \var\backup\1, \var\backup\2, and \var\backup\3. To restore the most recent version, enter the following command:
%NMSROOT%\bin\restorebackup.pl drive:\var\backup\3.
Step 3 Examine the log file in the following location to verify the database was restored:
%NMSROOT%\log\restorebackup.log
Step 4 Restart the system by entering:
net start crmdmgtd
You can relocate your database by running a script from the command line. Before you begin, ensure the new location has sufficient disk space.
| Caution As part of relocation, the entire product, except the web server is shut down and restarted. Ensure that you are not running any critical tasks. Otherwise, you might lose data. |
To move the database, perform the following steps:
Step 1 Ensure that you have the correct permissions at the command line prompt.
Step 2 Stop all processes by entering:
net stop crmdmgtd
Step 3 Move the database from the current location to the target location by entering:
%NMSROOT%\bin\dbmove.pl target directory
where %NMSROOT% is the installation directory
Step 4 Examine the log file in the following location to verify that the database was moved:
%NMSROOT%\log\dbmove.log
Step 5 Restart the system by entering:
net start crmdmgtd
Several Y2K Compliance Assessment Tool operations are potentially disruptive to the applications themselves (for example, stopping a process) and must be protected. To prevent such operations from being used accidentally or maliciously, this product uses a multilevel security system that allows access to certain features only to users who can authenticate themselves at the appropriate level.
The security features depend on the platform you are using. Table 6-1 shows available security levels:
| Level | Description |
|---|---|
0 | |
1 | |
2 | |
4 | |
8 |
Only systems administrators or superusers (admin login) can add or delete users or change certain user information. All users can change their own passwords.
To add a user, perform the following steps:
Step 1 Select Admin > User Accounts > Add Users.
The Add System Users dialog box appears. (See Figure 6-3.)
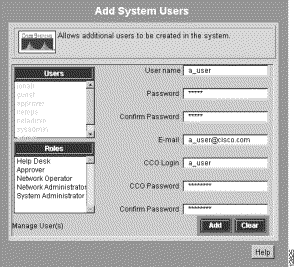
Step 2 Enter information in all fields, then click Add.
A confirmation message appears.
To delete users, perform the following steps:
Step 1 Select Admin > User Accounts > Modify/Delete Users.
The Modify Users dialog box appears. (See Figure 6-4.)
Step 2 Select the name of the user, then click Delete.
Step 3 Click Delete again. A confirmation message appears.
To change a password, perform the following steps:
Step 1 Select Admin > User Accounts > Modify My Profile.
The Modify My Profile dialog box appears. (See Figure 6-5.)
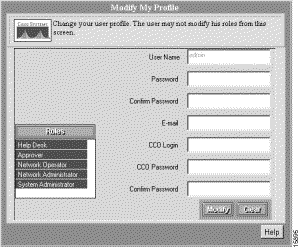
Step 2 Enter the new password and any other settings you want to change, then click Modify.
A confirmation message appears.
![]()
![]()
![]()
![]()
![]()
![]()
![]()
![]()
Posted: Thu Sep 30 16:04:52 PDT 1999
Copyright 1989-1999©Cisco Systems Inc.