|
|

These topics describe how to use URT to manage VLANs and users:
For a general overview of VLAN policies and how URT handles user logons and logoffs from VLANs, see:
URT VLAN-based policies control user access to VLANs. When using URT you must:
To grant access to VLANs other than the logon VLAN, you must create VLAN policies for users, groups, or organizational units by assigning them to the appropriate VLANs.
Before a user can access a VLAN and its services, you must assign a VLAN policy to that user.
Although you do not add or delete VLANs using URT, added and deleted VLANs affect your URT VLAN policies.
The following tasks describe how to set up and maintain VLANs for use with URT:
For each VTP domain, you must add the subnets and masks for each VLAN.
Step 2 Select Edit>Configure VLAN Subnets.
Step 3 In the Subnet Configuration window, select a VLAN from the list.
Step 4 Click Add.
Step 5 In the VLAN Configuration window, enter the IP addresses for any missing subnet and masks, then click OK.
Step 6 Repeat steps 3 through 5 until all subnet/mask pairs are displayed in the Subnet Configuration window.
 |
Note |
Every VTP domain has a default logon VLAN. When users log on, they are initially placed in that default logon VLAN. Users who are not associated with a specific VLAN remain in the default logon VLAN. If URT finds an association for a user, the user is placed in that VLAN.
The default logon VLAN provides unmapped users with network connectivity and ensures that they are authenticated before connecting to your network. When users log off, they are switched back to the logon VLAN.
To determine the logon VLAN for a VTP domain, select the VTP Domains folder in the left pane of the main window. Logon VLAN information for that domain is displayed in the right pane.
This is the VTP domain for which you are setting the logon VLAN.
|
Note Do not use the management VLAN (usually VLAN 1) as the URT logon VLAN. The management VLAN includes the IP addresses of the switches and is used to carry SNMP information. |
Step 2 Select Edit>Assign Logon VLAN.
The VTP Domain Configuration dialog box is displayed.
Step 3 Select the appropriate settings, as described in Table 5-1.
Table 5-1 VTP Domain Configuration Dialog Box
Step 4 Edit the subnet/mask information as follows:
Step 5 In the VTP Domain Configuration dialog box, click OK.
These topics describes the tasks associated with mapping users and groups to VLANs.
By associating or reassigning a user, group, or organizational unit to a VLAN, you ensure that users connect to the network in the correct VLAN—even if they log on through different systems or switch ports (for example, from a laptop).
Because the user always connects to the network in the same VLAN, you can create security policies based on VLANs and avoid MAC address-based VLAN mappings.
 |
Tip If a user has changed jobs within the company, you can move the user to the appropriate VLAN. |
A user's VLAN association overrides any group or organizational unit VLAN association. If the user has no VLAN association and you create one for a group or organizational unit to which the user belongs, the user is associated with the group or organizational unit VLAN.
|
Note URT does not override static VLAN assignments on switch ports. |
VLAN associations differ slightly for Microsoft Networking and Novell NetWare:
You must decide how you want to map users, groups, and organizational units to VLANs. Although you can later change VLAN mappings, developing a plan now for user-to-VLAN mappings can simplify your network management tasks.
If a user is likely to connect to the network from different locations, consider creating a VLAN mapping for each VTP domain the user is likely to access. To simplify VLAN associations, you can associate groups or organizational units to VLANs instead of users.
You must add the NT domain or NDS directory in which the user resides before you can assign the user to a VLAN. For more information, see the "Adding NT Domains and NDS Directories to URT" section.
|
Note You must have NT Administrator authority in the domain or NDS read and browse privileges in the directory. For more information, see the "Having Authority in Domains" section. |
For Microsoft Networking, URT recognizes only Windows NT global groups, not Windows NT local groups. If an NT group is not displayed in URT, it might be defined as a local group.
You can map a user to one VLAN per VTP domain. If a user connects to the network in a VTP domain for which you have not provided a VLAN mapping, the user is logged onto the default logon VLAN for the local VTP domain. The user also remains in the default logon VLAN if the assigned VLAN is not defined on the switch.
|
Note If a user is assigned to a VLAN, the icon is displayed in blue. When you select a user, the VLAN assignments for that user are displayed in the right pane. |
Step 2 In the Associate VLAN window, select the VTP domain and the VLAN to which you want to map the user, group, or organizational unit.
Step 3 Click OK.
If the user was already assigned to a different VLAN, the user is changed to the new VLAN the next time the switch polls the VPS.
After you add new VLANs to a VTP domain, you can associate users, groups, and organizational units with those VLANs in URT. If URT is already running, refresh the network information so that the new VLANs are displayed in the main window, using one of these methods:
For information about the steps required to associate users and groups to the new VLANS, see the "Associating or Reassigning a User, Group, or Organizational Unit to a VLAN" section.
Before deleting a VLAN from your network, you should reassociate users in URT. If you do not reassociate users but delete their VLAN, they stay in their logon VLAN and an error message is displayed on the VPS.
You must have NT Administrator authority in the domain or NDS read and browse privileges in the directory. For more information, see the "Having Authority in Domains" section.
Step 2 In the NT and NDS Domains folder, select each user, group, or organizational unit.
|
Note Users, groups, or organizational units associated with a nonexistent VLAN are displayed with a blue X in their icon. |
Step 3 To associate the selected user, group, or organizational unit with a different VLAN, click Associate or select Edit>Associate.
Step 4 Verify that the VLAN is not used as a logon VLAN by selecting the VTP domains folder and looking at the Logon VLAN list in the right pane. If the VLAN is listed there, edit the logon VLAN by selecting Edit>Assign Logon VLAN.
Step 5 When no associations for the VLAN remain in URT, delete the VLAN from the network.
Step 6 Click Refresh in the URT main window or select View>Refresh to update the window.
When you select the VTP domain, the deleted VLAN is no longer displayed.
If you no longer want a user, group, or organizational unit to be associated with a particular VLAN, you can delete the VLAN association.
|
Note If you delete the association without reassigning the user, group, or organizational unit to another VLAN, they use the default logon VLAN. |
You must have NT Administrator authority in the domain or NDS read and browse privileges in the directory. For more information, see the "Having Authority in Domains" section.
Step 2 Select Edit>Delete Association.
Step 3 Click Yes in the confirmation dialog box.
The user, group, or organizational unit is not deleted from the NT and NDS Domains folder—only the VLAN association is deleted.
You can use URT to create host-based dynamic VLAN policies. These topics describe the tasks for implementing host-based VLAN policies:
The list of MAC addresses in the URT main window displays only MAC addresses that have VLAN mappings.
Step 2 Click Add or select Edit>Add.
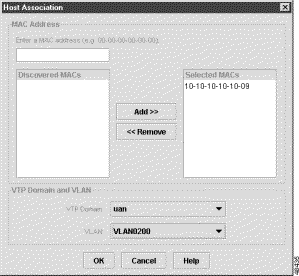
The Host Association dialog box is displayed (Figure 5-1). URT displays all unmapped MAC addresses in the Discovered MACs list. If a MAC address is already mapped to a VLAN, it is not displayed in the list (mapped MAC addresses are displayed only in the main window).
Step 3 Enter or select the MAC addresses to map.
|
Note You can select multiple MAC addresses by pressing the Shift key or the Ctrl key. All addresses you select must be associated with the same VLAN. |
You can map more than one address at a time to the same VLAN.
a. To quickly find out if a specific MAC address is in the discovered MAC list, enter the MAC address in the Enter a MAC Address text box. As you enter text, URT scrolls through the list of discovered MACs to the next address that matches your entry. If URT discovers the MAC address, it is highlighted.
b. If a desired address is not in the discovered MACs list, enter the full MAC address in the Enter a MAC Address text box, then click Add>> to add it to the list.
c. From the list of discovered addresses, select the MAC addresses to map to a specific VLAN, then click Add to add them to the selected MACs list.
Step 4 When you have selected all MAC addresses you want to map to the same VLAN, select the VTP domain and the desired VLAN.
Step 5 Click OK.
By default, URT ignores MAC-to-VLAN associations if the user logging on is assigned to a different VLAN in URT. You can require URT to use the MAC-to-VLAN association.
Step 2 In the URT Options window, click the Logon tab.
Step 3 Click the Retain MAC to VLAN Associations checkbox.
Step 4 Click OK.
You can edit the VLAN mappings for any host that has a mapping.
Step 2 In the Associate VLAN window, select the desired VTP domain and VLAN.
Step 3 Click OK.
If you no longer want to use host-based VLAN policies with a host, you can delete those host mappings from URT.
Step 2 Click Delete or select Edit>Delete.
URT deletes the MAC address and its VLAN mappings.
You can add user-to-VLAN or host-to-VLAN mappings using the command-line interface (CLI). Doing this is useful if you use an automated method of creating a text file with your mappings. You can create batch mappings by piping your text file into the urt command.
|
Note Make sure you define the NT domain or NDS tree using the URT main window before entering mappings for them on the command line. You cannot add domains or trees using the CLI. |
The urt.bat file that launches the URT Administrative GUI (main window) resides in the bin subdirectory of the URT root directory.
The syntax of the urt command is:
|
Tip For online help, enter urt -help. |
Table 5-2 describes the command syntax in more detail.
These topics describe the broader tasks of managing users within your network. Some of these tasks require using software other than URT and will help you to understand how URT fits into your typical user management procedures.
If a user requires a Microsoft Networking or Novell NetWare user account, follow this general procedure for adding the user to the network.
Step 2 From the URT main window, select the folder for the domain or directory.
Step 3 Select View>Refresh.
The newly added user is displayed in the folder for the domain or directory.
Step 4 If you already assigned the user to an existing group or organizational unit with a VLAN association, you do not need to create a VLAN association. Otherwise, assign the user to a VLAN.
When you delete users from the network, you should delete all of their accounts. When you delete users' NT and NDS user accounts, you also delete their VLAN associations.
When you restart URT or refresh the NT domain or NDS directory user list, users no longer defined are displayed with gray icons with a red X.
|
Note Deleting a user from the network does not delete the URT Client Module from the user's system. See the "Removing the URT Client Module from the Network" section. |
URT does not maintain a user's VLAN associations if you move the user account from one NT domain or NDS directory to another.
|
Note The VLAN Associations list in the right pane shows the old VLAN associations for the user. To keep the same associations, write them down. |
Step 2 Move the user account on the NT domain servers or NDS directories.
Step 3 In URT, select the username in the new NT domain or NDS directory.
Step 4 Associate the user with the desired VLANs. For more information about the procedure, see the "Associating or Reassigning a User, Group, or Organizational Unit to a VLAN" section.
To view a user's current VLAN information, select a domain or directory in the URT main window. The right pane shows the logged on users list as described in Table 5-3. You can use this information to troubleshoot or evaluate mappings.
If you select a user, group, or organizational unit, the VTP domain and VLAN to which the user is mapped are displayed in the right pane.
|
Note You cannot print a list of logged on users, VLAN associations, or other URT settings. |
A mismatch between a VLAN association and the VLAN to which a user is actually attached might occur if:
You can monitor the users connected to your network. For each user, you can see which network components are in use—for example, the switch, its port, and the VLAN to which the user is connected. You can also see the date and time the user was last seen on the network.
To keep track of user logons and logoffs over time, you can enable history logging. To minimize the amount of disk space devoted to history files, you can establish how many files to retain.
With history logging enabled, you can view history from the URT main window.
These topics describe how to monitor users with URT:
URT keeps track of which users are logged onto the network. When you select an NT or RADIUS domain or NDS or LDAP directory, the users connected in that domain or directory are displayed in the right pane.
Table 5-3 describes the information shown for logged on users.
Table 5-3 Logged On Users List
You can view historical information about user logons and logoffs and MAC addresses in centralized files maintained by URT. URT history files contain the following data:
|
Note When viewing user events, most of this data is displayed. When viewing MAC events, only a subset of this data is displayed. |
Step 2 Click the History tab.
Step 3 The Enable history logging checkbox is selected by default.
Step 4 Select the location in which to store the history files.
Step 5 You can manage history files by size or date. By default, the Date radio button is selected:
|
Note If you do not enter any values, URT uses the default values (10 MB for the maximum log file size, and 999 for the maximum number of log files). |
Step 6 Click OK.
In the URT history files, you can view details about user logon and logoff and events for new MAC addresses displayed on a switch port.
You can also rearrange column headings, sort the history by column, and delete rows of history.
You must have history logging enabled. Refer to the "Enabling the URT History Log" section for more information.
|
Tip Click Refresh to update the history log with recent information. |
The View History Files dialog box is displayed.
Step 2 Click the radio button for User events or MAC events.
Step 3 Select the files you want to view or click Select All to view all files in that directory.
Step 4 Click OK.
The History Log displays and the rows are color-coded:
Step 5 To find a specific history record:
The Find dialog box is displayed.
b. On the Simple tab, enter the string you want to find.
|
Note Do not select more than 20 MB of history data to display at any one time. When you view all history files, sorting or scrolling can be slowed. |
The history log scrolls to the next matching record, if found.
Step 6 You can edit the history log using one of these methods:
Users or groups not mapped to VLANs are displayed with gray icons in the left pane. To find these users or groups, open the directory or domain folder and look for gray icons.
Users not mapped to a particular VLAN are assigned a VLAN as follows:
URT can switch users into VLANs only if their workstations are directly connected to a supported switch. Because users connecting over serial lines are not connected to switches of the appropriate type, URT does not handle or otherwise affect these users. Their network connections remain unchanged after you deploy URT in your network.
You can map a user to one VLAN for each VTP domain. If you have separate VTP domains in each remote location, you can create an appropriate association for your mobile users for each location they visit.
If you do not assign a mobile user specific associations for each VTP domain, the user might be switched to a VLAN as follows:
If the logon VLAN you create for the VTP domain is sufficient for your mobile users, you do not need to create associations for each VTP domain.
If a workstation is directly connected to a static switch port—that is, a port assigned to a specific VLAN—the user remains in the VLAN defined on the switch, even if you map the user to another VLAN in URT.
URT does not override static VLAN assignments on switch ports.
![]()
![]()
![]()
![]()
![]()
![]()
![]()
![]()
Posted: Tue May 20 18:33:10 PDT 2003
All contents are Copyright © 1992--2003 Cisco Systems, Inc. All rights reserved.
Important Notices and Privacy Statement.