The VLAN Policy Server 1101 is a network management device that runs a common set of management services and the User Registration Tool (URT) VLAN Policy Server (VPS).
For detailed information about installing URT on your VPS, see Installation and Setup Guide for the Cisco Secure User Registration Tool, including the "Summary of Installation Tasks" section.
For detailed information about URT, see User Guide for the Cisco Secure User Registration Tool.
The VLAN Policy Server has a bezel that attaches to its front and covers the front panel. This bezel contains two Ethernet indicators, a power indicator, and a power button, and provides access to the console/serial port. Figure 1-1 shows the bezel's features.
To install the bezel, insert the tabs on each end of the bezel into the flanges on each side of the VLAN Policy Server. To remove the bezel, press the tabs and lift it from the chassis.
Figure 1-1 Bezel Features
1
Power indicator
2
Ethernet 0 activity/link indicator
3
Console/serial port access
4
Ethernet 1 activity/link indicator
5
Bezel mounting tabs (2)
6
Flanges (2)
Front Panel Features
The VLAN Policy Server front panel contains switches (see System Switches), indicators (see System Indicators), a CD-ROM drive, and the console/serial port. To access the front panel, remove the bezel. Figure 1-2 shows the front panel features.
Caution When connecting a console to the VLAN Policy Server, use the console/serial port on the front panel. Do not use the serial port located on the rear panel of the VLAN Policy Server.
Figure 1-2 Front Panel Features
1
CD-ROM drive
2
System fault indicator
3
Ethernet 0 activity/link indicator
4
Ethernet 1 activity/link indicator
5
Console/serial port
6
Non-maskable interrupt switch
7
Reset switch
8
Sleep switch (not supported)
9
Power switch
10
Hard drive indicator
11
Power indicator
System Indicators
When troubleshooting your system, you might need to check the status of the indicators on the system front panel, shown in Figure 1-2. The appearance and function of these lights are described in Table 1-1.
Table 1-1 System Indicators
Indicator
Color
Function
Power
Green
The power indicator lights up when the VLAN Policy Server is connected to an AC power source, and blinks when the VLAN Policy Server is in sleep mode.
The bezel contains a duplicate of this indicator.
System fault
Amber
The system fault indicator blinks during system startup and when a system fault is detected.
This indicator is not visible with the bezel attached.
Hard drive activity
Green
The hard drive activity indicator blinks when hard drive activity occurs.
This indicator is not visible with the bezel attached.
Ethernet 0 activity/link
Amber
The Ethernet 0 activity/link indicator lights up when the Ethernet 0 port is connected to a network, and blinks when activity occurs on this channel.
The bezel contains a duplicate of this indicator.
Ethernet 1 activity/link
Amber
The Ethernet 1 activity/link indicator lights up when the Ethernet 1 port is connected to a network, and blinks when activity occurs on this channel.
The bezel contains a duplicate of this indicator.
System Switches
Figure 1-2 shows the location of the switches on the VLAN Policy Server front panel. To activate a switch, press the corresponding icon on the front panel, as shown in Figure 1-2. Table 1-2 describes the function of these switches.
Table 1-2 Front-Panel Switches
Switch
Function
Power switch
The power switch turns the VLAN Policy Server power on or off. To turn system power off, press and hold this switch for at least 4 seconds.
There is a power switch on both the bezel and the front panel.
Sleep switch
The sleep switch places the system in sleep mode.
This switch is accessible only when the bezel is removed.
Reset switch
The reset switch reboots the system. If you cannot shut down the VLAN Policy Server using the operating system, press the reset switch.
This switch is accessible only when the bezel is removed.
Non-Maskable Interrupt switch
Use this switch only when instructed to do so by the Cisco Technical Assistance Center (TAC).
This switch is accessible only when the bezel is removed.
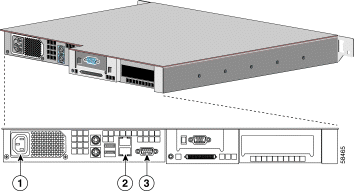
Back Panel Features
The back panel contains the VLAN Policy Server AC power receptacle, Ethernet connectors, and a serial port. Figure 1-3 shows the back panel connections. Do not attach peripheral devices, such as mice, monitors, and keyboards, to the VLAN Policy Server. It does not support their use.
Figure 1-3 Back Panel Connections
1
AC power receptacle
2
Ethernet connectors (Ethernet 0 is the lower port, and Ethernet 1 is the upper port)
3
Serial port
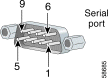
Serial Ports
The two integrated serial ports, on the front and back panels of the system, use 9-pin D-subminiature connectors.
Serial Port Connectors
If you reconfigure your hardware, you may need pin number and signal information for the serial port connectors. Figure 1-4 shows the pin numbers for the serial port connectors, and Table 1-3 defines the pin assignments and interface signals for the serial port connectors.
Figure 1-4 Pin Numbers for the Serial Port Connectors
Table 1-3 Serial Port Pin Assignments
Pin
Signal
I/O
Definition
1
DCD
I
Data carrier detect
2
SIN
I
Serial input
3
SOUT
O
Serial output
4
DTR
O
Data terminal ready
5
GND
N/A
Signal ground
6
DSR
I
Data set ready
7
RTS
O
Request to send
8
CTS
I
Clear to send
9
RI
I
Ring indicator
Shell
N/A
N/A
Chassis ground
Ethernet Connectors
Your system has integrated 10/100-Mbps Ethernet connectors. Each Ethernet connector provides all the functions of a network expansion card and supports both the 10BASE-T and 100BASE-TX Ethernet standards.
WarningTo avoid electric shock, do not connect safety extra-low voltage (SELV) circuits to telephone-network voltage (TNV) circuits. LAN ports contain SELV circuits, and WAN ports contain TNV circuits. Some LAN and WAN ports both use RJ-45 connectors. Use caution when connecting cables.
Waarschuwing
Om elektrische schokken te vermijden, mogen veiligheidscircuits met extra lage spanning (genaamd SELV = Safety Extra-Low Voltage) met telefoonnetwerkspanning (TNV) circuits verbonden worden. LAN (Lokaal netwerk) poorten bevatten SELV circuits en WAN (Regionaal netwerk) poorten bevatten TNV circuits. Sommige LAN en WAN poorten gebruiken allebei RJ-45 connectors. Ga voorzichtig te werk wanneer u kabels verbindt.
Varoitus
Jotta vältyt sähköiskulta, älä kytke pienjännitteisiä SELV-suojapiirejä puhelinverkkojännitettä (TNV) käyttäviin virtapiireihin. LAN-portit sisältävät SELV-piirejä ja WAN-portit puhelinverkkojännitettä käyttäviä piirejä. Osa sekä LAN- että WAN-porteista käyttää RJ-45-liittimiä. Ole varovainen kytkiessäsi kaapeleita.
Attention
Pour éviter une électrocution, ne raccordez pas les circuits de sécurité basse tension (Safety Extra-Low Voltage ou SELV) à des circuits de tension de réseau téléphonique (Telephone Network Voltage ou TNV). Les ports du réseau local (LAN) contiennent des circuits SELV et les ports du réseau longue distance (WAN) sont munis de circuits TNV. Certains ports LAN et WAN utilisent des connecteurs RJ-45. Raccordez les câbles en prenant toutes les précautions nécessaires.
Warnung
Zur Vermeidung von Elektroschock die Sicherheits-Kleinspannungs-Stromkreise (SELV-Kreise) nicht an Fernsprechnetzspannungs-Stromkreise (TNV-Kreise) anschließen. LAN-Ports enthalten SELV-Kreise, und WAN-Ports enthalten TNV-Kreise. Einige LAN- und WAN-Ports verwenden auch RJ-45-Steckverbinder. Vorsicht beim Anschließen von Kabeln.
Avvertenza
Per evitare scosse elettriche, non collegare circuiti di sicurezza a tensione molto bassa (SELV) ai circuiti a tensione di rete telefonica (TNV). Le porte LAN contengono circuiti SELV e le porte WAN contengono circuiti TNV. Alcune porte LAN e WAN fanno uso di connettori RJ-45. Fare attenzione quando si collegano cavi.
Advarsel
Unngå å koble lavspenningskretser (SELV) til kretser for telenettspenning (TNV), slik at du unngår elektrisk støt. LAN-utganger inneholder SELV-kretser og WAN-utganger inneholder TNV-kretser. Det finnes både LAN-utganger og WAN-utganger som bruker RJ-45-kontakter. Vær forsiktig når du kobler kabler.
Aviso
Para evitar choques eléctricos, não conecte os circuitos de segurança de baixa tensão (SELV) aos circuitos de tensão de rede telefónica (TNV). As portas LAN contêm circuitos SELV e as portas WAN contêm circuitos TNV. Algumas portas LAN e WAN usam conectores RJ-45. Tenha o devido cuidado ao conectar os cabos.
¡Advertencia!
Para evitar la sacudida eléctrica, no conectar circuitos de seguridad de voltaje muy bajo (safety extra-low voltage = SELV) con circuitos de voltaje de red telefónica (telephone network voltage = TNV). Los puertos de redes de área local (local area network = LAN) contienen circuitos SELV, y los puertos de redes de área extendida (wide area network = WAN) contienen circuitos TNV. En algunos casos, tanto los puertos LAN como los WAN usan conectores RJ-45. Proceda con precaución al conectar los cables.
Varning!
För att undvika elektriska stötar, koppla inte säkerhetskretsar med extra låg spänning (SELV-kretsar) till kretsar med telefonnätspänning (TNV-kretsar). LAN-portar innehåller SELV-kretsar och WAN-portar innehåller TNV-kretsar. Vissa LAN- och WAN-portar är försedda med RJ-45-kontakter. Iaktta försiktighet vid anslutning av kablar.
Network Cable Requirements
Your VLAN Policy Server Ethernet connectors are designed for attaching an unshielded twisted-pair (UTP) Ethernet cable equipped with standard RJ-45 compatible plugs. Press one end of the UTP cable into the Ethernet connector until the plug snaps securely into place. Connect the other end of the cable to an RJ-45 jack wall plate or to an RJ-45 port on a UTP concentrator or hub, depending on your network configuration. Observe the following cabling restrictions for 10BASE-T and 100BASE-TX networks:
For 10BASE-T networks, use Category 3 or higher wiring and connectors.
For 100BASE-TX networks, use Category 5 or higher wiring and connectors.
The maximum cable run length (from a workstation to a concentrator) is 328 feet or 100 meters.
For 10BASE-T networks, the maximum number of daisy-chained concentrators on one network segment is four.
Note To avoid line interference, voice and data lines must be in separate
sheaths.