|
|

1 Hosting Solution Engine Overview
3 Installing and Configuring the Hosting Solution Engine
4 Getting Started with the Hosting Solution Engine
The Cisco Hosting Solution Engine is a hardware-based daily operational solution to monitor and activate a variety of services in Cisco-powered data centers.
The Solution Engine gathers and displays fault and performance information for the Cisco devices that have been configured for monitoring.
When you log on to the Hosting Solution Engine, the device information displayed is based on your user log in.
You have the ability to customize views so that you can easily view the information that is most important to you.
The Hosting Solution Engine has the following major features:
Real-time monitoring for routers, switches, firewalls, and server load balancing devices.
Reports for all devices being monitored, which allows you to track server loads, usage, and other trends. The reports can be printed or exported as HTML.
Customized views, based on your user login, that allow you to view the information that is most critical to you.
Ability to provision and display different types of load balancers, such as Content Services Switch and LocalDirector.
Secure communication for a flexible user base.
This quick start guide is designed to help you get your Hosting Solution Engine installed and ready to use as quickly as possible. If you require more comprehensive installation and configuration information, see the Installation and Configuration Guide for the Cisco 1105 Hosting Solution Engine. It is available in PDF format on the Recovery CD.
 |
Warning Read the installation instructions before you connect the system to its power source. |
|
Warning Only trained and qualified personnel should be allowed to install, replace, or service this equipment. |
|
Warning This unit is intended for installation in restricted access areas. A restricted access area is where access can only be gained by service personnel through the use of a special tool, lock and key, or other means of security, and is controlled by the authority responsible for the location. |
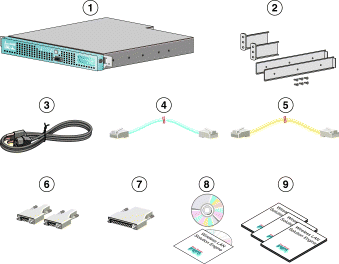
The Hosting Solution Engine package should include the following:
To install the Hosting Solution Engine, you will need the following:
Install the system in compliance with your local and national electrical codes.
Table 1 Task List Table
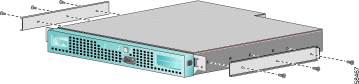
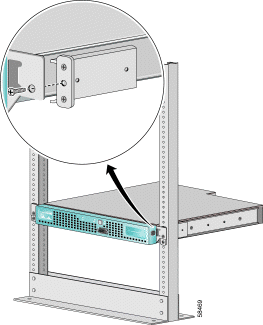
Step 2 Attach the rack-mount brackets to the rack. Make sure all three bracket holes line up with the holes on the rack.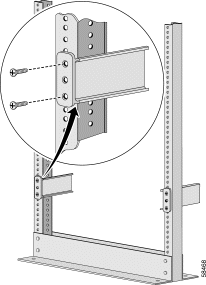
Step 3 Put the chassis into the rack and tighten the screws.
 |
Caution The rack-mount kit is not intended for use as a slide rail system. You must complete installation of the front-mount bracket assembly by securely fastening the chassis into the rack. |
|
Warning This product relies on the building's installation for short-circuit (overcurrent) protection. Ensure that a fuse or circuit breaker no larger than 120 VAC, 15A U.S. (240 VAC, 10A outside the U.S.) is used on the phase conductors (all current-carrying conductors). |
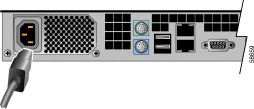
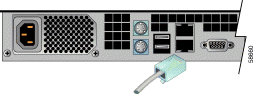
Step 4 Connect the AC power receptacle to the AC power source with the provided power cable.
Step 5 Plug the network connection into the Ethernet 0 port (the lower port).
This is necessary to enable discovery of the devices on your network. You must configure the network devices you want to monitor so that the Hosting Solution Engine can discover and monitor them. To perform these tasks, use the Command Line Interface (CLI) of the devices.
Table 2 Device Configuration Table
|
After you install and plug in the Hosting Solution Engine, you are ready to configure it at a console through the Command Line Interface (CLI).
 |
Note When connecting a console to the Hosting Solution Engine, use the console / serial port on the front panel. Do not use the serial port located on the rear panel of the Hosting Solution Engine. |
Step 2 Press the power switch to turn on the Hosting Solution Engine.
Step 3 Open a window for the system console, using a terminal emulation program if necessary.
The system begins booting and sends messages to the console window. When the system finishes booting, the localhost: login prompt appears. When the login prompt appears, you can configure the system.
Step 4 Enter setup at the login: prompt, then enter responses to the prompts that appear. The Hosting Solution Engine Setup Program Description Table on page 12 describes how to respond to the prompts.
Press Enter to enter a response and proceed to the next prompt. Press Backspace or Delete to delete characters.
After you enter a response, you cannot edit it again. To change an entered response you must exit the setup program and enter your responses again. You can exit the setup program by pressing Ctrl-c, or by entering no after the final prompt.
Table 3 Hosting Solution Engine Setup Program Description Table
|
Step 5 Answer the next set of prompts to configure the Hosting Solution Engine to discover devices. The Hosting Solution Engine Discovery Configuration Table below describes how to respond to the prompts. If you want to configure the Hosting Solution Engine to discover devices using the GUI, you can skip this part of the configuration by entering no at the first prompt. See the "Discovering the Network" section for details.
|
Note Before you discover the network, make sure all the devices you want to
monitor are set up correctly.
Table 4 Hosting Solution Engine Discovery Configuration Table
|
Step 6 Answer the next set of prompts to create a self-signed certificate. This certificate will allow you to access the Solution Engine securely, using HTTPS, until you are able to obtain a certificate from a certificate authority (CA). The Self-Signed Certificate Table describes how to respond to the prompts. After you finish responding to these prompts, the Hosting Solution Engine will reboot.
|
Note Do not type a period "." at each prompt. If you type "." the certificate will
not be generated and you will be prompted to re-enter your information. If you do
not wish to answer these questions, press enter at each prompt to generate a
functional self-signed certificate.
Table 5 Self-Signed Certificate Table
|
The Hosting Solution Engine resolves hostnames by using a Domain Name System server, or by importing host files using the import CLI command. If you are using a DNS server, register the system in Domain Name System DNS on a DNS server. Use the Solution Engine's hostname as its DNS name. If you plan on using the import command, refer to the Installation and Configuration Guide for the Cisco 1105 Hosting Solution Engine.
The Hosting Solution Engine does not require name resolution, but if it is not used, the following problems are among those that will occur:
If you are not using a DNS server, perform the same steps described in the "Configuring the Hosting Solution Engine" section, with the following exceptions:
DNS sever ip address: prompt, enter any IP address.
Step 2 After you have finished configuring the Hosting Solution Engine, erase the IP address you entered by entering the following CLI command:
where ip-address is the IP address you entered at the DNS sever ip address: prompt. For more information, see the Installation and Configuration Guide for the Cisco 1105 Hosting Solution Engine.
After configuring the Hosting Solution Engine, verify the configuration. Perform the following steps at the console to confirm that your settings are correct and that the system can communicate with the network:
Step 2 If you are using a DNS server, enter the following command to verify that the Solution Engine can obtain DNS services from the network:
where dns-name is the DNS name of a host that is registered in DNS. If the system cannot obtain the IP address of the host from DNS, use the ip name-server command to configure a working DNS server. For more information, see the Installation and Setup Guide for the Cisco 1105 Hosting Solution Engine.
Step 3 Enter the following command to verify that the system can communicate with the network:
where ip-address is the IP address of a host that is accessible on the network. A DNS server is a recommended host to ping because it should always be running and accessible.
Step 4 Enter the command show config to verify that the configuration is as you expected.
Step 5 Enter the show clock command to verify that the system time and date are correct in Coordinated Universal Time (UTC).
|
Note The system clock is preset to UTC. The system uses only UTC for keeping and displaying the time and date. |
Step 6 If the time or date is incorrect, set the correct time and date using the clock command.
Step 7 If your network uses NTP, configure the system to use NTP to set the clock. See the Installation and Setup Guide for the Cisco 1105 Hosting Solution Engine for details.
Step 8 Enter the exit command to log out of the system. You are now finished using the console.
To configure a Web browser, perform the following steps:
Step 2 Enable JavaScript.
Step 3 Configure your browser to accept all cookies.
Step 4 Change the default font to sans serif for improved readability.
See your browser's documentation for information on performing these steps.
Connect to the system using a Web browser, and perform the following steps to verify HTTP and HTTPS connectivity:
For example, if the system IP address is 209.165.202.128, enter http://209.165.202.128:1741 .
Step 2 To verify HTTPS connectivity, enter the system IP address in a web browser, prefixed by https. No port number is needed.
For example, if the system IP address is 209.165.202.128, enter https://209.165.202.128.
Step 3 Enter the User Name admin and the password you created during setup in the login dialog box.
There are two parts to getting the Hosting Solution Engine ready for use: setting up and discovering the devices, and enabling other users to use the Hosting Solution Engine. The Hosting Solution Engine (Hosting Solution Engine) automatically discovers Cisco CDP-enabled devices during the initial configuration. To discover your devices, you must add your seed devices, run and verify discovery, and set up network device credentials. After you discover and verify the network devices, you must create Hosting Solution Engine Domains, create Roles, and add Users to allow others access the Hosting Solution Engine. If you configured the Hosting Solution Engine to discover devices during setup, you do not need to add seed devices and run discovery. Use the GUI to verify that your devices were discovered, and configure the device credentials.
Table 6 Getting Started Table
|
If you configured the Hosting Solution Engine to discover devices during setup, you only need to verify that your devices were discovered. Continue on to the "Verifying Device Discovery" section for details. If you chose not to configure the Hosting Solution Engine to discover devices at setup, you can do it now using the GUI.
After you set up your network, add seed devices. For information on setting up your network, see the "Installation and Configuration Overview" section. To add seed devices from the GUI, select Administration>Device Manager. See the online help for details.
By adding a seed device (or set of seed devices), the neighbors of the seed device are discovered using CDP. If the device you want to manage does not support CDP, you must set that device as a seed. If you want the Hosting Solution Engine to discover devices beyond router boundaries, select the Jump Router Boundaries check box. You can specify multiple seed devices to:
|
Note Because the Content Services Switch, PIX Firewall, and LocalDirector do not support CDP, you must add them as seed devices. |
After you add seed devices, the Hosting Solution Engine can discover your devices. The Hosting Solution Engine automatically discovers devices in your network every four hours, however, you can manually discover the network devices at any time. Select Administration>Device Manager, and click Discover. See the online help for details.
To verify that all the devices you want to monitor have been discovered, select Administration>Device Manager. The discovered devices will appear in the device management tree.
Before you can provision Content Services Switches, IOS SLBs, Content Switching Modules, and LocalDirectors, you must provide the device credentials. You must also make sure that the SNMP settings on the Hosting Solution Engine correspond to the settings on your devices. After you set up device credentials, run discovery again so that the Hosting Solution Engine can discover services for those devices. Select Administration>Device Manager. See the online help for details.
After you set up the network and make sure your devices have been discovered, configure the Hosting Solution Engine for others to use. You must create Hosting Solution Engine Domains, create Roles, and add Users.
A domain is a grouping of devices on the network. The Hosting Solution Engine provides three predefined domains:
You can partition the network into logical subgroups to create additional domains. The domains created by users can be modified and deleted. To add domains, select Tiered Access > Domains.
After you create domains, you can create user roles. A user's role determines which Hosting Solution Engine features that user is allowed to access. The Hosting Solution Engine provides four predefined user roles:
|
Note The predefined user roles cannot be deleted, but they can be modified. The System Administrator role, however, cannot be modified or deleted. |
To create additional roles with different privileges, select Tiered Access > Roles.
After you create domains and roles, you can create users. You assign domains and roles to users to control the devices and features each user can access. To add users, select Tiered Access > Accounts.
The following sections provide sources for obtaining additional information on the Hosting Solution Engine.
The following sections provide sources for obtaining documentation from Cisco Systems.
You can access the most current Cisco documentation on the World Wide Web at the following sites:
Cisco documentation and additional literature are available in a CD-ROM package, which ships with your product. The Documentation CD-ROM is updated monthly and may be more current than printed documentation. The CD-ROM package is available as a single unit or as an annual subscription.
Cisco documentation is available in the following ways:
http://www.cisco.com/cgi-bin/order/order_root.pl
http://www.cisco.com/go/subscription
If you are reading Cisco product documentation on the World Wide Web, you can submit technical comments electronically. Click Feedback in the toolbar and select Documentation. After you complete the form, click Submit to send it to Cisco.
You can e-mail your comments to bug-doc@cisco.com.
To submit your comments by mail, use the response card behind the front cover of your document, or write to the following address:
Attn Document Resource Connection
Cisco Systems, Inc.
170 West Tasman Drive
San Jose, CA 95134-9883
Cisco provides Cisco.com as a starting point for all technical assistance. Customers and partners can obtain documentation, troubleshooting tips, and sample configurations from online tools. For Cisco.com registered users, additional troubleshooting tools are available from the TAC website.
Cisco.com is the foundation of a suite of interactive, networked services that provides immediate, open access to Cisco information and resources at anytime, from anywhere in the world. This highly integrated Internet application is a powerful, easy-to-use tool for doing business with Cisco.
Cisco.com provides a broad range of features and services to help customers and partners streamline business processes and improve productivity. Through Cisco.com, you can find information about Cisco and our networking solutions, services, and programs. In addition, you can resolve technical issues with online technical support, download and test software packages, and order Cisco learning materials and merchandise. Valuable online skill assessment, training, and certification programs are also available.
Customers and partners can self-register on Cisco.com to obtain additional personalized information and services. Registered users can order products, check on the status of an order, access technical support, and view benefits specific to their relationships with Cisco.
To access Cisco.com, go to the following website:
The Cisco TAC website is available to all customers who need technical assistance with a Cisco product or technology that is under warranty or covered by a maintenance contract.
If you have a priority level 3 (P3) or priority level 4 (P4) problem, contact TAC by going to the TAC website:
P3 and P4 level problems are defined as follows:
In each of the above cases, use the Cisco TAC website to quickly find answers to your questions.
To register for Cisco.com, go to the following website:
http://www.cisco.com/register/
If you cannot resolve your technical issue by using the TAC online resources, Cisco.com registered users can open a case online by using the TAC Case Open tool at the following website:
http://www.cisco.com/tac/caseopen
If you have a priority level 1 (P1) or priority level 2 (P2) problem, contact TAC by telephone and immediately open a case. To obtain a directory of toll-free numbers for your country, go to the following website:
http://www.cisco.com/warp/public/687/Directory/DirTAC.shtml
P1 and P2 level problems are defined as follows:
![]()
![]()
![]()
![]()
![]()
![]()
![]()
![]()
Posted: Wed Nov 5 12:30:38 PST 2003
All contents are Copyright © 1992--2003 Cisco Systems, Inc. All rights reserved.
Important Notices and Privacy Statement.