|
|

This chapter describes how to add subscribers and create subscriber configurations using CDM. This chapter also includes instructions for setting up subscriber permanent virtual channels and transit subscriber virtual channels.
This chapter includes the following sections:
You can configure subscriber properties for both preprovisioned modules and modules that the software detects after you deploy the DSLAM chassis. When you preprovision the settings for a subscriber, this subscriber is not in service until you have inserted the module and commissioned the Cisco DSLAM chassis.
When you create subscriber properties, you use the Create Subscriber Dialog windows. This section gives an overview of the Create Subscriber Dialog windows for each of the types of modem ports—CAP ADSL, DMT-2, and STU-C (for Flexi line cards, refer to the appropriate module type, either CAP ADSL or DMT-2). A special section of guidelines for setting Reed-Solomon coding on CAP ADSL modules is also included. Instructions for setting subscriber values are in the "Steps for Creating Subscriber Properties" section.
This section includes the following topics:
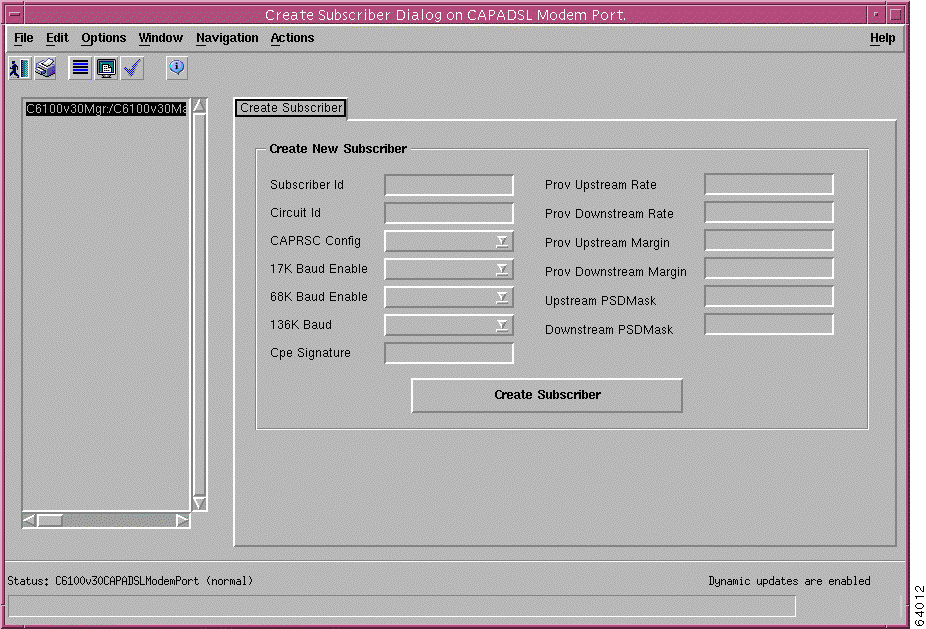
To create subscribers on CAP ADSL modem ports and set values for these subscribers, open the Create Subscriber Dialog on CAP ADSL Modem Port window, which is shown in Figure 3-1. To open the window, see "Steps for Creating Subscriber Properties" section.
Table 3-1 describes the fields in the Create Subscriber Dialog on CAP ADSL Modem Port window.
| Field | Description |
|---|---|
Use this field to input the ID for a new subscriber. Enter 1 to 20 alphanumeric characters. |
|
Use this field to configure an identifier that is assigned to the local loop (the phone line that goes to the CPE). Setting this field is optional. The Circuit ID depends on whether a port is a competitive local exchange carrier (CLEC) or an independent local exchange carrier (ILEC). |
|
Use to enable Reed-Solomon coding. Choose one of the following settings: See the "Guidelines for Setting Reed-Solomon Coding" section for more information about setting this field. |
|
Enter the value that reflects the type of CPE that is connected to the Cisco DSLAM chassis. Use the service provider standard setting or choose 0. |
|
Enter the setting for the maximum trained upstream rate of a subscriber modem. Use the tooltips to select the valid configuration settings, which are measured in kilobits per second. |
|
Enter the setting for the maximum trained downstream rate of a subscriber modem. Use the tooltips to select the valid configuration settings, which are measured in kilobits per second. |
|
Enter an associated upstream margin value for a subscriber. Use the tooltips to select the valid choices for this value. Note Margin values are assigned by the service provider and based on a subscriber service order. |
|
Enter an associated downstream margin value for a subscriber. Use the tooltips to select the valid choices for this value. |
|
| 1CAPRSC = CAP Reed-Solomon coding
2CPE = customer premises equipment 3PSD = power spectral density |
You can configure Reed-Solomon error coding per subscriber.
 |
Note You can disable Reed-Solomon coding for the 136 kilobaud rate in the downstream direction for CAP ADSL modules only. |
Consider the following guidelines in relation to using Reed-Solomon coding:
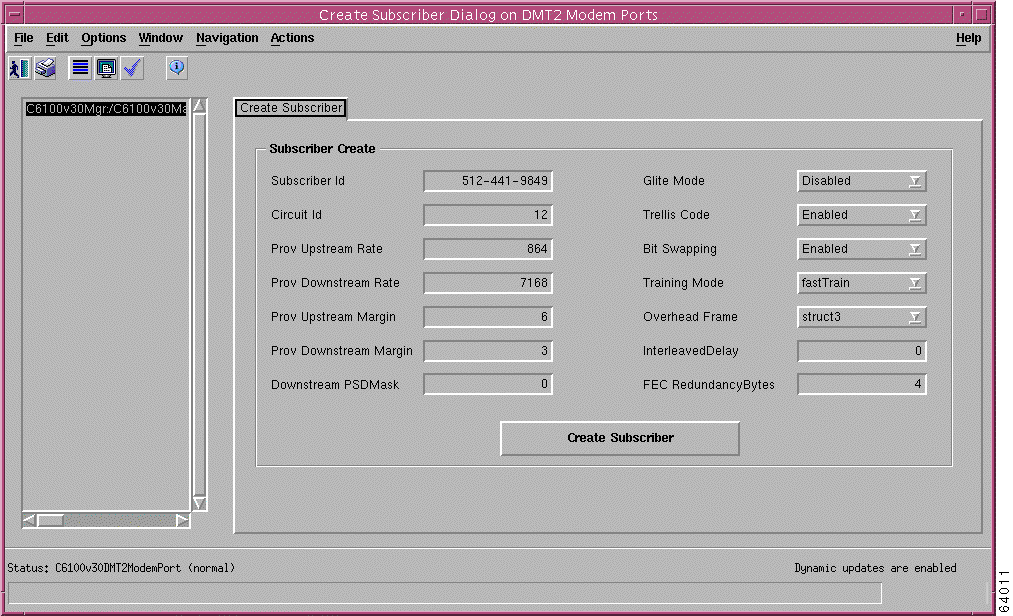
To create subscribers on DMT-2 modem ports and set the values for these subscribers, you must open the Create Subscriber Dialog on DMT2 Modem Ports window, which is shown in Figure 3-2. To open the window, see "Steps for Creating Subscriber Properties" section.
Table 3-2 describes the fields in the Create Subscriber Dialog window that are specific to DMT-2 modules.
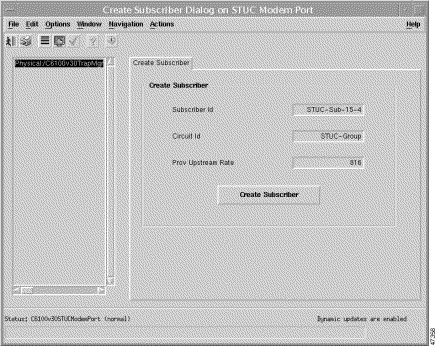
To create subscribers on STU-C modem ports and set the values for these subscribers, you must open the Create Subscriber Dialog on STU-C Modem Ports window, which is shown in Figure 3-3. To open the window, see "Steps for Creating Subscriber Properties" section.
Table 3-3 describes the fields on the Create Subscriber Dialog on STU-C Modem Port window.
To create subscriber properties, complete the following steps. Refer to Table 3-1 and Table 3-2 for descriptions of the fields in the Create Subscriber windows.
Step 2 Under the C6100v30 MultiplexerChassis, select the line card for which you want to configure a subscriber, as shown in Figure 3-4.
A graphical list of all available ports for the line card displays on the right side of the Map Viewer.
|
Note You can check whether a subscriber has already been assigned to a port by expanding the line card hierarchy to display all ports. If you can further expand the port hierarchy, a subscriber has already been assigned to the port. CDM issues an error if you try to create a subscriber for a port to which a subscriber has already been assigned. |
Step 3 From the right side of the Map Viewer, right-click the port to which you want to assign a subscriber.
Step 4 Choose Open Create Subscriber Dialog on [port name]—Depending on the type of port for which you are creating a subscriber.
The Create Subscriber Dialog window, shown in Figure 3-5 and in Figure 3-6, opens.
The type of Create Subscriber Dialog window that opens depends on the type of module for which you are adding or creating subscriber properties.
Step 5 Enter the value in the Subscriber ID field.
Step 6 Enter the value for the Circuit ID field; this field is optional.
 |
Caution You must enter a value in every field that follows. For fields with the choice of Disabled or Enabled, you must use the drop-down arrow and select either Disabled or Enabled. If you do not manually choose Disabled or Enabled, the value is read as null. |
Step 7 Enter a value in the Prov Upstream Rate field to provision this rate.
Step 8 Enter a value in the Prov Downstream Rate field to provision this rate.
Step 9 Enter a value in the Prov Upstream Margin field to provision this rate.
Step 10 Enter a value in the Prov Downstream Margin field to provision this rate.
Step 11 For CAP ATU-C modules, select the appropriate choices in the CAPADSL-specific fields as follows:
a. Select ShortInterleave or LongInterleave in the CAPRSC Config field.
b. Select Disabled or Enabled in the 17K Baud Enable field.
Step 12 For DMT-2 modules, select the appropriate choices in the DMT-specific fields as follows:
a. Select Enabled or Disabled in the GLite field.
b. Select Enabled or Disabled in the Trellis Code field.
c. Select Standard or Fast in the Training Mode field.
d. Select Enabled or Disabled in the Bit Swapping field.
e. Use the down arrow to select the Overhead Frame value—Either struct0, struct1, struct2, or struct3.
Step 13 Click Create Subscriber to create these settings for specific modules or subscribers.
A confirmation dialog box opens.
Step 14 Click Yes in the confirmation dialog box.
The Action Report window opens to inform you whether the process is successful.
This section includes instructions for changing subscriber properties as follows:
Complete the following steps to change subscriber settings on a CAP ADSL interface:
Step 2 Below the C6100v30 MultiplexerChassis, select the CAP ADSL line card for which you want to configure a subscriber.
A graphical list of all available ports for the line card displays on the right side of the Map Viewer.
|
Note You can check whether a subscriber has already been assigned to a port by expanding the line card hierarchy to display all ports. If you can further expand the port hierarchy, a subscriber has already been assigned to the port. CDM issues an error if you try to create a subscriber for a port to which a subscriber has already been assigned. |
Step 3 From the right side of the Map Viewer, right-click the port to which you want to assign a subscribe to access the object menu.
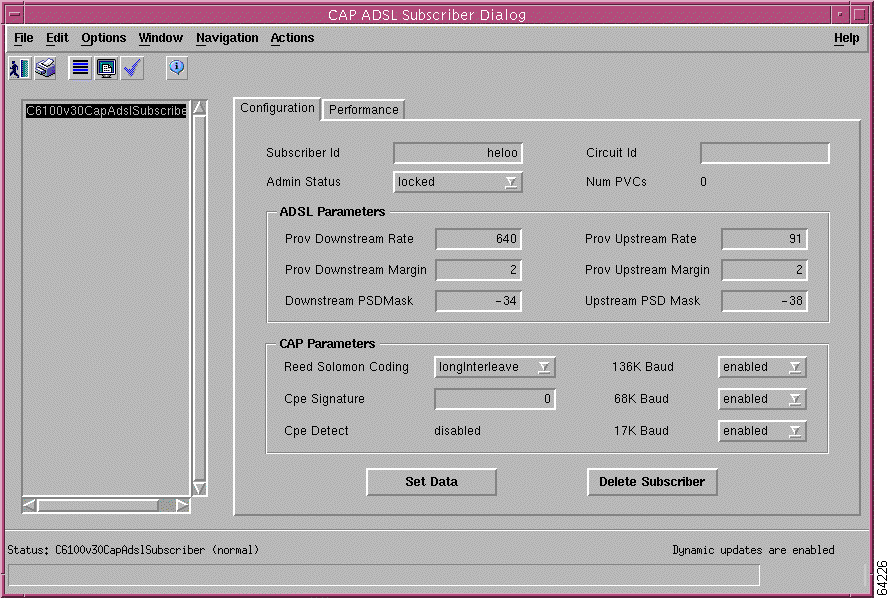
Step 4 Choose Open CAP ADSL Subscriber Dialog from the object menu.
The CAP ADSL Subscriber Dialog window, which is shown in Figure 3-7, opens to the Configuration tab.
See Table 3-1 for detailed descriptions of these fields. See the "Guidelines for Setting Reed-Solomon Coding" section for information on this field.
Step 5 Enter a value in the Subscriber ID field to specify the subscriber ID.
Step 6 Enter the appropriate value for the Circuit ID field; this field is optional.
Step 7 Use the down arrow to set the Admin Status field to locked or unlocked.
The Num PVCs field is read only.
|
Caution You must enter a value in every field that follows. For fields with the choice of disabled or enabled, you must use the down arrow and select either disabled or enabled. If you do not manually choose disabled or enabled, CDM reads the value as null. |
Step 8 Enter the appropriate values in the ADSL Parameters area as follows:
a. Enter an appropriate value in the Prov Downstream Rate field to provision this rate.
b. Enter an appropriate value in the Prov Upstream Rate field to provision this rate.
c. Enter an appropriate value in the Prov Downstream Margin field to provision this rate.
d. Enter an appropriate value in the Prov Upstream Margin field to provision this rate.
e. Enter an appropriate value in the Downstream PSD Mask field.
f. Enter an appropriate value in the Upstream PSD Mask field.
Step 9 Select the appropriate choices in the CAP Parameters area as follows:
The CPE Signature field is read only.
c. Select enabled or disabled in the 136K Baud field.
Step 10 Click Set Data to create these settings for specific modules or subscribers.
A confirmation dialog box opens.
Step 11 Click Yes in the confirmation dialog box.
The Action Report window opens to inform you whether the process is successful.
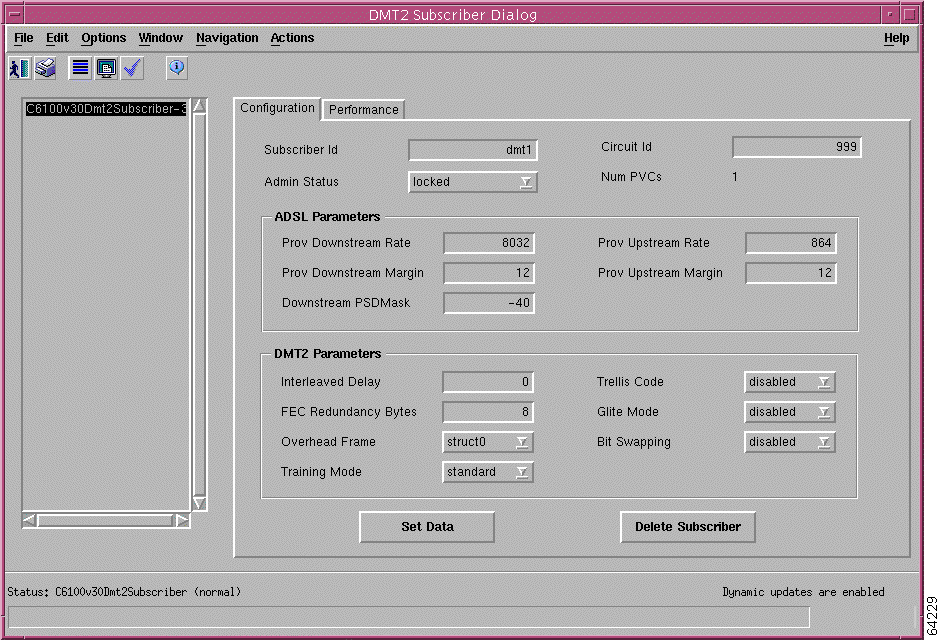
Complete the following steps to change subscriber settings on a DMT-2 interface:
Step 2 Below the C6100v30 MultiplexerChassis, select the DMT-2 line card for which you want to configure a subscriber.
A graphical list of all available ports for the line card displays on the right side of the Map Viewer.
|
Note You can check whether a subscriber has already been assigned to a port by expanding the line card hierarchy to display all ports. If you can further expand the port hierarchy, a subscriber has already been assigned to the port. CDM issues an error if you try to create a subscriber for a port to which a subscriber has already been assigned. |
Step 3 From the right side of the Map Viewer, right-click the port to which you want to assign a subscribe to access the object menu.
Step 4 Choose Open DMT2 Subscriber Dialog from the object menu.
The DMT2 Subscriber Dialog window, which is shown in Figure 3-8, opens to the Configuration tab.
See Table 3-2 for detailed descriptions of these fields.
Step 5 Enter a value in the Subscriber ID field to specify the subscriber ID.
Step 6 Enter the appropriate value for the Circuit ID field; this field is optional.
Step 7 Use the down arrow to set the Admin Status field to locked or unlocked.
The Num PVCs field is read only.
|
Caution You must enter a value in every field that follows. For fields with the choice of disabled or enabled, you must use the down arrow and select either disabled or enabled. If you do not manually choose disabled or enabled, CDM reads the value as null. |
Step 8 Enter the appropriate values in the ADSL Parameters area as follows:
a. Enter an appropriate value in the Prov Downstream Rate field to provision this rate.
b. Enter an appropriate value in the Prov Upstream Rate field to provision this rate.
c. Enter an appropriate value in the Prov Downstream Margin field to provision this rate.
d. Enter an appropriate value in the Prov Upstream Margin field to provision this rate.
e. Enter an appropriate value in the Downstream PSD Mask field.
Step 9 Select the appropriate choices in the DMT2 Parameters area as follows:
a. Enter an appropriate value in the Interleaved Delay field.
b. Enter an appropriate value in the FEC Redundancy Bytes field.
c. Use the down arrow to specify the type of overhead framing to set in the Overhead Frame field, either struct0, struct1, struct2, or struct3.
d. Use the down arrow to set the Training Mode field, either standard or fast.
e. Use the down arrow to set the Trellis Code field to disabled or enabled.
f. Use the down arrow to set the Glite Mode field to disabled or enabled.
g. Use the down arrow to set the Bit Swapping field to disabled or enabled.
Step 10 Click Set Data to create these settings for specific modules or subscribers.
A confirmation dialog box opens.
Step 11 Click Yes in the confirmation dialog box.
The Action Report window opens to inform you whether the process is successful.
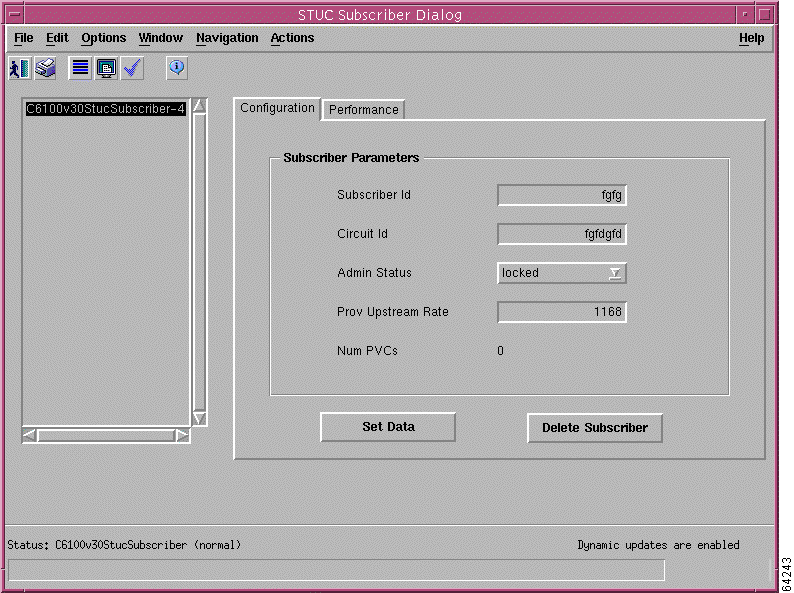
Complete the following steps to change subscriber settings on an STU-C interface:
Step 2 Under the C6100v30 MultiplexerChassis, select the STU-C line card for which you want to configure a subscriber.
A graphical list of all available ports for the line card displays on the right side of the Map Viewer.
|
Note You can check whether a subscriber has already been assigned to a port by expanding the line card hierarchy to display all ports. If you can further expand the port hierarchy, a subscriber has already been assigned to the port. CDM issues an error if you try to create a subscriber for a port to which a subscriber has already been assigned. |
Step 3 From the right side of the Map Viewer, right-click the port to which you want to assign a subscribe to access the object menu.
Step 4 Choose Open STUC Subscriber Dialog from the object menu.
The STUC Subscriber Dialog window, which is shown in Figure 3-9, opens to the Configuration tab.
See Table 3-3 for detailed descriptions of these fields.
Step 5 Enter a value in the Subscriber ID field to specify the subscriber ID.
Step 6 Enter the appropriate value for the Circuit ID field; this field is optional.
Step 7 Use the down arrow to set the Admin Status field to locked or unlocked.
Step 8 Enter an appropriate value in the Prov Upstream Rate field.
The Num PVCs field is read only.
Step 9 Click Set Data to create these settings for specific modules or subscribers.
A confirmation dialog box opens.
Step 10 Click Yes in the confirmation dialog box.
The Action Report window opens to inform you whether the process is successful.
For DSLAM configurations that use digital off-hook (DOH) or pooled subscribers, you enter the subscriber properties in the same way as described in the "Creating Subscribers on CAP ADSL Modem Ports" section. CAP ADSL modules are the only line card modules that support DOH configurations. DOH configurations should have a line controller chassis, a LIM controller module, and line interface modules. For information about setting up DOH configurations, see the "Creating Pooled Configurations" section.
This section provides instructions to configure ATM virtual channels and subscriber PVCs and includes the following topics:
To configure ATM channel mapping between the CPE and the ATM network through the Cisco 6100/6130 DSLAM chassis, you need to configure the ATM virtual channels. This section includes some general guidelines to consider before you set up ATM virtual channels for your subscriber and instructions for setting the virtual path identifier (VPI) and virtual channel identifier (VCI) addresses for your subscribers.
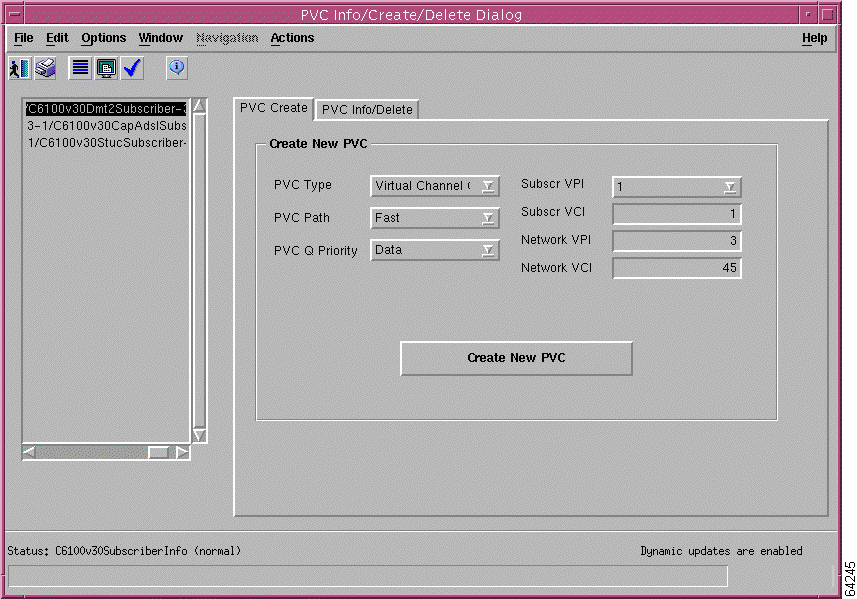
You create PVC subscriber settings on the PVC Create tab of the PVC Info/Create/Delete Dialog window, shown in Figure 3-10.
Table 3-4 describes the fields on the PVC Create tab.
| Field | Description |
|---|---|
Choose Virtual Channel Connection. Note The Virtual Path Connection option is not supported with this release of CDM NI-1. |
|
Specify the type of path for the PVC connection, either Fast or Interleaved. |
|
Specify the priority from one of the following choices; the queue priority is denoted by "qp." Note Passing standard data over voice transfer or voice signalling causes all transfers except pings to fail. |
|
Set the Network VPI in this field keeping in mind the standards restrictions. (See the "Guidelines for Adding New VPI/VCI Addresses" section for more information on the standards restrictions.) |
|
Set the Network VCI in this field keeping in mind the standards restrictions. |
Service provisioning for ATM must adhere to a variety of configuration standards, which prevent errors when establishing ATM connections. CDM includes service provisioning logic to ensure valid combinations of configuration data.
Consider the following guidelines before you configure ATM virtual channels:
This section provides instructions for setting VPI/VCI addresses for subscribers.
You can create new VPI/VCI addresses on the PVC Info/Create/Delete Dialog window, which is described in the preceding section. The following sections include guidelines and steps for adding new VPI/VCI addresses:
The Permanent Virtual Connection group box on the Service Provisioning dialog box includes an area for setting Subscriber IDs and an area for setting Network IDs. Consider the following guidelines:
Complete the following steps to create new subscriber and network VPI/VCI addresses. Refer to the field descriptions in Table 3-4.
A group of icons that represents subscribers assigned to the module appears on the right side of the Map Viewer window.
Step 2 From the right side of the Map Viewer window, right-click the icon of the subscriber for which you want to create a VPI/VCI address.
Step 3 Choose Open Subscriber PVC Operations Dialog from the object menu to open the PVC/Info/Create/Delete Dialog window as shown in Figure 3-10.
On the PVC Create tab, set the PVC and VPI/VCI parameters as follows. Use the tooltips for lists of valid values.
Step 4 Use the down arrow in the PVC Type field to select Virtual Channel Connection.
Step 5 Use the down arrow in the PVC Path field to select either Fast or Interleaved.
Step 6 Use the down arrow in the PVC Q Priority to select Voice (qp1), Voice Signalling (qp2), or Data (qp3), the recommended setting.
Step 7 Make sure the Subscr VPI field is set to 1.
Step 8 Enter the appropriate value in the Subscr VCI field to set the subscriber VCI value.
Step 9 Enter an appropriate value in the Network VPI field to set the network VPI value.
Step 10 Enter an appropriate value in the Network VCI field to set the network VCI value.
Step 11 Click the Save icon in the toolbar.
Step 12 Click Create New PVC.
Step 13 Click Yes in the confirmation dialog box.
An Action Report window opens to inform you whether this procedure is successful.
|
Note To modify an existing VPI/VCI address, you must first delete it from the PVC Info/Delete tab on the PVC Info/Create/Delete Dialog window, and then create it with the new parameters by repeating this procedure. See the "Steps for Viewing VPI/VCI Addresses" section for instructions on viewing and deleting subscriber and network VPI/VCI parameters. |
Complete the following steps to view VPI/VCI addresses for subscribers. Refer to the field descriptions in Table 3-4.
A group of icons that represents subscribers assigned to the module appears on the right side of the Map Viewer window.
Step 2 From the right side of the Map Viewer window, right-click the icon of the subscriber for which you want to create a VPI/VCI address.
Step 3 Choose Open Subscriber PVC Operations Dialog from the object menu to open the PVC/Info/Create/Delete Dialog window.
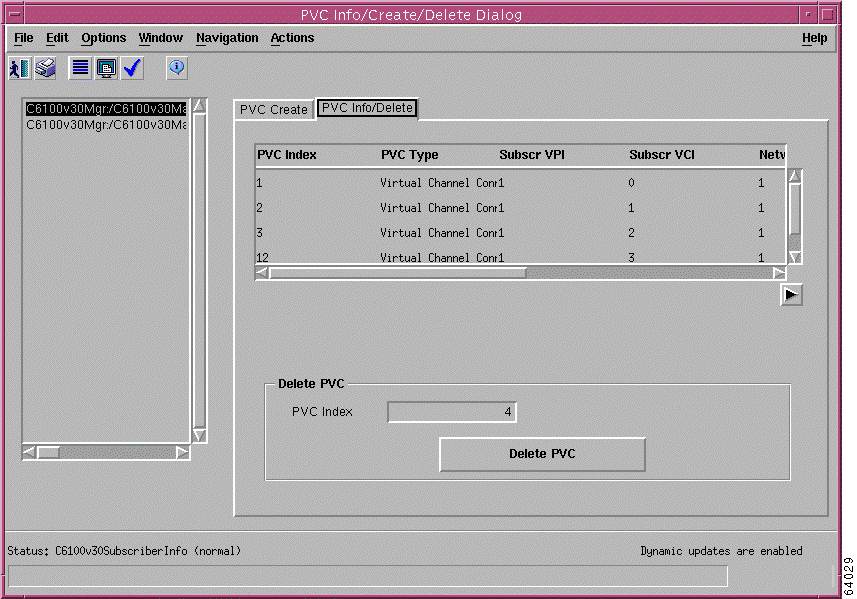
Step 4 Click the PVC Info/Delete tab that is shown in Figure 3-11.
Step 5 On the left side of the PVC Info/Create/Delete Dialog window, highlight the subscriber whose PVC settings you want to view or delete; for example, click C6100v30SubscriberInfo-4 to highlight it.
The following PVC data for that subscriber displays on the PVC Info/Delete tab:
Step 6 Use the scroll bar to scroll to all of these data fields.
|
Note The tooltip displays the MIB variable name for each parameter as you move your cursor across each field. |
Complete the following steps to delete VPI/VCI addresses for subscribers:
Step 2 Choose Open Subscriber PVC Operations from the object menu to open the PVC/Info/Create/Delete Dialog window.
Step 3 Click the PVC Info/Delete tab, shown in Figure 3-11.
Step 4 On the left side of the PVC Info/Create/Delete Dialog window, highlight the subscriber whose PVC settings you want to view or delete; for example, click C6100v30SubscriberInfo-4 to highlight it.
Step 5 Click Delete PVC.
Step 6 Click Yes in the confirmation dialog box.
If your purpose for deleting this subscriber PVC setting is to modify it, you can now create new settings for that subscriber by following the instructions in the "Creating New VPI/VCI Addresses" section.
This section describes how to set up transit subscribers on subtended systems and how to set subtended subscriber PVCs and includes the following topics:
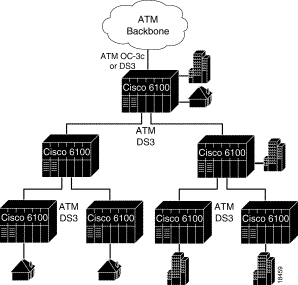
Subtending allows you to use one ATM backbone for multiple Cisco 6100/6130 DSLAM chassis. Subtending is a DSLAM feature that reduces the cost per subscriber by amortizing the expense of the network interface module and the edge-switch port connection over a large number of subscribers. Subtending provides the following advantages:
Figure 3-13 illustrates the connections of a subtended DSLAM system with six subtended systems.
Figure 3-14 shows valid address ranges for each DSLAM.
The following guidelines apply to subtending Cisco 6100/6130 DSLAM chassis nodes:
For example, if you assign subscriber A to VPI 5 and VCI 10 on the subtended Cisco 6100/6130 DSLAM, you must assign transit subscriber A to VPI 5 and VCI 10 on the host system. Transit subscribers on the subtending host system are logical containers for traffic that passes from the subtended DSLAM; therefore, you can create multiple transit subscribers on one port.
To subtend a Cisco 6100/6130 DSLAM chassis, you create settings for the local transit subscribers in the same manner as you would any subscribers. The subtend module should be preprovisioned on your system. The subtend module displays on the left side of the Map Viewer window as C6100v30SubtendPort; each subtend module has two ports.
Complete the following steps to create transit subscribers:
Step 2 From the object menu, right-click C6100v30SubtendPort to open another object menu.
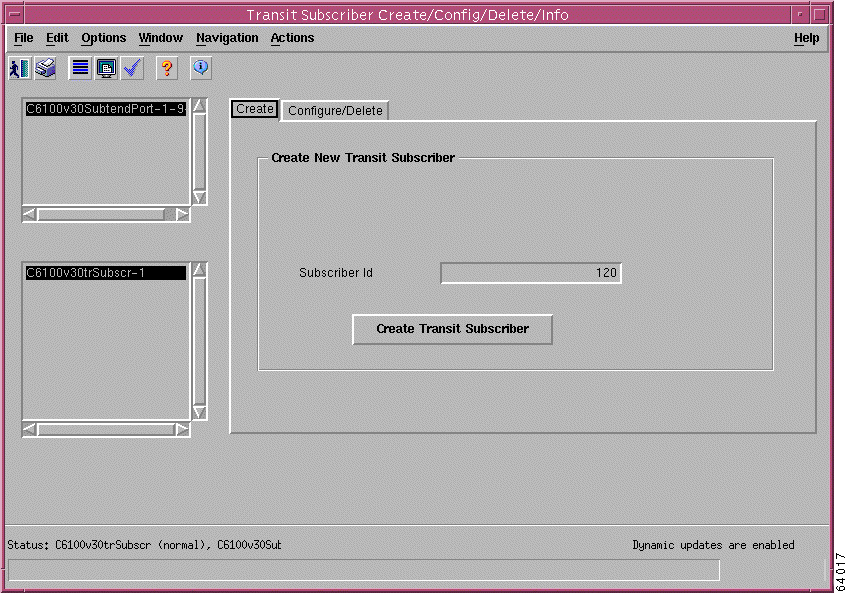
Step 3 Choose Open Transit Subscriber Create/Config/Delete Dialog from the object menu.
The Transit Subscriber Create/Config/Delete/Info window, shown in Figure 3-15, opens.
Step 4 In the Create New Transit Subscriber area, enter the ID for this subscriber in the Subscriber ID field.
Step 5 Click Create Transit Subscriber.
Step 6 Continue to enter subscriber IDs for each transit subscriber, and then click Create Transit Subscriber.
The transit subscribers that you create are visible on the left side of the Map Viewer window under the C6100v30SubtendModule, C6100v30SubtendPort views, and display as C6100v30trSubscr. See the "Steps for Creating Subscriber Properties" section for steps to set the subscriber values for each transit subscriber and the "Changing Subscriber Properties" section for steps to change subscriber settings.
To delete a transit subscriber, complete the following steps:
Step 2 From the object menu, right-click C6100v30SubtendPort to open another object menu.
Step 3 Choose Open Transit Subscriber Create/Config/Delete Dialog from the object menu.
The Transit Subscriber Create/Config/Delete/Info window, shown in Figure 3-16, opens.
Step 4 Click the Configure/Delete tab.
Step 5 From the list of transit subscribers on the left of this window, select the subscriber ID of the transit subscriber that you want to delete in the Tr Subscrid field.
Step 6 Check to see whether the Admin Status field is set to locked; if it is set to unlocked, use the down arrow to select locked.
Step 7 Click Set Data to change the Admin Status.
Step 8 Click Delete Transit Subscriber to delete this subscriber.
Step 9 Repeat Step 5 to Step 8 for all transit subscribers that you want to delete.
Complete the following steps to set transit subscriber PVCs. See the "Guidelines for Configuring ATM Virtual Channels" section for more information on setting PVCs.
Step 2 From the object menu, right-click C6100v30SubtendPort to open another object menu.
Step 3 Choose Open Transit Subscriber PVC Operation Dialog.
The TrSubscrPVC Create/Config/Delete/Info window, shown in Figure 3-17, opens to the Create TrPVC tab.
The Create TrPVC tab has two areas, Transit Subscriber Info and Create TrSubscriber PVC. See Table 3-4 for the field descriptions on this tab. Also use the tooltips for lists of valid values.
Step 4 From the left side of this window, highlight the transit subscriber for which you want to set PVCs.
Step 5 Use the down arrow in the PVC Type field to select Virtual Channel Connection.
Step 6 Use the down arrow in the PVC Q Priority to select Voice (qp1), Voice Signalling (qp2), or the recommended setting, Data (qp3).
Step 7 Use the down arrow to select a value for the Subscr VPI field.
Step 8 Enter an appropriate value in the Network VPI field to set the network VPI value.
Step 9 Enter the appropriate value in the Subscr VCI field to set the subscriber VCI value.
Step 10 Enter an appropriate value in the Network VCI field to set the network VCI value.
Step 11 Click Create Transit PVC.
Step 12 Click Yes in the confirmation dialog box.
An Action Report window opens to inform you whether this procedure is successful.
|
Note To modify an existing transit subscriber VPI/VCI address, you must first delete it from the trPVC Delete/Info tab on the TrSubscrPVC Create/Delete window, and then create it with the new parameters by repeating this procedure. See the "Viewing Transit Subscriber VPI/VCI Addresses" section for instructions on viewing and deleting subscriber and network VPI/VCI parameters. |
Complete the following steps to view transit subscriber VPI/VCI addresses.
Step 2 Choose Open Transit Subscriber PVC Operation Dialog.
Step 3 Click the TrPVC Delete/Info tab.
Step 4 On the left side of the TrPVC Delete Info tab, highlight the transit subscriber whose PVC settings you want to view; for example, click C6100v30SubscriberInfo-4 to highlight it.
The following PVC data for that transit subscriber displays on the TrPVC Delete/Info tab:
Step 5 Use the scroll bar to scroll to all of these data fields.
|
Note The tooltip displays the MIB variable name for each parameter as you move your cursor across each field. |
Complete the following steps to delete transit subscriber VPI/VCI addresses.
Step 2 Choose Open Transit Subscriber PVC Operation Dialog.
Step 3 Click the TrPVC Delete/Info tab.
Step 4 On the left side of the TrPVC Delete Info tab, highlight the transit subscriber whose PVC settings you want to view or delete; for example, click C6100v30SubscriberInfo-4 to highlight it.
Step 5 Click Delete TrPVC.
Step 6 Click Yes in the confirmation dialog box.
![]()
![]()
![]()
![]()
![]()
![]()
![]()
![]()
Posted: Wed Jan 8 09:58:21 PST 2003
All contents are Copyright © 1992--2002 Cisco Systems, Inc. All rights reserved.
Important Notices and Privacy Statement.