|
|

Table Of Contents
Installation Notes for the Cisco DSL Manager NI-1 and NI-2, Release 3.4
Client Workstation Requirements
Recommended Solaris Patches and UNIX Kernel Parameters
Recommended UNIX Kernel Parameters
Hardware Configuration Requirements
Setting Up the Cisco DSLAM Chassis Hardware
Configuring an Ethernet Port (NI-2 DSLAMs)
Downloading the Data Migration Utility Packages from the Cisco Web Site
CDM 3.3.x to CDM 3.4 Upgrade Overview
Upgrading from CDM 3.3.x to CDM 3.4
Installing from a Remote CD-ROM Drive
Installing CDM Using the cemfinstall Script
Starting a Cisco EMF User Session
Checking the Status of Cisco EMF
Obtaining Technical Assistance
Installation Notes for the Cisco DSL Manager NI-1 and NI-2, Release 3.4
March 22, 2002
This document explains how to install and uninstall the Cisco Digital Subscriber Line Manager (CDM) software application and how to upgrade from CDM Release 3.3(x) to Release 3.4. This document describes deployment options and specifies system requirements for different installations. The document also includes details about setting up and administering a CDM workstation.
Contents
This document includes the following sections:
•
Recommended Solaris Patches and UNIX Kernel Parameters
•
•
•
•
•
•
•
CDM Deployment Options
You can deploy CDM in a distributed configuration to utilize the power of multiple computers. Two types of deployment are available:
•
•
Note
Note
CDM Server Installation
Each CDM deployment must have a CDM server installed. Processes on the CDM server keep track of the current state of the network model, user access, and events (alarms). You should also install the Object Store database system on the computer that is being used as the server. See the Cisco Element Manager Framework Installation and Licensing Guide for details on installing Cisco EMF and the Object Store database system.
CDM Client Installation
A CDM deployment allows CDM clients to be installed on workstations that are separate from the CDM server. This client workstation runs CDM applications to access objects on the server. A client installation contains only those parts of the CDM system that are necessary for a CDM user session. This user session communicates with the CDM server when it is required to retrieve management information. The CDM applications that generate the GUI run on the CDM client computer, which allows for a more scalable solution.
The CDM client installation process installs the client software on the local computer; this means that you do not need to mount files across a network. Network traffic occurs only when the client requires more data from the server.
Note
System Requirements
You can deploy CDM in a number of different configurations, from a single hardware system to a multiworkstation distributed management system that uses Sun Solaris/SPARC hardware with Solaris, Release 2.6. Computer specifications are detailed in the following sections.
Note
Small Site Requirements
In the context of CDM Release 3.4, a small site is one that manages no more than 25 to 50 DSLAMs. As you add more DSLAMs, memory requirements increase. You might be able to manage a few more DSLAMs than you are already managing by increasing the memory and swap space on your computer. The CDM server requires about 2 GB RAM when it starts up. If your computer has less than 2 GB RAM, some processes will be swapped out to disk, and most processes will run more slowly. Always set up the swap space to be at least 2 to 3 times the amount of memory on the computer.
We recommend that you have no more than one to three users on the CDM server computer. If you need to support more users, it is recommended that you set up a separate computer with the CDM client software. A small site configuration that has a client and a server computer should be able to support from six to eight users.
The computer specifications for a small site are described in the following sections.
Minimum System Requirements for a Small Site
The server computer must meet the following minimum requirements:
•
–
–
–
–
•
Recommended System Configuration for a Small Site
We recommend the following configuration for the server computer of a small site:
•
–
–
–
–
•
Large Site Requirements
In the context of CDM 3.4, a large site is one that manages more than 50 DSLAMs. As you add more DSLAMs, the memory requirements increase. You might be able to manage a few more DSLAMs if you increase the memory and swap space on your computer. The CDM server requires about 2 GB RAM when it starts up. If your computer has less memory, some processes will be swapped out to disk and most processes will run more slowly. You should always set up the swap space to be at least 2 to 3 times the amount of memory on the computer.
It is very important that you set up the Object Store database on RAW file systems and across as many disk drives as you can afford. Use striping to divide the database across as many disk drives as possible to increase database performance. See the "Allocating Disk Space" section for instructions on how to use the striping method.
We recommend that you have no more than one to three users on the CDM server computer. If you need to support more users, set up a separate computer with the CDM client software.
For a large site, consider the computer specifications that are described in the following sections.
Minimum System Requirements for a Large Site
The server computer for a large site must meet the following requirements:
•
–
–
–
–
–
•
Recommended System Configuration for a Large Site
We recommend the following configuration for the server computer of a large site:
•
–
–
–
–
–
–
•
Client Workstation Requirements
You can have multiple client computers connected to the CDM server manager computer. The more CPU power you have on the client computer, the more client sessions you can support.
In larger deployments that have client-server configurations, we recommend the following hardware specifications for typical client deployments:
•
•
•
•
•
•
•
•
•
•
Note
Note
Recommended Solaris Patches and UNIX Kernel Parameters
This section includes recommendations about Solaris patches that you should install and UNIX kernel parameters that you should set.
Recommended Solaris Patches
We recommend that you install the latest Solaris patches for Solaris Release 2.6. You can download these patches from the Sun website at the following URL:
http://sunsolve.sun.com/pub-cgi/show.pl?target=patches/patch-access
Cisco engineers have tested Cisco EMF 3.2 and CDM 3.4 with kernel patch 105181-29 and a related cluster patch that was released November 2001. This is the kernel patch level that Cisco engineers used with all system level testing and with performance and scalability testing. This patch or a later patch works with Cisco EMF and CDM. We also recommend that you install the year 2000 Solaris patches.
Caution
To check which patches are installed on your computer, use the command showrev -a.
The applied patches are shown in the following output:
106125-12 SunOS 5.6: Patch for patchadd and patchrm106828-01 SunOS 5.6: /usr/bin/date patch105562-03 SunOS 5.6: chkey and keylogin patch105356-18 SunOS 5.6: /kernel/drv/ssd and /kernel/drv/sd patch105357-04 SunOS 5.6: /kernel/drv/ses patch105375-26 SunOS 5.6: sf & socal driver patch105379-06 SunOS 5.6: /kernel/misc/nfssrv patch105395-07 SunOS 5.6: /usr/lib/sendmail patch105407-01 SunOS 5.6: /usr/bin/volrmmount patch105552-03 SunOS 5.6: /usr/sbin/rpc.nisd_resolv patch105615-08 SunOS 5.6: /usr/lib/nfs/mountd patch105665-03 SunOS 5.6: /usr/bin/login patch105786-14 SunOS 5.6: /kernel/drv/ip driver patch105741-09 SunOS 5.6: /kernel/drv/ecpp patch105720-17 SunOS 5.6: /kernel/fs/nfs patch106049-02 SunOS 5.6: /usr/sbin/in.telnetd patch106235-09 SunOS 5.6: lp patch106257-05 SunOS 5.6: /usr/lib/libpam.so.1 patch106271-08 SunOS 5.6: /usr/lib/security/pam_unix.so.1 patch105755-10 SunOS 5.6: libresolv, in.named, named-xfer, nslookup, nstest patch106301-04 SunOS 5.6: /usr/sbin/in.ftpd patch106439-09 SunOS 5.6: /usr/sbin/syslogd patch106448-01 SunOS 5.6: /usr/sbin/ping patch105580-18 SunOS 5.6: /kernel/drv/glm patch106226-02 SunOS 5.6: /usr/sbin/format patch105642-08 SunOS 5.6: prtdiag patch106040-17 SunOS 5.6: X Input & Output Method patch105800-07 SunOS 5.6: /usr/bin/admintool, y2000 patch106193-06 SunOS 5.6: Patch for Taiwan timezone107434-01 CDE 1.2: Spell checking occasionally kills mail105558-04 CDE 1.2: dtpad patch105669-10 CDE 1.2: libDtSvc Patch105837-03 CDE 1.2: dtappgather Patch, including SDE 1.0 installations106242-03 CDE 1.2: libDtHelp.so.1 fixes105566-11 CDE 1.2: calendar manager patch105703-27 CDE 1.2: dtlogin patch105464-02 OpenWindows 3.6: Multiple xterm fixes106222-01 OpenWindows 3.6: filemgr (ff.core) fixes105284-46 Motif 1.2.7: Runtime library patch105802-15 OpenWindows 3.6: ToolTalk patch106495-01 SunOS 5.6: truss & truss support library patch105529-11 SunOS 5.6: /kernel/drv/tcp patch105667-03 SunOS 5.6: /usr/bin/rdist patch105722-07 SunOS 5.6: /usr/lib/fs/ufs/ufsdump and ufsrestore patch105780-05 SunOS 5.6: /kernel/fs/fifofs patch106123-05 SunOS 5.6: sgml patch106522-04 SunOS 5.6: /usr/bin/ftp patch106569-01 SunOS 5.6: libauth.a & libauth.so.1 patch106592-04 SunOS 5.6: /usr/lib/nfs/statd patch106625-13 SunOS 5.6: libsec.a, libsec.so.1 and /kernel/fs/ufs patch106834-02 SunOS 5.6: cp/ln/mv patch107618-02 SunOS 5.6: patch /usr/sbin/vold107758-01 SunOS 5.6: Pax incorrectly change mode of symlink target file107766-01 SunOS 5.6: ASET cklist reports unchanged 6month older files as new107774-01 SunOS 5.6: inetd denial-of-service attack107991-02 SunOS 5.6: /usr/sbin/static/rcp patch105338-27 CDE 1.2: dtmail patch106027-10 CDE 1.2 / SDE 1.0: dtsession patch106112-06 CDE 1.2: dtfile patch106437-03 CDE 1.2: Print Manager Patch105633-60 OpenWindows 3.6: Xsun patch106415-04 OpenWindows 3.6: xdm patch106648-01 OpenWindows 3.6: libce suid/sgid security fix106649-01 OpenWindows 3.6: libdeskset patch106650-04 OpenWindows 3.6: mailtool attachment security patch107336-01 OpenWindows 3.6: KCMS configure tool has a security vulnerability108199-01 CDE 1.2: dtspcd Patch108201-01 CDE 1.2: dtaction Patch107565-03 SunOS 5.6: /usr/sbin/in.tftpd patch108492-01 SunOS 5.6: Snoop may be exploited to gain root access105403-04 SunOS 5.6: ypbind/ypserv patch108660-01 SunOS 5.6: Patch for sadmind105472-08 SunOS 5.6: /usr/lib/autofs/automountd patch108895-01 SunOS 5.6: patch /usr/sbin/rpc.bootparamd108893-01 SunOS 5.6: patch /usr/lib/netsvc/yp/rpc.ypupdated108890-01 SunOS 5.6: patch /usr/lib/netsvc/yp/ypxfrd108499-01 SunOS 5.6: ASET sets the gid on /tmp, /var/tmp when setting med high108468-02 SunOS 5.6: ldterm streams module fixes108346-03 SunOS 5.6: patch usr/sbin/rpc.nispasswdd108307-02 SunOS 5.6: keyserv fixes107733-09 SunOS 5.6: Linker patch106639-06 SunOS 5.6: /kernel/strmod/rpcmod patch106468-05 SunOS 5.6: /usr/bin/cu and usr/bin/uustat patch109266-02 SunOS 5.6: /usr/bin/mail has buffer overflow109339-02 SunOS 5.6: ncsd's size grows - TTL values not implemented109388-01 SunOS 5.6: patch /usr/vmsys/bin/chkperm108804-02 SunOS 5.6: /usr/bin/tip patch108333-02 SunOS 5.6: jserver buffer overflow106882-02 SunOS 5.6: /usr/lib/nfs/nfsd patch106292-11 SunOS 5.6: pkgadd/pkginstall & related utilities106285-03 SunOS 5.6: /kernel/sys/msgsys patch109719-01 SunOS 5.6: arp should lose set-gid bid106429-02 SunOS 5.6: /kernel/drv/mm patch105847-10 SunOS 5.6: /kernel/drv/st.conf and /kernel/drv/st patch105405-03 SunOS 5.6: libcurses.a & libcurses.so.1 patch105792-06 SunOS 5.6: /usr/sbin/tar patch105693-11 SunOS 5.6: cachefs patch111029-01 SunOS 5.6: /kernel/sys/semsys patch105486-07 SunOS 5.6: /kernel/fs/hsfs patch111109-01 SunOS 5.6: Patch to /usr/bin/nawk106361-12 SunOS 5.6: csh/jsh/ksh/rksh/rsh/sh patch110990-01 SunOS 5.6: Patch for ttymon111240-01 SunOS 5.6: Patch to /usr/bin/finger107490-01 SunOS 5.6: savecore doesn't work if swap slice is over 2G111664-01 SunOS 5.6: bzip patch111560-01 SunOS 5.6: dmesg security problem110002-02 Security and other fixes for 32-bit CRE111572-01 SunOS 5.6: ar_open failure can lead to stale queue & memory corruption111859-01 SunOS 5.6: Buffer overflow in whodo via $TZ106303-03 SunOS 5.6: /usr/lib/netsvc/yp/rpc.yppasswdd patch105990-05 SunOS 5.6: vi/ex/edit/view/vedit patch111236-01 SunOS 5.6: Patch for /usr/sbin/in.fingerd107298-03 SunOS 5.6: ntpdate and xntpd patch111039-02 SunOS 5.6: /usr/bin/bdiff and /usr/bin/sdiff patch107326-02 SunOS 5.6: rlmod and telmod patch112073-01 SunOS 5.6: /usr/bin/mailx security problem105181-29 SunOS 5.6: Kernel update patch105210-38 SunOS 5.6: libaio, libc & watchmalloc patch105568-23 SunOS 5.6: /usr/lib/libthread.so.1 patch105591-12 SunOS 5.6: Shared library patch for C++105401-35 SunOS 5.6: libnsl and NIS+ commands patch105216-04 SunOS 5.6: /usr/sbin/rpcbind patchRecommended UNIX Kernel Parameters
The following UNIX kernel parameters are recommended for running Cisco EMF/CDM server computers. These parameters are recommended for Sun Enterprise 450 servers with 4 GB of RAM and four CPUs. These parameters are located in the /etc/system file. You can verify the running parameters by using the /etc/sysdef command to generate a system definition report.
Sun documentation recommends that you add the following parameters to the /etc/system file for Solaris 2.6 with kernel patch 105181-13 or later:
set pt_cnt=1024set npty=1024set dosynctodr=0set priority_paging=1set fastscan=131072set handspreadpages=131072set maxpgio=65536Sun recommends that you set priority paging as specified in the preceding parameters. It may be normal to have high paging and scan rates, and it is likely that the page scanner will overburden the CEMF/CDM private process memory. If several hundred pages or more are scanned per second, the amount of time the page scanner takes to check whether a page has been accessed falls to a few seconds. Pages that have not been used in the last few seconds are used by the page scanner when you are using the file system. This behavior can negatively affect application performance, and it is why priority paging was introduced.
Because Cisco EMF uses the file system frequently to log information and create the transaction log file, it is good idea to enable priority paging.
Hardware Configuration Requirements
This section includes information and instructions about the hardware requirements for your Cisco DSLAM configuration and configuration information for the UNIX server. This section includes the following topics:
•
•
•
Setting Up Disk Configuration
If you have a large site, we recommend that you install the Object Store database on a RAW disk partition. This recommendation is based on the reasons that follow. (If you are not sure whether you should install the Object Store database on a RAW disk partition, read this section before you decide.)
1.
2.
3.
We recommend the following configurations:
1.
2.
Note
http://www.cisco.com/univercd/cc/td/doc/product/rtrmgmt/cemf/3_2/index.htm
Allocating Disk Space
To maximize the performance of your CEMF/CDM system, you need to first plan how you will allocate your disk drives. Consider the following objectives as you plan your system configuration:
1.
2.
3.
4.
5.
System Configuration for Four or Six Disk Drives
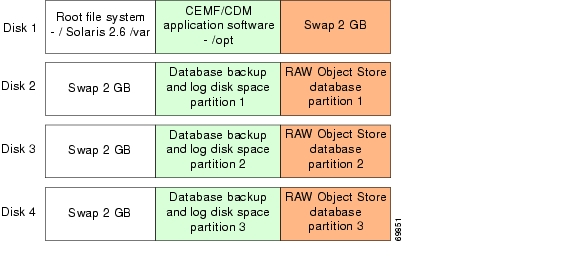
This section describes a way to partition your database across four disk drives or across six disk drives through the use of a concatenated meta device and a striped meta device. The partitions that are striped should all be the same size, but the concatenated partitions can vary in size.
For a system that has four disk drives, we recommend the disk drive setup that is shown in Figure 1:
Figure 1 Diagram of Disk Drive Setup for a System with Four Disk Drives
In the concatenated meta device shown in Figure 1, the disk space is concatenated across three drives. In the striped meta device shown in Figure 1, the RAW device file is striped across three drives.
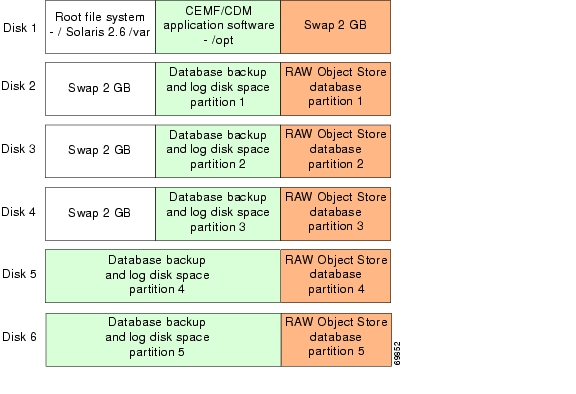
For a system that has six disk drives, we recommend the disk drive setup that is shown in Figure 2.
Figure 2 Diagram of Disk Drive Setup for a System with Four Disk Drives
In the concatenated meta device shown in Figure 2, the disk space is concatenated across five drives. In the striped meta device shown in Figure 2, the RAW device file is striped across five drives.
The more disk drives your system includes, the better the disk performance will be for database access, especially if the disk drives are on different SCSI controllers.
Setting Up Disk Partitions
The Solaris operating system includes a utility for disk partitioning and maintenance called format. This utility lists all of the physical disk drives in the system and allows you to define the size of partitions and label the disk drives. You cannot modify a disk that is currently mounted, but you can use the format utility to partition all the drives for the Object Store database, as described in the previous section.
Each drive can have eight partitions, numbered from 0 to 7. Partition 2 is reserved for the total disk, and partition 1 is generally reserved for any swap space that you want to define. Remember that after you make any changes to the partition sizes, you need to label the disk to write (save) the partition map. For more information, see the UNIX man pages on format.
Setting Up Meta Devices Using DiskSuite
After you set up the disk partitions, spread the UNIX device files across the disk drives. This arrangement produces a meta device. You can use DiskSuite to set up the concatenated meta device as described in the previous section.
You can download DiskSuite and related documentation and information at the following web site:
http://www.sun.com/software/solaris/ds/ds-disksuite/
You can use DiskSuite to set these meta devices as RAID 0, 1, and 5. You want to use RAID 0, which is also called disk striping. Disk striping allows you to spread I/O load across several disks. Doing so improves application performance by increasing the storage I/O throughput that is available to a single process.
Note
After you create the meta device, use the UNIX utility newfs to create a UFS file system on the meta device.
Setting Up the Object Store Database on RAW File System
For specific instructions on installing Cisco EMF and setting up the Object Store database on a RAW file system (RAWFS), refer to the "RAW File System (RAWFS)" section in Chapter 5 of the Cisco Element Management Framework Installation and Administration Guide at:
http://www.cisco.com/univercd/cc/td/doc/product/rtrmgmt/cemf/3_2/index.htm
During the Cisco EMF installation process, the installation script asks if you want the Object Store database on a UNIX (cooked) file system or on a RAW file system. If in your configuration plans you have chosen to install the database on a RAW file system, enter y for yes to that question in the Cisco EMF installation script. Allow the system to default to the path where the database is to be installed. After you install Cisco EMF and any related patches, and after you have configured your disk drives and set up striping, you need to configure the Object Store database with the device names of your RAW striped partitions.
Note
Complete the following steps to set up the Object Store disk to use RAW after you have installed Cisco EMF. In these steps, assume that you installed Cisco EMF in /opt/cemf. If this is not the case, modify the locations.
Step 1
/opt/cemf/bin/cemf shell
Step 2
/opt/cemf/ODI/OS5.1/ostore/etc/<hostname>_server_parameters
Edit this file to define the RAW device for the striped meta device that you created, as shown in the example that follows. The meta device is most likely to be the following path: /dev/md/rdsk/d0. You should also remove the Log File line in this file so that the transaction.log file is placed on the RAW striped disk.
Replace the line,
Log File: /ext/dblog/transact.log
with
Partition0: PARTITION /dev/md/rdsk/d0The _server_parameters file after you make this change:
Partition0: PARTITION /dev/md/rdsk/d0Cache Manager Ping Time: 20000Cache Manager Ping Time In Transaction: 20000Step 3
Step 4
/opt/cemf/ODI/OS5.1/ostore/lib/osserver -i
Now you can continue installing CDM and then start Cisco EMF to create the database.
Setting Up the Cisco DSLAM Chassis Hardware
Make sure that you properly set up and configure your hardware (Cisco 6015, 6100, 6130, 6160, or 6260 DSLAM chassis with NI-1 or NI-2 card) and that you can communicate with the node from the CDM server.
Documentation for setting up Cisco DSLAM hardware is available at the following web site:
http://www.cisco.com/univercd/cc/td/doc/product/dsl_prod/index.htm
Configuring an Ethernet Port (NI-2 DSLAMs)
The CDM software communicates with a Cisco DSLAM by transmitting Simple Network Management Protocol (SNMP) messages from the Sun workstation on which CDM resides through the Ethernet port on the NI-2 card of the DSLAM.
To configure an Ethernet port using a terminal console, complete the following steps:
Step 1
Switch> enableSwitch# config terminalSwitch (config)# enable password <ENABLE PASSWORD>Step 2
Switch> enablePassword: <ENABLE PASSWORD>Switch# config terminalSwitch (config)# interface Ethernet 0/0Switch (config-if)# ip address <ADDRESS> <NETMASK>
Note
Switch (config-if)# exitSwitch (config)# exitSwitch#Step 3
Note
Step 4
Switch> enablePassword: <ENABLE PASSWORD>Switch# config terminal
Note
Switch (config)# snmp-server community <Read Only Community Name> roSwitch (config)# snmp-server community <Read Write Community Name> rwSwitch (config)# snmp-server enable traps
Note
Switch (config)# snmp-server host <ADDRESS>traps version 2c <Community Name>Switch (config)# exitStep 5
Connection Manager, telnet <IP ADDRESS OF DEVICE NI-2>Switch> enablePassword: <ENABLE PASSWORD>Switch# config terminalSwitch (config)# line vty 0 4Switch (config-line)# password <TELNET PASSWORD>Switch (config-line)# loginSwitch (config-line)# exitSwitch (config)# exitSwitch#
Note
Setting Up TFTP
To set up CDM so that you can back up or restore configuration data, you need to configure your CDM UNIX server to provide TFTP services to each Cisco DSLAM chassis as it boots. To do this, you must configure the workstation to support TFTP. To set up TFTP, complete the following steps:
Step 1
The entry should be of the form:
tftp dgram udp wait root /usr/sbin/in.tftpd in.tftpd -s /tftpboot
Step 2
mkdir /tftpboot
cd /tftpboot
ln -s . tftpboot
Step 3
License Requirements
CDM uses Cisco EMF, which requires a license key to operate. You can find information about how to obtain a license key in the Cisco Element Management Framework Installation and Administration Guide, or you can contact the Cisco Technical Assistance Center (TAC) for assistance.
Data Migration Utilities
This section tells you how to move data from CDM 3.3(x) to CDM 3.4. It includes the following sections:
•
•
•
Note
Downloading the Data Migration Utility Packages from the Cisco Web Site
To access the CDM 3.4 migration utility packages on the Cisco web site, complete the following steps:
Step 1
•
•
•
–
–
Step 2
Step 3
Step 4
The Technical Assistance Center web page displays.
Step 5
The Network Management Software web page displays.
Step 6
The Software Download web page displays.
Step 7
Step 8
A dialog opens that asks you what you want to do with the file.
Step 9
Step 10
CDM 3.3.x to CDM 3.4 Upgrade Overview
This section tells you how to upgrade from CDM 3.3x to CDM 3.4. You must be running Cisco EMF 3.0.4 and CDM 3.3.x to use the CDM 3.4 migration utility. The data migration utility files include two packages—a CDM migration save package named CDMMigSav, and a CDM migration restore package named CDMMigR.
There are two basic scenarios for migrating your data from CDM 3.3x to CDM Release 3.4:
•
•
If you are using the cutover migration scenario, run the data migration save package on the computer that is running CDM 3.3.x. This utility extracts the configuration data from your system. After you copy the saved data files to the computer that is running CDM 3.4, you run the data migration restore package on that computer.
Note
Note
You can use the migration utility procedure to save and then restore the following information from your CDM 3.3.x configuration:
•
•
•
•
•
•
•
Note
Note
Note
Table 1 outlines the basic steps for upgrading from CDM 3.3x to CDM 3.4 through the use of the in-place migration scenario. These steps are described in greater detail in the "Upgrading from CDM 3.3.x to CDM 3.4" section.
Table 2 outlines the basic steps for upgrading from CDM 3.3x to CDM 3.4 using the cutover migration scenario. The term "old computer" refers to the computer on which CDM 3.3x is installed; the term "new computer" refers to the computer on which you are installing CDM 3.4. These steps are described in greater detail in the "Upgrading from CDM 3.3.x to CDM 3.4" section.
Note
Upgrading from CDM 3.3.x to CDM 3.4
This section includes the steps for upgrading from CDM Release 3.3.x to CDM Release 3.4 and includes the following sections:
•
•
•
•
Backing Up Your Database
Complete the following steps to back up your database. You should have Cisco EMF 3.0.4 and CDM 3.3x installed.
Step 1
Note
Note
Step 2
Step 3
Note
http://www.cisco.com/univercd/cc/td/doc/product/rtrmgmt/cemf/3_2/install/index.htm
Saving Your Configuration Data
Complete the following steps to save your configuration data before you install CDM or upgrade from CDM 3.3x to CDM 3.4:
Step 1
http://www.cisco.com/cgi-bin/tablebuild.pl/dsl-mgrUse the following commands:
uncompress CDMUTL-3.4.tar.Z
tar -xvf CDMUTL-3.4.tar
The CDM utility creates a subdirectory named CDMMigrateSave.
Step 2
cd CDMMigrateSave
Step 3
./dminstall
Step 4
mkdir /opt/DataMigration/data
Step 5
chmod 666 /opt/DataMigration/data
Step 6
/opt/cemf/bin/cemf shell
Step 7
cd /opt/cemf/config/extractInfoTool/perl
With this utility, the assumption is that CDM is installed in the /opt/cemf directory, which is the recommended directory. If it is not, We recommend that you make a symbolic link and name it /opt/cemf; this link will point to the directory in which CDM 3.3.x is installed. You must execute this script from the /opt/cemf/config/extractInfoTool/perl directory.
Step 8
./migrate.pl
The following script displays on your screen:
****************************************************************** ** CDM3.3 To Cdm3.4 data Migration Utility ** ** ******************************************************************1 = Save Dslam datax = ExitStep 9
Selecting option 1 creates several files in the current directory. CDM uses these files later to recreate the DSLAMs after you install and upgrade to CDM 3.4.
The following script displays on your screen:
Save CDM3.3 Dslams data will overwrite any previous saved data. Continue? [n]: yStep 10
The following script displays on your screen:
Please specify the full path of all the data migration output file
Note
Step 11
/opt/DataMigration/data
The following script displays on your screen:
Migration In Progress...1 = Save Dslam datax = ExitEnter the desired option:xStep 12
Downloading and Installing Cisco EMF 3.2 and Related Cisco EMF Patches
To download and install Cisco EMF and any related patches, you must refer to the Cisco Element Management Framework Installation and Administration Guide.
Note
Uninstalling Cisco EMF and CDM
If you are installing Cisco EMF 3.2 and CDM 3.4 on one server, you must first uninstall any earlier versions of Cisco EMF and CDM that you currently have installed. Use the -r options at the end of the installation utility script to remove previously installed packages. Remove CDM first, and then remove Cisco EMF.
Installing and Upgrading to CDM 3.4
Upgrade to CDM 3.4 by downloading CDM for NI-2 (and optionally CDM for NI-1 if you are currently running CDM for NI-1 release 3.3.x). Complete the following steps to continue the upgrade procedure and install CDM 3.4:
Note
Step 1
cd CDM-NI1-PKG
./cemfinstall
Step 2
Step 3
cd CDM-NI2-PKG
./cemfinstall
Step 4
Next you need to restore and create the DSLAMs that you backed up previously, as follows:
Step 5
mkdir CDMMigrateSave
Step 6
/opt/cemf/bin/cemf shell
Transferring Your Data (Cutover Migration)
If you are running CDM on more than one computer, that is, if you are using the cutover migration method, you need to transfer your data from the computer that is running CDM 3.3x to the computer that is running CDM 3.4.
Complete the following steps:
Step 1
mkdir /opt/DataMigration/data
Step 2
chmod 666 /opt/DataMigration/data
Step 3
Step 4
a.
b.
c.
cd /opt/DataMigration/datad.
binary
prompt
mget * (get multiple files)
bye (exit)
Restoring Your Data
This section tells you how to restore the data that you saved in the "Backing Up Your Database" section.
Restoring the DSLAMs could take several minutes, depending on the number of DSLAMs that were commissioned in your previous version of CDM. This process redeploys all NI-2 cards that you saved previously and sends a commission request on any NI-2 cards that were not decommissioned in the previous system.
Note
Complete the following steps to restore the data:
Step 1
cd CDMMigrateRestore
Step 2
./dminstall
Step 3
/opt/cemf/bin/cemf shell
Step 4
cd /opt/cemf/config/restoreInfoTool/perl
Step 5
./migrate.pl
The following script displays on your screen:
****************************************************************** ** CDM 3.3 To CDM 3.4 Data Migration Utility - Restore ** **---------------------------------------------------------------** Note: Please check the chassis state to be normal ** before step 3: Discover subtend topology ** ******************************************************************1 = Restore DSLAMs2 = Check DSLAMs status3 = Discover Subtend Topology, Restore Profile/PVC/SPVC/VCL names &Reconstruct SubtendPVC Viewx = ExitEnter the desired option: 1Step 6
The following script displays on your screen:
Restore DSLAMs will create the saved DSLAMs in the current system. Continue? [n]: yStep 7
The following script displays on your screen:
Please specify the full path of all the data migration output file from CDM 3.3Step 8
For example: /opt/DataMigration/data
The following script displays on your screen:
1 = Restore DSLAMs2 = Check DSLAMs status3 = Discover Subtend Topology, Restore Profile/PVC/SPVC/VCL names
& Reconstruct SubtendPVC Viewx = ExitEnter the desired option: 2Step 9
This steps checks to make sure that the DSLAMs are in a normal state before you proceed to select choice 3, to discover subtend topology, restore PVC/SPVC/VCL profiles, and reconstruct the subtend PVC view.
Caution
Note
The following script displays on your screen:
Check Dslams status. Continue? [n]: yStep 10
Status of "Physical:/Site-1/172.19.31.51-shelf/172.19.31.51-6160Chassis":normalStatus of "Physical:/Site-1/172.19.31.50-shelf/172.19.31.50-6100Chassis":normalTotal Number of chassis in normal state: 2Total Number of chassis in discovery state: 0Total Number of chassis in synchronizing state: 0Total Number of chassis in other states (Ex. decommissioned, discoverylostcomms, performancelogginon, etc): 01 = Restore DSLAMs2 = Check DSLAMs status3 = Discover Subtend Topology, Restore Profile/PVC/SPVC/VCL names &Reconstruct SubtendPVC Viewx = ExitEnter the desired option: 3Step 11
The following script displays on your screen:
Restore Subtend Topology, QoSProfile/PVC/SPVC/VCL names, SubtendPVC view.Continue? [n]: yStep 12
The following script displays on your screen:
Please specify the full path of the Data Migration data directory(NOTE: This directory should have the write permission)Step 13
/opt/DataMigration/data
This process determines which DSLAMs are currently deployed. The server upgrade should now be complete. You can log in to CDM while the restore and synchronization process is occurring; however, not all the data is reflected in the GUI until the utility completes.
Step 14
Step 15
./dminstall -r
Installing from a Remote CD-ROM Drive
To install software onto a system that does not have its own CD-ROM drive, mount the product CD on a remote system and then export the device to make it accessible over the network. Both of these operations are done on the remote system with the CD-ROM drive. Then mount the remote CD on the local system where the installation is to take place.
Step 1
Step 2
Step 3
/usr/bin/ps -ef | grep vold
If the Volume Manager is running, a message similar to the following displays:
root 591 1 0 Feb 26 ? 0 :01 /usr/sbin/vold
Step 4
/etc/rc2.d/S92volmgt start
Step 5
a.
/usr/lib/nfs/nfsd 8
/usr/lib/nfs/mountd
b.
share -F nfs -o ro /cdrom/cdrom0
c.
share
Note
Step 6
a.
mkdir /mnt/cemfmnt
b.
mount <REMOTE-HOST> : /cdrom/cdrom0 /mnt/cemfmnt
Replace <REMOTE-HOST> with the host name of the remote device.
The contents of the CD are now listed under the /mnt/cemfmnt mount point.
Installing CDM Using the cemfinstall Script
To install CDM, complete the following steps.
Note
Step 1
Step 2
Step 3
host# <CEMF_ROOT>/bin/cemf start
Replace CEMF_ROOT with the directory on which Cisco EMF is installed. Cisco EMF processes start.
Step 4
cd /cdrom/cdrom0
Step 5
./cemfinstall
A set of menu options display.
Step 6
•
•
•
<CEMF_ROOT>/bin/cemf start
CDM automatically installs in the CEMF_ROOT directory.
If the Manager system has multiple network interfaces, the install script prompts you to select the appropriate interface.
The installation utility runs the appropriate installation. As each part of the installation occurs, informational messages display on the screen. Some messages might require user input, usually just yes or no.
For example, if an error occurs during installation, the installation process stops. Before the installation process stops, the install script prompts you to remove any software that was installed up to that time.
Step 7
You are now ready to run CDM.
Uninstalling CDM Release 3.4
When you run the cemfdeinstall script, all CDM processes are automatically stopped and uninstalled. Complete the following steps to uninstall CDM:
Step 1
Step 2
Step 3
host# <CEMF_ROOT>/bin/cemf install -r -a
Note
Step 4
•
•
The installation script informs you that the uninstallation process is about to occur.
If you proceed with the uninstallation process, the screen scrolls through the software as it is deleted, and then the following message displays:
Removal of <package> was successful.
Starting a Cisco EMF User Session
When you start a Cisco EMF user session, CDM automatically starts at the same time. To begin a Cisco EMF user session, complete the following steps:
Step 1
Step 2
<CEMF_ROOT>/bin/cemf start
Replace CEMF_ROOT with the directory on which Cisco EMF is installed. If Cisco EMF is already running, go to Step 3.
Step 3
<CEMF_ROOT>/bin/cemf session
Replace CEMF_ROOT with the directory on which Cisco EMF is installed.
Note
Cisco EMF prompts you to enter a user name and a password.
Note
The Cisco EMF and CDM processes start.
Stopping Cisco EMF
When you stop Cisco EMF, you also stop the CDM software application. Complete the following steps to stop Cisco EMF and CDM:
Step 1
Step 2
Complete the following steps if you want to entirely stop all Cisco EMF processes; otherwise, you do not need to complete these steps:
Step 3
Step 4
<CEMF_ROOT>/bin/cemf stop
Replace CEMF_ROOT with the directory on which Cisco EMF is installed.
The Cisco EMF and CDM processes stop.
Checking the Status of Cisco EMF
To check the status of Cisco EMF, enter the following command:
<CEMF_ROOT>/bin/cemf status
where <CEMF_ROOT> is the directory in which Cisco EMF is installed.
If Cisco EMF is active, a list of running and non-running processes displays. Table 3 lists the information that displays for each process. The message "Cisco EMF system not running" displays if Cisco EMF is inactive.
Caution
Related Documentation
A complete list of all Cisco DSL Manager product related documentation is available on the World Wide Web at http://www.cisco.com/univercd/cc/td/doc/product/rtrmgmt/cdm/index.htm.
A complete list of all Cisco Element Management Framework related documentation is available on the World Wide Web at http://www.cisco.com/univercd/cc/td/doc/product/rtrmgmt/cemf/index.htm.
A complete list of all DSL hardware related documentation is available on the World Wide Web at http://www.cisco.com/univercd/cc/td/doc/product/dsl_prod/index.htm.
Obtaining Documentation
The following sections provide sources for obtaining documentation from Cisco Systems.
World Wide Web
You can access the most current Cisco documentation on the World Wide Web at the following sites:
Documentation CD-ROM
Cisco documentation and additional literature are available in a Cisco Documentation CD-ROM package, which is shipped with your product. The Documentation CD-ROM is updated monthly and may be more current than printed documentation. The CD-ROM package is available as a single unit or through an annual subscription. Registered Cisco.com users can order the Documentation CD-ROM through the online Subscription Store:
http://www.cisco.com/go/subscription
Ordering Documentation
Most Cisco documentation is available only online at:
http://www.cisco.com/univercd/home/home.htm
You can order some printed Cisco documentation in the following ways:
•
http://www.cisco.com/cgi-bin/order/order_root.pl
•
Documentation Feedback
We appreciate your comments and feedback about Cisco documentation. There are several ways to submit comments to Cisco.
•
•
•
Cisco Systems
Attn: Document Resource Connection
170 West Tasman Drive
San Jose, CA 95134-9883•
–
–
http://www.cisco.com/univercd/cc/td/doc/product/dsl_prod/
and click here at the top of the page in the sentence "Is this Cisco documentation helpful? Click here to give us your feedback." This displays a Documentation Survey that you can complete and submit to Cisco electronically.
Obtaining Technical Assistance
Cisco provides Cisco.com as a starting point for all technical assistance. Customers and partners can obtain documentation, troubleshooting tips, and sample configurations from online tools. For Cisco.com registered users, additional troubleshooting tools are available from the TAC website.
Cisco.com
Cisco.com is the foundation of a suite of interactive, networked services that provides immediate, open access to Cisco information and resources at anytime, from anywhere in the world. This highly integrated Internet application is a powerful, easy-to-use tool for doing business with Cisco.
Cisco.com provides a broad range of features and services to help customers and partners streamline business processes and improve productivity. Through Cisco.com, you can find information about Cisco and our networking solutions, services, and programs. In addition, you can resolve technical issues with online technical support, download and test software packages, and order Cisco learning materials and merchandise. Valuable online skill assessment, training, and certification programs are also available.
Customers and partners can self-register on Cisco.com to obtain additional personalized information and services. Registered users can order products, check on the status of an order, access technical support, and view benefits specific to their relationships with Cisco.
To access Cisco.com, go to the following website:
Technical Assistance Center
The Cisco TAC website is available to all customers who need technical assistance with a Cisco product or technology that is under warranty or covered by a maintenance contract.
Contacting TAC by Using the Cisco TAC Website
If you have a priority level 3 (P3) or priority level 4 (P4) problem, contact TAC by going to the TAC website:
P3 and P4 level problems are defined as follows:
•
•
In each of the above cases, use the Cisco TAC website to quickly find answers to your questions.
To register for Cisco.com, go to the following website:
http://www.cisco.com/register/
If you cannot resolve your technical issue by using the TAC online resources, Cisco.com registered users can open a case online by using the TAC Case Open tool at the following website:
http://www.cisco.com/tac/caseopen
Contacting TAC by Telephone
If you have a priority level 1 (P1) or priority level 2 (P2) problem, contact TAC by telephone and immediately open a case. To obtain a directory of toll-free numbers for your country, go to the following website:
http://www.cisco.com/warp/public/687/Directory/DirTAC.shtml
P1 and P2 level problems are defined as follows:
•
•
CCIP, the Cisco Powered Network mark, the Cisco Systems Verified logo, Cisco Unity, Fast Step, Follow Me Browsing, FormShare, Internet Quotient, iQ Breakthrough, iQ Expertise, iQ FastTrack, the iQ Logo, iQ Net Readiness Scorecard, Networking Academy, ScriptShare, SMARTnet, TransPath, and Voice LAN are trademarks of Cisco Systems, Inc.; Changing the Way We Work, Live, Play, and Learn, Discover All That's Possible, The Fastest Way to Increase Your Internet Quotient, and iQuick Study are service marks of Cisco Systems, Inc.; and Aironet, ASIST, BPX, Catalyst, CCDA, CCDP, CCIE, CCNA, CCNP, Cisco, the Cisco Certified Internetwork Expert logo, Cisco IOS, the Cisco IOS logo, Cisco Press, Cisco Systems, Cisco Systems Capital, the Cisco Systems logo, Empowering the Internet Generation, Enterprise/Solver, EtherChannel, EtherSwitch, GigaStack, IOS, IP/TV, LightStream, MGX, MICA, the Networkers logo, Network Registrar, Packet, PIX, Post-Routing, Pre-Routing, RateMUX, Registrar, SlideCast, StrataView Plus, Stratm, SwitchProbe, TeleRouter, and VCO are registered trademarks of Cisco Systems, Inc. and/or its affiliates in the U.S. and certain other countries.
All other trademarks mentioned in this document or Web site are the property of their respective owners. The use of the word partner does not imply a partnership relationship between Cisco and any other company. (0201R)
Copyright © 2002, Cisco Systems, Inc.
All rights reserved.
![]()
![]()
![]()
![]()
![]()
![]()
![]()
![]()
Posted: Wed Oct 6 15:22:46 PDT 2004
All contents are Copyright © 1992--2004 Cisco Systems, Inc. All rights reserved.
Important Notices and Privacy Statement.