|
|

The Broadband Provisioning Registrar (BPR) software includes a provisioning application programming interface (API) that you can use to automate the provisioning of cable modems, digital set-top boxes (DSTBs), computers, and IP telephony devices on service provider networks. This chapter helps you get started with the development process.
A provisioned device meets two conditions: it is registered, and it is activated.
In the absence of either of these conditions, the device is not provisioned.
Self-provisioning and preprovisioning are the two most common provisioning flows. Each flow passes through a set of states defined by the attributes registered/unregistered and activated/not activated.
During self-provisioning, device activation precedes device registration. Self-provisioning passes through these states:
1. Unregistered and not activated. A subscriber buys the device.
2. Unregistered and activated. The subscriber connects the device, turns it on, and BPR gives the device a default configuration for an unregistered device.
3. Registered and activated. The subscriber uses a web user interface to register the modem.
During preprovisioning, device registration precedes device activation. Preprovisioning passes through these states:
1. Unregistered and not activated. The device arrives at the service provider's warehouse.
2. Registered and inactivated. The service provider adds the device to BPR.
3. Activated and registered. The device boots and receives the class of service defined when the service provider added the device.
The first-time configuration of a device is the result of a collaboration between the RDU, DPE, and Network Registrar extensions. Network Registrar extensions send DHCP information to the RDU. The RDU stores this information, then generates a configuration context which contains:
The RDU also validates rules to decide when the configuration is invalid. It then passes this configuration context to the DPEs. Unless subsequent configuration requests from the device are deemed invalid, they only require the Network Registrar extensions and the DPE.
When a device appears on the network for the first time, the RDU builds the initial configuration information using data collected from several sources.
Having collected the data, the RDU runs an extension point for the technology and generates the configuration information for the device. The RDU then sends the configuration information to all DPEs in the device's provisioning group.
The DPE stores the configuration context that the RDU has sent it. It responds to configuration requests, being from the NR extensions for DHCP configuration for a device, or from the device requesting a TFTP file.
The DPE adds to the initial configuration information by performing realtime mixing of data such as:
The Network Registrar extensions request a configuration from the best available DPE. This configuration contains operations to perform on the DHCP response that is sent to the device. These operations include: setting the TFTP server as the DPE that returned the configuration, and setting the host and domain name.
Changes to configuration occur under these conditions:
The goal of the development process is the creation of one or more provisioning clients that use the provisioning API commands. The service provider's application then calls the provisioning client, which in turn, serves as the entry point to the BPR regional distribution unit (RDU).
 |
Note For simplicity, the term provisioning client encompasses any implementation of provisioning API commands, including event driven implementations. Also for simplicity, the term service provider application refers to any application that calls a provisioning client, such as an Operations Support System (OSS), workflow, or billing system. |
A single provisioning client can handle all provisioning tasks, or the tasks can be divided among separate clients. High-level provisioning client tasks include:
Use the information in this section to help determine how best to use the resources associated with BPR.
This chapter contains information on writing a provisioning client and helps you understand how your provisioning client behaves during the provisioning process.
"Provisioning API Use Cases," outlines the procedures for common provisioning use cases, such as:
Each procedure includes provisioning API code segments in pseudocode.
The demonstration program shows how to call the provisioning API to perform various tasks, through a web-based interface.
You can find BPR code examples and sample technology templates at this location: <BPR_HOME>/rdu/samples.
The provisioning API supports several technologies; each with it's own separate interface. The JavaDoc that accompanies this product fully describes the provisioning API.
The provisioning API supports provisioning of these devices:
The provisioning API supports these technologies:
|
Note Basic DHCP devices like computers are also supported as technologies. |
The provisioning API supports these interfaces:
The JavaDoc packaged with BPR describes each method in the provisioning API and includes:
For convenience, this guide includes a listing of the provisioning APIs. See "Provisioning API Reference" for more information.
The CSRC DPR provisioning API is a subset of the BPR provisioning API. However, you may need to make changes in your CSRC DPR code because:
BPR deprecates the DOCSIS and computer methods from the provisioning interface, but includes new DOCSIS and computer interfaces. In all cases, migration to the new method is recommended.
BPR API methods are signature compatible with the corresponding CSRC DPR 2.0 API methods.
|
Note The error conditions associated with some methods, have been changed to provide a richer set of error codes for command processing. Additionally, some ambiguous behavior in DPR is more clearly defined in BPR. Both improvements have resulted in a potentially significant code update between the two products. |
Your desktop development environment must include:
This procedure outlines a general approach to setting up your environment.
1. Install the Java 2 Software Development Kit.
2. Copy the appropriate provisioning .jar file into your environment. For example:
3. Put the .jar file in the class path.
4. Include the appropriate import statements for the provisioning packages in your Java code. For example:
5. Compile your code (a check of links). For example:
6. Run the program. For example:
A provisioning client submits requests to the RDU in the form of batches containing single or multiple commands. The batch is submitted via a connection to the RDU (PACEConnection). The RDU in turn maintains a queue of all batches, including the status of the batch. If the RDU goes down, it can restore all reliable batches in the queue.
When you connect to the RDU and then submit a batch, the RDU:
You can choose either synchronous or asynchronous batch execution. Asynchronous batch execution depends on the firing of an event. The service provider's application can register for events such as:
To use events, define and register a listener and qualifier on the PACEConnection for a batch, and then follow the steps for creating batches. See "Provisioning API Use Cases" for examples. Event notifications return through commands defined for each event. The service provider's application then needs to monitor these commands, and the service provider's application determines the nature of the notification it wishes to receive.
By default, batches submitted to the RDU include flags that can control device disruption and the progress of configuration generation. Batches that you pass to the RDU include:
The ActivationMode class defines these flags.
Each batch returns a status code. See the ActivationMode class in the JavaDoc for more information.
The ConfirmationMode class defines these flags:
Keep these batch guidelines in mind:
Follow these steps to create a batch:
1. Open a PACE connection to the RDU.
3. Get the appropriate API interfaces.
4. Reference commands to the batch.
6. Get the status of the batch.
7. Get the requested query data, if it is a read batch.
The following sections discuss each of these steps in more detail.
Before you can begin to build batches and send commands to the RDU, you must first open a connection. Open the connection by calling a getInstance() command on the PACEConnectionFactory class. Example 1-1 shows the code that calls a getInstance() command.
|
Note To verify that the connection is established after a call to getInstance(), use the isAlive() call on the PACEConnection to see if the connection is alive. |
Alternatively, you can use the IP address of the RDU server. Example 1-2 shows code that calls a getInstance() command using the IP address of the RDU server:
|
Note BPRAuthenticationException is a run-time exception and, therefore, your compiler will not catch it. |
After you open a PACE connection to the RDU, you must get a new batch by calling a newBatch() command on the PACEConnection interface. Each batch must have a unique identifier, an Activation mode, and a Confirmation mode. See the JavaDoc for complete descriptions of the flags.
Example 1-3 shows typical flags on the newBatch() command:
After you get a new batch, and before you can add commands to the batch, you must reference the command interface or interfaces that you need. For each new batch, use the API names class to specify the target interface. Example 1-4 shows typical referencing of interfaces.
Once you have referenced the command interface or interfaces you need for the current batch, you are ready to add commands to the batch. Example 1-6 shows how to queue commands that preprovision a DSTB to myBatch.
Each of these commands is implicitly added to myBatch because the command accessors (in the example, provisioningCommands and dstbCommands) are implicitly tied to the batch from which they were retrieved (See the "Step 3Reference the Appropriate API Interfaces" section). You cannot use these command accessors to add commands to another batch (for example, myBatch2). If you wish to perform additional commands, after myBatch has been posted, you must first create a new batch and then re-retrieve the command accessors for the new batch.
Example 1-6 adds a query command to a separate batch. The query gets the device details for a particular device identified by its MAC address:
The commands are now queued to the batch, but have not yet executed. To execute these commands, you must post the batch to the RDU. Example 1-7 shows the code that posts a batch.
The post() command instructs the RDU to execute the commands that have been queued to the batch. The call waits while the RDU processes the batch which, depending on the number (and complexity) of batches queued at the RDU, could take several minutes to complete. The RDU either returns a BatchStatus or it generates an exception. A BatchStatus details either errors encountered with particular commands or the success status for the posted batch. An exception indicates that the RDU could not process the batch.
|
Note If getInstance() is unable to contact the RDU, the post method will return a PACEConnectionException or a BPRAuthenticationException to indicate if something is wrong with the connection. |
If the post() command in the previous step did not throw an exception, the batch has been processed and you have the BatchStatus return value.The BatchStatus contains a status code indicating either that the batch executed successfully, or that there were errors. In addition, the BatchStatus provides access to status for the individual commands in the batch. If the batch failed, you can get additional information as to which command caused the batch to fail. And, if the batch succeeded, and the batch consisted of query commands, then the CommandStatus provides access to the requested data (see the "Step 7Get the Requested Query Data (If Required)" section).
Example 1-8 examines the BatchStatus return value from the previous step:
If the posted batch consisted of query commands, use the CommandStatus command to extract the requested data from the BatchStatus returned by Batch.post(). Example 1-9 extracts the returned data from a batch that contained a single query (see Example 1-6):
Repeat Steps 2 through 7 as many times as you want for the given connection. When you are done posting batches, you should close the connection and release system resources. However, if the client is continually connecting and disconnecting from the RDU, it may be more efficient to leave the connection open. Example 1-10 shows how to close the connection.
When adding a device, a provisioning client passes a number of important parameter values to the RDU.
Device identification information can include:
The MAC address is a combination of the hardware type, hardware length, and the hardware address of a device. It is the address of the Ethernet interface of the device. BPR uses the MAC address as a key identifier of a device and ensures that the address is unique for each device. For example, if the hardware type is "1", the hardware address length is "6", and the hardware address is "00:01:02:nn:nn:nn", then the MAC address of the device is 1:6:00.01.02:nn:nn:nn, where n is a digit.
MAC addresses are found in commands that:
The fully qualified domain Name (FQDN) is the full name of a system, that is a host name and domain name in dot notation. For example, if the host name is "foo" and the domain name is "bar.com"or "bar.com.", then the FQDN is "foo.bar.com" or "foo.bar.com."
BPR ensures that the FQDN is unique for each device. Your system must enable dynamic DNS (DDNS) on the Network Registrar DHCP server and DNS servers to populate DNS with device FQDNs.
FQDNs are found in commands that:
The owner identifier (ownerID) correlates all devices belonging to one owner. It can, for example, associate a device with an account number used by a billing system. The owner identifier is a string which can be anything including numbers.
The ownerID is found in commands that:
A class of service is the template for the device configuration. The service model defines classes of service, such as Gold with a list of options that can include:
Initial configuration for the classes of service takes place in the administrator application, where classes of service are defined for each technology. For example, both DOCSIS devices and computers will have a default class of service for devices that have not been previously registered with BPR by a command, such as addDOCSISModem or addComputer.
A class of service specification is found in commands that:
When specifying classes of service, keep these points in mind:
BPR can store class of service configurations as templates (for example, gold.tmpl or unprov.tmpl). When templates are used, the templates can contain hard-coded specifications for each configuration option or macros that read configuration options from properties passed in by a provisioning client. To understand your current class of service definitions and their implementations, view the individual files. For information on building templates, see the "Building Class of Service Templates" section.
The DHCPCriteria object bundles a set of parameters that targets a certain criteria for IP address selection and may contain additional DHCP options. A provisioning client references a DHCPCriteria object by identifier. Each device has one associated DHCPCriteria object. A DHCP criteria may be a client-class and/or selection-tag and determines which scope a device will be put in when it issues a DHCP discover.
 |
Caution BPR and Network Registrar have configuration items for some of the same options. In particular, DHCP option properties can be configured in both systems. If there is contention between the values configured in Network Registrar and values specified in a provisioning client, the values in BPR will override the values configured in Network Registrar. All client classes and selection tags must first be set up in Network Registrar before they can be used by a provisioning client. An incorrect association of class of service, client class, and selection tags in your client may mean that the batch cannot succeed or can result in an inappropriately provisioned device. |
An administrator has created a client class called ccProvComputer in Network Registrar. A scope selection tag (tagProvComputer) has also been created and associated to the client class ccProvComputer and a scope. A provisioning client has added a device to BPR with a DHCPCriteria object that uses the client class ccProvComputer.
|
Note The scope selection tag tagProvComputer is not added to the DHCP criteria in this case. |
The device boots and BPR uses the client class ccProvComputer to a device. Network Registrar now gives the device an IP address from a scope that has tagProvComputer assigned and that has the correct gateway address. Network Registrar also updates the DHCP reply with any policy options that have been configured on the client class ccProvComputer.
A scope selection tag has been created in Network Registrar and associated tagComputer with a scope. A device has been added to BPR with a DHCPCriteria object that uses tagComputer. The device boots and BPR uses this device the scope selection tag tagComputer. Network Registrar now gives this device an IP address from a scope that has the tagComputer assigned and has the correct gateway address.
When specifying DHCP criteria, keep these points in mind:
Properties are used throughout the provisioning API to provide optional arguments to the commands. They are either predefined in BPR or added through the provisioning API. BPR stores properties as maps containing key/value pairs, and validates each property. See the com.cisco.provisioning.cpe.constants package in "Provisioning API Reference" or the JavaDoc for a listing of all keys.
When BPR is processing an API operation, each command accepting properties validates each predefined or custom property. Use the addCustomPropertyDefinition method to register new properties with BPR. BPR returns an error if the property is not registered or if the specification of the property does not exactly match the registered name of the property.
BPR supports two types of properties, each with an underlying order of precedence. The two types are:
Table 1-1 shows the precedence hierarchy for device properties and the methods that return the device properties on each level.
Table 1-1 Device Property Precedence Hierarchy
| Precedence Hierarchy | Methods that Return Properties on a Given Level |
|---|---|
Table 1-2 shows the precedence hierarchy for system properties and the methods that return the system properties on each level.
Table 1-2 System Property Precedence Hierarchy
| Precedence Hierarchy | Methods that Return Properties on a Given Level |
|---|---|
For properties that exist on more than one level, the property on the lowest level overrides the property on a higher level. For example, a property set on the IP device level overrides the same property set on the class of service level. See the JavaDoc for specific information on property levels.
All properties supported on a lower level will also be supported on the higher level. But the reverse may not be true. For example, all properties supported on a DOCSIS modem (at the technology level) are supported on the DOCSIS class of service. But all the properties supported on the DOCSIS class of service may not be supported on a DOCSIS modem.
Registration modes implement the business rules by which the service provider determines the number of interactions with the subscriber. For any registered device, the service provider must be prepared to process any change to the device. So there is a significant quantitative difference between registering 100 cable modems with unregistered computers behind them and registering 100 cable modems each of which has a potentially large number of registered computers behind it.
In order to control device changes, BPR includes these registration modes:
BPR includes sample templates that can define classes of service as well as other information specific to a technology implementation. You can use the sample templates, modify them, or write your own.
When working with templates, keep these important points in mind:
Example 1-11 shows a simple template for a DOCSIS modem.
This section describes initial and subsequent activation and shows the process which a DOCSIS modem follows to receive a configuration from BPR. In this context, activation is the process of a device receiving a configuration (DHCP, TFTP, TOD) from BPR.
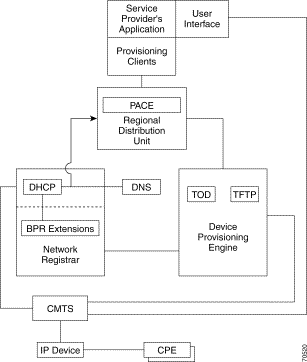
Figure 1-1 is a reference model for the provisioning process.
|
Note Some provisioning flows, such as the voice flow, may require additional components not shown here. |
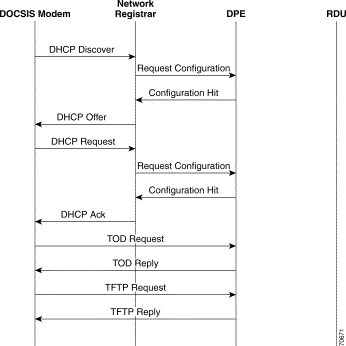
First time activation refers to the first time BPR sees network traffic from the device. As shown in Figure 1-2, this initial traffic is the DHCP Discover. The configuration given to the device depends on its registered state. If the device has been registered, in a process known as pre-provisioning, the device will automatically receive its registered level of service. However, if the device is unregistered, it only receives the default level of service. This is useful in self-provisioning where the desired outcome is to provide just enough service to the device to allow the subscriber to complete the provisioning process.
This is the process by which a DOCSIS modem is activated for the first time.
a. The cable modem boots and sends out a DHCP DISCOVER packet. This packet includes the modem's MAC address which is used as a device identifier.
a. The CMTS receives the packet and forwards it to Network Registrar.
|
Note For simplicity, assume that the traffic involved in all of the remaining steps passes through the CMTS. |
a. Checks its cache and determines that it does not have a configuration for the modem based on the modem's MAC address.
b. Returns a negative response (CONFIGURATION MISS) to Network Registrar.
a. Network Registrar drops the packet and requests the configuration (GENERATE CONFIGURATION) from the RDU. The information included in this requests identifies the devices provisioning group.
b. The cable modem times out and, after a few seconds, the modem sends a new DHCP DISCOVER packet.
If the device is registered, the RDU:
a. Runs device detection to determine the technology. The information in the request is used to determine if the device has roamed between provisioning groups.
b. Creates a configuration from the information specified when the device was registered. This includes the DHCP criteria and the class of service of the device.
c. Sends the configuration to every DPE in the provisioning group for this device.
If the device is unregistered, the RDU:
a. Runs device detection to determine the technology, using the information in the request to determine what kind of configuration to create (for example, DOCSIS).
b. Creates a configuration from the information generated by device detection, the information passed in by the Network Registrar extensions, and defaults for this technology.
c. Sends the device configuration to every DPE in the provisioning group to which the device is assigned.
a. After the modem times out, it resends a DHCP DISCOVER packet. This packet includes the modem's MAC address which is used as a device identifier.
a. Checks its cache and finds a configuration for the modem based on the modem's MAC address.
b. Passes the configuration back to the Network Registrar. The configuration includes those DHCP options that must be in the DHCP reply.
a. Receives the configuration, and executes the commands specified in that configuration.
b. Returns a DHCP OFFER to the DOCSIS modem. This OFFER includes an IP address for the device.
a. The cable modem sends a DHCP REQUEST packet to the Network Registrar. This packet includes the modem's MAC address, which is used as a device identifier.
a. The Network Registrar invokes a BPR extension point, which contacts the DPE (REQUEST CONFIGURATION).
a. Checks its cache and uses the modem's MAC address to locate the proper device configuration.
b. Passes the configuration back to Network Registrar. The configuration includes those DHCP options that must be in the DHCP reply.
a. Mixes in any necessary information.
b. Returns TFTP response containing the device configuration.
|
Note If this is a DOCSIS cable modem, the cable modem and CMTS may be configured for additional validation. |
The process by which you provision a computer is identical to steps 1 through 15 provided for a DOCSIS modem. This is because the computer does not have to request ToD or a TFTP file to become provisioned.
After a device is initially activated, as shown in Figure 1-3, subsequent activation does not require communication with the RDU to request a configuration be generated. The RDU generates a new configuration if service selection on the device has changed.
These are the steps a DOCSIS modem takes on subsequent activations.
a. Boots and sends a DHCP DISCOVER packet to the Network Registrar. The packet includes those DHCP options that must be in the DHCP reply.
a. Checks its cache and finds a configuration for the modem based on the modem's MAC address.
a. Passes the configuration back to the Network Registrar. The configuration includes those DHCP options that must be in the DHCP reply.
a. Receives the configuration, and executes the commands in the configuration.
b. Returns a DHCP OFFER, which includes an IP address for the device.
a. The cable modem sends a DHCP REQUEST packet back to the Network Registrar. The packet includes the modem's MAC address which is used as the device identifier.
a. Checks its cache and finds a configuration for the modem based on the modem's MAC address.
b. Passes the configuration back, which includes the DHCP options to be put into the DHCP reply.
a. Mixes in any necessary information.
b. Returns a TFTP REPLY containing the device configuration, to the cable modem.
a. Validates the configuration file.
|
Note If this is a DOCSIS cable modem, the cable modem and CMTS may be configured for additional validation. |
![]()
![]()
![]()
![]()
![]()
![]()
![]()
![]()
Posted: Thu Apr 10 04:21:36 PDT 2003
All contents are Copyright © 1992--2002 Cisco Systems, Inc. All rights reserved.
Important Notices and Privacy Statement.