|
|

You use the System Management Interface Tool (SMIT), an IBM AIX system administration facility, to install and configure CiscoWorks Blue Maps from a local or remote CD-ROM drive. The example installation and configuration process described in this chapter uses the graphical user interface (GUI) version of SMIT; you can use the ASCII version called SMITTY, if you prefer. Refer to your IBM documentation for more information about SMIT and SMITTY.
In the process of installing and configuring CiscoWorks Blue Maps on AIX, you do the following:
This chapter also contains sections on:
 | Caution If you are a relatively inexperienced AIX user, limit your activities as the root user to the tasks described in this publication. As the root user, you can adversely affect your operating environment if you are unaware of the effects of the commands you use. |
If you are not logged in, enter the following commands to log in as the root user:
login: root
Password: rootpassword
hostname#
If you are already logged in, but not as the root user, enter the following to change your login to root:
hostname% su
Password: rootpassword
hostname#
The prompt changes to a pound sign (#), indicating that you are logged in as the root user:
You can install CiscoWorks Blue Maps from a CD-ROM drive attached to your system or from a CD-ROM drive connected to a remote system. You must first use SMIT to mount the local or remote device on the local AIX system.
 | Caution Avoid exposing the CiscoWorks Blue Maps CD-ROM to direct sunlight because it might harm the contents of the disk. |
Step 1 Place the CD-ROM into its caddy and insert it into the CD-ROM drive.
Step 2 Log in as the root user. For details, see the section "Becoming the Root User."
Step 3 Start SMIT by entering the following at the command prompt:
hostname# smit
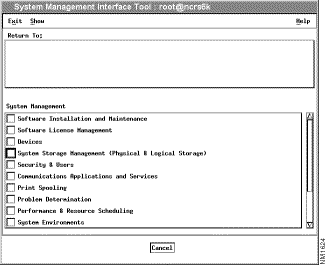
The main SMIT menu appears, as shown in Figure 2-1.

Step 4 From the System Management menu, click Physical & Logical Storage.
Step 5 Click File Systems.
Step 6 Click Add / Change / Show / Delete File Systems.
Step 7 Click CDROM File Systems.
Step 8 Click Add a CDROM File System.
Step 9 Click the "DEVICE name" List button and select the device name (such as /dev/cd0) from the list that appears.
Step 10 Enter the name of a mount point directory (such as /cdrom) in the "Mount point" field.
Step 11 Click Do and read the output.
If you have already performed this procedure, or if another device is already mounted on the mount point, the process will fail.
Step 12 Click Done.
Step 13 Terminate SMIT by pressing F12 or by selecting Exit SMIT on the Exit menu.
Step 14 Enter the following at the command prompt:
hostname# smit mountfs
Step 15 Click the "FILE SYSTEM name" List button and select a device name (such as /dev/cd0) from the list that appears.
Step 16 In the "DIRECTORY over which to mount" field, enter the name of a mount point directory (such as /cdrom).
Step 17 Click the "TYPE of file system" List button and select cdrfs as the file system type.
Step 18 Set the Mount as Read-Only System field to yes.
Step 19 Click Do, read the output, and then click Done.
Step 20 Terminate SMIT by pressing F12 or by selecting Exit SMIT on the Exit menu.
Install software from a device on a remote system, you must have remote access rights to that system. Specifically, he .rhosts file (in the root directory) on the remote system must contain the local host name and your username to access the remote system. For more information, refer to the manual (man) page for .rhosts.
Installation of CiscoWorks Blue Maps does not require any disk space on the remote system. The software is copied across the network to the local workstation.
To mount the CD-ROM on the local file system from a remote CD-ROM drive, perform the following steps on the remote system:
Step 1 Place the CD-ROM into its caddy and insert it into the CD-ROM drive.
Step 2 Log in as the root user. For details, see the section "Becoming the Root User."
Step 3 Start SMIT by entering the following at the command prompt:
hostname# smit
The main SMIT menu appears, as shown in Figure 2-1.
Step 4 From the System Management list, click Physical & Logical Storage.
Step 5 Click File Systems.
Step 6 Click Add/Change/Show Delete File Systems.
Step 7 Click CDROM File Systems.
Step 8 Click Add a CDROM File System.
Step 9 Click the "DEVICE name" List button and select the device name (such as /dev/cd0) from the list that appears.
Step 10 Enter the name of a mount point directory (such as/cdrom) in the "Mount point" field.
Step 11 Click Do and read the output.
If you have already performed this procedure, or if another device is already mounted on the mount point, the process will fail.
Step 12 Click Done.
Step 13 Terminate SMIT by pressing F12 or by selecting Exit SMIT on the Exit menu.
Step 14 Enter the following at the command prompt:
hostname# smit mountfs
Step 15 Click the "FILE SYSTEM name" List button and select a device name (such as /dev/cd0) from the list that appears.
Step 16 In the "DIRECTORY over which to mount" field, enter the name of a mount point directory (such as /cdrom).
Step 17 Click the "TYPE of file system" List button and select cdrfs as the file system type.
Step 18 Set the Mount as Read-Only System field to yes.
Step 19 Click Do and read the output, and then click Done.
Step 20 Terminate SMIT by pressing F12 or by selecting Exit SMIT on the Exit menu.
Step 21 Enter the following at the command prompt:
hostname# smit mknfsexp
Step 22 In the "PATHNAME of directory to export" field, enter the pathname of the directory (such as /cdrom).
Step 23 Use the arrow keys to change the Mode to Export Directory field to read-only.
Step 24 Enter the appropriate information, if necessary, into any of the other fields.
Step 25 Click Do, read the output, and then click Done.
Step 26 Terminate SMIT by pressing F12 or by selecting Exit SMIT on the Exit menu.
Perform the following steps on the local system:
Step 1 Log in as the root user. For details, see the section "Becoming the Root User."
Step 2 Enter the following at the command prompt:
hostname# mount remote_hostname:remote_exported_filesystem_name local_mount_point
For example, to mount a remote file system named zen, enter the following at the prompt:
hostname# mount zen:/cdrom /cdrom
The CD-ROM is ready for installation of software.
Installation is the transfer of software from the distribution medium to the AIX system.
 | Caution CiscoWorks Blue Maps should be installed in the /usr/cw-blue directory. If you create a file system, its mount point must be /usr/cw-blue. |
To install CiscoWorks Blue Maps from a mounted CD-ROM drive, perform the following steps:
Step 1 Place the CD-ROM into its caddy and insert it into the local or remote CD-ROM drive.
Step 2 Log in as the root user. For details, see the section "Becoming the Root User."
Step 3 Set the CWBROOT environment variable to /usr/cw-blue, and NMSROOT to /usr/nms.
If you are using the Kshell, type the following on the command line.
hostname# export CWBROOT=/usr/cw-blue
hostname# export NMSROOT=/usr/nms
If you are using the Cshell or the TCshell, type the following on the command line.
hostname# setenv CWBROOT /usr/cw-blue
hostname# export CWBROOT
hostname# setenv NMSROOT /usr/nms
hostname# export NMSROOT
Step 4 Start SMIT by entering the following at the command prompt:
hostname# smit
Step 5 On the System Management menu, click Software Installation & Maintenance.
Step 6 On the next menu, click Install / Update Software.
Step 7 On the next menu, click Install / Update Selectable Software (Custom Install).
Step 8 On the next menu, click Install Software Products at Latest Available Level.
Step 9 In the "Install Software Products at Latest Level" dialog, click the List button, then click the name of the CD-ROM device on which you loaded the CD-ROM in Step 1.
Step 10 Click Do.
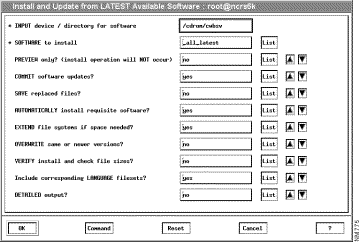
The "Install Software Products at Latest Available Level" dialog displays additional fields as shown in Figure 2-2.

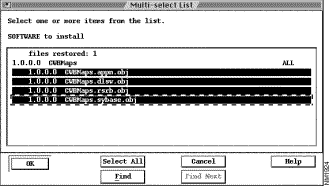
Step 11 Click the List button next to the "SOFTWARE to install" field. After a several-second delay, the Multi-Select List dialog appears, as shown in Figure 2-3.

Step 12 To install all CiscoWorks Blue Maps applications, click all modules in the list so that they are simultaneously highlighted, or click CWBMaps ALL.
To install the APPN Maps application only, click CWBMaps.appn.obj. To install the DLSw Maps application only, click CWBMaps.dlsw.obj and CWBMaps.sybase.obj. To install the RSRB Maps application only, click CWBMaps.rsrb.obj and CWBMaps.sybase.obj.
Step 13 Click OK and then click Do.
Step 14 In response to the "ARE YOU SURE?" prompt, click OK when you are sure you want to install the modules you just highlighted. An animated man appears on the screen.
If the man raises his hands and SMIT displays OK, the process has succeeded.
If the man falls on his face, installation has failed. If the reason for the failure is not apparent, read the installation log file $HOME/smit.log or $CWBROOT/install/cwb_install.log and supply it to a Cisco Technical Assistance Center (TAC) representative.
Step 15 Click Done.
Step 16 If Step 14 is successful, click the Return to System Management button and go to the following section, "Configuring CiscoWorks Blue Maps."
If installation fails, terminate SMIT by pressing F12 or by clicking Exit SMIT on the Exit menu.
Configuring CiscoWorks Blue Maps on AIX consists of configuring the Sybase database management system used by all CiscoWorks Blue Maps applications.
Step 1 Start SMIT if you have not already done so by entering the following:
hostname# smit
Step 2 On the initial SMIT menu, click Communications Applications and Services.
Step 3 On the next menu, click Cisco Network Management Applications for AIX.
Step 4 On the next menu, click CiscoWorksBlue Maps.
Step 5 On the CiscoWorksBlue Maps menu, click Configure.
Step 6 On the Configure menu, click Sybase.
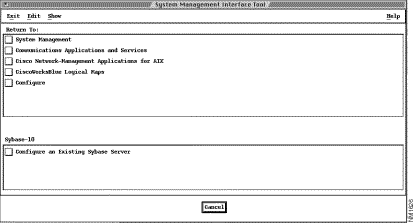
The Sybase menu appears, as shown in Figure 2-4.

Step 7 Click Configure an Existing Sybase Server (because this installation of CiscoWorks Blue Maps will utilize an existing Sybase server).
Step 8 Accept the defaults or enter new values into the fields of the dialog that appears.
Step 9 Click Do and read the output.
Step 10 Click Done, and then click Cancel twice.
Step 11 Terminate SMIT by pressing F12 or by selecting Exit SMIT on the Exit menu.
Perform these steps after installation and configuration of CiscoWorks Blue Maps.
Unmount the CD-ROM by logging in as the root user and entering the following at the local or remote workstation where it is mounted:
hostname# cd /
hostname# umount /cdrom
AIX unmounts the CD-ROM device from the /cdrom directory. Remove the CD-ROM caddy from the drive.
During installation and configuration, log files are created to track the installation process and provide diagnostic information if a problem arises. When you are satisfied that CiscoWorks Blue Maps is properly installed and operating, you can remove these files. To remove these files from your system, log in as the root user and enter the following command:
hostname# rm /tmp/cwb_install.log cwb_config.log $CWBROOT/install
Unless an error message appears, the log files are removed.
If you must de-install all files related to CiscoWorks Blue Maps, perform these steps:
Step 1 Log in as the root user. For details, see the section "Becoming the Root User."
Step 2 Start SMIT by entering the following at the command prompt:
hostname# smit
Step 3 On the System Management menu, click Communications Applications and Services.
Step 4 On the next menu, click Cisco Network-Management Applications for AIX.
Step 5 On the next menu, click CiscoWorks Blue Maps.
Step 6 On the next menu, click De-install CiscoWorks Blue Maps.
Step 7 In the De-install dialog, click the "De-install" List button.
Step 8 In the Multi-select List dialog, select all object names associated with the Blue Map applications you want to de-install, or click CWBMaps.sybase.obj to de-install the Sybase configuration tools and your Maps database, then click OK.
Step 9 Click Do.
Step 10 In response to the "ARE YOU SURE?" prompt, click OK. An animated man appears on the screen.
While the animated man is running, SMIT is de-installing all files related to the selected applications.
If the man raises his hands and SMIT displays OK, the de-installation process has succeeded.
If the man falls on his face, de-installation has failed. If the reason for the failure is not apparent, read the log file $HOME/smit.log and supply it to a Cisco Technical Assistance Center (TAC) representative.
Step 11 Terminate SMIT by pressing F12 or by clicking Exit SMIT on the Exit menu.
The environment variables in Table 2-1 are set automatically by the CiscoWorks Blue Maps applications. The table is for technical reference only.
| Variable | RSRB | DLSw | APPN | Required Value |
|---|---|---|---|---|
CWBROOT | yes | yes | yes | /usr/cw-blue |
yes | yes | yes | /usr/nms | |
yes | yes | yes | $CWBROOT/Xdefaults | |
yes | yes |
| $NMSROOT/sybase10 | |
yes | yes |
| the name of the Sybase database server, such as | |
yes | yes | yes | $NMSROOT/help | |
yes | yes | yes | $NMSROOT/hyperhelp/bin | |
DBNAME | yes | yes |
| If you specify any database name other than the default |
![]()
![]()
![]()
![]()
![]()
![]()
![]()
![]()
Posted: Thu Aug 19 11:45:41 PDT 1999
Copyright 1989-1999©Cisco Systems Inc.