|
|

This chapter provides information on using the Administration application on UNIX workstations. Use the CiscoWorks Blue Administration application to add, delete, modify, and discover devices in your CiscoWorks Blue database, and to select DLSw key devices. DLSw key devices are described in the "Specifying the Status of Aggregated Peers" section.
This chapter includes the following main sections:
This section covers starting the CiscoWorks Blue Administration application. You can start the Administration application from the following locations:
You can start the CiscoWorks Blue Administration application from a NMS, such as NetView for AIX.
On a UNIX workstation, the CiscoWorks Blue Administration application is accessible from /opt/CSCOcb/bin/. To start the application from a system prompt, enter the following commands:
You can log in to a remote UNIX host from your own local UNIX workstation, export the remote host display to your local workstation, and then run the application from the remote host. To start the remote host's CiscoWorks Blue Administration application from your local workstation, use the following procedure:
Step 2 Log in to the remote UNIX host as root (or with a username of your own choosing).
Step 3 Set your DISPLAY environment variable to export the display from the remote host to your local workstation. Depending on which shell you are using, use one of the following commands:
Step 4 To start the CiscoWorks Blue Administration application, enter the following commands:
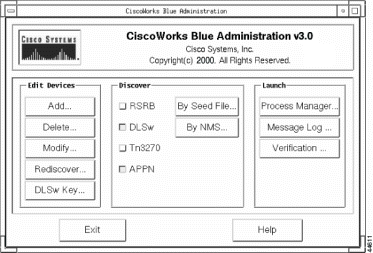
When you start the CiscoWorks Blue Administration application, the CiscoWorks Blue Administration window is displayed. Use the CiscoWorks Blue Administration window to add, delete, modify, and discover devices in your CiscoWorks Blue database, and to select DLSw key devices.
Use the main window to perform the following tasks:
The Edit Devices area allows you to manipulates the devices in the database and includes the following buttons:
The Edit devices area has the following buttons:
The Discover area allows you to discover DLSw, RSRB, APPN/SNASw, or TN3270 devices using either a seed file or an NMS database, and adds the discovered devices to the CiscoWorks Blue database. Discover performs a common discovery process, which includes any SRB rings. Discover queries routers for the protocols you select.
The Discover area has the following buttons
|
:
|
The Discover list includes the following check boxes:
The Launch area allows you to start CiscoWorks Blue client applications:
The Launch area has the following buttons:
|
The Administration window has the following buttons:
Other windows in the Administration application may have one or more of the following buttons:
|
This section covers how to discover the various protocols in your networks:
This section describes how to discover the Cisco DLSw-enabled routers in your SNA network.
Discovery is the process by which the DLSw application queries each device in the network to determine whether it is enabled for DLSw networking. Each time the DLSw application finds a router, it performs one of the following actions:
There are several ways in which the DLSw application can discover the routers in a network. You can provide a list of enabled routers in a special file called a seed file. Or you can let the Maps application get its information from an NMS database.
Both methods of discovery are described in the following subsections:
If your NMS is incapable of providing an accurate list of Cisco routers, or if you want to provide a list of routers to limit discovery, you can create a seed file for the Maps application.
Each record in the seed file can be either a comment or a router specification. You can list the routers in any order within the seed file.
A comment is a single line of text that begins with the pound (#) character, as shown below.
Use the following conventions for the router specification:
The following sample router specification designates router west.cisco.com as a key device with the read community string "public":
Because the key parameter is used only for DLSw and is ignored for APPN/SNASw and RSRB, you can use the same seed file for all three Maps applications. The following lines are from a sample seed file:
 |
Note Do not allow any extraneous characters, spaces, or blank lines in your seed file. They can cause database problems. Also, remember that the device names and read community strings are case-sensitive. |
To use a seed file to provide the information to the application, use the following procedure:
Step 2 Start DLSw and select Admin > Discover > Seed File to display the Seed File Discover window.
Or you can use the CiscoWorks Blue Administration application, as described in "Using the Administration Application."
Step 3 Enter the name of the seed file, verify the correct read community string, and click Discover. Discovery takes place while you wait.
After loading the database using the seed file, the DLSw application operates normally until a router is taken off line or a new router is configured. At that time, you can perform one of the following actions:
The NMS maintains a database, which includes all SNMP-managed routers in your network. You can use that database to provide the Maps application with the information it needs to discover the DLSw-enabled routers in the network. You can do this manually or automatically.
To have the Maps application discover the network from the NMS database manually, select Admin > Discover > Database from the Maps application menu bar. The Maps application adds the routers found by the NMS to the database. The Maps application checks the database for new routers, polls their MIBs, and updates the database with the new MIB information.
You can have Maps check the NMS database automatically. This is called automatic discovery mode; you might want to use it if you expect to install or reconfigure routers often. To use automatic discovery mode, use the cwb start cwbdiscover command as a UNIX cron job (a chronologically started job). Set the cron job to run at night or when system and network activity are low.
If you want to add only one or a few routers to your network, you can discover each router individually using the following procedure:
Step 2 When prompted, enter the router's device name and its read community string.
Step 3 Click OK.
The DLSw application adds the router to the database, polls the router's MIB, and adds the MIB information to the database. Watch the status area to see a message indicating the success or failure of this polling.
It is sometimes useful to rediscover a DLSw router, especially if one of the following events occurs:
There are several ways to rediscover individual routers:
The following conditions must be met to have SNA PUs and LUs correlated with the DLSw routers that support them:
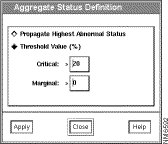
In a key devices view of the network, each key router is shown connected to one icon that represents all of that router's peers. This icon is called an aggregated peer router. The connection from the key router to its aggregated peer router is called an aggregated peer connection. Each aggregated peer connection and each aggregated peer router is displayed in a color that indicates its status. The status shown for the aggregated peer or peer connection represents the status of each component that makes up the aggregate. You can specify how to choose the color in which the aggregated status is displayed. There are two ways to choose the status of an aggregated peer or peer connection: using the worst-case status or using a calculated status.
|
Note The method that you select for specifying the status of aggregated peers affects all aggregates on the map. |
You can choose to have all aggregated peers displayed in the color that is used for the peer with the worst status. For example, if the worst peer connection represented in the aggregated peer connection is inactive, then the aggregated peer connection is displayed as a red line and its aggregated peer router is also displayed in red.
To specify how aggregated peers are displayed, use the following procedure:
Step 2 Select Propagate Highest Abnormal Status.
Step 3 Click Apply.
A peer connection can have one of four statuses: active, degraded, inactive, or unknown. Degraded, and inactive statuses are considered abnormal. When all peer connections have unknown status, the aggregate status is "unknown."
You can choose to have the aggregated peers displayed in a color that represents a status calculated from that of the individual peers which make up the aggregation. The calculation is based on the percentage of peers in the aggregation whose condition is abnormal. An abnormal condition is based on the reported status of the peer.
To determine how to display an aggregated peer, look at the percentage of individual peers with an abnormal condition in the aggregated peer. Once that percentage is determined, you define two threshold values: the Marginal% value and the Critical% value.
To specify percentages for the Marginal% value and Critical% value, use the following procedure:
Step 2 Select Threshold Value (%) and enter the values in the Critical% and Marginal% fields.
Step 3 Click Apply.
The Marginal% value is a threshold value that the DLSw application uses to determine which aggregated peers are in a degraded state or an active state. When the percentage of abnormal peers in the aggregation exceeds this threshold value, the aggregated peer status is considered degraded and is displayed in yellow. When the percentage of abnormal peers in the aggregation is less than or equal to this Marginal% value, the aggregated peer status is considered active and is displayed in green.
You define the Marginal% value for your network. The default Marginal% value for DLSw aggregated peers is 0 percent.
The Critical% value is a threshold value that is used to determine which aggregated peers are in the inactive state. When the percentage of abnormal peers in an aggregation exceeds the critical% threshold value, the aggregated peer status is considered inactive and is displayed in red.
You define the Critical% value for your network. The default Critical% value for DLSw aggregated peers is 20 percent.
A special case occurs when all peers are unknown. In this case, the aggregated peer is considered unknown and is displayed in blue.
DLSw calculates the status of an aggregated peer connection using the following method:
Step 2 DLSw compares the percentage of abnormal peer connections (x percent) to the Critical% value and to the Marginal% value.
Step 3 DLSw now calculates the status of the aggregated peer connection.
For example, there is a key router with six peer connections: three connections are active; one connection is unknown; and two connections are inactive. That means that 50 percent of the peer connections have abnormal status. Here are some scenarios:
This section describes how to discover the RSRB-enabled routers in your SNA network. Discovery is the process by which the RSRB application queries each device in the network to determine whether it is enabled for RSRB networking. Each time the RSRB application finds a router, it does one of the following actions:
There are several ways that the RSRB application can discover the routers in a network. You can provide a list of enabled routers in a special file called a seed file. Or you can let the Maps application get its information from the NMS database.
The discovery methods are described in the following sections:
If your NMS is incapable of providing an accurate list of Cisco routers, or if you want to provide a list of routers that will limit discovery to just a limited set of routers, you can create a seed file for the Maps application.
Each record in the seed file can be either a comment or a router specification. You can list the routers in any order within the seed file.
A comment is a single line of text that begins with the pound (#) character, as shown in the following line:
A router specification has one of the following formats:
Use the following conventions for the router specification:
You can use the same seed file for all three Maps applications (DLSw, RSRB, and APPN/SNASw). Although the DLSw application uses a third parameter on each router entry to identify a router as a DLSw key device, that parameter is ignored for the RSRB and APPN/SNASw applications. The following lines are from a sample seed file:
|
Note The seed file should not contain any extraneous characters, spaces, or blank lines. Also, remember that the device names and read community strings are case-sensitive. |
To use a seed file for discovery, use the following procedure:
Step 2 Start RSRB and select Admin > Discover > Seed File to display the Seed File Discover window.
Or you can use the CiscoWorks Blue Administration application (cwbadmin) described in "Using the Administration Application."
Step 3 Enter the name of the seed file, verify the correct read community string, and click Discover. Discovery takes place while you wait.
After loading the database using the seed file, the application operates normally until a router is taken off line or a new router is configured. If a new router is added to the network, you can perform one of the following tasks:
The NMS maintains a database which includes all SNMP-managed routers in your network. You can use that database to provide the Maps application with the information it needs to discover the routers in the network.
To have the RSRB application discover the network from the NMS database manually, select Admin > Discover > Database from the Maps application menu bar. The Maps application adds the routers found by the NMS to the database. The Maps application checks the database for new routers, polls their MIBs, and updates the database with the new MIB information.
You can have Maps check the NMS database automatically. This is called automatic discovery mode; you might want to use it if you expect to install or reconfigure routers often. To use automatic discovery mode, use the cwb start cwbdiscover command as a UNIX cron job (a chronologically started job). Set the cron job to run at night or when system and network activity are low.
If you want to add only one or several routers to your network, you can discover each router individually by using the following procedure:
Step 2 When prompted, enter the router's device name and its read community string.
Step 3 Click OK. The Maps application adds the router to the database, polls the router's MIB, and adds the MIB information to the database.
Watch the status area for a message indicating the success or failure of this polling.
It is sometimes useful to rediscover an RSRB router, especially if one of the following events occurs:
To rediscover individual routers you can select Edit > Rediscover Device(s) from the RSRB menu bar.
This section describes the APPN/SNASw discovery process and includes the following subsections:
The APPN/SNASw application performs several kinds of discovery:
APPN identifies nodes using their APPN/SNASw names, which are in the form NETID.CPNAME. NETID is the network ID; CPNAME is the control point name. To query and collect management data from nodes, APPN/SNASw must also know the IP address for each node (because the APPN/SNASw application manages APPN/SNASw nodes using the SNMP protocol).
The process of finding an IP address for each APPN/SNASw node is called discovery. APPN/SNASw starts with the APPN/SNASw CP name for each node. Then it discovers the IP address by prompting you to enter an IP address or device name (and read community string) for each CP name the first time you request a view. The APPN/SNASw application maintains this correlation between IP address and CP name for subsequent sessions.
To avoid being prompted for IP addresses or host names, you can perform a one-time discovery of the entire APPN/SNASw network. For APPN/SNASw, this discovery is the process of querying all IP devices in the network to determine whether they are also APPN/SNASw network nodes, and, if so, to get their APPN/SNASw names.
The APPN/SNASw application stores the correlation data in a binary file named
/opt/CSCOcb/etc/appnfile. You should not edit this file, but you can delete it to force the APPN/SNASw application to lose all its correlation data and rediscover the network. You can delete this file to force rediscovery when CP names or IP addresses are changed or reassigned.
You can launch the discovery process by selecting Admin > Discover item on the menu bar or from an NMS.
You can launch the discovery process from the Admin menu in two ways:
This process discovers all the devices in the seed file or database. After discovery is complete, select View > Global to display the global view.
We recommend that you do not launch the discovery process using an NMS because the NMS selects a topology agent at random. It is better to explicitly select a topology agent or to use a seed file of network nodes from which to select a network topology agent. APPN/SNASw queries the devices from the seed file in the order in which they are listed. You can launch discovery using an NMS to correlate the IP addresses with CP names for the remaining nodes.
An APPN/SNASw seed file is a list of IP devices to be queried for a network topology agent. The APPN/SNASw application uses a seed file in the following situations:
If your NMS cannot be relied upon for an accurate list of Cisco routers, or if you want to provide a special list of routers, you can create a seed file for the APPN/SNASw application.
Each record in the seed file can be a comment or a router specification. You can list the routers in any order within the seed file, but the order of routers in the seed file determines the order in which the routers are discovered to select a network topology agent.
A comment is a single line of text that begins with the pound (#) character, as follows:
A router specification has one of the following formats:
Use the following conventions for the router specification:
The delimiter can be a space or a colon (:).
router can be either a host name or the IP address of a router in the network.
read_community_string is the read community string for that router. To use the default string (public), you can omit the read_community_string or you can use just an asterisk (*) as a place holder for the default read community string. If a read community string is missing for a device, the APPN/SNASw application uses the default read community string specified by the rdcommstr parameter in the cwbinit file. You can create the APPN/SNASw seed file with a text editor, and then save it as the appnseed file. The recommended location for the seed file is $HOME/.appn/appnseed.
You can use the same seed file for all three Maps applications (DLSw, RSRB, and APPN/SNASw). Although DLSw has a third parameter on each router entry to identify a router as a key device, that parameter is ignored for the APPN/SNASw and RSRB applications. The following lines are from a sample seed file:
|
Note The seed file should not contain any extraneous characters, spaces, or blank lines. Also, remember that the device names and read community strings are case-sensitive. |
To use a seed file to provide the information to the application, use the following procedure:
Step 2 Start APPN/SNASw and select Admin > Discover > Seed File. to display the Seed File Discover window.
You can use the CiscoWorks Blue Administration application (cwb start admin command) described in "Using the Administration Application."
Step 3 Enter the name of the seed file, verify the correct read community string, and click Discover. Discovery takes place while you wait.
After loading the database using the seed file, the application operates normally until a router is taken off line or a new router is configured. At that time, you can perform one of the following actions:
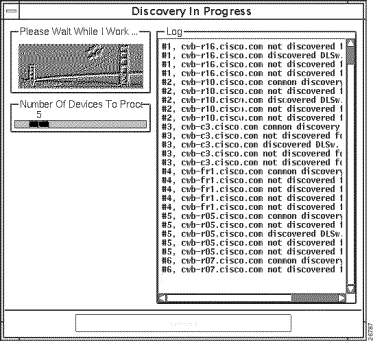
Use the CiscoWorks Blue Administration application to discover devices for the database. Use the following procedure to discover devices in the database:
Step 2 In the Discover list, select one or more of the following protocol types:
|
Note After you run discovery for TN3270 or APPN/SNASw, cwbsnamapsd is automatically restarted to refresh its cache. |
Step 3 Then select a method of discovery:
The appropriate processes are started to discover and then add enabled devices to the CiscoWorks Blue database during which time the screen displays a work in a Discovery in Progress window. This window is shown in Figure 7-4.
Use the Seed File Discover window to select a seed file for discovery.
The Seed File Discover window has the following fields:
|
The Seed File Discover window has the following buttons:
|
You can add one or more devices to the database manually in the following instances:
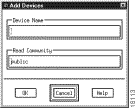
If a Cisco device does not appear on a map or web page, but you know that the device exists in the network, you can add the device using the Add button.
When you add a device, the application prompts you for the device's host name or IP address and read community string. The application then places the new device in the database.
Use the following procedure to add a device to the database:
Step 2 In the Device name field, enter the host names or IP addresses, separated by spaces, of the devices that you want to add.
Step 3 In the Read Community field, enter the read community string of the device that you want to add.
Step 4 Click OK. The new device is added to the database.
After you add new devices, the DLSw poller and cwbsnamapsd are automatically restarted to update the following:
From the CiscoWorks Blue Administration application, you can use the Delete button to remove devices from the database. You might want to delete devices for the following reasons:
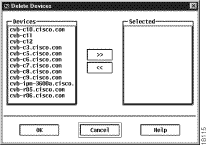
Use the following procedure to delete devices from the database:
Step 2 The Devices list all the devices (routers) in the database. Select all the devices you want to delete.
Step 3 Click the >> button to move the selected devices into the Selected list.
The Selected list displays the devices to be deleted. Use the >> and << buttons to move devices between the Devices list and the Selected list.
If you inadvertently move devices to the Selected list which you do not want to delete, select those devices and click the << button to move them back to the Devices list.
Step 4 Click OK to delete the selected devices. The selected devices are deleted from the database.
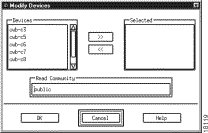
Change the read community string for one or more devices using the following procedure:
Step 2 The Devices list box displays the devices currently in the database. Select all the devices you want to modify.
Step 3 Click the >> button to move the selected devices into the Selected list. The selected list box displays the devices to be modified. Use the >> and << buttons to move devices between the Devices list and the Selected list.
If you inadvertently move devices which you do not want modified to the Selected list, select those devices and click the << button to move them back to the
Devices list.
Step 4 The Read Community string specifies the new read community string for the selected devices. Enter a new read community string to be applied to all the selected devices.
Step 5 Click OK to change the read community string for the selected devices. The read community string is changed in the CiscoWorks Blue database (not in the router itself) for the selected devices.
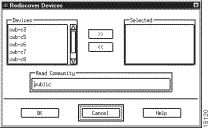
You may want the discovery process to rediscover a device if that device is now running different protocols; or you may want to update the database information about that device but do not want to wait until the next polling interval. Use the following procedure to rediscover a device:
Step 2 The Devices list displays the devices currently in the database. Select all the devices you want to rediscover.
If you select more than one device by pressing the Ctrl or Shift key, all selected devices must have the same read community string.
Step 3 Click the >> button to move the selected devices into the Selected list. The Selected list box displays the devices to be rediscovered.
If you inadvertently move devices which you do not want rediscovered, select those devices and click the << button to move them back to the Devices list.
Step 4 The Read Community String field specifies the read community string fort the selected devices. Enter a new read community string to be applied to all the selected devices.
Step 5 Click OK. The selected devices are rediscovered.
After you rediscover devices, the DLSw poller and cwbsnamapsd are automatically restarted to update the database with circuit information used in SNA correlation and to update the cwbsnamapsd cache with current TN3270 and APPN/SNASw information.
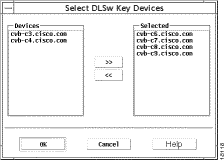
Use the DLSw Key Devices Selection window to designate DLSw key devices from the CiscoWorks Blue database, or to deselect current key devices. You can specify one or more devices as DLSw key devices using the following procedure:
Step 2 The Devices list displays the DLSw devices that are not key devices. Select all the devices that you want to make key devices.
Step 3 Click the >> button to move the selected devices into the Selected list. The Selected list box displays the DLSw devices that are designated as key devices.
When you click OK, the devices in the Selected list become key devices.
If you inadvertently move devices to the Selected list which you do not want designated as key devices, select those devices and click the << button to move them back to the Devices list.
Step 4 Click OK. The devices in the Selected list become DLSw key devices. The devices in the Devices list remain unchanged.
After you add key devices, the DLSw poller is automatically restarted, updating the database with circuit information used in SNA correlation.
You can launch the Process Manager client from the Administration window. From the CiscoWorks Blue Administration window, click Process Manager. The Process Manager client application starts and the Process Manager window is displayed.
For information about using the Process Manager, see "Using the Process Manager."
You can launch the Message Log client from the Administration window. From the CiscoWorks Blue Administration window, click Message Log. The Message Log client window is displayed.
For information about using the Message Log viewer, see "Using the Message Log Viewer."
You can launch the Installation Verification web page from the Administration window. From the CiscoWorks Blue Administration window, click Verification. The web browser is started, which displays the Verification web page. The Verification web page verifies the protocols you configured during installation, checks the cwbinit configuration file, and checks the CiscoWorks Blue databas
![]()
![]()
![]()
![]()
![]()
![]()
![]()
![]()
Posted: Tue Aug 5 16:01:30 PDT 2003
All contents are Copyright © 1992--2003 Cisco Systems, Inc. All rights reserved.
Important Notices and Privacy Statement.