|
|

 |
Note The information in this chapter applies to UNIX workstations only. |
This chapter describes the CiscoWorks Blue Maps Advanced Peer-to-Peer Networking (APPN) application.
This chapter includes the following main sections:
If you prefer to view the APPN information from a web browser, see "Using the CiscoWorks Blue Home Page."
The APPN application displays a global map of the APPN network topology. The global map is made up of the APPN network nodes (NNs), branch extender network nodes (BrNNs), and the transmission groups (TGs) between them. The network nodes and the TGs make up the backbone of the APPN network. From the global map, you can display more detailed maps that show the APPN end nodes (ENs) and low-entry network (LEN) nodes along with the NNs and the TGs.
All APPN network nodes store identical information about the backbone APPN network. At startup, the APPN application must access the network information that is stored in any one APPN network node. APPN needs the information from the APPN Management Information Base (MIB) before it can display an APPN map. The network node that supplies this network information is called the network topology agent.
APPN network nodes are named in the format NETID.CPNAME, rather than by IP address or device name. For example, a node with NETID=NETA and CPNAME=IBUPU3 would be displayed as NETA.IBUPU3.
However, the APPN application needs IP addresses or device names for it to manage the APPN routers using SNMP. APPN uses its discovery process to correlate the APPN names with the IP addresses or device names.
Maps and SNA View support the SNA Switching Services feature of the Cisco IOS software. The SNA Switching Services feature identifies a new APPN branch extender network node (BrNN) and includes a new APPN stack in the Cisco IOS software. To support SNA Switching Services, the Cisco routers must be running Cisco IOS Release 12.0(5)XN or Release 12.1 or later. These product changes support the following SNA Switching Services:
The Maps and SNA View Release 2.1 APPN web interface now shows a new transmission group (TG) status: degraded TG. For a degraded TG, the CP-CP session is defined but not active.
The APPN web interface now reports BrNNs, which provide SNA Branch Extender functionality. A BrNN looks like a network node to downstream nodes, but looks like an end node to upstream nodes.
The APPN Motif application no longer displays the Startup Query to prompt you to designate a network topology agent. If you want a network topology agent, you can designate one in the cwbinit file. When you first start the APPN Motif application, you should run discovery once to correlate IP addresses and CP names. Then, each time you start APPN, it polls all discovered routers for APPN information.
The APPN application displays a global map of the APPN network topology. The global map is made up of the APPN network nodes (NNs), BrNNs, Virtual Routing Nodes (VRNs), and the TGs among them.
You can start the APPN application from the workstation system prompt, from a remote workstation, or from a network management system, such as NetView for AIX.
You can start APPN in one of the following ways:
You can start APPN from any valid user account. The installation process establishes a sample default user account named cwblue. The user cwblue does not have a starting password. You can either assign a password to cwblue or log in as root and change to cwblue.
To start the APPN Maps application from a workstation system prompt, enter these commands:
cd /opt/CSCOcb/binWhere:
-f devicename specifies the host name or IP address of an APPN node to be used as the network topology agent.
-r read_community_string specifies the read community string for the router specified by devicename. APPN uses the read_community_string value when communicating with an APPN node. If you do not enter a read community string, the APPN application uses the default read community string specified in the cwbinit file or, if there is not one there, the default string "public."
-v displays version information.
-h displays online help.
You can log in to a remote UNIX host from your own local UNIX workstation, export the remote host display to your local workstation, and then run the application from the remote host. To start the remote host's APPN application from your local workstation, use the following procedure:
Step 2 Log in to the remote UNIX host.
Step 3 Set your DISPLAY environment variable to export the display from the remote host to your local workstation. Depending on which shell you are using, enter one of these commands:
Step 4 To start APPN, enter the following commands:
cd /opt/CSCOcb/binWhere:
-f devicename specifies the host name or IP address of an APPN node to be used as the network topology agent. APPN displays a global view at startup. For the name of a network topology agent, see your network administrator.
-r read_community_string specifies the read community string for the router specified by devicename. APPN uses the read_community_string value when communicating with APPN nodes. If you do not enter this value, the program uses the default read community string "public," unless another default string is specified in the cwbinit file.
-v displays version information.
To start APPN from a network management system:
If you start APPN from NetView, or if you do not enter any options with the cwb start appn command, the APPN application looks in its preferences file, $CWBROOT/etc/cwbinit, for the control point (CP) name, or for an IP address or device name (and read community string) of a network topology agent. If a network topology agent is not defined, APPN polls all routers for APPN topology.
You can use the Session Field Suppression variables in the cwbinit file to configure fields to be suppressed from the SNA View web Sessions tables and Session Connectivity displays.
# SNA View Sessions and Session Connectivity Field Suppression
#
# The following allow the indicated field name and the related
# contents to be suppressed in the Sessions table and on the Session
# Connectivity display. By default all fields and their associated
# values are displayed.
# To suppress a field and its contents uncomment the field entry. You
# may want to do this to reduce the Sessions table width or to block
# sensitive data from being displayed to SNA View users.
# To turn on the field name suppression set the associated variable = # on.
## Valid values: on/off. default value: off.

##suppressLUName = on
##suppressPU2Name = on
##suppressFEPName = on
##suppressLogicalLineInfo = on
##suppressPhysicalLineInfo = on
##suppressClientIP = on
##suppressMACSAP = on
##suppressIDBLKNUM = on
##suppressCPName = on
##suppressDLURName = on
##suppressDLUSName = on
##suppressNodeName = on
Use the "SNA View Sessions and Session Connectivity Field Suppression" variables to configure the following:
Initially the session suppression entries are set as comments so they are not active. Each value lets you suppress one or more related fields. For example, to suppress the display of the IDBLK/IDNUM field, you would uncomment the suppressIDBLKNUM line, as shown below:
suppressIDBLKNUM = on
| This parameter... | Suppresses these fields... |
|---|---|
suppressLUName = on | LU Name |
suppressPU2Name = on | PU2 Name |
suppressFEPName = on | FEP Names |
suppressLogicalLineInfo = on | Logical Line PU field and logical line information |
suppressPhysicalLineInfo = on | Physical line information |
suppressClientIP = on | Client IP address |
suppressMACSAP = on | Client MAC/SAP and Destination MAC/SAP or MAC1/SAP1 and MAC2/SAP2 |
suppressIDBLKNUM = on | IDBLK/IDNUM |
suppressCPName = on | CPNAME |
suppressDLURName = on | DLUR Name |
suppressDLUSName = on | DLUS Name |
suppressNodeName = on | Node Name |
This section describes how to locate and select nodes on the APPN map.
There are two methods for locating a node on the APPN map:
To locate a node from the View menu you must know the node's CP name, IP address, or host name. Then use the following procedure:
Step 2 Select either By CP Name or By IP Address or Device Name.
Step 3 Enter the CP name, IP address, or host name of an APPN node.
Step 4 Click Locate. APPN displays the portion of the map that contains the selected device and highlights the device.
Each icon on the APPN map has an associated popup menu. To activate the menu, click the icon with the right mouse button. Table 7-1 lists the popup menus associated with the APPN map icons.
| Icon | Popup Menu Items |
|---|---|
Network node, | Information—Displays information about the selected node, including the device type, the node type, and its capability. List LUs—Lists the LUs associated with the selected node. For network nodes, lists LUs in this domain. For end nodes and LEN nodes, lists the LUs associated with this node. Get Directory—Queries the selected node to compile a directory of LUs. Show Adjacent Nodes—Displays the nodes adjacent to the selected node. Telnet—Starts a Telnet client. |
Port Info—Displays information about the selected port, including the port name and status, the data-link control type, and the MAC and SAP addresses. | |
Link | Link Info—Displays information about the selected link, including the link name, CP names at either end of the link, link addresses, and link capacities. |
Virtual routing node | Information—Displays information about the selected node, including the device type and node type, and its capability. Show Adjacent Nodes—Displays the nodes adjacent to the selected node. Telnet—Starts a Telnet client. |
The APPN map presents a global (high-level) view of the applicable network devices, an up-to-date view of the APPN-enabled network nodes, and their status and the TGs that connect them. From the APPN menu bar, select View to display the following views:
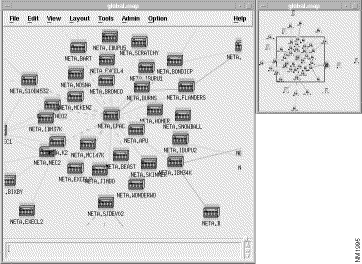
The global view is displayed when you start the APPN application. To display the global view at another time, select View > Global from the APPN menu bar. The global view is displayed, as shown in Figure 7-1. The global view is updated as new information is available from the network topology agent, subject to the polling interval (defined by the nettopopoll parameter in the cwbinit file).
The global view displays devices and connections from the APPN network topology database as viewed from the network topology agent. The global view shows the network nodes and virtual routing nodes and the TGs between them. The TGs are aggregated so that one line between two nodes represents one or more TGs between the nodes.
If a node has unknown status, APPN has determined that the network topology agent is not receiving updates from that node. This problem may be caused by inactive TGs or no CP-CP sessions to carry the updates.
ENs do not appear in the APPN global view. To see ENs, select an NN and choose the Adjacent Nodes view or Ports and Links view. If you know the EN name but not its connected NN. Select View > Adjacent Nodes from the menu bar and enter the EN name.
To view information about the connections between the nodes, use the following procedure from the global view, as shown in Figure 7-1.
Step 2 Press the right mouse button.
Step 3 Select one of the following items from the popup menu:
Step 4 Select Info from the popup menu to display details about the TG or link that you selected.
To view network node information, use the following procedure:
Step 2 Press the right mouse button.
Step 3 Select Information.
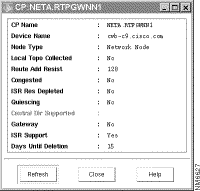
APPN displays information about that node, including its CP name, device type, and node type, as shown in Figure 7-2.
To view the supported LUs, you must first collect directory information from the network. Use the following procedure:
Step 2 Press the right mouse button.
Step 3 Select Get Directory from the popup menu.
Step 4 Press the right mouse button again.
To view adjacent nodes, use the following procedure:
Step 2 Press the right mouse button.
Step 3 Select Show Adjacent Nodes.
The adjacent nodes view shows a subset of the APPN network that includes the following nodes:
 |
Note If the APPN application does not know the IP address and read community string of the APPN node you selected, it will prompt you to enter this information. |
To view the ports and links information, use the following procedure:
Step 2 Press the right mouse button.
Step 3 Select Ports and Links.
The ports and links view, shown in Figure 7-3, is a view of all the logical ports on the selected node and the links from those ports to adjacent nodes. Each adjacent node is displayed with its network ID (NETID) and control point name (CPNAME) in the format NETID.CPNAME.
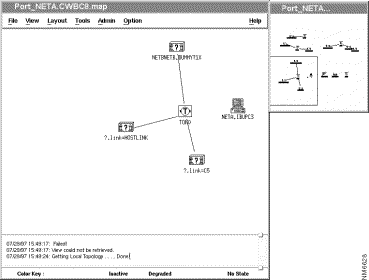
If there is an inactive link and the node does not have the adjacent CP name defined, APPN displays the node with the text "link=linkname" in place of the node's APPN name, as shown in Figure 7-4.

This label indicates that the link is inactive and the destination node of the link is not known to the selected APPN node.
The quotation mark (?) indicates that the node's name also is not known. The text "link=linkname" indicates the link between the known APPN node and the unknown node.
The ports and links view can depict the following port types:
To display detailed information about a port on a network node, use the following procedure:
Step 2 Press the right mouse button.
Step 3 Select Port Info.
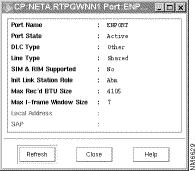
The APPN application displays the port information window, shown in Figure 7-5, which includes the port name, port state, data-link control (DLC) type, and line type.
To display detailed information about link, use the following procedure:
Step 2 Press the right mouse button.
Step 3 Select Link Info.
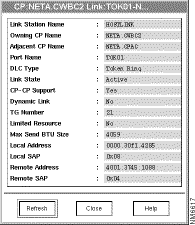
The APPN application displays the Link Information window, as shown in Figure 7-6.
This section describes how to use the Tools menu to view PUs and LUs in the APPN network. APPN collects the PU information from the DLUR MIB on the router, and LU information from the directory table in the APPN MIB.
You can select Tools > PU from the menu bar to configure filtering criteria to be used when searching the database for PUs. To locate PUs from the Tools menu, use the following procedure:
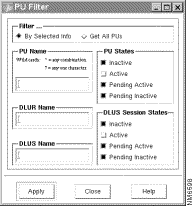
Step 2 In the PU Filter window, select one of the following methods for filtering the PU names:
Step 3 Click Apply. The PU List window is displayed, showing the PU names, filtered as you requested, as shown in Figure 7-8.
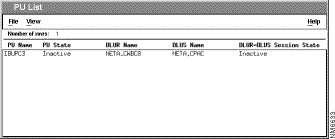
The PU List window displays the DLUR name, the DLUS name, and the DLUR-DLUS session state for each PU.
When you select Tools > PU from the menu bar, the APPN application displays the PU Filter window to let you configure a filter to be used when selecting the PUs to be displayed. You can get all PUs, or you can configure the filter to select PUs based on applied criteria. You can filter the names in the PU List based on the PU name, DLUR name, DLUS name, PU state, and DLUR-DLUS session state.
To display all PUs, select Get All PUs to display a PU List that contains all PU names in the network.
To display PUs based on their PU names, enter all or part of a PU name in the form NAME. You can use a wildcard, such as PU*, to display a list of PU names that begin with the same characters. The PU List will contain PUs whose PU names match the filter criteria.
To display PUs based on the DLUR name, enter all or part of a DLUR name. You can also use wildcards in this name. The PU List will contain PUs whose DLUR names satisfy the filter criteria.
To display PUs based on the DLUS name, enter all or part of a DLUS name. You can also use wildcards in this name. The PU List will contain PUs whose DLUS names satisfy the filter criteria.
To display PUs based on their PU state, select one or more PU states. The PU List window will contain the names of PUs that match one of the selected PU states. The possible PU states are Inactive, Active, Pending Active, and Pending Inactive.
To display all PUs based on the DLUR-DLUS session state, select one or more DLUS session states. The DLUS session state indicates the status of the CPSVRMGR control session between the DLUR node and the DLUS node. The PU List window will contain the names of PUs that match one of the selected DLUR-DLUS session states. The possible DLUR-DLUS session states are Inactive, Active, Pending Active, and Pending Inactive.
To display a list of all LUs, select Tools > LU from the menu bar. The LU List window is displayed, as shown in Figure 7-9.
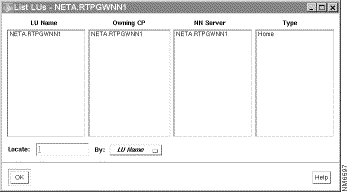
The LU List window displays a row of information for each independent or dependent LU. Each row contains the following items:
The colors and symbols on the APPN map are explained below:
Table 7-2 identifies the icons displayed on an APPN map.
| Icon | Description |
|---|---|
| Known APPN network node. |
| Managed APPN network node; the check mark above the icon shows that the network node is managed by CiscoWorks Blue Maps. |
| APPN network topology agent in a global view. Focus node in an adjacent node or ports and links view. |
| APPN end node. |
| APPN LEN node. |
| Port on an APPN network node. The letter in the circle indicates the port type: T—Token Ring E—Ethernet S—SDLC ?—Other |
| Unknown or unmanaged node. |
| Host node (VTAM mainframe). |
| Virtual routing node (connection network). |
![]()
![]()
![]()
![]()
![]()
![]()
![]()
![]()
Posted: Mon Sep 4 13:47:29 PDT 2000
Copyright 1989-2000©Cisco Systems Inc.