|
|

September 15, 1999
These release notes describe changes for CiscoWorks Blue Maps and SNA View release 2.1. They also list the caveats for installing and using Maps and SNA View, and list any known problems with release 2.1. They contain the following major sections:
The most current release notes for this product are available on the World Wide Web (WWW) version of the Cisco Connection Online (CCO). See the "Cisco Connection Online" section of these release notes for information on accessing and using the web version of the CCO.
The CiscoWorks Blue Maps and SNA View mainframe code is also shipped on the UNIX CD-ROM. See the /mainframe/readme file on the CD-ROM for information about how to install the mainframe code from the CD-ROM.
This section describes the major changes for CiscoWorks Blue Maps and SNA View release 2.1. These changes are fully documented in the online help, and in the online versions of the product publications (see the "Documentation" section). The following new and changed functions are available in release 2.1:
This section describes functions that are new in release 2.1.
In previous releases, Maps and SNA View supported just the standard Cisco proprietary MIBs. In release 2.1, Maps and SNA View support the standard IETF MIBs as well.
Maps and SNA View release 2.1 support the following MIBs:
Maps and SNA View query the release 2.0 MIBs and the following new MIBs in release 2.1:
Maps and SNA View queried the following SNA protocol MIBs in release 2.0:
Maps and SNA View support the SNA Switching Services feature of the Cisco IOS software. The SNA Switching Services feature identifies a new APPN branch extender network node (BrNN) and includes a new APPN stack in the Cisco IOS software. To support SNA Switching Services, the Cisco routers must be running Cisco IOS release 12.0(5)XN or release 12.1 or later. These product changes support the following SNA Switching Services:
The Maps and SNA View release 2.1 APPN web interface now shows a new transmission group (TG) status: degraded TG. For a degraded TG, the CP-CP session is defined but not active.
The APPN web interface now reports BrNNs, which provide SNA Branch Extender functionality. A BrNN looks like a network node to downstream nodes, but looks like an end node to upstream nodes.
The APPN Motif application no longer displays the Startup Query to prompt you to designate a network topology agent. If you want a network topology agent, you can designate one in the cwbinit file. When you first start the APPN Motif application, you should run discovery once to correlate IP addresses and CP names. Then, each time you start APPN, it polls all discovered routers for APPN information.
The APPN application displays a global map of the APPN network topology. The global map is made up of the APPN network nodes (NNs), BrNNs, Virtual Routing Nodes (VRNs) and the TGs between them.
Maps and SNA View provide session connectivity displays for PU 4-PU 4 sessions. The following changes support PU 4-PU 4 sessions:
In the SNA View Basic Search page (on the web), you can search for PU 4 sessions by selecting PU4/NODE in the Name Type field. The Basic Search page is shown in Figure 1.
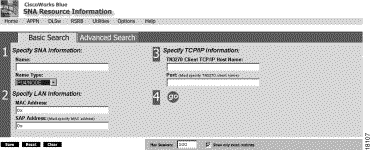
In the Name Type field indicate the kind of name you entered in the Name field:
You can specify all of these fields with or without the domain name. If you specify a domain name, the named resource must have been discovered from VTAM with the domain specified or there will not be a match.
In the SNA View Advanced Search page (on the web), you can search for PU 4 sessions. The Advanced Search page is shown in Figure 2.
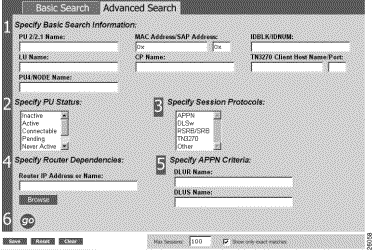
In the Specify Basic Search Information Name fields, enter the PU or LU name of the resource:
You can specify all of these fields with or without the domain name. If you specify a domain name, the named resource must have been discovered from the VTAM with the domain specified or there will not be a match.
The values you enter in the Name fields determine what results are displayed:
The MAC Address/SAP Address field and the Status field apply to a PU 2 or a PU 4, depending on the node names you enter:
The Session List displayed for a PU 4 search is shown in Figure 3.
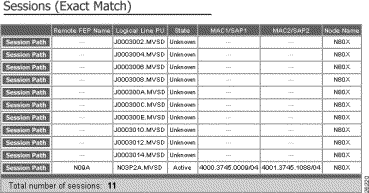
The following fields are shown in the Sessions tables for a PU 4-PU 4 session:
| Field | Description |
|---|---|
Session Path | Click Session Path to see a Session Connectivity Display for the session. |
Remote FEP | Remote FEP name. A remote FEP is a control unit that handles the remote PU 4 and might be a 3745 running NCP. |
Logical Line PU | |
State | Shows the state of each session: Active---VTAM status is ACTIV. Inactive---VTAM status is INACT. Connectable---VTAM status is CONCT. Pending---VTAM status is one of the pending statuses. Never active---VTAM status is NEVAC. Other---Session has some other status; often used for a session, such as a DLSw circuit, that could not be correlated to a PU. Unknown---No reported status. Pending Active---Status is pending active. Pending Inactive---Status is pending inactive. |
MAC/SAP11 | MAC and SAP addresses of the PU. |
MAC/SAP22 | MAC and SAP addresses of the host network connection. |
Node Name | Name of the major node under which the PU is defined. |
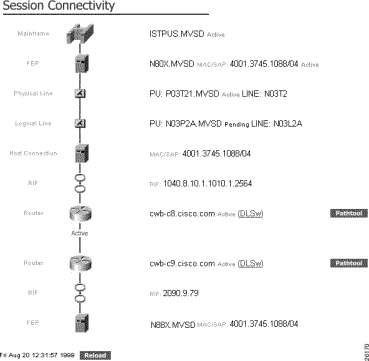
When you search for and find PU 4-PU 4 sessions and then select a single session, you will see a Session Connectivity display, as shown in Figure 4. (If your filter matches only one session, you immediately see the Session Connectivity display for that session.)
To support PU 4-PU 4 sessions, a new parameter card is added. Use the INCLUDE_PU4 parameter card to specify a list of SNA PU 4 major nodes (these are NCP names local to this mainframe) that will be monitored for PU 4-PU 4 connections.
You do not need to specify a PULU_FILTER card. If you do also specify a PULU_FILTER card, you must specify the following PU names:
VTAM DD Card
For the mainframe application to be able to discover PU 4-PU 4 connections, the VTAM DD statement must be specified in the NSPOPEN procedure. A VTAM DD card has been supplied as a comment. You can uncomment this card and supply the correct VTAM dataset containing the NCP members (substitute your dataset name in place of SYS1.VTAMLST):
//VTAM DD DSN=SYS1.VTAMLST,DISP=SHR
Default
If you do not specify an INCLUDE_PU4 parameter card or a PULU_FILTER card then all PU 4-PU 4 connections are monitored.
Occurrences
You can include more than one INCLUDE_PU4 parameter card.
Card Syntax
INCLUDE_PU4 [NODE1 [... NODEn]]
Where:
NODE1 [... NODEn] specifies the names, including wildcard characters, of one or more SNA PU 4 nodes (NCP names local to this mainframe), separated by spaces, whose PU 4-PU 4 connections are to be monitored.
You can use an asterisk (*) wildcard in each resource name. You can use an asterisk in the following places:
You may not put an asterisk in the middle of the name.
If a resource name includes an asterisk, then any PU 4 name that meets the wildcard requirements will be included in the list of monitored PU 4 nodes.
Examples
The examples are based on this sample configuration on mainframe HOST1:
Member(NCP1A)
 N1G1    GROUP ....
  N1G1L1  LINE  LOCADD=XXXX3745YYYY,
                 ....
  N1G1PU1 PU    ADDR=01,
                ...
  N1G1LU1 LU    LOCADDR=0,
                ...
N1G2    GROUP PHYSRSC=N1G1PU1,
               ...
  N1G2L1  LINE ...
  N1G2PU1 PU   ADDR=04CCCC3745DDDD,
               ...
  N1G2L2  LINE ...
  N1G2PU2 PU   ADDR=04EEEE3745FFFF,
               ...
Member(NCP2C)
  N2G1    GROUP ....
  N2G1L1  LINE  LOCADD=XXXX3745YYYY,
                 ....
  N2G1PU1 PU    ADDR=01,
                ...
  N2G1LU1 LU    LOCADDR=0,
                ...
N2G2    GROUP PHYSRSC=N1G1PU1,
               ...
  N2G2L1  LINE ...
  N2G2PU1 PU   ADDR=04CCCC3745DDDD,
               ...
  N2G2L2  LINE ...
  N2G2PU2 PU   ADDR=04EEEE3745FFFF,
               ...
The following examples show how to use search patterns:
1. To monitor all PU 4-PU 4 connections for NCP1A and NCP2C, use this card:
INCLUDE_PU4 NCP1A NCP2C
2. To monitor all PU 4-PU 4 connections for all PU 4 nodes with names that begin with the characters NCP1 or NCP2 use this card:
INCLUDE_PU4 NCP1* NCP2*
This technique is useful for installations that change the NCP name when changes to the NCP generation are made. The original NCP name might start as NCP1A. After the first change, it would be renamed NCP1B, then NCP1C, and so on. Instead of updating the filter card every time the NCP generation is changed, NCP1* matches all these changes.
3. To monitor all PU 4-PU 4 connections for all PU 4 nodes with names that contain the character 1 or end in the letter C, use this card:
INCLUDE_PU4 *1* *C
4. To monitor the N1G2PU1 connection in NCP1A but not the N1G2PU2 connection in the same NCP, and to monitor all PUs and LUs with names in the format CWB* or IBD*, use these cards:
INCLUDE_PU4 NCP1*
PULU_FILTER N1G1* N1G2PU1* CWB* IBU*
In release 2.1 you can connect a Solaris workstation to the mainframe using LU 6.2.
This section describes functions that are improved in release 2.1.
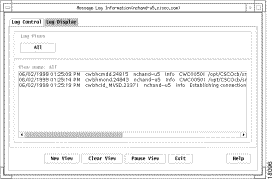
The Process Management and Message Log windows are upgraded to increase usability.
The Message Log Display tab (Figure 5) displays the accumulated messages from one message view.
The CWBlue tab displays a list of the Maps and SNA View processes in the Process Management window (Figure 6).
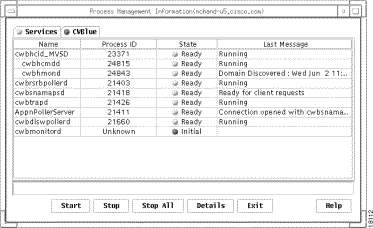
The Process Management and Message Log windows have Exit buttons. Click the Exit button to exit the application.
The title bar of each Process Management and Message Log window displays the host name of the connected workstation.
The Process Management window tabs use the following status colors for both processes and services:
You can use the Session Field Suppression variables in the cwbinit file to configure fields to be suppressed from the SNA View web Sessions tables and Session Connectivity displays.
# SNA View Sessions and Session Connectivity Field Suppression
#
# The following allow the indicated field name and the related contents
# to be suppressed in the Sessions table and on the Session Connectivity
# display. By default all fields and their associated values are displayed.
# To suppress a field and its contents uncomment the field entry. You
# may want to do this to reduce the Sessions table width or to block
# sensitive data from being displayed to SNA View users.
# To turn on the field name suppression set the associated variable = on.
# Valid values: on/off. default value: off.

#suppressLUName = on
#suppressPU2Name = on
#suppressFEPName = on
#suppressLogicalLineInfo = on
#suppressPhysicalLineInfo = on
#suppressClientIP = on
#suppressMACSAP = on
#suppressIDBLKNUM = on
#suppressCPName = on
#suppressDLURName = on
#suppressDLUSName = on
#suppressNodeName = on
Use the "SNA View Sessions and Session Connectivity Field Suppression" variables to configure the following:
Initially the session suppression entries are set as comments so they are not active. Each value lets you suppress one or more related fields. For example, to suppress the display of the IDBLK/IDNUM field, you would uncomment the suppressIDBLKNUM line, as shown below:
suppressIDBLKNUM = on
| This parameter... | Suppresses these fields... |
|---|---|
suppressLUName = on | LU Name |
suppressPU2Name = on | PU2 Name |
suppressFEPName = on | FEP Names |
suppressLogicalLineInfo = on | Logical Line PU field and logical line information |
suppressPhysicalLineInfo = on | Physical line information |
suppressClientIP = on | Client IP address |
suppressMACSAP = on | Client MAC/SAP and Destination MAC/SAP or MAC1/SAP1 and MAC2/SAP2 |
suppressIDBLKNUM = on | IDBLK/IDNUM |
suppressCPName = on | CPNAME |
suppressDLURName = on | DLUR Name |
suppressDLUSName = on | DLUS Name |
suppressNodeName = on | Node Name |
When CiscoWorks Blue processes add a device to the database or make device queries, they use the device host names. If a domain name server is available, the processes can query the domain name server to resolve the host names. If a domain name server is not available, the processes must use the exact device names with which the devices were first discovered.
If you do not enable DNS queries, a device can be added only by the name with which the device was discovered. If you enable DNS queries, a DNS lookup will let you enter any other valid names for the device that can be resolved by a domain name server. For example, using DNS lookup, a device that was discovered as heritage.cisco.com could also be referred to as heritage.
You can select DNS lookup in the following ways:
During configuration, a prompt asks you to specify whether or not to use a DNS lookup when devices are added to the database. See the "Changes to Configuration Procedure" section for the new steps in the configuration procedure.
The doDNSSearch variable in the cwbinit file lets you specify that a domain name server lookup will be done for queries to routers during discovery and polling. In previous releases, you had to enter the exact name of the router by which it was first discovered. In release 2.1 you can set this variable so that you can enter a different host name that can be resolved by a DNS lookup. This variable is used when you do the following:
The following new section of the cwbinit file provides thedoDNSSearch variable:
# This boolean value is used by both the cwbsnamapsd server process
# and other processes such as cwbadmin, cwbdiscover, dlsw and rsrb
# that add devices to the database.
#
# When adding a device to the database, this value is used to decide
# whether to do a DNS lookup on the name of the device being added,
# storing the DNS name in the DNS database table.
#
# cwbsnamapsd uses this value to decide whether to do a DNS lookup on
# a device name supplied in a user's request, if the request could
# not be satisfied with a device name or IP address lookup.
#
# The default value is "false", DNS lookups are not enabled.  Set this
# value to "true" to enable DNS lookups.

doDNSSearch = false
You can set the doDNSSearch variable in the cwbinit file to true to discover and query routers by any valid name. Now you can enter the discovered name, a valid IP address, or any valid name for the router. For example, you could enter cwb-c5 in the input field for a DLSw focus view even if the router was discovered as cwb-c5.cisco.com. To enable domain name server lookup for routers, change the doDNSSearch value to true:
doDNSSearch = true
The DNS lookup is done when the router is added to the database, and any time a device cannot be found by discovered name or IP address. This might impact performance.
The configuration part of the installation procedure, and the cwb config command, let you select the ports to be used for the CiscoWorks Blue web server, the Open Server Gateway, and the Name server. See the "Changes to Configuration Procedure" section for the new steps in the configuration procedure.
In release 2.1, Maps and SNA View offer the following improvements to the process of discovering routers.
In release 2.1, the set of four independent discovery processes is combined into one discovery process that discovers data common to all protocols, such as IP addresses and ring-bridge tables, once rather than once for each protocol.
Devices that are not discovered for any one of the protocols are not added to the database. This process avoids the overhead of discovering unnecessary devices from an NMS database.
The Discovery Progress window now displays more informative status messages as devices are discovered.
In release 2.1, the cwb start cwbdiscover command replaces the old discovery commands (cwb start cwbdlswdiscover, cwb start cwbappndiscover, cwb start cwbrsrbdiscover, and cwb start cwbtn3270discover), which are no longer valid.
The syntax of the cwb start cwbdiscover command is as follows:
Command |
cwb start cwbdiscover [-d [d][r][a][t]] |
Syntax Description -d [d][r][a][t] |
Specifies one or more protocols to discover: · d discovers devices running the DLSw protocol. · r discovers devices running the RSRB protocol. · a discovers devices running the APPN protocol. · t discovers devices running the TN3270 protocol. If you specify the -d switch with no protocols, all protocols are discovered. If you enter multiple protocols, do not separate them with spaces. |
-r read_community_string | Specifies a global read community string for all devices in the seed file that do not specify a read community string. If all read community strings are the same, you can put the device name in the seed file and specify the read community string on the command line. |
-s seed_file_name | Specifies a seed file. Replace seed_file_name with the seed file name. |
-h | Displays a help message. |
-v | Displays the version. |
When discovery is run the discovery process queries a set of base MIB variables and then queries a set of variables specific to the protocol being discovered. This section lists the MIB variables queried during discovery. It contains these main topics:
The following variables are queried when discovery is run, no matter which protocol is being discovered:
sysObjectID | ipAdEntIfIndex |
ifIndex | ipAdEntNetMask |
ifType | dot1dSrPortLocalSegment |
ifPhysAddress | dot1dSrPortBridgeNum |
ipAdEntAddr | dot1dSrPortTargetSegment |
rsrbRemotePeerEncapsulation | rsrbRemotePeerState |
rsrbRingLocal | rsrbVirtRingIPAddr |
rsrbRemotePeerIPAddr | rsrbRingBridge |
rsrbRingType |
|
| DLSW-MIB (RFC 2024) | CISCO-DLSW-MIB |
|---|---|
dlswNodeStatus | ciscoDlswStatus |
dlswTConnOperLocalTAddr | ciscoDlswTConnOperLocalTAddr |
dlswTConnOperConnectTime | ciscoDlswTConnOperConnectTime |
dlswTConnOperState | ciscoDlswTConnOperState |
dlswTConnOperConfigIndex | ciscoDlswTConnOperConfigIndex |
dlswTConnConfigTDomain | ciscoDlswTConnConfigTDomain |
dlswTConnConfigLocalTAddr | ciscoDlswTConnConfigLocalTAddr |
dlswTConnConfigRemoteTAddr | ciscoDlswTConnConfigRemoteTAddr |
dlswCircuitS1DlcType | ciscoDlswCircuitS1DlcType |
dlswCircuitS1RouteInfo | ciscoDlswCircuitS1RouteInfo |
dlswCircuitS2TDomain | ciscoDlswCircuitS2TDomain |
dlswCircuitS2TAddress | ciscoDlswCircuitS2TAddress |
dlswCircuitState | ciscoDlswCircuitState |
The following APPN MIB variables are queried during discovery:
| APPN-MIB (RFC 2455) | IBM-6611-APPN-MIB |
|---|---|
appnNodeCpName | ibmappnNodeCpName |
appnNodeType | ibmappnNodeType |
appnNodeBrNn |
|
The discovery process queries the device to determine whether it is configured with the tn3270sCpuCard TN3270 MIB variable.
This section lists the MIB variables that are queued during polling, and contains the following subsections:
DLSw MIB Variables Queried During Polling
APPN MIB Variables Queried During Polling
During DLSw polling, the poller queries the MIB that was discovered for DLSw. If the Cisco IOS release has changed so that MIB support has changed, you must rediscover this device. The following DLSw MIB variables are queried during polling:
| DLSW-MIB (RFC 2024) | CISCO-DLSW-MIB |
|---|---|
dlswNodeUpTime | ciscoDlswUpTime |
dlswTConnOperLocalTAddr | ciscoDlswTConnOperLocalTAddr |
dlswTConnOperConnectTime | ciscoDlswTConnOperConnectTime |
dlswTConnOperState | ciscoDlswTConnOperState |
dlswCircuitS1DlcType | ciscoDlswCircuitS1DlcType |
dlswCircuitS1RouteInfo | ciscoDlswCircuitS1RouteInfo |
dlswCircuitS2TDomain | ciscoDlswCircuitS2TDomain |
dlswCircuitS2TAddress | ciscoDlswCircuitS2TAddress |
dlswCircuitState | ciscoDlswCircuitState |
During APPN polling, the poller queries the MIB that was discovered for APPN. If the Cisco IOS release has changed so that MIB support has changed, you must rediscover this device. The following APPN MIB variables are queried during polling:
| APPN-MIB (RFC 2455) | IBM-6611-APPN-MIM |
|---|---|
appnNodeCpName | ibmappnNodeCpName |
appnNodeType | ibmappnNodeType |
appnLocalTgOperational | ibmappnLocalTgOperational |
appnLocalTgCpCpSession |
|
Next, the process queries the following variables from the DLUR MIB:
dlurDlusSessnStatus dlurDlusSessnStatus dlurDlusName
DLUR-MIB (RFC2232)
OLD-DLUR-MIB
If the appn_pu_polling parameter in cwbinit is set to ON, the following DLUR-MIB (RFC 2232) variables are also polled:
| DLUR-MIB (RFC2232) | OLD-DLUR-MIB |
|---|---|
dlurPuSscpSuppliedName | dlurPuName |
dlurPuStatus | dlurPuStatus |
dlurPuActiveDlusName | dlurPuActiveDlusName |
If appn_port_polling parameter in cwbinit is set to ON, the following APPN-MIB variables are also polled:
| APPN-MIB (RFC 2455) | IBM-6611-APPN-MIB |
|---|---|
appnPortOperState | ibmappnNodePortState |
If appn_link_polling parameter in cwbinit is set to ON, the following APPN-MIB variables are also polled:
| APPN-MIB (RFC 2455) | IBM-6611-APPN-MIB |
|---|---|
appnLsOperState | ibmappnNodeLsState |
appnLsAdjCpName | ibmappnNodeLsCpName |
appnLsTgNum | ibmappnNodeLsTgNum |
The first time a device is polled, the following APPN MIB variables are also polled:
| APPN-MIB (RFC 2455) | IBM-6611-APPN-MIB |
|---|---|
appnLocalTgDestVirtual | ibmappnLocalTgDestVirtual |
appnNodeBrNn |
|
| ibmappnLocalTgCpCpSession |
If appn_port_polling parameter in cwbinit is set to ON, the following APPN MIB variables are also polled the first time:
| APPN-MIB (RFC 2455) | IBM-6611-APPN-MIB |
|---|---|
appnPortDlcType | ibmappnNodePortDlcType |
appnVrnPortName |
|
If appn_link_polling parameter in cwbinit is set to ON, the following APPN MIB variables are also polled the first time:
| APPN-MIB (RFC 2455) | IBM-6611-APPN-MIB |
|---|---|
appnLsPortName | ibmappnNodeLsPortName |
appnLsCpCpSessionSupport | ibmappnNodeLsCpCpSession |
| ibmappnNodeLsDlcType |
For network topology polling, the following IBM-6611-APPN-MIB variables are polled initially and as changes are detected (APPN-MIB variables are not queried during network topology polling):
ibmappnNnNodeFRName | ibmappnNnNodeFRFrsn |
ibmappnNnNodeFRType | ibmappnNnNodeFRCongested |
ibmappnNnNodeFRQuiescing | ibmappnNnTgFROwner |
ibmappnNnTgFRDest | ibmappnNnTgFRNum |
ibmappnNnTgFRFrsn | ibmappnNnTgFRDestVirtual |
ibmappnNnTgFROperational | ibmappnNnTgFRCpCpSession |
For network topology polling, the following IBM-6611-APPN-MIB variables are polled at each poll interval to detect changes in the network topology (APPN-MIB variables are not queried during network topology polling):
ibmappnNodeUpTime | ibmappnNodeNnFrsn |
If changes are detected, the initial variables are polled for the changed resources.
This section describes changes to the mainframe application made in release 2.1.
If you use a TCP/IP connection, you can migrate your workstations to CiscoWorks Blue release 2.1 while leaving the mainframe at release 1.2 or 2.0. CiscoWorks Blue release 2.1 Maps and SNA View applications work and communicate with the older release 1.2 or 2.0 mainframe application over TCP/IP, but only at the release 1.2 or 2.0 level of function. If you chose to leave the mainframe at release 1.2 or 2.0 for now, you should plan to upgrade it to release 2.1 soon to get the full release 2.1 capability.
To use either of these TCP/IP stacks in MVS, make the following changes to the NSPOPEN procedure or JCL.
//NSPOPEN EXEC PGM=NSPOPEN,PARM='=ICS_SUBSYS=SUBS',
//        TIME=1440,REGION=&RGN,
If you are using Cisco IOS 390 release 1 or TCP Access 4.1 (or earlier), and you are not using the default subsystem name of ACSS, you must apply PTF TP06511 from Interlink/Sterling. PTF TP06511 requires the following other PTFs:
You can obtain all these PTFs from ftp.interlink.com/pub/ptf410. PTFs TP04545 and TP04823 are in the 9712 Cumulative.
If you are using Cisco IOS 390 release 2, or TCP Access 5.2, you do not need these PTFs.
This section explains how to configure LU 6.2 connectivity between the SNA host workstation component and the mainframe.
This section contains these main topics:
Before starting the steps to allow the SNA Host component on the workstation to communicate with the mainframe, you must first do the necessary configuration to allow an LU 6.2 session to flow from the workstation to the mainframe. You may need to make changes to both VTAM and the workstation application that supports LU 6.2 sessions. The following workstation LU 6.2 programs are supported:
If the workstation is not directly connected to the mainframe running the SNA Host component, but the session instead passes through one or more VTAMs before reaching the destination VTAM, then the correct configuration may require changes to all VTAMs (and possibly NCPs in the path).
If this LU 6.2 configuration has not yet been done, the installation should be delayed until the LU 6.2 configuration is complete. One way to determine whether there is LU 6.2 connectivity between the workstation and the mainframe is to issue the VTAM command D NET,APING,ID=NETID.RESOURCE. The NETID.RESOURCE is the fully qualified name of the SNA workstation. Until this command returns a positive response, the mainframe is unable to connect to the workstation.
After the initial LU 6.2 configuration is complete, you can use the procedures in the following sections to complete the configuration for the SNA host component.
If the AIX workstation is connected to the mainframe using SNA LU 6.2, use this procedure to configure the LU 6.2 operating environment. This procedure creates the sna_tps file for transaction program profiles for the command server and the message server and a logmode named PARALLEL.
To configure AIX, create a file named sna_tps, and configure PARALLEL mode processing, as described in the following sections:
[NSPOPNCS]
LUALIAS = ""
DESCRIPTION = ""
USERID = root
GROUP = system
TIMEOUT = 30
TYPE = NON-QUEUED
STYLE = EXTENDED
PATH = /opt/CSCOcb/bin/cwbstarttp
ARGUMENTS = cwbhcmd_server MYDOMAIN

[NSPOPNMS]
LUALIAS = ""
DESCRIPTION = ""
USERID = root
GROUP = system
TIMEOUT = 30
TYPE = NON-QUEUED
STYLE = EXTENDED
PATH = /opt/CSCOcb/bin/cwbstarttp
ARGUMENTS = cwbhci_server MYDOMAIN
This sample sna_tps file defines two TPs:
In the file, each TP name is enclosed in brackets, as shown below:
[NSPOPNMS]
[NSPOPNCS]
For each TP, code the following entries:
After you create the /etc/sna/sna_tps file, create a new LU 6.2 session profile named PARALLEL as described in the eNetwork Communication Server for AIX publications. Use the xsnaadmin command to configure an LU 6.2 PARALLEL logmode. The xsnaadmin command can often be found in the /usr/lpp/X11/bin directory.
Step 1 At the command prompt, enter the xsnaadmin command:
% xsnaadmin
The xsnaadmin window is displayed.
Step 2 In the xsnaadmin window, select Services>APPC>Modes.
Step 3 If the PARALLEL mode is not in the list of defined modes, select Add. The Add Mode window is displayed.
If the PARALLEL mode is already in the list of defined modes, you can exit the window.
Step 4 In the Add Mode window, enter PARALLEL for the Mode Name and either accept the defaults or customize the values for your operating environment.
If you need to create a PARALLEL log mode, accept the default parameter values:
| Field | Default value |
|---|---|
COS Name | #CONNECT |
Initial session limit | 2 |
Maximum session limit | 32767 |
Min con. winner sessions | 1 |
Auto-activated sessions | 0 |
Receive pacing window (Initial) | 4 |
This section describes how to configure SNAplus2 for LU 6.2 support on HP-UX. To configure HP-UX SNAplus2, you first create a file named sna_tps, and then you configure PARALLEL mode processing, as described in the following sections:
#SNA Host Message Server
["NSPOPNMS"]

PATH          = /opt/CSCOcb/bin/cwbstarttp
ARGUMENTS     = cwbhci_server MYDOMAIN
TYPE          = NON-QUEUED
TIMEOUT       = 30
USERID        = root
GROUP         = sys


#SNA Host Command Server
["NSPOPNCS"]

PATH          = /opt/CSCOcb/bin/cwbstarttp
ARGUMENTS     = cwbhcmd_server MYDOMAIN
TYPE          = NON-QUEUED
TIMEOUT       = 30
USERID        = root
GROUP         = sys
This sample sna_tps file defines two TPs:
In the file, each TP name is enclosed in quotation marks and then in brackets, as shown below:
["NSPOPNMS"]
["NSPOPNCS"]
For each TP, code the following entries:
After you create the sna_tps file, use the xsnapadmin command to configure SNAplus2 for PARALLEL log mode. The xsnapadmin command is often found in the /opt/sna/bin/X11 directory.
Step 1 At the command prompt, enter the xsnapadmin command, as shown below.
% xsnapadmin
The xsnapadmin window is displayed.
Step 2 In the xsnapadmin window, select Services>APPC>Modes.
Step 3 If the PARALLEL mode is not in the list of defined modes, select Add. The Add Mode window is displayed.
If the PARALLEL mode is already in the list of defined modes, exit the window.
Step 4 In the Add Mode window, enter PARALLEL for the Mode Name and either accept the defaults or customize the values for your operating environment.
If you need to create a PARALLEL log mode, accept the default parameter values:
| Field | Default value |
|---|---|
Receive pacing window | 4 |
Initial session limit | 2 |
Max session limit | 32767 |
Min con. winner sessions | 1 |
Auto-activated sessions | 0 |
This section describes how to configure SNAP-IX for LU 6.2 support on Solaris. To configure SNAP-IX, you first create the file sna_tps, and then you configure PARALLEL mode processing, as described in the following sections:
[NSPOPNCS]
LUALIAS = ""
DESCRIPTION = ""
USERID = root
GROUP = other
TIMEOUT = 30
TYPE = NON-QUEUED
PATH = /opt/CSCOcb/bin/cwbstarttp
ARGUMENTS = cwbhcmd_server MYDOMAIN

[NSPOPNMS]
LUALIAS = ""
DESCRIPTION = ""
USERID = root
GROUP = other
TIMEOUT = 30
TYPE = NON-QUEUED
PATH = /opt/CSCOcb/bin/cwbstarttp
ARGUMENTS = cwbhci_server MYDOMAIN
This sample /etc/sna/sna_tps file defines two TPs:
In the file, each TP name is enclosed in brackets, as shown below:
[NSPOPNMS]
[NSPOPNCS]
For each TP, code the following entries:
After you create the /etc/opt/sna/sna_tps file, create a new LU 6.2 session profile named PARALLEL as described in the SNAP-IX publications. Use the xsnaadmin command to configure an LU 6.2 PARALLEL logmode. The xsnaadmin command can often be found in the /opt/sna/bin/X11 directory.
Step 1 At the command prompt, enter the xsnaadmin command, as shown below.
% xsnaadmin
The xsnaadmin window is displayed.
Step 2 In the xsnaadmin window, select Services>APPC>Modes.
Step 3 If the PARALLEL mode is not in the list of defined modes, select Add. The Add Mode window is displayed.
If the PARALLEL mode is already in the list of defined modes, exit the window.
Step 4 In the Add Mode window, enter PARALLEL for the Mode Name, and either accept the defaults or customize the values for your operating environment.
If you need to create a PARALLEL log mode, accept the default parameter values:
| Field | Default value |
|---|---|
Initial session limit | 2 |
Maximum session limit | 32767 |
Min con. winner sessions | 1 |
Auto-activated sessions | 0 |
Receive pacing window (Initial) | 4 |
If you are using Tivoli NetView for OS/390 version 1.1 or later, SNA View and Maps can use the new NetView automation facilities rather than the CiscoWorks Blue PPI task. This change improves performance of the status updates. To make this change, edit the NSPSVTBL member and change which automation table statement is used.
The NSPSVTBL member has two sections that let you decide which automation table statement to use. The first automation table statement, which is the default statement (it is not commented), always works regardless of which level of NetView you are using.
IF (MSGID='IST093I' | MSGID='IST105I' | MSGID='IST259I' |
MSGID='IST590I' | MSGID='IST619I' | MSGID='IST621I' |
MSGID='IST1132I' | MSGID='IST1133I' | MSGID='IST1416I') &
TEXT=MESSAGE
THEN EXEC(CMD('NSPSVTAM ' MESSAGE)
ROUTE(ONE NSPAUTO1));
The second automation table statement (commented) is for NetView V1R1 or later. It provides a direct PPI communication using NetView pipelines and gives better performance. To use this statement, comment all the lines of the first statement and uncomment all the lines of the second statement.
IF (MSGID='IST093I' | MSGID='IST105I' | MSGID='IST259I' |
MSGID='IST590I' | MSGID='IST619I' | MSGID='IST621I' |
 MSGID='IST1132I' | MSGID='IST1133I' | MSGID='IST1416I')
THEN EXEC(CMD('PIPE (NAME NSP2PPI END ¨) SAFE * '
'| EDIT /0006/ X2C N 1.* N '
'| A:COUNT BYTES | EDIT PAD /0/ 1.* D2C RIGHT 2 N '
'| B:FANIN | JOINCONT // '
'| C:PPI SVOPEN | HOLE '
 '¨ A: | B: '
 '¨ C: | NLOCATE /+0000000000/ '
 '| EDIT /PPI SEND FAILED, RC:/ NW 1.* NW '
 '/(SEE "HELP PIPE PPI")/ NW | LOG NETLOG')
ROUTE(ONE NSPAUTO1));
In all the mainframe JCL shipped with release 2.1, all names in the format NSP200*.* or NSPS200*.* are changed to NSP210*.* and NSPS210*.*.
The following new messages are added to the mainframe program.
Where:
task1 is the name of the subtask attempting to add a message to another subtask's free queue.
task2 is the name of the subtask whose queue is being added to.
count is the number of times the attempt has failed.
Explanation An attempt by one subtask to add to the free queue of another subtask has failed. The request is retried.
Recommended Action No action is required. This is a diagnostic message that can be used to determine the cause of other problems that will be indicated with their own error messages.
Where:
file is the name of the member that could not be opened.
Explanation The application could not open the requested file. You may receive this message with the member name being that of the HOSTPU for the VTAM, this is not a problem.
Recommended Action If the error is received for any member name other than the host VTAM, contact the Cisco TAC.
Where:
task is the name of the subtask that is attempting to free messages
count is the number of times the operation has been attempted.
Recommended Action No action is required. This is a diagnostic message that can be used to determine the cause of other problems that will be indicated with their own error messages.
Explanation The STOP command was issued with a parameter. This is not a valid command.
Recommended Action Enter the STOP command without any parameters to stop the address space. If you are attempting to stop only one subtask, use the KILL command.
You can use the TRACE command inside the NSPPARM member by doing the following:
Examples
1. To use the TRACE command from within the NSPPARM member to start tracing of the DISCOVER subtask, put the following in NSPPARM:
DISCOVER NSPDSC1
TRACE INT DISCOVER
2. To use the TRACE command from within the NSPPARM member to start internal detail tracing of the TCP subtask, put the following in NSPPARM:
TCP 6104 6104
TRACE INT TCP DETAIL
When you provide your own exit routine, you can link the ISTEXCCS exit routine in 24-bit or 31-bit mode.
By default, the combined exit will be linked with attributes AMODE(24),RMODE(24) as specified in the NSPELNKS member in the NSPSSAMP dataset. If your exit requires a 31-bit address mode, you may change NSPELNKS to have attributes AMODE(31),RMODE(24) because the supplied SNA View exits will operate with 31-bit address mode.
By default the combined exit will be linked with attributes AMODE(24),RMODE(24) as specified in the NSPELNKB member in the NSPSSAMP dataset. If your exit requires a 31-bit address mode, you may change NSPELNKB to have attributes AMODE(31),RMODE(24) because the supplied SNA View exits will operate with 31-bit address mode.
Maps and SNA View no longer ship member NSPSCMD, so you do not copy the NSPSCMD member to a NetView CLIST data set.
This section describes how to calculate the sizes of both the PRIMARY and BACKUP databases in NSPDBVSM. Use the sample member provided in the member
prefix.NSPS210I.NSPSSAMP(NSPDBVSM) to allocate two VSAM databases used by the NSPEXCCS exit routine. Use the following formula to calculate the size of both the PRIMARY and BACKUP databases in NSPDBVSM:
Step 1 Estimate the total number of switched PUs that will connect into the VTAM.
Step 2 Multiply the number in Step 1 by 230.
Step 3 Add a contingency factor (100 percent is suggested).
Step 4 The result is the minimum number of bytes to allocate for each VSAM database in NSPDBVSM (PRIMARY and BACKUP).
This section describes changes at the workstation for release 2.1.
The CiscoWorks Blue configuration procedure has new prompts for when you have applied a license key from an evaluation copy of the products or license key that is invalid.
If you have installed the products but you have applied a temporary license key for an evaluation copy of Maps or SNA View, or a license key that is invalid, you might see one of the following messages:
INFO:Your current CiscoWorks Blue Maps license expires on mm/dd/yyy.
Do you want to enter CiscoWorks Blue Maps license key[yes|no]? [Y]

INFO:Your current CiscoWorks Blue SNA View license expires on mm/dd/yyy.
Do you want to enter CiscoWorks Blue SNA View license key[yes|no]? [Y]

INFO:Your current CiscoWorks Blue Maps license key is not valid.
Do you want to enter CiscoWorks Blue Maps license key[yes|no]? [Y]

INFO:Your current CiscoWorks Blue SNA View license key is not valid.
Do you want to enter CiscoWorks Blue SNA View license key[yes|no]? [Y]
If you have already installed the products but did not apply any license, and then you reran the installation program, you will see the following message:
INFO:Your current CiscoWorks Blue license keys are not valid.
Do you want to enter CiscoWorks Blue license key(s) [yes|no]? [Y]
Press Enter if you now want to apply a valid, permanent license key for Maps or SNA View.
The CiscoWorks Blue configuration procedure is started at the end of installation or when you enter the cwb config command. The configuration procedure now prompts you to enable DNS queries and to select ports used by CiscoWorks Blue processes.
The CiscoWorks Blue configuration procedure starts with a set of predefined default values. After you run the CiscoWorks Blue configuration procedure the first time, the choices you make become the default values for the next time you run the program. For example, the first time you run the program, the default for enabling DNS queries is N:
Would you like to enable DNS search [yes|no]? [N]
If you change the N to Y and press Enter to enable DNS queries, then the next time you run the configuration procedure the default changes to Y:
Would you like to enable DNS search [yes|no]? [Y]
The following new steps are added to the configuration procedure:
Step 1 In response to the following prompt:
If you select N, then a device can be added only by the name with which the device was discovered. If you select Y, then a DNS lookup will let you enter any other valid names for the device that can be resolved by a domain name server. For example, using DNS lookup, a device that was discovered as heritage.cisco.com could also be referred to as heritage.
Devices in the network may be referred to in different ways.  For
example a device may be discovered as router1.cisco.com, but a
Maps/SNA View user may refer to the device just as router1.  In order
for the application to identify both names as the same device it
must perform a DNS lookup on the device name both when it is discovered
and for each client request that can not be identified based upon the
device name supplied.  Enabling DNS searches can increase the device
discovery time and the amount of time it takes to service requests,
especially if the DNS searches fail for the devices being discovered.

Would you like to enable DNS search [yes|no]? [N]
Step 2 In response to the following prompt press Enter to accept the default port for use by the CiscoWorks Blue web server or type in another TCP port above 1023 and press Enter. Initially the default port is port 80.
Enter 80, 8080 or an unused tcp port above 1023 for Web Server:[80]
The configuration program checks to see whether the selected port is available. If it is unavailable, you will be prompted to select another port for the web server.
Step 3 In response to the following prompt press Enter to accept the default port for use by the CiscoWorks Blue Open Server Gateway or type in another TCP port above 1023 and press Enter. Initially the default port is port 44541.
Enter an unused tcp port above 1023 for Open Server Gateway:[44541]
The configuration program checks to see whether the selected port is available. If it is unavailable, you will be prompted to select another port for the Open Server Gateway.
Step 4 In response to the following prompt press Enter to accept the default port for use by the CiscoWorks Blue Name server or type in another UDP port above 1023 and press Enter. Initially the default port is port 44542.
Enter an unused udp port above 1023 for Name Server:[44542]
The configuration program checks to see whether the selected port is available. If it is unavailable, you will be prompted to select another port for the Name server.
Step 5 If one of the selected ports is reserved in the /etc/services file but does not appear to be in use at this time, you might see the following message. If you want to keep the port reserved and use another port, type N and press Enter.
WARNING: Port port_number/protocol is reserved for application_name service in /etc /services file.
Do you want to use port_number/protocol anyway [yes|no]? [N]
Step 6 In response to the following prompt type Y and press Enter to stop and restart CiscoWorks Blue processes or type N and press Enter to restart them at a later time. If you make any changes to the CiscoWorks Blue configuration, you must stop and restart all CiscoWorks Blue processes before those changes become active.
CiscoWorks Blue configuration has changed. You must restart
all CiscoWorks Blue processes to make these changes effective.
Do you want to restart CiscoWorks Blue processes [yes|no]? [Y]
When you use the cwb show status command, the resulting display shows you the status and process ID of all servers and processes. The Last Message column displays the last message sent by the process to the Process Manager.
CiscoWorks Blue Naming Server Started.
CiscoWorks Blue Process Manager Started.
Process Manager running with processes:

PROCESS              STATE    PID        Last Message

CWBHTTPAdapter       Ready    45818      Running
CWBOSAMonitor        Ready    25078      Running
cwbhcid_MVSDTCP      Ready    26162      Running
  cwbhcmdd             Ready    17106      Running
  cwbhmond             Ready    18690      Domain Discovered : Mon Aug  2 17:189
CWBPMMonitor         Ready    19262      Running
cwbrsrbpollerd       Ready    27004      Running
cwbsnamapsd          Ready    26422      Ready for client requests
cwbtrapd             Ready    15548      Running
CWBMsgLogServer      Ready    40696      Running
AppnPollerServer     Ready    21386      Connection opened with cwbsnamapsd
cwbdlswpollerd       Ready    29058      Running
cwbhci_server_MVSDLU62 Initial
cwbhcmd_server_MVSDLU62 Initial
CWBDBAdapter         Ready    33598      Running
cwbmonitord          Initial
The cwb clear db command clears the data base and the appnfile file:
cd /opt/CSCOcb/bin
cwb clear db
After installation, you can use the cwbupgrade.sh command to apply the Maps and SNA View license keys. To enter a license key, use the following procedure:
Step 1 Start the /opt/CSCOcb/install/cwbupgrade.sh program:
/opt/CSCOcb/installcwbupgrade.sh
Step 2 When you see the following prompt, type y to enter a license key:
Do you want to enter CiscoWorks Blue Maps license key [yes|no]? y
Step 3 When you see the following prompt, enter the Maps license key:
Enter the CiscoWorks Blue Maps license key (example 123456789012) or press enter if not licensed for CiscoWorks Blue Maps: 123456789012
Step 4 When you see the following prompt, enter the SNA View license key:
Enter the CiscoWorks Blue SNA View license key (example 123456789012) or press enter if not licensed for CiscoWorks Blue SNA View: 123456789012
Step 5 If you applied a temporary license key for an evaluation copy of Maps or SNA View, or a license key that is invalid, you might see one of the following messages:
INFO:Your current CiscoWorks Blue Maps license expires on mm/dd/yyy.
Do you want to enter CiscoWorks Blue Maps license key[yes|no]? [Y]

INFO:Your current CiscoWorks Blue SNA View license expires on mm/dd/yyy.
Do you want to enter CiscoWorks Blue SNA View license key[yes|no]? [Y]

INFO:Your current CiscoWorks Blue Maps license key is not valid.
Do you want to enter CiscoWorks Blue Maps license key[yes|no]? [Y]

INFO:Your current CiscoWorks Blue SNA View license key is not valid.
Do you want to enter CiscoWorks Blue SNA View license key[yes|no]? [Y]
Press Enter if you now want to apply a valid, permanent license key for Maps or SNA View.
Step 6 If Maps or SNA View is now running, press Enter when you receive the following message:
INFO: CiscoWorks Blue Servers are currently running. You must restart all CiscoWorks Blue processes to make these changes effective.
Do you want to restart CiscoWorks Blue processes [yes|no]? [Y]
A change to the Cisco IOS software deletes inactive dynamic TGs from the router database. If you want to keep those inactive TGs in the Maps and SNA View cache, set the keep_deleted_tgs option in the cwbinit file to on. The following keep_deleted_tgs option is new in the cwbinit file:
# This option controls the CWBlue cache deletion of TGs that are no longer
# reported by local topology agents. A Cisco IOS change was made to delete
# inactive dynamic TGs from the router database.
# To delete TGs that are no longer reported by the agent,
# set this parameter to 'off'.
# To keep those TGs in the CWBlue cache, set this parameter to 'on'. If TG
# events are enabled, this will trigger an event if the TG becomes
# operational again.
# valid values:on/off
keep_deleted_tgs = off
The cwb tac command lets you specify a directory for saving the command output.
The cwb tac command runs the CiscoWorks Blue TAC collection program to collect and zip all the information you will need when you call the Cisco TAC. You must be the root user to use the cwb tac command.
Command |
cwb tac [-o outputdirectory] |
Syntax Description -o outputdirectory |
Specifies a directory where the command output is saved. If you omit this operand, the output is saved as file cwbtac_n.tar.Z in a temporary directory, where the n is increased for each successive use. The cwb tac command searches for a temporary directory in this order: /usr/tmp, /var/tmp, /tmp. You can specify an output directory in which to save the output of the cwb tac command: · You can specify an absolute directory by preceding the path with a / character. If the specified directory does not exist, the cwb tac command prompts you to create it. The following command saves the zipped file as /usr/cwblue/cwbtac_1.tar.Z: cwb tac -o /usr/cwblue
· You can specify a relative directory. This directory is always relative to /opt/CSCOcb/etc. The following command saves the zipped file as /opt/CSCOcb/etc/tac/cwbtac_1.tar.Z: cwb tac -o tac
|
During installation, the CiscoWorks Blue products save the host name of the workstation in a set of files for use during processing. If you later change the host name of the workstation, you must also change the host name in those files.
To change the host name, use the following process:
Step 1 Use the following command to stop a all CiscoWorks Blue processes:
/opt/CSCOcb/bin/cwb stop all
Step 2 Change the host name in the following files:
Step 3 Use the following command to restart all CWBlue processes:
/opt/CSCOcb/bin/cwb start servers
The CiscoWorks Blue products do not include the local workstation's IP address in any of its files, so you can change the IP address without impact.
In release 2.1, the eventgen_tg option in the cwbinit file adds an all value to control how events are generated for TGs:
Events are not generated during the first polling cycle for each agent to prevent events for every active TG from being sent because all TGs will be new to the Cisco Works Blue cache.
The following event_gen option is changed in the cwbinit file:
# This option controls TG event generation.
# To turn off TG event generation, set eventgen_tg = off.
# To generate event for existing TGs when an operational state change
# is detected, set eventgen_tg = on.
# To generate events for existing TGs when an operational state change
# is detected and for newly created operational (active) TGs,
# set eventgen_tg = all.
# Exception: No events are generated for TGs created on
#  the first poll cycle. This avoids a storm of events during
#  process startup.
# valid values: on/off/all
eventgen_tg = on
This section describes changes to the set of required software for release 2.1.
The following patches are required on AIX version 4.2:
The following patches are required on AIX version 4.3:
The following minimum patch level is required on HP-UX version 10.20:
The following minimum patch levels are required on HP-UX version 11.00:
If you install the CiscoWorks Blue applications on an HP-UX system, you might need to change the following kernel parameters, if they are lower than the following settings, using the HP-UX sam command:
See your HP-UX publications for instructions on changing these values.
These values are the minimum values needed for Maps and SNA View. If you have other resource-intensive applications on this workstation, you might need to increase these values. If you are unable to start the Process Manager, if you get "out of space" errors trying to start other CiscoWorks Blue processes, or if you get java exceptions with the message "out of memory," try increasing the swap space.
There is a CCO web page for CiscoWorks Blue Maps and SNA View that contains links to marketing and technical documentation and includes the latest downloadable CiscoWorks Blue files. Maintenance releases for the CiscoWorks Blue products will be available on CCO as problems are found and fixed. To find the latest product information, point your web browser to the following location:
http://www.cisco.com/kobayashi/sw-center/sw-netmgmt.shtml
Select the CiscoWorks Blue Software Module Updates link and then follow the links to the desired product, version, and operating system.
All changes for the release 2.1 products are fully described in these Release Notes.
The following release 2.0 printed publications are not updated for release 2.1. Instead, the release 2.1 publications are distributed online both through Cisco's CCO web page and as PDF files distributed with this product.
The following release 2.1 publications are available as PDF files in the /docs directory on the product CD-ROM.
The tips and caveats in this section apply to all CiscoWorks Blue applications on all platforms, unless otherwise noted.
On HP-UX systems, each process must reserve its own swap space. If all available swap space is reserved, even if it is not used, no more processes can be started. CiscoWorks Blue will normally run in a system that has 256MB of swap space. However, we recommend at least 384MB, especially if you run all the client applications or other programs such as OpenView. If processes fail to start with "out of space" in the Process Manager client Last Message field, you should increase the swap space. Use the swapinfo -ta command to check for available space.
The maximum length for a device name that the CiscoWorks Blue applications can handle is 100 characters. Names longer than 100 characters will not be added.
If discovery fails and displays a "Process Not Responding" message, it might be because the discover process took longer than 5 minutes to discover the last router (normally the last router in the Edit>Key Devices list). The discovery process runs until discovery of this router is finished. Use the ps command to determine when the discovery process is complete and then run the discovery process again. For information on using the command line options, see the "Commands and Processes" appendix of the CiscoWorks Blue Maps and SNA View Workstation Installation and Administration Guide. [CSCdj52257]
When starting a Maps application, you might get the following warning messages in the xterm window. You can safely ignore these messages. [CSCdj03762]
Warning: Color name " " is not defined
Warning: Cannot parse default background color spec
The Zoom In and Zoom Out functions are not available on HP-UX. However, the See All and Zoom Reset functions are available on HP-UX. [CSCdj52945]
If a DLSw router stops responding to poll requests, and then begins responding to poll requests again at a later time, Maps does not issue events (Traps) for any of its peers that changed their state during this time. There is no workaround at this time. [CSCdj15551]
Selecting Layout>See All resizes the icons in the current window so that they are all viewable within the window. On a crowded view, using this function might cause problems in other views, such as icons being displayed on top of each other. Selecting a different item on the Layout menu does not correct this problem. [CSCdj53042]
If an adjacent node icon type or status changes, the adjacent node or ports and links view of another node will not update the status or icon of the changed node if that is the only view change. To get the updated status or icon, select the focus node and then reselect View Adjacent Nodes. [CSCdj41219]
In the APPN adjacent nodes view, if the focus node's dynamic link to an end node goes down, the transmission group (TG) or link will display red, but the end node icon will stay green even though Maps no longer knows the status (the icon should turn blue). Observe the status of the link to determine end node connectivity rather than the end node icon status.
If you change the layout of objects on the screen, use File>Save to save the changes. Otherwise, if you encounter problems saving when you exit the application, any screen changes you've made might be lost. If you get an error when you try to save, check your file permissions and disk space. [CSCdj52534]
To fix this layout problem, use the following procedure:
Step 1 Select File>Clone Window.
Step 2 Close the original window.
Step 3 Select Layout>Circular, Layout>Hierarchical, or Layout>Symmetrical in the new window.
When the Motif interface for DLSw is used, peer statistics are not available for unknown routers. To view statistics for unknown routers, use the web interface instead. [CSCdj51719]
On HP-UX, the list of service access points (SAPs) might be truncated. [CSCdj52122]
In RSRB, if only one RSRB peer is defined to a virtual ring, the focus view for that peer does not show the virtual ring. [CSCdi87301]
If the online help for the web browser, the Administration program, the Process Manager, or the Message logger does not launch successfully, edit the following files to ensure that the path to the Netscape executable is correct:
The installation program asks you for this path. If you enter the wrong path, the online HTML help might not work.
Customers using newer versions of VTAM, versions that contain the characters "CS" in their version strings, might find that not all PUs are discovered. To find out whether this problem exists, issue the following VTAM command:
D NET,VTAMOPTS,OPTION=HOSTPU,FORMAT=CURRENT
If the returned version string contains the characters "CS" before the VxRy string, you will need to obtain a fix from the Cisco TAC.
Some PUs are not discovered.
Obtain a fix from the Cisco TAC.
Traps sent by Cisco routers for promiscuous peer connections (connections that are configured only at the remote routers) lost are not forwarded to the CWBlue trap daemon by SunNetManager and NetView because the dlswTConnOperState shows NO_SUCH_INSTANCE. CWBlue must rely on polling to learn of the connection outage. Alternatively, if the remote peer is explicitly configured on the local router, the trap will be processed. [CSCdm90577]
The Routing Information Field (RIF) is displayed in RING.BRIDGE.RING format in various places, such as the SNA View Session Connectivity page, the Maps DLSw Circuit Details web page, and the Maps DLSw Circuit Information View and its dialog. When the direction of the RIF can not be determined, the ring and bridge numbers can appear to be backwards. Do not assume an order when you see RIF data. [CSBdm56440]
If you run Process Manager and Message Logger from a remote PC (you export UNIX windows to a PC) your PC X emulator software should be started in XDCMP mode.
On HP-UX, some versions of csh and tcsh shells fail after stopping the CiscoWorks Blue Administration application. [CSCdm11785]
After exiting the CiscoWorks Blue Administration application, the window from which it was started quickly repeats the system prompt and scrolls.
Kill the window that is scrolling. Use a different shell or find a newer version of these shells. The problem occurs only with older versions of these shells.
The Process Management and Message Log client windows might occasionally stop functioning correctly and might need to be closed and restarted. The CiscoWorks Blue processes themselves are unaffected. [CSCdk91839]
Process Manager or Message Logger client windows lose data, for example:
Stop all CiscoWorks Blue processes and restart them using the following commands:
cwb stop all
cwb start servers
cwb start MsgLogClient
cwb start ProcMgrClient
If you are using the web interface from a PC and you click a CiscoView or TN3270 link, you must have an X-Windows System server running on your PC. Otherwise you will not see the CiscoView or TN3270 interface nor will you see an error message.
The Process Manager is running, but when you issue the cwb show status command, the output shows all CWBlue processes in the Initial state but CWBMsgLogServer is in the Starting state. The MsgLogServer gets the following message during startup:
Unable to bind to Process Manager Server
This message is followed by a detailed CORBA System Exception information.
The problem appears to be a third-party package error. A workaround may be available by changing the localhost entry in the /etc/hosts file. Check the /etc/hosts file. The localhost entry should be the first uncommented entry in the /etc/hosts file as shown in the following examples:
# comment line in hosts file
127.0.0.1       localhost loghost
or
127.0.0.1 localhost
To make the localhost entry the first entry, change the /etc/hosts file as shown below:
Step 1 Become the root user:
su root
Step 2 Edit the /etc/hosts file.
Step 3 Either add this line as the first entry or move this line to the first entry.
127.0.0.1 localhost [loghost]
Step 4 Stop all servers:
/opt/CSCOcb/bin/cwb stop all
Step 5 Start all servers:
/opt/CSCOcb/bin/cwb start servers
If a Process Management or Message Log client window is started remotely, but the DISPLAY environment variable is not correctly set, the clients do not start, as can be expected, but a jre process remains running, consuming a small amount of system resources. [CSCdm01487]
You might have many jre processes running in the system, affecting system performance.
Set your DISPLAY environment correctly:
setenv DISPLAY workstation:0.0
You can kill the stray jre processes with kill -9, or by stopping the CiscoWorks Blue product and restarting it:
/opt/CSCOcb/bin/cwb stop all
/opt/CSCOcb/bin/cwb start servers
Cisco Connection Online (CCO) is Cisco Systems' primary, real-time support channel. Maintenance customers and partners can self-register on CCO to obtain additional information and services.
Available 24 hours a day, 7 days a week, CCO provides a wealth of standard and value-added services to Cisco's customers and business partners. CCO services include product information, product documentation, software updates, release notes, technical tips, the Bug Navigator, configuration notes, brochures, descriptions of service offerings, and download access to public and authorized files.
CCO serves a wide variety of users through two interfaces that are updated and enhanced simultaneously: a character-based version and a multimedia version that resides on the World Wide Web (WWW). The character-based CCO supports Zmodem, Kermit, Xmodem, FTP, and Internet e-mail, and it is excellent for quick access to information over lower bandwidths. The WWW version of CCO provides richly formatted documents with photographs, figures, graphics, and video, as well as hyperlinks to related information.
You can access CCO in the following ways:
For a copy of CCO's Frequently Asked Questions (FAQ), contact cco-help@cisco.com. For additional information, contact cco-team@cisco.com.
If you are a network administrator and need personal technical assistance with a Cisco product that is under warranty or covered by a maintenance contract, contact Cisco's Technical Assistance Center (TAC) at 800 553-2447, 408 526-7209, or tac@cisco.com. To obtain general information about Cisco Systems, Cisco products, or upgrades, contact 800 553-6387, 408 526-7208, or cs-rep@cisco.com.
![]()
![]()
![]()
![]()
![]()
![]()
![]()
![]()
Posted: Wed Sep 15 09:25:28 PDT 1999
Copyright 1989-1999©Cisco Systems Inc.