|
|

Table Of Contents
Installing the Cisco Broadband Access Center Software
Cisco Broadband Access Center Software Installation Overview
Complete Provisioning Installation Description
Distributed Installation Description
Cisco Broadband Access Center Installation
Complete Provisioning System Installation
Installing the BAC Without Configuration Engine
Installing Configuration Engine
Setting Up CNS AR After Installing BAC
Setting Up Interlink Merit RADIUS Server After Installing BAC
Re-Installing Broadband Access Center
Installation Window Components and Field Descriptions
Installing the Cisco Broadband Access Center Software
This chapter provides information about how to install the Cisco Broadband Access Center for Broadband Aggregation (BAC) software, how to start BAC servers re-install the BAC software, and provides a list of all field components in the BAC installation windows.
Before you begin the installation process, be sure the system requirements have been met, as described in the "Broadband Access Center System Requirements" section on page 1-4, and the preinstallation tasks have been reviewed, as described in Chapter 2, "Pre-installation Tasks."
This chapter includes the following sections:
•
"Cisco Broadband Access Center Software Installation Overview" section
–
–
•
•
•
–
–
–
–
•
•
•
Cisco Broadband Access Center Software Installation Overview
The BAC software architecture is a client/server model. The BAC server is essential to the BAC operations. The BAC server works with both the server and the BAC database to enable provisioning and other functions. The BAC software is available in the CSCObacss directory and is available on the product CD-ROM. A command line interface is available to do some operations, however, most operations are done through a graphical user interface (GUI).
The BAC software supports the following installation types:
•
•
Complete Provisioning Installation Description
In a complete provisioning Broadband Access Center software installation, the BAC software (BAC client, graphical user interface) is installed on the same machine. You can also install the BAC software on a machine without a Cisco Configuration Engine or a UI Web server.
Distributed Installation Description
The distributed installation allows you to install components on different machines. This helps to share work loads and reduce the number of duplicate components.
You can distribute the Configuration Engine and the BAC UI Web server, but the rest of the BAC software is installed on the same machine as the BAC package. When you select the Configuration Engine or BAC UI Web server installation option, it installs a Configuration Engine or a BAC UI Web server, it does not install any of BAC servers on that machine. It is referred to as distributed because the user can install the BAC software on different machines and install as many Configuration Engines and UI Web servers on other machines and use all of them.
BAC Menu Options
The BAC software product offers the following installation options:
•
•
•
•
•
After you select a BAC installation option, BAC software provides you with technology options:
•
•
Before You Begin Installation
Read these rules before you select how to install the BAC software:
•
Note
•
•
•
Note
•
•
•
The Oracle database is made up of a server and a client. The Oracle client must always be installed on the same machine as the BAC server. The recommended configuration is to install the Oracle server on a remote machine and the Oracle client on the BAC server machine. However, if you will be installing the BAC software and Oracle database on the same machine, you must increase the machine's memory.
Caution
•
–
–
–
–
–
–
–
–
•
Installing BAC from a CD-ROM
This section describes what to do before you begin the BAC installation when you install from a CD-ROM.
Step 1
If your system does not have an automounted CD-ROM, you will need to mount it manually. For information about mounting the CD-ROM manually, see "Mounting the CD-ROM Manually" section on page 2-5.
Step 2
Step 3
# cd /cdrom/cdrom0Step 4
./InstallStep 5
# /cdrom/cdrom0/Solaris
Note
Note
Step 6
% setenv DISPLAY <machine>:0.0Step 7
# cd /cdrom/cdrom0Step 8
cd /<device>% ./Install
Note
Cisco Broadband Access Center Installation
This section describes the installation options available to you when you install the BAC software. The BAC installation options, both complete provisioning and distributed, are:
•
•
•
•
Starting BAC Installation
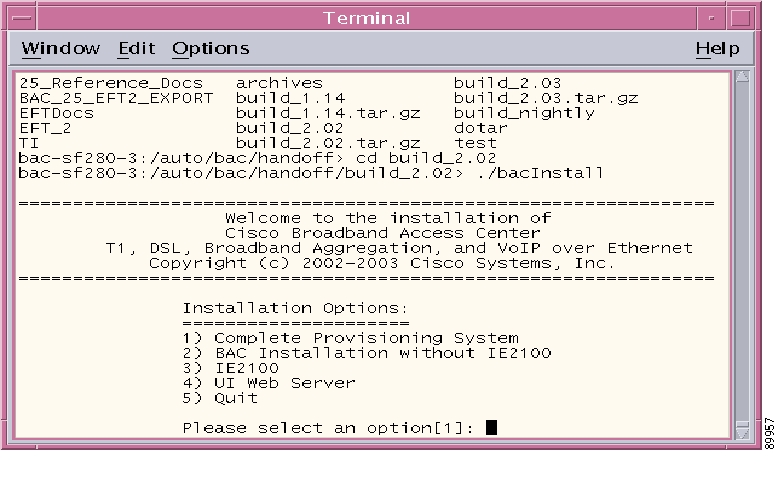
To display the BAC Installation Options window, from the CD ROM and run ./bacInstall. The BAC installation window displays, as shown in Figure 3-1.
Figure 3-1 BAC Installation Options
The BAC Installation Options menu displays the following options:
1.
2.
3.
4.
5.
Complete Provisioning System Installation
This section describes what to do when you select the complete provisioning installation, which is installing BAC with Configuration Engine and all the other BAC components. Option 1, Complete Provisioning System is the default.
The Cisco Broadband Access Centerserver is central to BAC operations. The server works with both the client and the Cisco Broadband Access Centerdatabase to enable provisioning and other functions. The server and client communicate through the Common Object Request Broker Architecture (CORBA). The server queries the BAC database to obtain data for the client.
A complete BAC provisioning system includes the components listed and defined in Table 3-1.
Follow these steps to begin installing BAC:
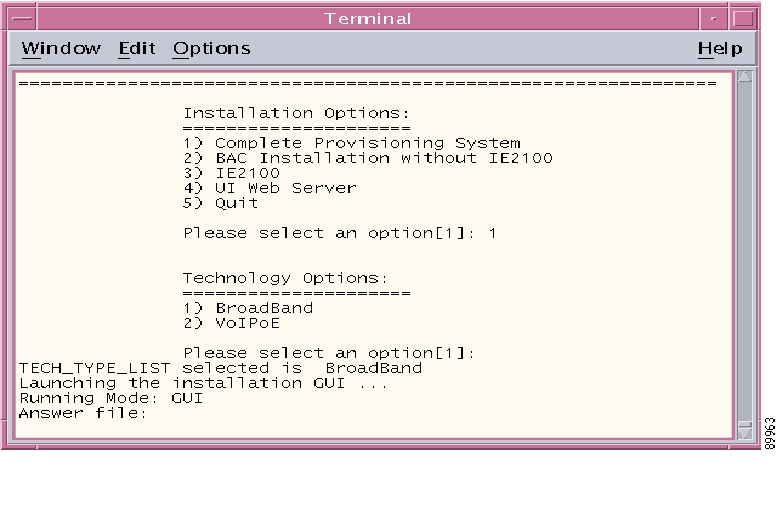
Step 1
Figure 3-2 BAC Technology Menu Options
Note
You can select one of the following technology options:
•
•
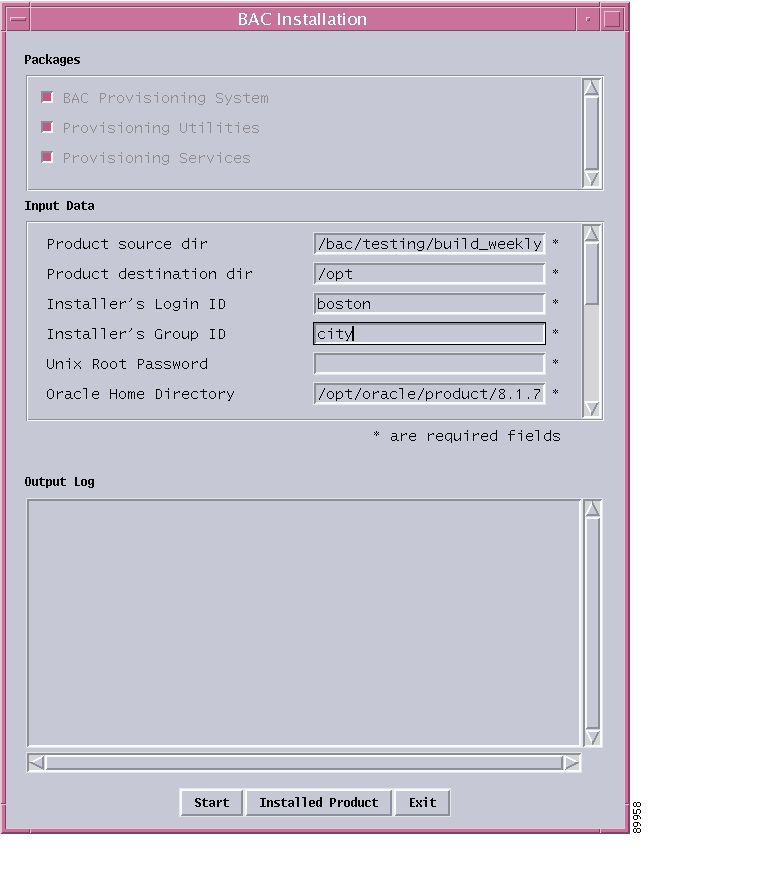
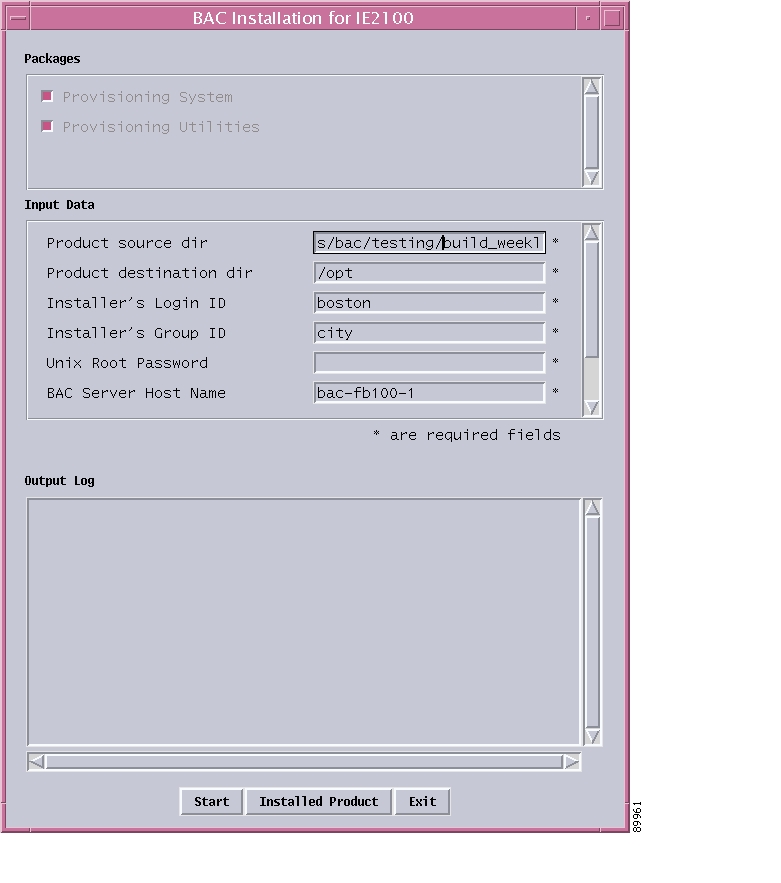
Step 2
Figure 3-3 BAC Installation Window - First Input Data Pane
For a description of the various fields provided in the BAC Installation window, see the "Installation Window Components and Field Descriptions" section.
Step 3
Step 4
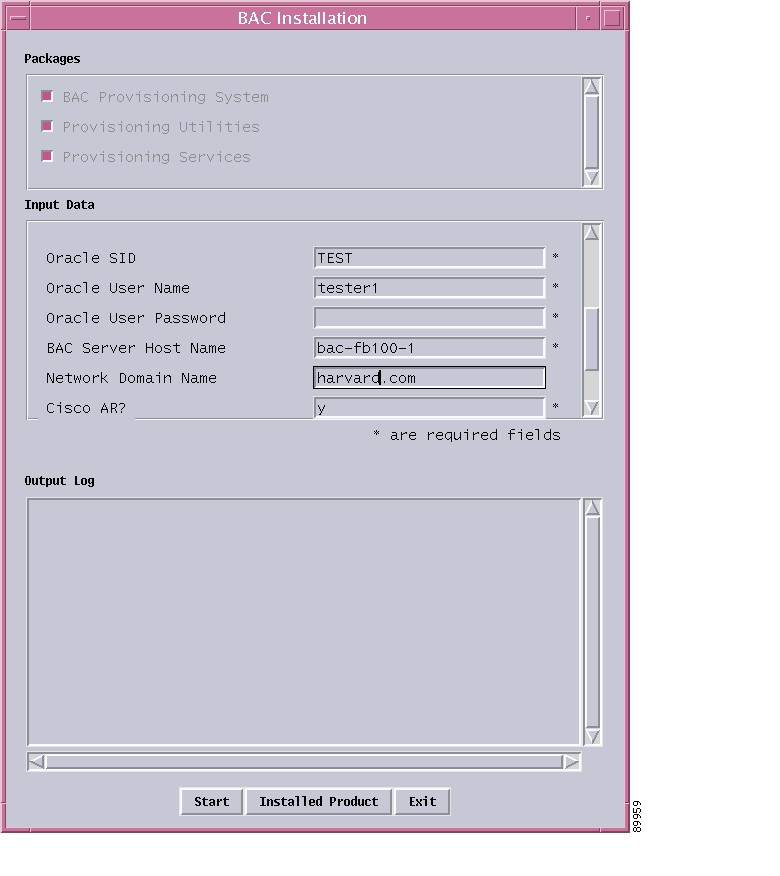
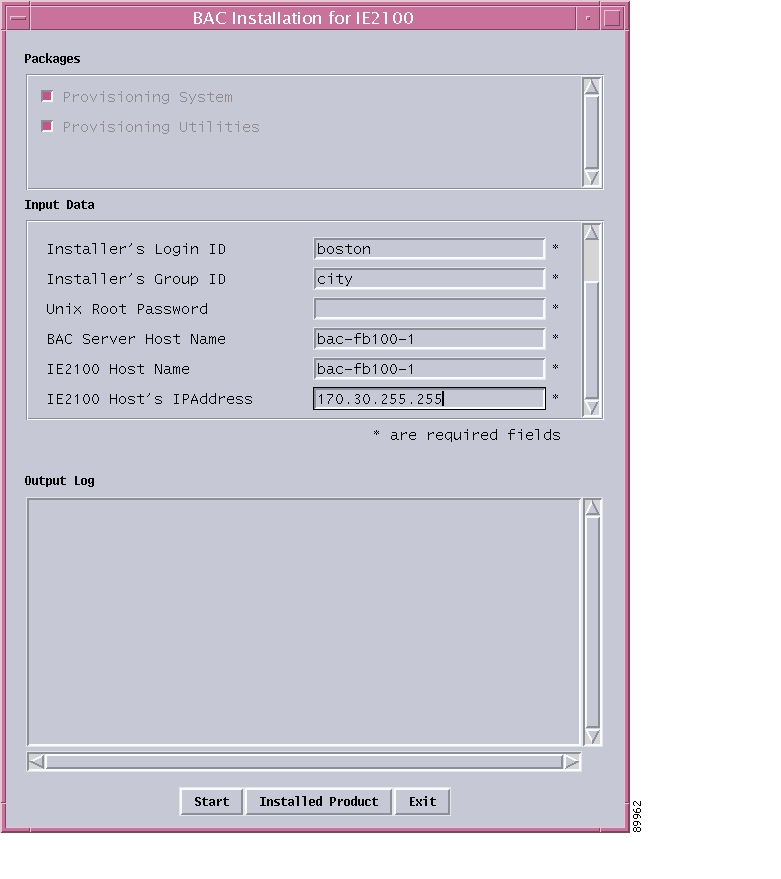
Figure 3-4 BAC Installation Window - Second Input Data Pane
Step 5
Figure 3-5 BAC Installation Window - Third Input Data Pane
Note
Step 6
Step 7
A pop-up window displays that lists which BAC components are installed on this machine.
Step 8
The Output Log pane shows the progress of the installation. The BAC installation script runs through its checks. It then, depending upon the optional BAC components you selected (for example Cisco Networking Services, Cisco CNS Access Registrar, Cisco CNS Network Registrar, or CNS Configuration Engine), queries you on whether or not it should open the following configuration files for you to edit:
•
•
•
Note
For details about these files and the entries you will need to edit, see Chapter 4, "Configuring the Cisco Broadband Access Center Software."
Step 9
*********END*********Step 10
If you select option 1, Complete Provisioning System and technology option 2, VoIPoE, then follow these steps:
Step 1
Step 2
The same windows display ( Figure 3-3, Figure 3-4, and Figure 3-5), except there is a field called Cisco NR, Cisco CNS Network Registrar, which appears in the second Input Data pane (not Cisco AR). Repeat the same steps from the previous section.
Step 3
Step 4
Installing the BAC Without Configuration Engine
This option allows you to install BAC and its components without a Configuration Engine.
Follow these steps when you select installation option 2 and technology option 1 or 2:
Step 1
Note
Step 2
Note
Step 3
Step 4
Step 5
The Output Log pane shows the progress of the BAC installation script as it proceeds.
Step 6
Installing Configuration Engine
By distributed installation, you can define Cisco Configuration Engines and install components on different machines to help share the work loads. Follow these steps when you install configuration engines on different machines.
Step 1
Figure 3-6 BAC Installation for Config Engine Window - Part 1
For a description of the various fields provided in the BAC Installation for Config Engine window, see the "Installation Window Components and Field Descriptions" section.
Step 2
Step 3
Figure 3-7 BAC Installation for Config Engine Window - Part 2
Step 4
Step 5
The Output Log pane shows the progress of the installation. The BAC installation script starts the provisioning system, checks the product source directory, copies required files, enters files, invokes installation for a Configuration Engine, and unzips packages.
After installation completes, the window displays the following text:
*********END*********Step 6
Installing UI Web Server
The BAC Web-based user interface (Web UI), provides service provider and subscriber management, network resource and inventory management, and network access for administrators and operators. For a UI Web server distributed installation, you must mount the template root directory and the Cisco Service Template Manager (CSTM) property file.
The Template Manager user interface is an integrated component of the BAC user interface and requires access to certain file system directories and files on the machine where BAC servers are running.
To make those directories and files accessible from the UI Web server machine, you must perform the share command on the directories on the BAC servers machine and then mount them on the UI Web Server machine. (Refer to the Unix share and mount commands how to do this.)
The following example describes how you get the directories and files to be shared and mounted.
Step 1
Step 2
•
•
•
Step 3
Note
For example, mount directories /opt/CSCObacss/common/templates and /opt/CSCObacss/cstm/config on machine B under the name /bacTemplateRoot, and /bacCSTMConfig, respectively. Respond to the two installation prompts as follows:
- prompt: Template Root directory: <-- answer: /bacTemplateRoot- prompt: CSTM Property File: <-- answer: /bacCSTMConfig/Template.properties
Note
Follow these steps when you select option 4 from the BAC Installation Options menu:
Step 1
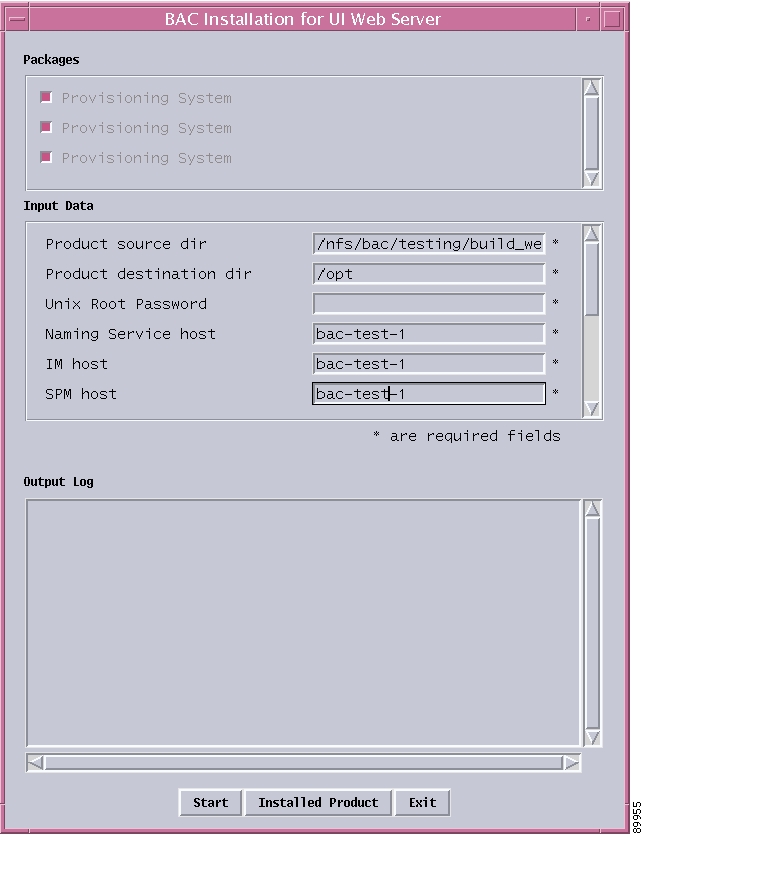
Figure 3-8 BAC Installation for UI Web Server - First Pane
Step 2
Step 3
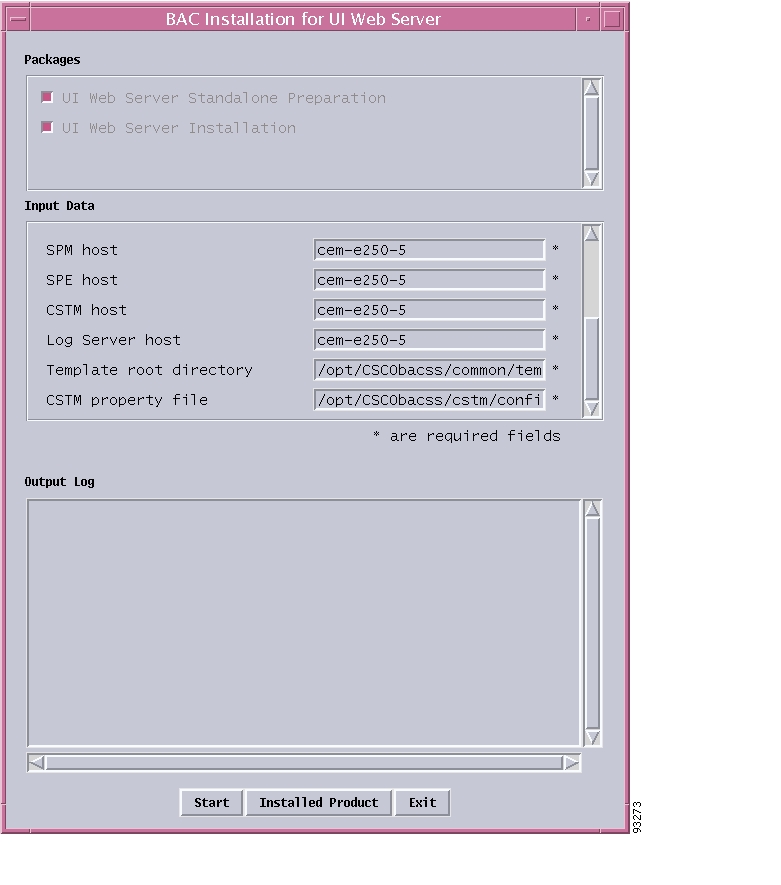
Figure 3-9 BAC Installation for UI Web Server - Second Pane
Step 4
Step 5
Note
After Installing BAC
The SubscriberAccessManager is a server to handle the interface with RADIUS servers. SAM supports the integration with Cisco AR and Interlink Merit RADIUS server to work with BAC. After you install BAC software, you must set up the following to work properly with BAC.
•
•
Setting Up CNS AR After Installing BAC
If you intend to use Cisco Access Registrar for AAA services, then you might need to make changes to the configuration of Cisco Access Registrar or apply a patch release to the software. to make sure it is properly configured after installing BAC. Follow these steps:
Step 1
–
–
–
–
Note
Step 2
a.
set Filename <your directory>/ParseSubscriberODBC.tcl (ar-sub-odbc.rc file)set Filename <your directory>/ParseTunnelODBC.tcl (ar-tunnel-odbc.rc file)set Filename <your directory>/ParsePVCAuth.tcl (ar-pvc-odbc.rc file)b.
set UserID <your database user>set Password <your database password>set DataBase <your SID>Step 3
Note
Step 4
./apply_patch.apply_patch.Broadband./apply_patch.VoIPoE
Note
http://www.cisco.com/univercd/cc/td/doc/product/rtrmgmt/cnsar/3_0/install/index.htmSetting Up Interlink Merit RADIUS Server After Installing BAC
The BAC provides provisioning of a client in Merit text file (/etc/opt/aaa/clients) and provisioning subscriber, tunnel, and PVC through an external database. An SDK (software development kit) implementation is a Merit AATV plug-in to access the BAC database for authentication and authorization and return value if any.
Follow these steps to set up Interlink Merit to work properly with BAC:
Step 1
Step 2
Step 3
ln -s libodbc.so.1.0.0 libodbc.soln -s libodbc.so.1.0.0 libodbc.so.1ln -s libodbcinst.so.1.0.0 libodbcinst.soln -s libodbcinst.so.1.0.0 libodbcinst.so.1ln -s liboraodbc.so.1.0.0 liboraodbc.soln -s liboraodbc.so.1.0.0 liboraodbc.so.1
Step 4
Step 5
VALUE Authentication-Type LNS 31 (the next new value before Unassigned)Step 6
Cisco.attr Cisco-Policy-Up 37 string(*,0,0)Cisco.attr Cisco-Policy-Down 38 string(*,0,0)Step 7
Cisco.com LNS "to handle user login from this realm"NULL LNS " to handle tunnel that has no @realm situation"
Note
Step 8
Step 9
ln -s /var/opt/aaa/run <your Merit radius pid file>
Note
Step 10
<your host> <shared key> type=NAS v1Step 11
Step 12
a.
b.
Step 13
Step 14
./radiusd -x -x -sThe debug output is in /var/opt/aaa/logs. There are two files:
•
•
However, if you start radius daemon with debug mode, the provisioning process may not work properly. The radius daemon with debug mode does not write the process id to the radiusd.pid (/var/etc/opt/aaa/run) file. Once NAS is configured, the daemon is not refreshed if the pid is not properly written in the radiusd.pid file.
Step 15
Step 16
Note
Starting the BAC Servers
If you select installation option 2, BAC Installation without Config Engine, from the BAC Installation Options menu, then you must start the servers.
Note
http://www.cisco.com/univercd/cc/td/doc/product/rtrmgmt/cns/ce/rel13/ag13/index.htmTo start the servers running, follow these steps:
Step 1
% cd BAC_HOME/script% ./bacStartUp initialStep 2
Password: Enter password.You will see the screen display:
Now startup script will proceed with rest of the steps.....
Note
Note
Step 3
0=internal directory mode,1=external directory mode. [0]Enter the host name: bac-ma123-1Enter the domain name: cisco.comYou must configure eth0 or eth1. Press Enter to skip.Enter the eth0 ip address: 170.21.255.255Enter the Country Code: usEnter the Company Code: ciscoConfiguration Engine user ID is used to log in to the web-based GUI and manage network device objects and templates. This account does NOT have shell access.Enter Configuration Engine login name: adminEnter Configuration Engine login password: ********Re-enter Configuration Engine login password: ********Enter internal LDAP server password: ********Re-enter internal LDAP server password: ********Encryption settings:--------------------Enable cryptographic (crypto) operation between Event Gateway(s)/Configserver and device(s) (y/n)? [y] nAuthentication settings:------------------------IOS Devices are normally authenticated before being allowed to connect to the Event Gateway/Config Server. Disabling authentication will increase security risk.Enable authentication (y/n)? [y] nEvent services settings:------------------------Enter NSM directive (none, default, http): [default]Enable Event Gateway debug log (y/n)? [n] yEnter log file rotation timer (minutes, 0 = no rotation): [2]Enter max log file size (Kbytes): [3072]Enter the max versions of log file (0-99): [1]Each Event Gateway process serves 500 devices. Maximum number ofEvent Gateways allowed is 11.Enter number of Event Gateways that will be started with plaintextoperation: 10Enter CNS Event Bus Network Parameter: [bac-ma123-1]Enter CNS Event Bus Service Parameter: [7500]Current settings of IMGW:-------------------------Gateway ID: bac-ma123-1Run as daemon (y/n)? yTimeout in seconds for a CLI command to complete: 180Timeout in seconds to get the next prompt in Telnet session: 60Concurrent Telnet session limit: 20Remove temporary logs of Telnet sessions into devices (y/n)? yLocation of temporary logs of Telnet sessions into devices: /tmpHoptest success retry interval (sec): 7200Hoptest failure retry interval (sec): 3600Logging level (verbose, error, silent): errorLog file Prefix: IMGW-LOGLog file size (bytes): 50331648Log file rotation timer (minutes): 60Logging mode (append, overwrite): appendRe-configure IMGW (y/n)? [n] yEnter Gateway ID: [bac-ma123-1]Run as daemon (y/n)? [y]Enter Timeout in seconds for a CLI command to complete: [180]Enter Timeout in seconds to get the next prompt in Telnet session: [60]Enter Concurrent Telnet session limit: [20]Remove temporary logs of Telnet sessions into devices (y/n)? [y]Enter Location of temporary logs of Telnet sessions into devices: [/tmp]Enter Hoptest success retry interval (sec): [7200]Enter Hoptest failure retry interval (sec): [3600]Enter Logging level (verbose, error, silent): [error] verboseEnter Log file Prefix: [IMGW-LOG]Enter Log file size (bytes): [50331648]Enter Log file rotation timer (minutes): [60]Enter Logging mode (append, overwrite): [append]Please review the following parameters:hostname: bac-ma123-1domain name: cisco.cometh0 IP address: 170.21.255.255country code: uscompany code: cscoConfiguration Engine login name: adminConfiguration Engine login password: ********internal LDAP server password: ********Enable cryptographic (crypto) operation between Event Gateway(s)/Config server and device(s) (y/n)? nEnable authentication (y/n)? nNSM directive (none, default, http): defaultEnable Event Gateway debug log (y/n)? ylog file rotation timer (minutes, 0 = no rotation): 2max log file size (Kbytes): 3072the max versions of log file (0-99): 1number of Event Gateways that will be started with plaintext operation: 10CNS Event Bus Network Parameter: bac-ma123-1CNS Event Bus Service Parameter: 7500Re-configure IMGW (y/n)? yGateway ID: cem-sf280-7Run as daemon (y/n)? yTimeout in seconds for a CLI command to complete: 180Timeout in seconds to get the next prompt in Telnet session: 60Concurrent Telnet session limit: 20Remove temporary logs of Telnet sessions into devices (y/n)? yLocation of temporary logs of Telnet sessions into devices: /tmpHoptest success retry interval (sec): 7200Hoptest failure retry interval (sec): 3600Logging level (verbose, error, silent): verboseLog file Prefix: IMGW-LOGLog file size (bytes): 50331648Log file rotation timer (minutes): 60Logging mode (append, overwrite): appendWarning: setup cannot be aborted while committing changes.Commit changes (y/n): ydo_plutoSupport ...Shutdown servers ...Configure IMGW ...Configure DCL ...Create DCL ...Run configurator ...Configure EvtGateway start/stop file ...Register tibco rvrd start/stop script for system shutdown/restart ...Run NSM configurator ...echo default"://" > /opt/CSCOnsm/conf/tibgate-nsm.confStart servers .../etc/init.d/NetAppDCL startPopulate DCL with imgw data ...Start tibco/etc/init.d/tibco start >> /var/log/appliance-setup.log 2>&1/etc/init.d/httpd start/etc/init.d/Imgw start >> /var/log/appliance-setup.log 2>&1/etc/init.d/EvtGateway start >> /var/log/appliance-setup.log 2>&1Initialize Group for Internal Mode ...Configure DAT ...do_modularRouterSupport ...Warning: plutosetup will open some class files to public access. It is a security risk.Continue (y/n): yNow startup script will proceed with rest of the steps.Step 4
Re-Installing Broadband Access Center
When pressing Exit during the installation process, the program will attempt to exit the process immediately. When you proceed to re-install, there are three possibilities:
1.
2.
3.
# pkgrm CSCObacss# \rm -rf CSCObacss# pkgrm TIBRV (CSCOesdk is the directory that is created and TIBRV is the package name)# \rm -rf CSCOesdkInstallation Window Components and Field Descriptions
Table 3-2 lists and describes the various fields found within the BAC Installation window. Not all of the fields described in this section are displayed in this window at all times. The fields displayed are dependent upon the installation option you selected. See Figure 3-3, Figure 3-4, and Figure 3-5 for sample BAC Installation windows.
Table 3-2 BAC Window Components and Field Descriptions
Product Source Dir
The source directory of the BAC product. This will most likely be /cdrom/cdrom0.
Product Destination Dir
The destination directory for the BAC product. The default is the /opt directory. If other than the /opt, directory, a soft link is created from /opt to the specified destination directory.
Cisco Configuration Engine installation requires the following minimum disk space for the three directories:
•
•
•
Installer's Login ID
The username of the BAC installation and administration user.
Installer's Group ID
The group name of the BAC installation and administration user.
UNIX Root Password
The password of the root user on the UNIX system.
Naming Service Host
The host machine on which the Orbix Naming Service is running.
IM host
The host machine on which the BAC Inventory Manager server is running.
SPM host
The host machine on which the BAC Service Provisioning Manager is running.
SPE host
The host machine on which the SPE CORBA Manager is running.
CSTM host (Cisco Service Template Manager)
The host machine on which the BAC CSTM (TM CORBA Server) is running.
Log Server host
The host machine on which the BAC Log Server is running.
Template root directory
The root directory where the BAC CSTM server stores the actual template files.
CSTM property file
The full path name of the CSTM server's property file. The file is called Template.properties.
Oracle Home Directory
The home directory of the Oracle client on the local machine. This directory is defined by the $ORACLE_HOME environment variable.
Oracle SID
The Oracle server ID (SID) for BAC to access the Oracle server through the Oracle client. Use the SID defined in the "Setting Up Oracle Before BAC Installation" section on page 2-2. The Oracle client must be able to resolve this string.
Oracle User Name
The Oracle username for BAC to access the Oracle server through the Oracle client. Use the Oracle username defined in the "Setting Up Oracle Before BAC Installation" section on page 2-2.
Oracle User Password
The Oracle password for BAC to access the Oracle server through the Oracle client. Use the Oracle password defined in the "Setting Up Oracle Before BAC Installation" section on page 2-2.
BAC Server Host Name
In a simple installation architecture, this is the host name of the BAC server. In a distributed installation architecture, this is the host name for the BAC Provisioning Services.
Network Domain Name
The domain name for the CORBA server so it can append to the machine's name and be resolved to the full name. This has nothing to do with the domain name referenced by the Network Inventory Manager.
Cisco CNS NR
Indicates whether or not the Cisco CNS Network Registrar product is being used in conjunction with BAC.
Cisco CNS AR
When you answer Y in this field, it only expands the CNS AR library in .../sam/bin and .../sam/lib directories and creates a cisco-ar soft link if one does not exist. You can install BAC first, answer Y in the CNS AR option, and then install CNS AR later or you can install CNS AR first and then install BAC later.
Config Engine Host Name
The Cisco Configuration Engine host name.
Config Engine Host's IPAddress
The Cisco Configuration Engine IP address.
![]()
![]()
![]()
![]()
![]()
![]()
![]()
![]()
Posted: Mon Jan 31 17:06:06 PST 2005
All contents are Copyright © 1992--2005 Cisco Systems, Inc. All rights reserved.
Important Notices and Privacy Statement.