cc/td/doc/product/rtrmgmt/bacbba/bacba26
hometocprevnextglossaryfeedbacksearchhelp
PDF

Table Of Contents

Cisco Broadband Access Center
for Broadband Aggregation Release 2.6
Data Migration Guide

Contents

Introduction

Data Migration Stages

Assumptions

Preconditions

Migrating BACBA 2.5 to BACBA 2.6

Performing the Migration Procedure

Performing the Final Step—Manual Customization

Verifying Data Migration

Running Synchronization

Files and Structures of Data Migration Scripts


Cisco Broadband Access Center
for Broadband Aggregation Release 2.6
Data Migration Guide


November 24, 2004

This document is for Cisco Broadband Access Center for Broadband Aggregation (BACBA) users who want to migrate from the BACBA 2.5T software to the BACBA 2.6 software. This document contains the procedures you must follow to migrate your data to the latest version of the software.

Contents

Introduction     2

Data Migration Stages     2

Assumptions     3

Preconditions     3

Migrating BACBA 2.5 to BACBA 2.6     5

Performing the Migration Procedure     5

Performing the Final Step—Manual Customization     7

Verifying Data Migration     8

Running Synchronization     9

Files and Structures of Data Migration Scripts    10

Introduction

BACBA 2.6 introduces a new schema that affects data in several areas, so during migration the affected data is switched to the new schema. The areas are as follows:

BACBA backend data—Data is stored in the Oracle database using RMOR as middleware

Security Policy Engine (SPE) data—The SPE schema has changes from version 2.0 to version 2.1.

The BACBA migration script assumes that only one service provider group is defined. A known issue bug in the SPE schema update script means you cannot create service provider group in SPE during migration in BACBA 2.6.

The work around requires manually using the GUI to create a service provider after successfully migrating to and initializing BACBA 2.6.

Subscriber Access Manager (SAM) data—SAM has new tables new features in BACBA 2.6. The migration script adds these tables directly to the database.

To successfully migrate SAM data from 2.5 to 2.6, BACBA provides a set of scripts to handle the data migration as automatically as possible; however, because you are uninstalling and then installing two different versions of BACBA, it is not possible to run one script for the whole process.

Data Migration Stages

Because you must run more than one script to migrate BACBA data, the process occurs in three stages:

1. Premigration—The migration export script exports the data from the database into many XML files. The script then modifies the data in these XML files into the format that is required to fit the BACBA 2.6 schema.

2. Data import—In this stage, the import script will drop the old Oracle tables and create new BACBA 2.6 tables, and then import all the XML files back into database. After the XML files are generated and modified, they can be imported to BACBA 2.6.


Note You can install BACBA 2.6 on the same machine on which you installedc BACBA 2.5. If you choose to install the software on the same machine, you must first uninstall BACBA 2.5, then install BACBA 2.6. If you choose to install BACBA 2.6 on a different machine, you must make sure that this machine can access the XML files that were generated and modified in the pre-migration stage. You can store the files in an NFS directory, or you can FTP these files over to the BACBA 2.6 machine. Before running the import script, install BACBA 2.6 and apply the TI_v17_13.tar file. Then, make sure the BACBA servers are not be running.


3. Postmigration stage: After you finish importing data, perform an initial startup of the BACBA 2.6 servers. At this time, since the data is already in the database, say no to drop table option. Make sure you do not drop the tables during initial startup. After all servers are up and running, bring up the GUI from your desktop and createa service provider. Data migration is now complete. Check the log files for any error messages and use the GUI to examine or spot check the data.

The migration process takes many hours to complete. If you are installing BACBA 2.6 on a different machine than BACBA 2.5, the BACBA 2.5 servers can resume normal operation during the data import stage. After data migration, BACBA 2.6 machines may be out of synchronization with the most current data. To correct this problem, you must run BACBA 2.6 synchronization to update the data between BACBA 2.6 database and the routers. After running synchronization, the system is considered operational.

Assumptions

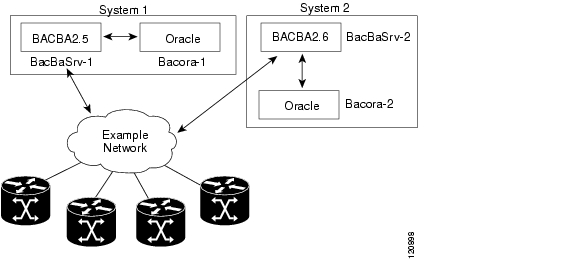
This document assumes two sets of systems, one set for BACBA 2.5 and one set for BACBA 2.6. Each system contains two machines, one running BACBA server and the other running the Oracle database, as illustrated in Figure 1.

Figure 1 Data Migration Systems

This document also makes the following assumptions:

The Oracle database is installed in both systems and up running.

BACBA 2.6 is installed and TI.tar is installed, but BACBA servers are not running.

The person running data migration scripts knows how to install and uninstall BACBA and has the basic knowledgeof shutting down and starting the servers.

The data migration package is downloaded from Cisco.com into the BACBA 2.5 host and is then untarred into the bac_data_migration directory.

Any customized templates and files are properly backed up, so that you incorporate them after migration.

Preconditions

Before you run data migration, make sure you meet the following preconditions:

If the server version is BACBA 2.5T10, run the script to fix the TAC case # 600506358. Obtain the BACBA 2.5T11 patch from Cisco.com and apply the patch. Backup the database before running the script.


Note If you are already running BACBA 2.5T11, you do not need to Nothing is required to perform if the BACBA server version is already BACBA 2.5T11.


Shut down BACBA 2.5 on the production machine. To shutdown BAC, go to /opt/CSCObacss/scripts and execute bacShutDown all.

CPC has stopped sending northbound API commands and that no provisioning activities are occurring with BACBA 2.5. To check if there are any activities in BACBA 2.5, view the file /opt/CSCObacss/cdm/logs/CDM.log and run the following command:

cat /opt/CSCObacss/cdm/logs/CDM.log

If there are BACBA activities, this command displays new output on the screen. Enter Control+C to exit from the cat command.

If there are activities, please contact CPC operators and have them stop sending NBAPI commands and then shutdown BACBA servers.

Both machines, BACBA 2.5 and BACBA 2.6, have the same package installed and the file dbmigrate.properties from BACBA 2.5 is copied into BACBA 2.6 after the data is exported. The data migration tar file copies all the necessary files into <Install_path>/bac_data_migration directory, where <install_path> is the full, path the operator must specify to perform data migration.

The BACBA 2.6 system does not have data. If there is data in the database and it is needed, backup the database.

The BACBA 2.5 machine, which is bacsrv-1 in Figure 1, must have enough disk space to accommodate all the XML files. BACBA data with 1.2 million PVCs requires approximately 7 GB of disk space.

The BACBA 2.6 machine, which is bacsrv-2 in Figure 1, has enough disk space to accommodate all the XML files copied from BACBA 2.5 machine.

The table size for template features (contained in the TemplateFeature table of your database) is the appropriate size. This template primarily contains PVC descriptions. The default maximum size for an XML file is set at 1MB, which accommodates 280 template features per file. The data migration script can handle up to 6,000 XML files per table. If your database contains more than 1,680,000 (280*6000) template features, you must increase the maximum size of XML files to handle these features before running bacDbExport.csh.

1. To check the number of template features, at the command line enter the following:

source /opt/oracle/product/8.1.7/oracle.csh
sqlplus <username>/<password>@<SID>, for example sqlplus pluto/pluto@PLUTO
select count(*) from TemplateFeature;

After some processing time, the system returns the number of TemplateFeatures.

2. To change the maximum size of the XML file, follow these steps:

a. Change (cd) to the directory from which you installed bacba26_data_migration

b. In a text editor, such as vi, open bacDbExport.csh.

c. Change the following line:

echo MAX_OBJ_FILE_SZ=1000000 >> dbmigrate.properties

For example, to increase the number of templates features in each file from 280 to 420, and increasing the total number of features to 2,520,000, make the following change:

echo MAX_OBJ_FILE_SZ=1500000 >> dbmigrate.properties

All customized templates and files have been backed up. You must merge all customized templates into BACBA2.6 templates. Do not copy them to BACBA 2.6.

Migrating BACBA 2.5 to BACBA 2.6

With very large databases, data migration can take many hours to complete. The procedures in this section assume that data migration from one production machine into another production machine. At a high level, migration encompasses:


Step 1 Perform the migration procedure.

Step 2 Perform some manual customization tasks.

Step 3 Verify migration.

Step 4 Run synchronization.


Performing the Migration Procedure

Before you begin, locate a directory with enough disk space on the BACBA 2.5 machine to store the entire Oracle database. The migration procedure exports this data into XML format files. Also make sure the directory cannot be erased when you uninstall BACBA.


Step 1 Login as the same user on the machine that runs BACBA 2.5, in Figure 1.

Step 2 Change (cd) to the /opt/CSCObacss/scripts directory.

Step 3 At the prompt, enter bacShutDown all.

Step 4 Untar the BAC2.6DataMigration.tar in a directory on the BAC2.5 machine.

Step 5 Change (cd) directory as follows:

cd <directory_where_you_install_data_migration_files>/bac_data_migration

Step 6 At the prompt, enter the following:

./bacDbExport.csh <directory to store XML files>

Note After the export is completed, inspect /tmp/update.log and make sure no error is found. If any error is found, please contact bac-support@cisco.com for consultation.


Step 7 Log in as the same user on the machine that will run BACBA 2.6, bacsrv-2 in Figure 1.

Step 8 Install BACBA 2.6. See the Cisco Broadband Access Center for Broadband Aggregation Installation and Configuration Guide for installation steps.

Step 9 Apply TI_support.tar:

tar xvf TI_support.tar

Step 10 Change (cd) to ti-delivery and run patchTI.

Step 11 Copy all XML files from the BACBA 2.5 machine to the BACBA 2.6 machine, if the two machines cannot share the same file system.

Step 12 On the BACBA 2.6 machine, complete these steps:

a. Make sure you have created the directory to hold the XML files.

b. Issue the make directory (mkdir) <full_path_for_directory_to_hold_XML_files>command.

Step 13 On the BACBA 2.5 machine.

a. Change (cd) to <full_path_for_directory_to_hold_XML_files>

b. Begin a file transfer protocol session as follows:

ftp <BACBA 2.6 machine hostname>

c. Change (cd) to <full_path_for_directory_to_hold_XML_files>

d. At the prompt, enter the following commands:

ascii
prompt
mput *
exit

Step 14 Copy (cp) the dbmigrate.properties from the BAC2.5 to the BAC2.6 machine

Step 15 On BACBA 2.5 machine, enter the following commands:

cd <full_path_where_data_migration_installed>
ftp <BACBA 2.6 machine hostname>
cd <full_path_where_data_migration_installed>
ascii
put dbmigrate.properties
exit

Step 16 Go to the directory that contains the migration scripts on the BACBA 2.6 machine.


Note Since you have installed BACBA 2.6 on another machine, copy the entire content of the bac_data_migration directory and the XML files from the BACBA 2.5 machine to the BACBA 2.6 machine in the same directory structure, or make sure they are accessible by the BACBA 2.6 machine.


Step 17 Change (cd) to <directory_where_you_install_data_migration>/bac_data_migration.

Step 18 At the prompt, enter the following command:

./bacDbImport.csh

Step 19 After the script is completed, check the following files for any error:

/opt/CSCObacss/log/drop_all_table.log

/opt/CSCObacss/log/BAC_spDBLoad.log

/opt/CSCObacss/log/migrateRmor.log

/opt/CSCObacss/log/SPE_drop_table.log

/opt/CSCObacss/log/SPE_create_table.log

/opt/CSCObacss/log/SPE_init_table.log

opt/CSCObacss/log/SAM_create_table.log

/opt/CSCObacss/log/LogServer_create_table.log


Note Report any error to bac-support@cisco.com. If you see a prompt to drop tables and have error messages, such as table not found, you can ignore the messages, which simply indicate the table does not exist and the script will create it later.


Note If you are migrating the data from one machine to another, make sure your exported XML directory and the migration scripts are accessible to both machines. Otherwise, you need to install the data migration files again on the new machine and then transfer the XML files to an accessible directory. Finally, you need to modify the XML_OBJ_DIR value to the new directory in the dbmigration.properties file to indicate the correct location of the data files.


Performing the Final Step—Manual Customization

The final part of data migration involves manually customizing the CDM properties file, your service provider, and Configuration Engine. Follow these steps:


Step 1 Change (cd) to /opt/CSCObacss/cdm/properties.

Step 2 In a text editor, such as vi, open the cdm.properties file as follows:

a. Go to the end of the file to this section of text:

TG_Server_Name_Service_Catetory= TGServer
TGServer_0=<hostname of the machine>
<hostname of the machine>=<hostname of the machine>

#These lines are for Telnet
IE2100_0=<IP address of the machine>
IE2100_0.type=IMG
IE2100_0.WEBADDRESS=http://<IP address of the machine>/imgw/IMGWDevice
IE2100_0.RAINMAKERNAME=< hostname of the machine>
#following line is for HTTP
IE2100_1=< IP address of the machine>

b. In the text highlighted in bold type in Step 2a, replace the IP addresses and hostnames as appropriate.

Step 3 Do an initial start up of the BACBA servers:

cd /opt/CSCObacss/scripts
./bacStartUp

Step 4 When you are prompted to drop tables, enter No.

Step 5 Answer NO to drop table questions.


Note If you are using bacStartUp -forceInit, after answering No to drop tables, answer Yes profile generation.


Step 6 Start the BACBA GUI to create a service provider.

a. Go to a device running Microsoft Windows and bring up Microsoft Internet Explorer web browser, and type in http://<BACBA 2.6 machine hostname or ip address>:8888/bac

b. Enter the username BACAdmin and the password. The default password is cisco.

c. In the BACBA GUI, go to the Subscribers tab and click Service Provider Management.

The left hand side should have Service Providers and BroadBand in the listing.

d. Highlight BroadBand and go to the bottom of the right hand window pane.

e. Click Create Service Provider and, in the popup window, enter the name of the service provider, exactly as it was defined in BAC2.5T.

Step 7 Using the GUI, modify the Configuration Engine (ConfigEngine) resource data:

a. Click Network Service. The system displays a new page which lists resources on the left window pane.

b. Expand the ConfigEngine folder.

c. Click one of the ConfigEngine resources.

d. Click Edit, then Next to open the Properties page.

e. In the center pane, go to the IP address field and modify the IP address to reflect where the IMGW/ConfigEngine server resides. It is most likely installed on the same machine as BACBA 2.6.

f. Change all ConfigEngine resources in this way.


Verifying Data Migration

If there are no errors while the script runs, the easiest way to verify your data is through the GUI. After creating the service provider and modifying the IP addresses of the ConfigEngine resources, check the contents of the Cisco 10000 routers and the PVCs provisioned on each.


Step 1 Check the resources and verify all the QoS contents including Access List, Class Map and Policy Map.

a. Using the GUI, click Network Services. The system displays a list of network resources on the left window pane.

b. Expand the QoS folder, and the system displays AccessList, ClassMap and PolicyMap folders,

c. Expand each folder.

d. For each resource listed in a folder, click Edit to inspect the contents.

Step 2 Check that the numbers and contents of the Cisco 10000 routers under the service provider network are correct.

a. Using the GUI, click Network > Device Inventory. The system lists all the C10Ks. For each device, click Edit to inspect the IP address, parent FDN, Resources and Access Parameters.

b. If you do not see all C10K in the GUI, please modify the attributes in /opt/CSCObacss/common/XMLProperties/VcSystemProperties.xml

c. Change maxSubscriberDeviceListing and maxObjectSelectorItemsPerLevel to 250.

d. After changing the values, either restart BACBA server or, on the Tools tab, click Refresh.

Step 3 Check that the owner of each router is correctly set; for example, BroadBand::ServiceProvider1.

Step 4 For each router, verify that the PVCs contain the correct VCClass, VCClass type, subinterface number, VPI and VCI.

a. Using the GUI, click Network.

b. Select the service provider network click Device Provisioning

c. In the center pane, click a radio button and then click View Service. The system displays the "Existing roles and service features" page.

d. Select either SinglePVC or MultiPointSinglePVC and click View. The system displays a popup window showing up to 1000 PVCs.

e. Inspect the contents of the PVCs.

Step 5 Add and delete a PVC to make sure that normal provisioning operations are correct.

a. Using the GUI, click the Network tab and select the service provider network,

b. Click Device Provisioning. In the center pane the system displays devices.

a. Click a radio button to select a device click Add Service. The system displays the "Service Profile Selection" page.

b. Select the service provider and then select SinglePVC or MultiPointSinglePVC.

c. Click Next. Fill in the data for the PVC, then click Download Method.

d. Make sure that the download method is correctly set.

e. Click Next to add the PVC into C10K.

f. Delete the PVC by clicking Delete PVC.


Running Synchronization

The import process takes many hours to complete, and, if the BACBA 2.5 machine has resumed performing PVC operations during the BACBA 2.6 import stage, it is recommended that you run device synchronization on the BACBA 2.6 machine. This updates its database with current routers. After the synchronization is completed without errors, data migration is done and you can test the machine.

Using the GUI to Run Synchronization


Step 1 Go to a device running Microsoft Windows and bring up the Microsoft Internet Explorer web browser.

Step 2 Enter this URL:

http://<BACBA 2.6 machine hostname or ip address>:8888/bac

Step 3 Enter the username BACAdmin and its password. The default password is.

Step 4 Go to the Subscribers tab and click Network.

Step 5 Click Synchronization on the top menu.

The list pane on the left hand side should display administrative networks defined for the service provider.

Step 6 Highlight the desired administrative network. The window pane on the right lists the network's C10K devices.

Step 7 Select the desired device by left mouse click on the radio button of the device.

Step 8 Left mouse click on the "Sync Device" button.

Step 9 Wait for synchronization to end and then choose another device to synchronize.


Caution Do not try to synchronize many devices at the same time or perform a network level synchronization. These operations require heavy memory and CPU use.

Files and Structures of Data Migration Scripts

After you expand the tar file, the bac_data_migration directory contains the following files:

addback

addTechName

bacDbExport.csh

bacDbImport.csh

dbmigrate.properties

dbtool.jar

drop_all_table.csh

env.csh

exportRmorDB.csh

migrateRmorDB.csh

modifyFile.csh

modifyFile_CE.csh

modifyFile_CNOTE.csh

modifyFile_P.csh

modifyFile_TechName.csh

prepare_data.jar

prepareXMLFile_TF

README

README.backup_restore

removeEndPointRef.csh

revertXMLData.csh

rmor.jar

spDBLoad

spe_delete_data.sh

spe_migrate_data.sh

spe_revert_data.sh

spe_upgrade.sh

tabledrop.sql

Technology.0

updateXMLData.csh

UpgradeRDBMSSchema.class

The five files highlighted in bold in the preceding list are ones to be particularly aware of.

The README file is similar to this document.

The README.backup_restore file is a quick note for how to do a fast database backup and fast database restore. If you are going to do backup before data migration, you might want to read this file.

The bacDbExport.csh script is what you first run on the BACBA 2.5 machine. The syntax for the script is:

bacDbExport.csh <directory to store XML files>

Make sure the directory for the XML files has enough disk space and preferably is accessible to both BACBA 2.5 and BACBA 2.6 machines.

The bacDbImport.csh script imports the XML files to BACBA 2.6. You can run this script either locally on the BACBA 2.6 machine or from an NFS disk that is accessible to the BACBA 2.6 machine. The syntax for the script is;

bacDbImport.csh

This script reads the XML file location from the dbmigrate.properties file, so examine this file to see if the location is correct before running this script.

The dbmigrate.properties file stores all the information about the database and the location of the stored XML files. After bacDbExport.csh is called, this file is set automatically. If your XML files location has been changed after copying to the BACBA 2.6 machine, you need to edit this file so that bacDbImport.csh will know where to find the XML files.

This file contains the following contents after bacDbExport.csh is run:

FROM_META=/opt/CSCObacss/rmor/pluto.xml
FROM_RDBMS=oracle
FROM_DBHOST=cem-sf280-2
FROM_DBNAME=BAC
FROM_DBUSER=bacuser
FROM_DBPASSWD=bacuser
FROM_POOLCONN=2
FROM_SHAREDCONN=10
XML_OBJ_DIR=/disk2/mig2

Database values are read from the /opt/CSCObacss/common/XMLProperties/ServerProperties.xml file from BACBA 2.5, and then put into dbmigration.properties. Data migration reads database data from this file to access database.

The XML_OBJ_DIR is the directory location to which XML files are exported.

The bacDbImport.csh,script reads this file and looks for XML_OBJ_DIR value, using this value to locate the generated XML files. If you are using different machines for data migration into BACBA 2.6, you want to make sure this file is modified accordingly to make sure the location of the XML files is correct or accessible to the target machine.

After bacDbImport.csh is completed, the file will look like the following:

FROM_META=/opt/CSCObacss/rmor/pluto.xml
FROM_RDBMS=oracle
FROM_DBHOST=cem-sf280-2
FROM_DBNAME=BAC
FROM_DBUSER=bacuser
FROM_DBPASSWD=bacuser
FROM_POOLCONN=2
FROM_SHAREDCONN=10
XML_OBJ_DIR=/disk2/mig2
TO_META=/opt/CSCObacss/rmor/pluto.xml
TO_RDBMS=oracle
TO_DBNAME=PLUTO
TO_DBUSER=pluto
TO_DBPASSWD=pluto
TO_DBHOST=bac-sf280-1
TO_POOLCONN=10
TO_SHAREDCONN=2

These database values are read from the/opt/CSCObacss/common/XMLProperties/ServerProperties.xml from BACBA 2.6. If you run the bacDbImport.csh again, this script checks the content and look for the TO_ and if it finds any match, it will not run. This will prevent user run this script multiple times. If you know that you really want to run bacDbImport.csh again, remove all the attributes with TO_.


hometocprevnextglossaryfeedbacksearchhelp

Posted: Mon Jan 31 13:05:16 PST 2005
All contents are Copyright © 1992--2005 Cisco Systems, Inc. All rights reserved.
Important Notices and Privacy Statement.