|
|

Proper configuration of the cumulative device allows for accurate information by which to manage the device. Certain configuration criteria is essential to enable communication between the EM and the device. The procedures which follow provide the necessary information to create and maintain chassis, module, interface, and connection configuration.
The Configuration chapter details the following:
The Chassis Configuration section covers the following areas:
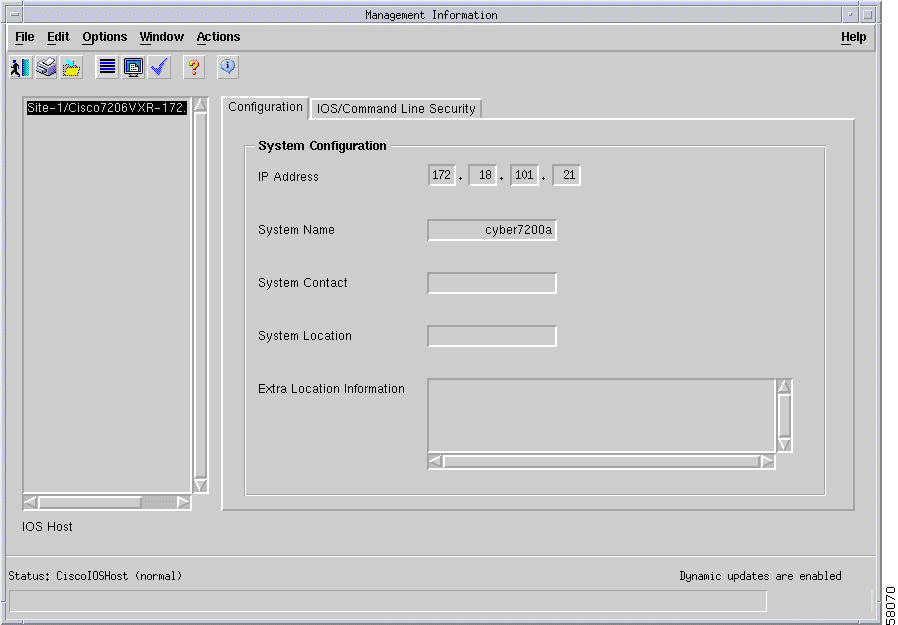
The Management Information window allows you to configure the chassis IP address, system attributes, and set or change chassis user names and passwords.
 |
Caution It is strongly recommended that only a system administrator have access to the Management Information window because access password configuration and modification can occur using this window. |
The Management Information section covers the following areas:
To configure the fields within the Configuration tab, proceed as follows:
The Management Information window appears displaying the Configuration tab.
Step 2 Select an IOS Host from the corresponding list box on the left-hand side of the window.
The IP address that the EM uses to contact the device displays in the corresponding field. Although not recommended, this entry is modifiable.
Step 3 Configure the fields on the Configuration tab as follows:
Step 4 Click the Save icon on the toolbar to save your changes.
Step 5 Choose File > Close to close the Management Information window.
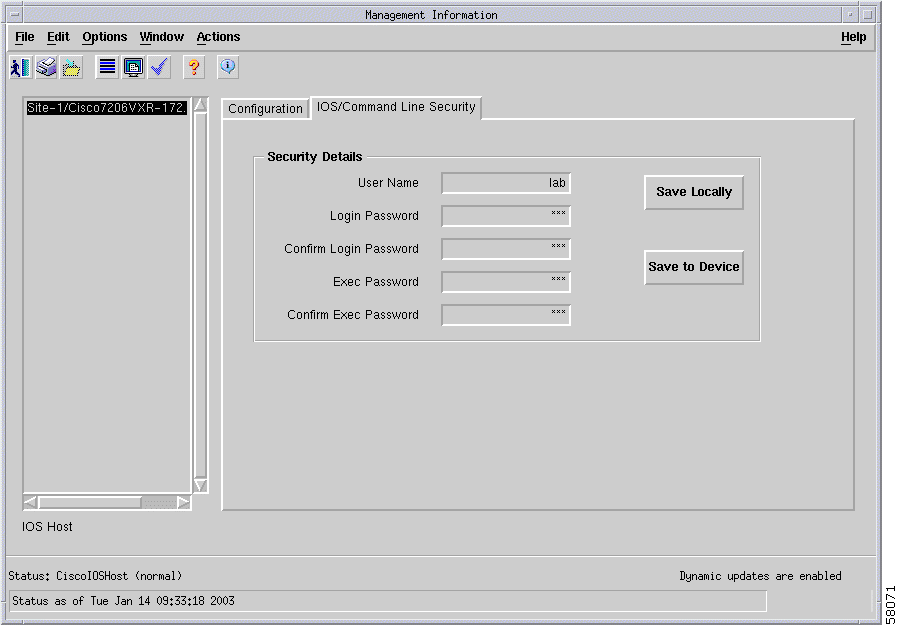
In order to manage passwords, the chassis password must be identical on the (local) EM and the device. You can manage chassis passwords for both the EM and the device using the Management Information window.
Following initial deployment, you must first enter the chassis password to match that of the device and choose the Save Locally option. The local password on the EM is set to match the password on the device. Once the EM and device chassis passwords match, you may modify the password as you see fit and choose the Save to Device option. Choosing the Save to Device option changes the chassis password locally within the EM and on the device simultaneously.
Similarly, when the chassis password changes on the device you must modify the password to match that of the device and save locally; thereby forcing the (local) EM password to match the device password. Again, when the chassis password is identical on both the EM and the device, you may change the password at your discretion and save to the device in order to update the password in the EM and on the device.
If the chassis password does not match the password of the device, then the actions may fail to complete. Upon failures, an action report may display indicating that the password is not active when operations initiate.
There are two types of passwords supported by the EM used to perform privileged tasks, enable and secret passwords. Each device can be configured using the enable password or the enable and secret passwords. The secret password always takes precedence over the enable password. Choosing the save the password locally to the device changes and enable password, not the secret password.
To enter or change the username or passwords, proceed as follows:
The Management Information window appears displaying the Configuration tab (see the previous figure for an example).
Step 2 Click the IOS/Command Line Security tab.
The IOS/Command Line Security tab displays in the Management Information window.
Step 3 Enter the appropriate information in the Security Details fields as follows:
Step 4 If you know the passwords that are set on the device, perform one of the following:
If you want to reconfigure the passwords on the device and passwords have been previously specified, you can click Save to Device. This action will work only if previous valid passwords have been saved locally.
Step 5 Click the Save icon on the toolbar to save your changes.
Step 6 Choose File > Close to close the Management Information window.
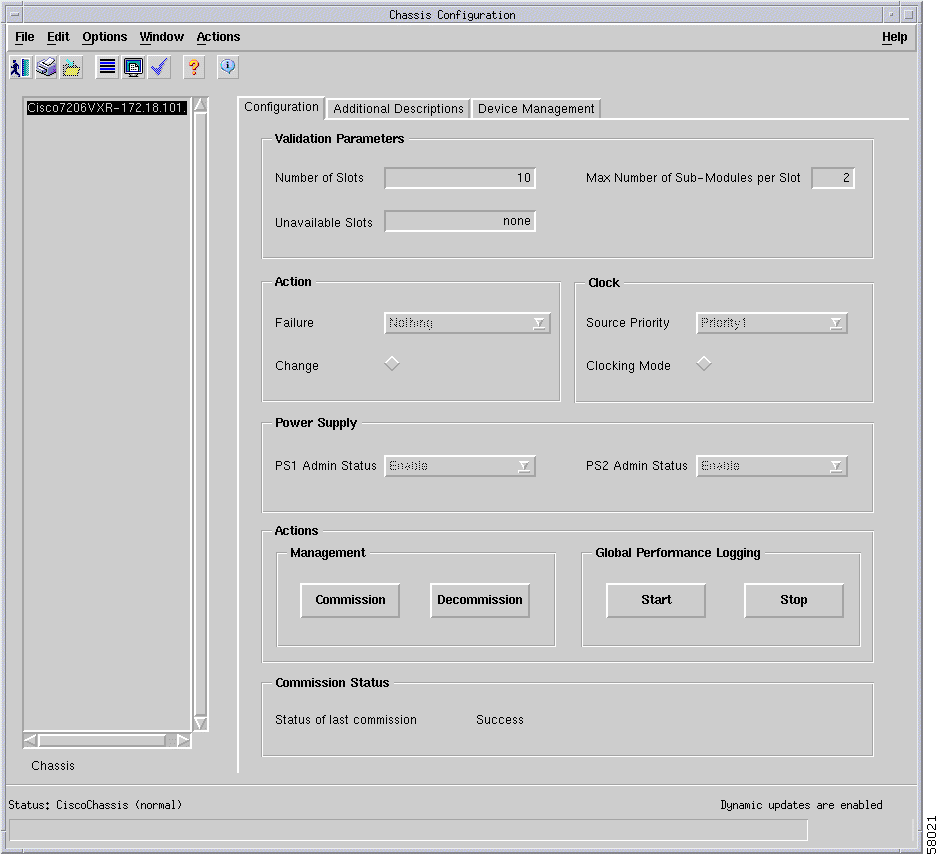
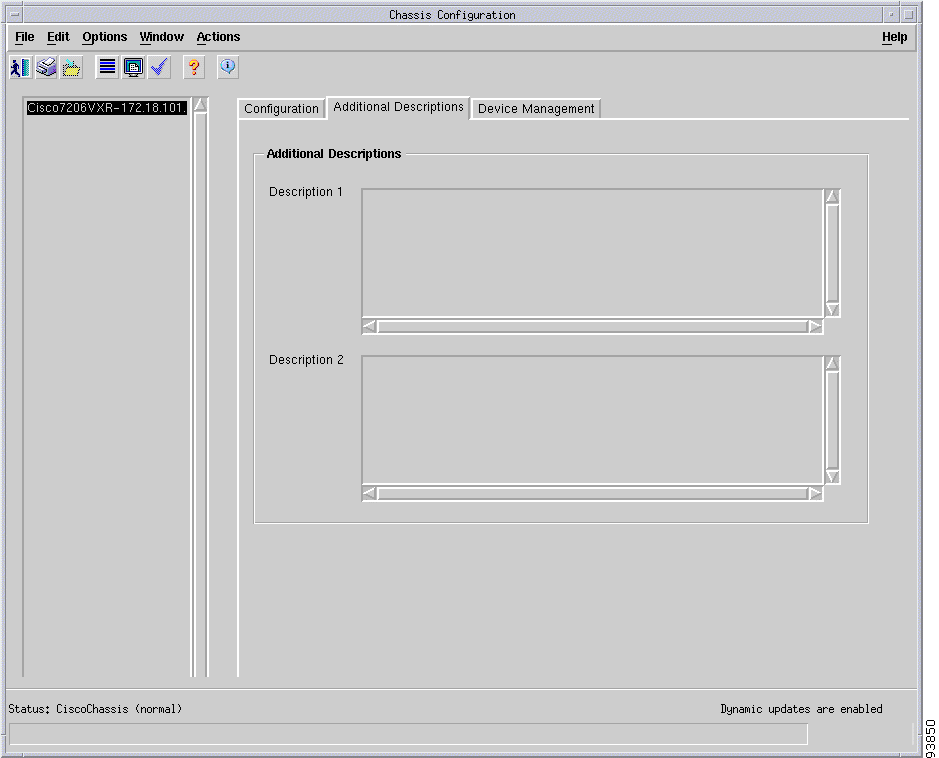
The Chassis Configuration window allows you to view and configure parameters, commission or decommission, switch global performance logging on or off for a particular chassis, and write to the running configuration file. The Chassis Configuration window (Additional Descriptions tab) also allows you to specify additional description information for a specific chassis. The Description 1 and Description 2 attributes allow you to enter text descriptions for identification purposes; for example, CLLI codes.
You use the Chassis Configuration window to perform the following tasks:
To configure the chassis, proceed as follows:
The Chassis Configuration window appears displaying the Configuration tab.
Step 2 Select a Chassis from the Chassis list box on the left-hand side of the window.
Step 3 The Validation Parameters area contains attributes that describe the population characteristics of a chassis and are used to validate module deployment. Optionally, you can modify the values in the Validation Parameters fields as follows:
Step 4 Configure the system actions to be taken in the event of a system failure in the Action fields as follows:
Step 5 Configure the parameters in the Clock area as follows:
Step 6 Configure the power supplies by selecting the appropriate option from the PS1 Admin Status and the PS2 Admin Status option buttons. Options are: enable, disable, or reset.
Step 7 Click the Additional Descriptions tab.
The Chassis Configuration window appears displaying the Additional Descriptions tab.
Step 8 Enter additional descriptions into the Descriptions 1 and Descriptions 2 areas (optional) as required.
You can enter any information you wish into the Description 1 and Description 2 fields. For example, you might wish to record additional text descriptions for identification purposes, such as CLLI codes.
Step 9 Click the Save icon on the toolbar to save your changes.
Step 10 Choose File > Close to close the Chassis Configuration window.
When you commission a chassis, subchassis discovery begins automatically. Subchassis discovery discovers and commissions all objects within the chassis. For additional details regarding subchassis discovery, see the "Chassis Commissioning and Subchassis Discovery" section.
Commissioning automatically starts active management (such as heartbeat polling) on the chassis and all commissioned objects within the chassis.
To commission a chassis, proceed as follows:
The Chassis Configuration window appears displaying the Configuration tab (see Figure 5-3).
Step 2 Select the Chassis you want to commission from the Chassis list box on the left-hand side of the window.
Step 3 Ensure the chassis has proper configuration. For information on chassis configuration attributes, see the "Configuring the Chassis" section.
Step 4 Click Commission (in the Management area).
The chassis commissions and all objects contained within commission through subchassis discovery. As subchassis objects discover, they display in the left-hand pane of the Map Viewer window and populate the chassis map in the right-hand pane of the Map Viewer. An Action Report window appears displaying the outcome of the chassis commission. Additionally, status information displays in the Commission Status area of the Chassis Configuration window reiterating the outcome of the commissioning action as either Succeeded or Failed.
When viewing the Chassis Configuration window in future instances, the Commission Status area displays the result of the last commission action, either Succeeded or Failed.
Step 5 Click Close to close the Action Report window.
Step 6 Choose File > Close to close the Chassis Configuration window.
The following figure shows a Cisco 7206VXR chassis map in the Physical view after subchassis discovery. Modules and interfaces are automatically discovered within the chassis and enter the appropriate post-commissioning state. For details about object states, see the "Object States" section.
After commissioning a chassis you can configure and manage the chassis objects.
Decommissioning a chassis decommissions all objects within the chassis and active management (such as polling) stops on the chassis as well as on all objects within the chassis.
Decommissioning a managed chassis object is necessary in order to delete a managed chassis object from the EM. Should you attempt to delete a managed chassis object from the EM without first decommissioning it, an error displays indicating that the action cannot complete successfully.
To decommission a chassis, proceed as follows:
The Chassis Configuration window appears displaying the Configuration tab (see Figure 5-3).
Step 2 Select the chassis you want to decommission in the Chassis list box on the left-hand side of the window.
Step 3 Click Decommission (in the Management area).
The chassis and all objects contained within are decommissioned. Decommissioned objects remain in the left-hand pane of the Map Viewer window and appear grayed out in the chassis map which displays in the right-hand pane of the Map Viewer. An Action Report window appears displaying the outcome of the chassis decommissioning. Additionally, status information displays in the Commission Status area of the Chassis Configuration window reiterating the outcome of the decommission action as either Succeeded or Failed. If decommissioning is successful, the state of the chassis and subchassis objects change to decommissioned.
Step 4 Click Close to close the Action Report window.
Step 5 Choose File > Close to close the Chassis Configuration window.
Global performance logging collects performance information on interfaces within a specific chassis. Following a minimum fifteen minute increment, performance data is available for viewing through the Cisco EMF Performance Manager.
If you start global performance logging on a chassis, all subchassis objects move into the performance logging on state. Performance data gathering, however, is only applicable to interfaces. Therefore, despite having a state of performance logging on, performance data for chassis and modules is not available in the Performance Manager, with exception only to CPU performance data.
For additional information on the Performance Manager, see the "Performance Manager" section.
|
Caution Global performance logging can use a lot of resources, so use discretion before enabling this option. |
In lieu of starting global performance logging, you can start performance logging on a per module or interface basis. For information on starting performance logging for a specific module, see the "Module Performance" section. For information on starting performance logging for a particular interface, see the "Interface Performance" section.
To start global performance logging for a selected chassis, proceed as follows:
The Chassis Configuration window appears displaying the Configuration tab (see Figure 5-3).
Step 2 Select the relevant chassis from the Chassis list box on the left-hand side of the window.
Step 3 Click Start (in the Global Performance Logging area) to begin performance logging on the selected chassis.
An Action Report window appears indicating whether the performance logging "on" action is successful or fails.
Step 4 Click Close to close the Action Report window.
Step 5 Choose File > Close to close the Chassis Configuration window.
Stopping global performance logging at the chassis-level stops performance collection at the module and interface level as well.
Rather than stopping performance logging globally, you may stop performance logging on a per module or interface basis. For instructions on stopping performance logging for a selected module, see the "Module Performance" section. For instructions on stopping performance logging for a selected interface (such as ATM, Ethernet, or SONET), see the "Interface Performance" section.
To stop global performance logging for a selected chassis, proceed as follows:
The Chassis Configuration window appears displaying the Configuration tab (see Figure 5-3).
Step 2 Select the relevant chassis from the Chassis list box on the left-hand side of the window.
Step 3 Click Stop (in the Global Performance Logging area) to stop global performance logging for the selected chassis.
The Action Report window appears indicating whether the performance logging "off" action is successful or fails.
Step 4 Click Close to close the Action Report window.
Step 5 Choose File > Close to close the Chassis Configuration window.
Two configurations reside within the EM, a running config and a start up config. As you make changes while working on the system, the running config updates automatically. However, if you should reboot the device, the EM automatically defaults to the current (saved) start up config and a new running config initiates. As such, the changes made to the previous running config are lost. To prevent this from happening, the EM enables you to write changes from the running config to the start up config during the same session.
To write a running config of the selected chassis to the start up config, proceed as follows:
The Chassis Configuration window appears displaying the Configuration tab (see Figure 5-3).
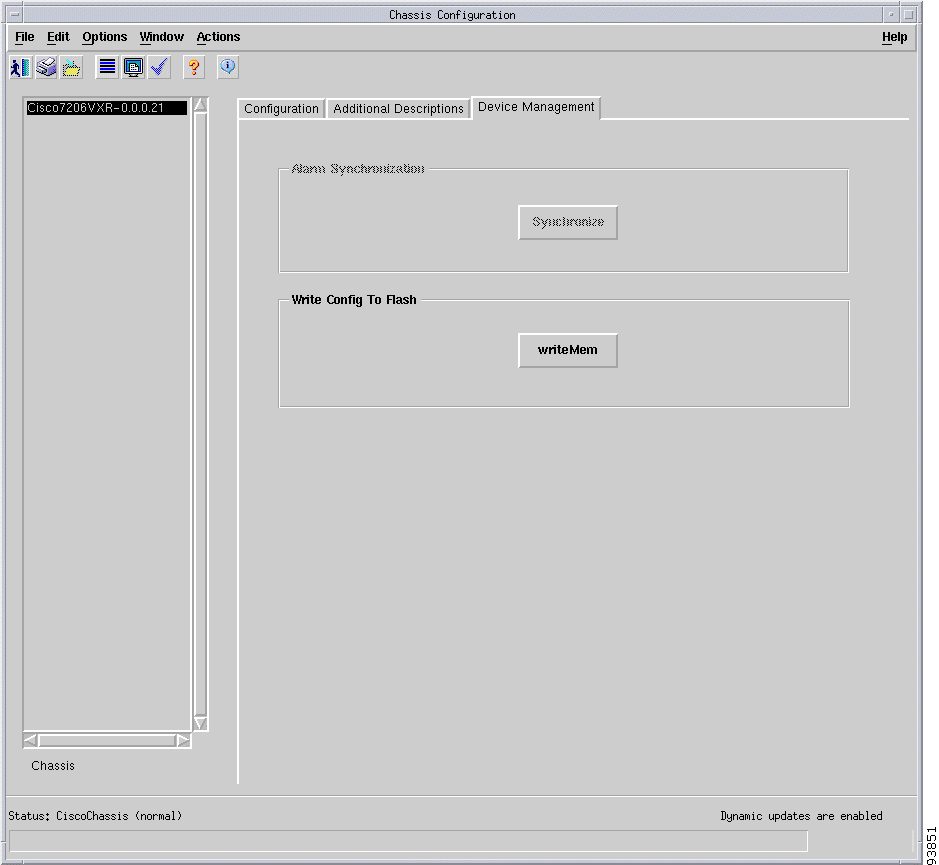
Step 2 Click the Device Management tab.
The Chassis Configuration window appears displaying the Device Management tab.
Step 3 Select the relevant chassis from the Chassis list box on the left-hand side of the window.
Step 4 Click writeMem (in the Write Config to Flash area).
Changes to the running config apply to the startup config. In the future, when the startup config is accessed, it will contain the most recent running config written to memory.
Step 5 Click the Save icon on the toolbar to save your changes.
Step 6 Choose File > Close to close the Chassis Configuration window.
The SNMP Management section covers the following areas:
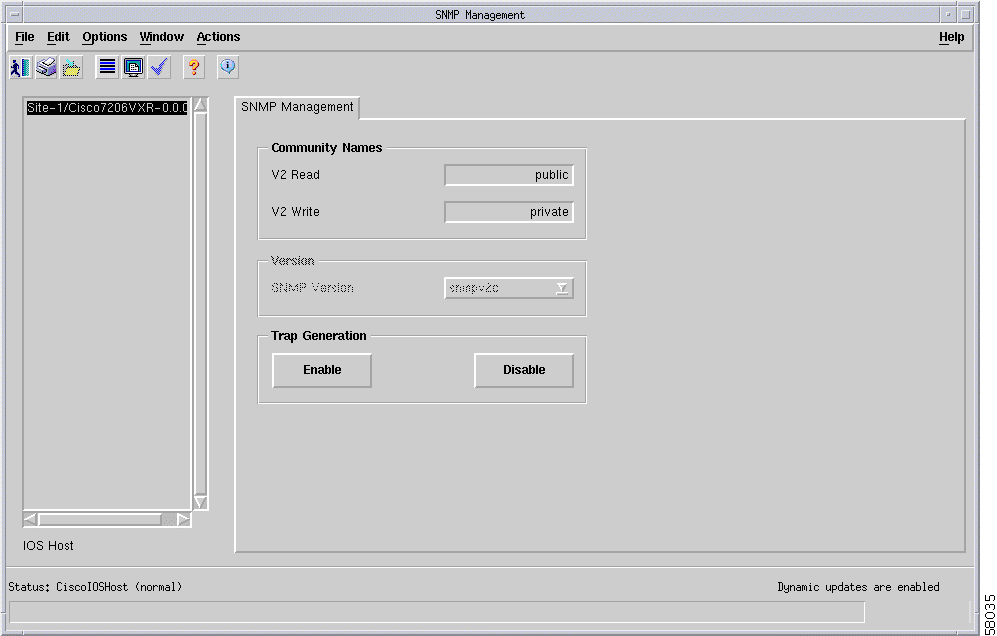
Community names provide a security mechanism for SNMP communications. The device holds its own community names, so the community names set within the EM must match the setting on the device in order to get or set attributes (from the device). If community string settings do not match between the EM and the device, a critical alarm arises on the chassis and the chassis moves into the discovery lost comms state.
Community name configuration is directly related to the SNMP version configuration.
To configure SNMP community names and version information, proceed as follows:
The SNMP Management window appears displaying the SNMP Management tab.
Step 2 Select an IOS Host from the IOS Host list box on the left-hand side of the window.
Step 3 Enter the appropriate Community Name information as follows:
SNMP community strings are local only. The data you enter in the fields of the Community Names area have no effect on the device.
Step 4 Select the SNMP version to be used from the SNMP Version option list.
Step 5 Click the Save icon on the toolbar to save your changes.
Step 6 Choose File > Close to close the SNMP Management window.
Trap generation may be enabled or disabled within the EM through SNMP management. It is, however, necessary to configure the device with the EM server IP address from the CLI in order to receive (SNMP) trap data from the device. This is a critical prerequisite step when enabling trap generation. If the device is not configured with the EM server IP address, trap data will not be received by the EMS.
 |
Note For details on configuring the EM to receive trap information from the device, see the Cisco 7000 Series Manager Installation Guide. |
The device sends traps to the EM when trap generation is enabled. When the EM receives a trap, alarms raise on the chassis or the chassis' underlying modules or interfaces. When trap generation is disabled on the device, the EM does not receive any traps and, therefore, does not raise any alarms. As such, it is recommended to enable trap generation at all times.
To enable or disable trap generation on a selected chassis, proceed as follows:
The SNMP Management window appears displaying the SNMP Management tab (see Figure 5-7).
Step 2 Select an IOS Host from the IOS Host list box on the left-hand side of the window.
Step 3 Ensure that the SNMP version and community configuration is appropriate. For additional information, see the preceding section.
Step 4 Click the appropriate Trap Generation button as follows:
Step 5 Click the Save icon on the toolbar to save your changes.
If enabled, traps convert into alarms which display in the Cisco EMF Event Browser. For additional information on the alarms supported by the EM, see "Alarms." Additionally, alarm indicators display on the Map Viewer appropriately.
|
Note For details regarding the Event Browser and Map Viewer, see the Cisco Element Management Framework User Guide. |
Step 6 Choose File > Close to close the SNMP Management window.
If you are familiar with other Cisco EMs, the IOS image download feature is typically available through the EM-specific menu initiated by right-clicking a relevant object in the Cisco EMF Map Viewer tool. Currently, Cisco IOS image management capabilities are provided through the Resource Manager Essentials (RME) which is now integrated into Cisco EMF. Using RME, you can upgrade the device with the current version of Cisco IOS image software.
|
Note For overview information on the RME tool and instructions specific to using RME with Cisco EMF, see
the Cisco Element Management Framework Installation and Administration Guide
(http://www.cisco.com/en/US/partner/products/sw/netmgtsw/ps829/products_installation_and_confi
gu ration_guide_book09186a00800ffd0d.html) and the Cisco Element Management Framework
User Guide
(http://www.cisco.com/en/US/partner/products/sw/netmgtsw/ps829/products_user_guide_book 09186a00800ffd02.html). |
|
Note For detailed information on the RME tool, see the User Guide for Resource Manager Essentials. |
Configuration backup and restore capabilities are now available through the RME application which is integrated into Cisco EMF. Using the RME application you can archive the network database as necessary.
|
Note For overview information on the RME tool and instructions specific to using RME with Cisco EMF, see
the Cisco Element Management Framework Installation and Administration Guide
(http://www.cisco.com/en/US/partner/products/sw/netmgtsw/ps829/products_installation_and_confi
gu ration_guide_book09186a00800ffd0d.html) and the Cisco Element Management Framework
User Guide
(http://www.cisco.com/en/US/partner/products/sw/netmgtsw/ps829/products_user_guide_book 09186a00800ffd02.html). |
|
Note For detailed information on the RME tool, see the User Guide for Resource Manager Essentials. |
Profiles allow you to apply a set of existing parameters to a number of similar objects, eliminating the need to enter the same data numerous times. Once you create a profile, you can apply that same profile to any number of interfaces or connections as applicable, thus saving time and creating efficiency.
The following figure outlines the interface profile workflow.
This EM supports ATM QoS connection and POS profiles.
Profile management involves the following:
ATM QoS profiles, when applied to ATM connections, allow for more efficient configuration of PVCs and SPVCs.
Managing ATM QoS connection profiles involves the following:
To create an ATM QoS connection profile, proceed as follows:
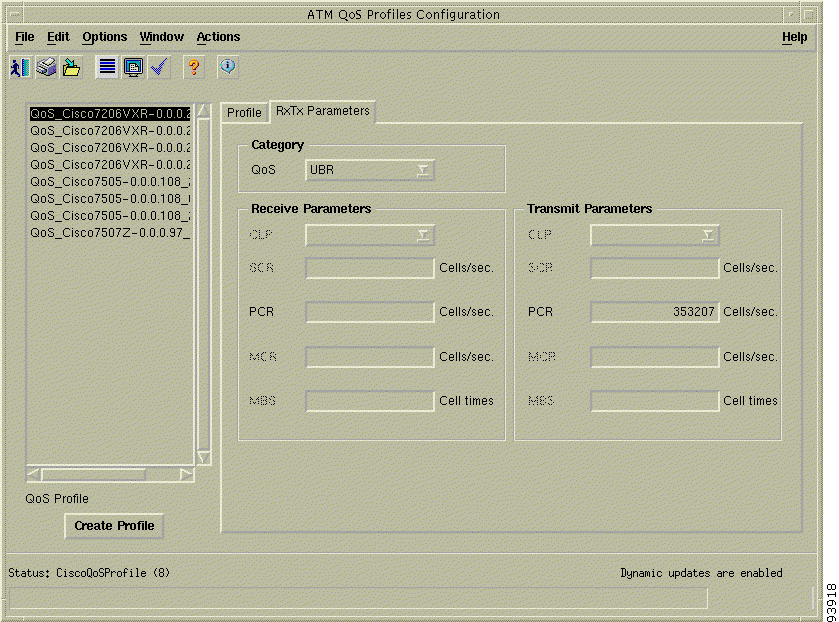
The ATM QoS Profiles Configuration window appears displaying the Profile tab.
Step 2 To create a profile based on an existing profile, select the profile you want to model from the profile list box on the left-hand side of the window (optional).
Step 3 Click Create Profile.
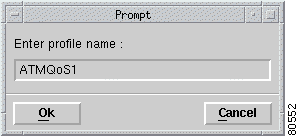
A Prompt window appears for you to enter the name of your new profile.
Step 4 Enter a name for the new profile in the Enter profile name data entry box. Each profile created must have a unique name. Do not insert spaces into a profile name. When you choose a profile name, it is recommended to use a naming convention that describes the profile type. For example, an ATM QoS profile might be called ATMQoS1 or QoSConnection1.
Step 5 Click Ok.
The QoS Interface Profiles Configuration window reappears and the new profile name displays in the QoS Profiles list on the left-hand side of the window. Default configuration data displays in the Profile Parameters panel. If you chose to create the profile based on an existing profile, custom configuration data from the existing profile displays rather than default data.
 |
TimeSaver In order to save time configuring similar profiles, you can apply an existing profile to a new profile. Choose Edit > Apply Profile, then choose the existing profile you wish to apply from the profiles listed. The configuration settings are copy from the existing profile to the new profile. If you prefer to copy and paste individual parameters, or only a single tab of the configuration, you can copy and paste data between profiles as needed. Select the profile from which you want to copy data, then click the tab where the data you want to copy exists. To copy a specific setting, select the item you want to copy, then choose the Edit > Copy. To copy all settings on a specific tab, choose Edit > Copy Page Configuration. Select the profile to which you want to add the information, click the appropriate tab as necessary. If applicable, select the individual parameter. Choose Edit > Paste to paste to the information. The settings which copy appear in blue. |
Step 6 Configure the parameters in the Profile Configuration area as follows:
Step 7 Click the RxTx Parameters tab.
The ATM QoS Profiles Configuration window, RxTx Parameters tab displays.
Step 8 Select the appropriate QoS service category for the selected QoS profile. Depending on the service category selection, the fields on the window activate/deactivate. The following table lists the applicable (i.e., active) fields for each service category.
Table 5-1 QoS Service Category Parameters
| QoS Service Categories | Applicable Receive/Transmit Parameters |
|---|---|
It is possible to select a service category that is not supported, for example ABR and UBR+. However, this will be detected when an attempt is made to create the connection on the device and the operator informed.
Step 9 Configure the fields in the Receive Parameters and Transmit Parameters areas. Each of these areas contain the same fields, therefore only one description of each field follows:
Step 10 Click the Save icon to save your changes.
Step 11 Choose File > Close to close the ATM QoS Profiles Configuration window.
You may proceed to the "Connection Configuration" section for details on applying the profile and configuring the connection.
An existing profile is available for editing only if it is not currently applied to a connection. Once you have applied a profile to a connection, you cannot edit it (unless you remove it from the connection first). If you want to view the (interface) connections that are using a specific profile, run a Cisco EMF query against the profile name.
|
Note For information on running a Cisco EMF query, refer to the Cisco Element Management Framework
User Guide Release 3.2 at the following URL: h ttp://www.cisco.com/en/US/partner/products/sw/netmgtsw/ps829/products_user_guide_book 09186a00800ffd02.html. |
Once you remove a profile from all interfaces, you can proceed to edit its configuration.
To edit an ATM QoS interface profile, proceed as follows:
The ATM QoS Profiles Configuration window appears displaying the Profile tab (see Figure 5-9).
Step 2 Choose the profile you wish to edit from the list of existing profiles displayed in the QoS Profile list on the left-hand side of the window.
Step 3 Edit the parameters in the Profile and RxTx Parameters tabs as required. For parameter descriptions, see Steps 6 through 9 of the "Creating and Configuring an ATM QoS Connection Profile" section.
Step 4 Click the Save icon on the toolbar to save the parameters you have selected for your profile.
Step 5 Choose File > Close to close the ATM QoS Profiles Configuration window.
Deletion of an existing profile can only occur if it is not currently applied to an interface. Once you have applied a profile to an interface, you cannot delete it (unless you remove it from the interface first). If you want to view the (interface) connections that are using a specific profile, run a Cisco EMF query against the profile name.
|
Note For information on running a Cisco EMF query, refer to the Cisco Element Management Framework
User Guide Release 3.2 at the following URL: http://www.cisco.com/en/US/partner/products/sw/netmgtsw/ps829/products_user_guide_book 09186a00800ffd02.html. |
Once you remove a profile from all interfaces, you can proceed to delete it.
To delete an ATM QoS interface profile, follow these steps:
The ATM QoS Profiles Configuration window appears displaying the Profile tab (see Figure 5-9).
Step 2 Choose the profile you wish to delete from the list of existing profiles displayed in the QoS Profile list on the left-hand side of the window.
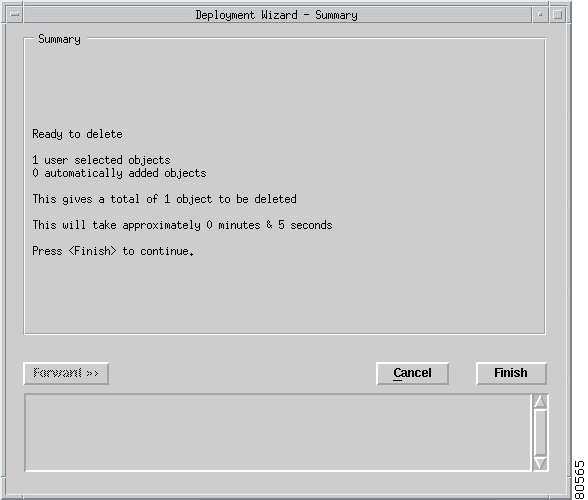
Step 3 Right click on the profile, then select the Deployment > Delete Objects option.
The Deployment Wizard-Summary window appears.
Step 4 Click Finish to delete the profile.
A Deletion prompt window appears for you to confirm that you wish to delete the selected profile.
Step 5 Click Yes to delete the selected profile or click No to close the window without deleting the profile.
When a profile deletes it disappears from the list of existing profiles which appear in the ATM Profile list on the left-hand side of the window and an Information window appears.
Step 6 Click OK to close the Information window.
Step 7 Choose File > Close to close the ATM Interface Configuration Profile window.
Interface configuration profiles allow you to apply a single profile to multiple POS interfaces, thereby allowing you to reduce interface configuration efforts.
Managing POS interface profiles involves the following:
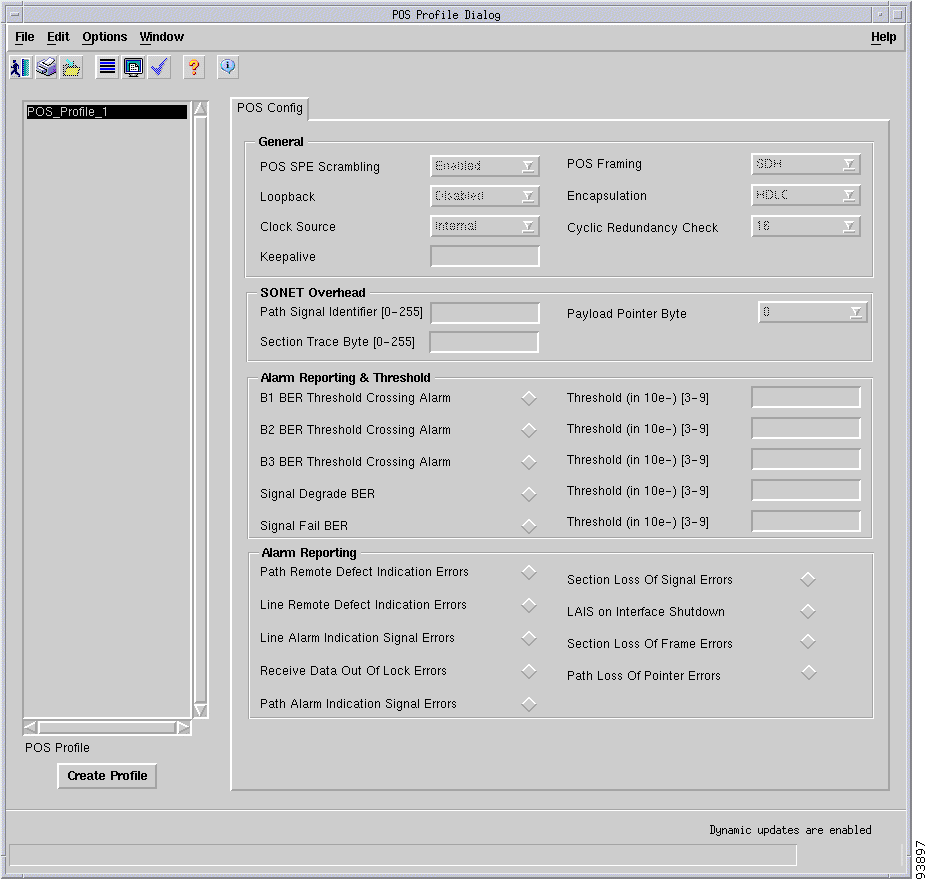
To create a POS interface profile, proceed as follows:
The POS Profile Dialog window appears displaying the POS Config tab.
Step 2 To create a profile based on an existing profile, select the profile you want to model from the profile list box on the left-hand side of the window (optional).
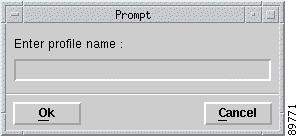
Step 3 Click Create Profile.
A Prompt window appears for you to enter a name for your new profile.
Step 4 Enter a name for the new profile in the Enter profile name data entry box. Each profile must have a unique name. Do not insert spaces into a profile name. When you choose a profile name, it is recommended to use a naming convention that describes the profile type. For example, a POS profile might be called POS1 or POSInterface1.
Step 5 Click Ok.
The POS Profile Dialog window reappears with the new profile name displaying in the POS Interface list on the left-hand side of the window and default configuration data. Note that the first profile you create, the default data will most likely be inappropriate. Therefore you must configure each parameter as the following steps describe. If you chose to create the profile based on an existing profile, custom configuration data from the existing profile displays rather than default data.
|
TimeSaver In order to save time configuring similar profiles, you can apply an existing profile to a new profile. Choose Edit > Apply Profile, then choose the existing profile you wish to apply from the profiles listed. The configuration settings copy from the existing profile to the new profile. If you prefer to copy and paste individual parameters, or only a single tab of the configuration, you can copy and paste data between profiles as needed. Select the interface from which you want to copy data, then click the tab where the data you want to copy exists. To copy a specific setting, select the item you want to copy, then choose the Edit > Copy. To copy all settings on a specific tab, choose Edit > Copy Page Configuration. Select the profile to which you want to add the information, click the appropriate tab as necessary. If copying a single setting, select the individual parameter. Choose Edit > Paste to paste the information. The settings which copy appear in blue. |
Step 6 Configure the parameters in the General area as follows:
Step 7 Configure the parameters in the SONET Overhead area as follows:
Step 8 Configure the parameters in the Alarm Reporting & Threshold area as follows:
Step 9 Configure the parameters in the Alarm Reporting area as follows:
Step 10 Click the Save icon on the toolbar to save the parameters you have selected for your profile.
Step 11 Choose File > Close to close the POS Profile Dialog window.
You may proceed to the "Configuring an Interface" section for details on entering generic interface configuration and applying the POS profile to an appropriate interface.
To edit a POS interface profile, proceed as follows:
The POS Profile Dialog window appears displaying the POS Config tab (see Figure 5-13).
Step 2 Choose the profile you wish to edit from the list of existing profiles which display in the POS Profile list on the left-hand side of the window.
Step 3 Edit the parameters as required. For parameter descriptions, see Steps 6 through 11 of the "Creating and Configuring an POS Interface Profile" section.
Step 4 Click the Save icon on the toolbar to save the parameters you have selected for your profile.
Step 5 Choose File > Close to close the POS Profile Dialog window.
To delete a POS interface profile, proceed as follows:
The POS Profile Dialog window appears displaying the POS Config tab (see Figure 5-13).
Step 2 Choose the profile you wish to delete from the list of existing profiles which display in the POS Profile list on the left-hand side of the window.
Step 3 Choose Edit > Delete Profile, then select the profile you wish to delete from the list.
A Deletion prompt window appears for you to confirm that you wish to delete the selected profile.
Step 4 Click Yes to delete the selected profile or click No to close the window without deleting the profile.
When a profile deletes it disappears from the list of existing profiles in the POS Profile list on the left-hand side of the window and an Information window appears.
Step 5 Click OK to close the Information window.
Step 6 Choose File > Close to close the POS Profile Dialog window.
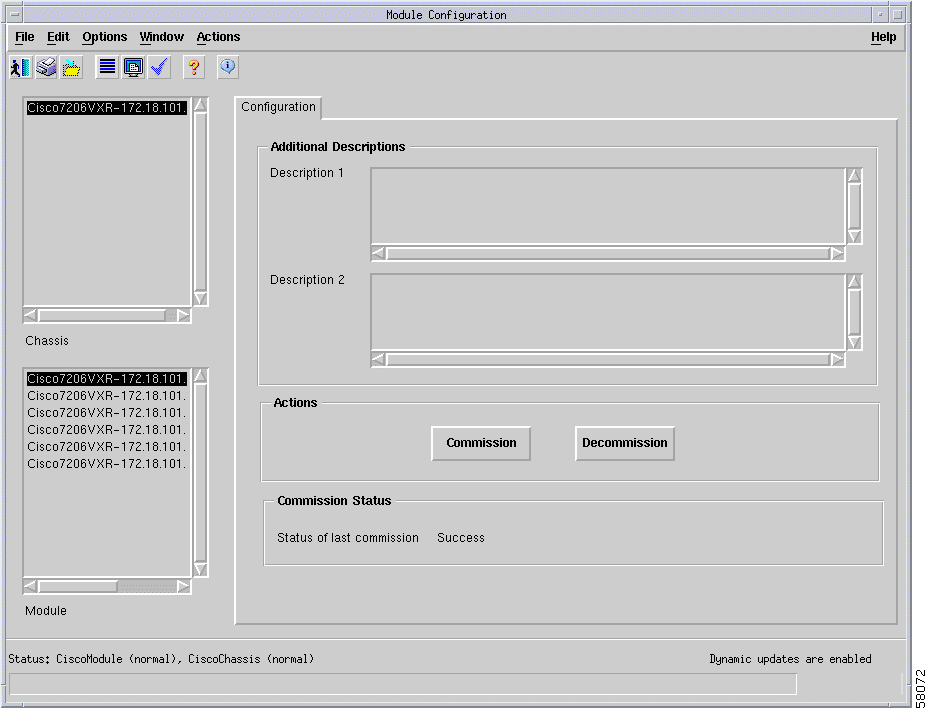
The Configuration window allows you to commission or decommission any module. You can also provide textual descriptions of the specific module, if required.
The Module Configuration section provides the following information:
To configure a module, proceed as follows:
The Module Configuration window appears.
Step 2 Select a chassis from the Chassis list box on the left-hand side of the window, then select a module from the Module list box.
Configuration data for the selected module appears in the Additional Descriptions area and the Commission Status area displays the status of the last commission performed on the selected module. Possible values are Succeeded or Failed.
Step 3 Enter additional descriptions into the Descriptions 1 and Descriptions 2 areas (optional) as required.
You can enter any information you wish into the Description 1 and Description 2 data entry fields. For example, you might wish to record additional text descriptions for identification purposes, such as CLLI codes.
Step 4 Click the Save icon on the toolbar to save your changes.
Step 5 Choose File > Close to close the Chassis Configuration window.
Using the Cisco 7000 Series Manager to commission a chassis initiates discovery and commissioning activities for all modules and physical interfaces within a selected chassis, with the exception of voice cards. Voice cards are discovered when a card is initially inserted into a chassis. While the commissioning process is initiated, it is not successfully completed and the card is placed in the Card Type Not Set state. To successfully commission discovered voice cards, you must configure each deployed card as either a T1 or E1 card type, then recommission the card. (Recommissioning is automatically initiated when the card configuration is saved.)
|
Note Once a voice card is configured, you need not reconfigure (and recommission) the card if a chassis is decommissioned and later recommissioned. Even though chassis commissioning rediscovers existing modules, the voice card configuration is not cleared; therefore, the card commissions properly. |
To configure and recommission voice cards:
The Voice Card Type Configuration window displays (see Figure 5-16).
Step 2 Select a chassis from the Chassis list box at left of the window, then select a module from the Module list box.
Step 3 From the Card Type menu, select the desired voice card type you want to configure (either T1 or E1.)
|
Note This option is only enabled if you are initially configuring the card type. If the voice card has been previously configured, this option is disabled. |
Step 4 Click Save to save the voice card type configuration.
The selected card is recommissioned and the state of the card changes accordingly. The state of the chassis does not change while the voice card is recommissioned. However, you might notice a brief chassis state change, to Information state (in Map Viewer you can see a white border around the chassis), during the process.
Step 5 Repeat steps 2 through 4 to configure and recommission additional voice cards.
Step 6 Choose File > Close to close the Voice Card Type Configuration window.
As previously described, there are several types of modules the EM supports, including line cards and supporting modules (e.g., power supplies and processors). Commissioning modules discovers and commissions the module and all the objects within the module when applicable, and begins heartbeat polling. Overall, successful commissioning places the module in a manageable state (by the EM).
The following lists the activities which occur when commissioning line cards and processor modules.
Commissioning a module initiates the following activities for modules present in the device:
Commissioning any supporting module present in the device initiates the following activities:
To commission a module, proceed as follows:
The Module Configuration window appears (see Figure 5-15).
Step 2 Select a chassis from the Chassis list box on the left-hand side of the window, then select a module from the Module list box.
Step 3 Ensure the module has proper configuration. For information on module configuration attributes, see the "Module Configuration" section.
Step 4 Click Commission (located in the Actions area).
The module and all objects it contains commission through discovery. An Action Report window appears displaying the outcome of the module commission. Additionally, status information displays in the Commission Status area of the Module Configuration window reiterating the outcome of the commissioning action as either Succeeded or Failed.
When viewing the Module Configuration window in future instances, the Commission Status area displays the result of the last commission action, either Succeeded or Failed.
Step 5 Click Close to close the Action Report window.
Step 6 Choose File > Close to close the Module Configuration window.
Decommissioning modules also decommissions all objects beneath the card. As a part of decommissioning, heartbeat polling, status gathering, and performance monitoring terminates. These activities put the module in a state that is unmanageable from the EM.
The following lists the activities which occur when decommissioning line cards and supporting modules.
Decommissioning a module initiates the following activities:
Decommissioning any supporting module initiates the following activities:
It is recommended that you decommission a module prior to physically removing it from a managed chassis. Decommissioning a module before physically removing it prevents alarms.
To decommission a module, proceed as follows:
The Module Configuration window appears (see Figure 5-15).
Step 2 Select a chassis from the Chassis list box on the left-hand side of the window, then select a module from the Module list box.
Step 3 Click Decommission to decommission the selected module.
The module and all objects contained within are decommissioned. Decommissioned objects remain in the left-hand pane of the Map Viewer window and appear grayed out in the chassis map in the right-hand pane of the Map Viewer. An Action Report window appears displaying the outcome. If decommissioning is successful, the state of the module and objects contained within change to decommissioned.
Step 4 Choose Close to close the Action Report window.
Step 5 Choose File > Close to close the Module Configuration window.
The Interface Configuration section covers the following:
To commission an interface, follow these steps:
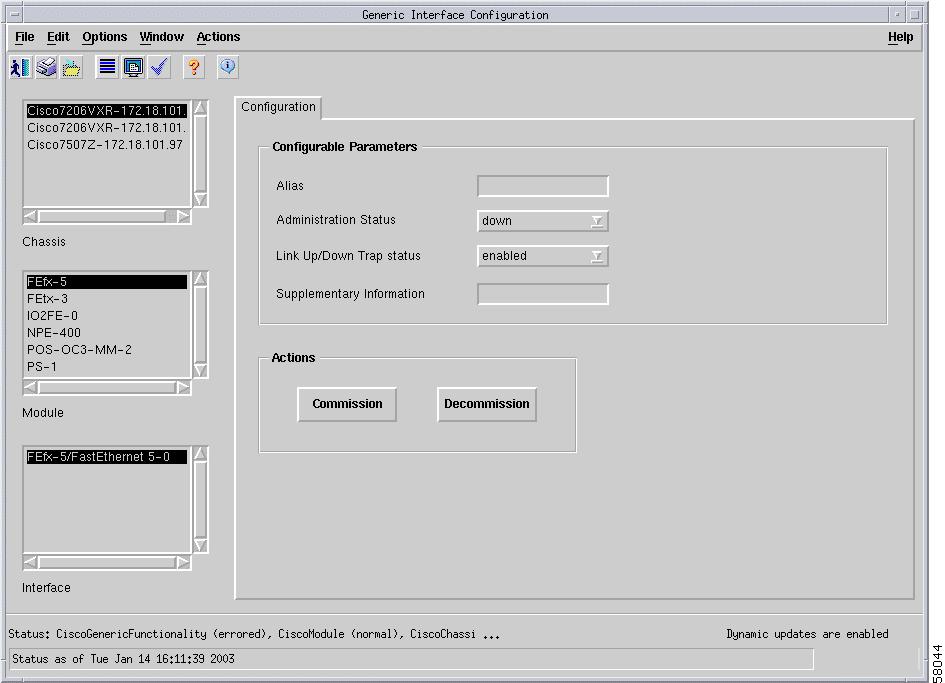
The Generic Interface Configuration window appears.
Step 2 Select a chassis from the Chassis list box on the left-hand side of the window, select a module from the Module list box, then select an interface from the Interface list box.
Configuration data for the selected interface appears in the Configurable Parameters panel.
Step 3 Ensure the interface has proper configuration. For information on interface configuration attributes, see the "Configuring an Interface" section.
Step 4 Click Commission (in the Actions area).
The status of the selected interface appears at the bottom left-hand corner of the window, and a Confirmation window appears.
Step 5 Click Yes to commission the interface or click No on the Confirmation window to cancel the operation at this time.
The interface discovers and commissions, and the interface's state changes accordingly. A status report appears displaying whether the commission action successful or fails.
Step 6 Click Close to close the Action Report window.
Step 7 Choose File > Close to close the Generic Interface Configuration window.
To decommission an interface, follow these steps:
The Generic Interface Configuration window appears (see Figure 5-17).
Step 2 Select a chassis from the Chassis list box on the left-hand side of the window, select a module from the Module list box, then select an interface from the Interface list box.
Configuration data for the selected interface appears in the Configurable Parameters panel.
Step 3 Click Decommission (in the Actions area).
The status of the selected interface appears at the bottom left-hand corner of the window, and a Confirmation window appears.
Step 4 Click Yes to decommission the interface or click No on the Confirmation window to cancel the operation at this time.
The interface is decommissioned and the interface's state changes accordingly. A status report appears displaying whether the commission action is successful or fails.
Step 5 Click Close to close the Action Report window.
Step 6 Choose File > Close to close the Generic Interface Configuration window.
Interfaces require some level of configuration before the EM can manage them effectively. In order to successfully configure an interface, no matter the type, the interface must be in a commissioned state. To commission an interface, see the "Commissioning an Interface" section.
When interface configuration is complete, the interface may be commissioned to enable the EM to manage it.
To configure general interface criteria, proceed as follows:
The Generic Interface Configuration window appears.
Step 2 Select a chassis from the Chassis list box on the left-hand side of the window, select a module from the Module list box, then select an interface from the Interface list box.
Configuration data for the selected interface appears in the Configurable Parameters area. If configuration has not yet taken place from the EM, configuration data populates the attributes according to the information available on the device.
Step 3 Ensure that the interface is in a post-commissioning state by reviewing the interface status in the lower left-hand corner of the window.
If the interface is in the normal state or any other post-commissioned state, you may proceed. If the interface is in the decommissioned state, you must first commission the interface before continuing with the interface configuration. To commission an interface, see the "Commissioning an Interface" section.
Step 4 Configure the attributes in the Configurable Parameters area as follows:
Step 5 Click the Save icon on the toolbar to save your changes.
Step 6 Choose File > Close to close the Generic Interface Configuration window.
If the EM supports the technology-specific configuration of the interface for which you have set general configuration parameters, you may further configure the interface. Proceed to one of the following sections:
In order to successfully configure an interface, the interface must be in a commissioned state. To commission an interface, see the "Commissioning an Interface" section.
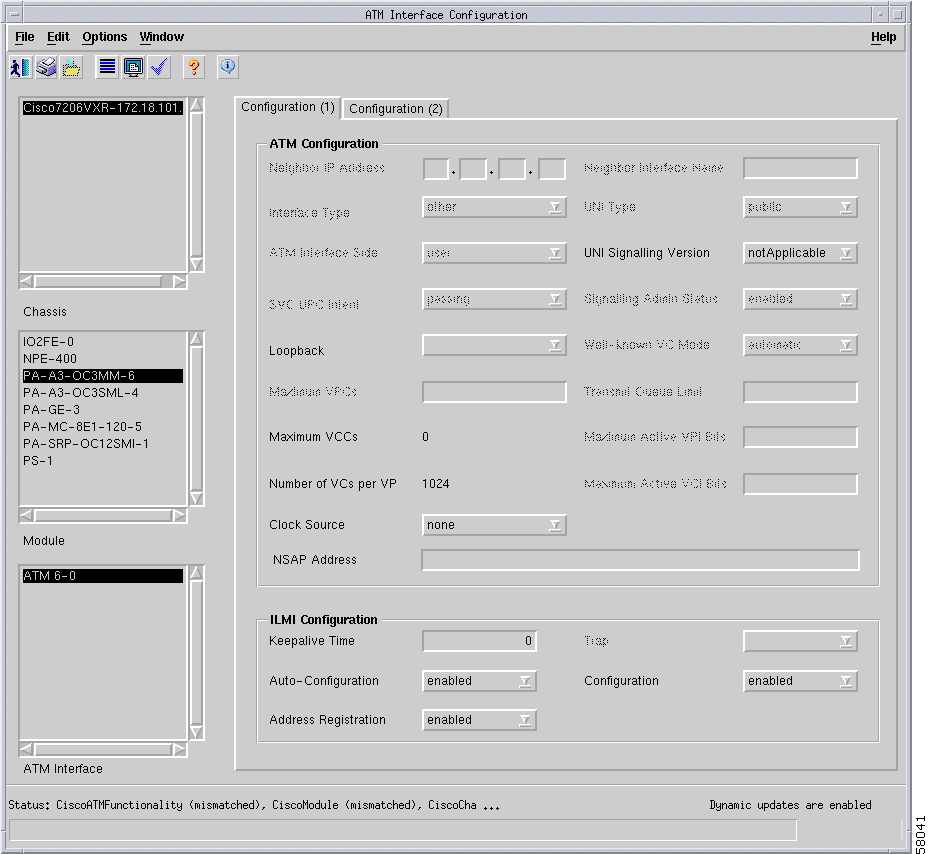
To configure an ATM interface, proceed as follows these steps:
The ATM Interface Configuration window appears displaying the Configuration (1) tab.
Step 2 Select a chassis from the Chassis list box on the left-hand side of the window, select a module from the Module list box, then select an interface from the ATM Interface list box.
Configuration data for the selected interface appears on the Configuration (1) and Configuration (2) tabs. If configuration has not yet taken place from the EM, configuration data populates the attributes according to the information available on the device.
Step 3 Ensure that the interface is in a post-commissioning state by reviewing the interface status in the lower left-hand corner of the window.
If the interface is in the normal state or any other post-commissioned state, you may proceed. If the interface is in the decommissioned state, you must first commission the interface before continuing with the interface configuration. To commission an interface, see the "Interface Configuration" section.
|
TimeSaver In order to save time configuring interfaces, you can apply an existing profile to populate the configuration parameters. Choose Edit > Apply Profile, then choose the existing profile you wish to apply from the profiles listed. The configuration settings copy from the profile to the configuration of the interface. If you prefer to copy and paste individual parameters, or only a single tab of the configuration, you can copy and paste data between profiles as needed. Select the interface from which you want to copy data, then click the tab where the data you want to copy exists. To copy a specific setting, select the item you want to copy, then choose the Edit > Copy. To copy all settings on a specific tab, choose Edit > Copy Page Configuration. Select the profile to which you want to add the information, click the appropriate tab as necessary. If applicable, select the individual parameter. Choose Edit > Paste to paste to the information. The settings which copy appear in blue. |
Step 4 Configure the parameters in the ATM Configuration panel as follows:
Step 5 Configure the parameters in the ILMI Configuration panel as follows:
Attempting to save configuration parameters after setting the Auto-Configuration field to disable results in error if the Auto-Configuration field disabled setting was not saved first.
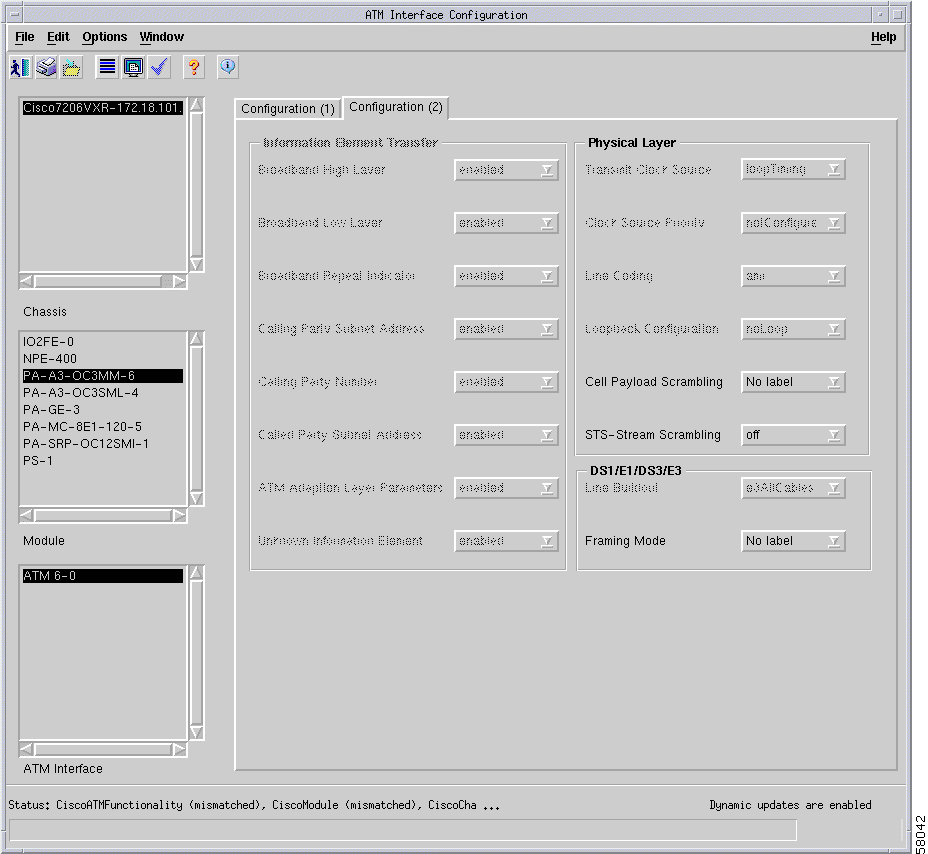
Step 6 Choose the Configuration (2) tab.
The ATM Interface Configuration window displays the Configuration (2) tab.
Step 7 The Information Element Transfer area allows you to enable or disable the following attributes. For all fields, Enabled allows for the element to be transferred to the called party; Disabled does not allow for the transfer to take place. Configure the parameters in the Information Element Transfer panel by selecting Enabled or Disabled from the following fields:
Step 8 Configure the parameters in the Physical Layer area as follows:
Step 9 Configure the parameters in the DS1/E1/DS3/E3 area as follows:
Step 10 Click the Save icon on the toolbar to save the parameter configuration.
Step 11 Choose File > Close to close the ATM Interface Configuration window.
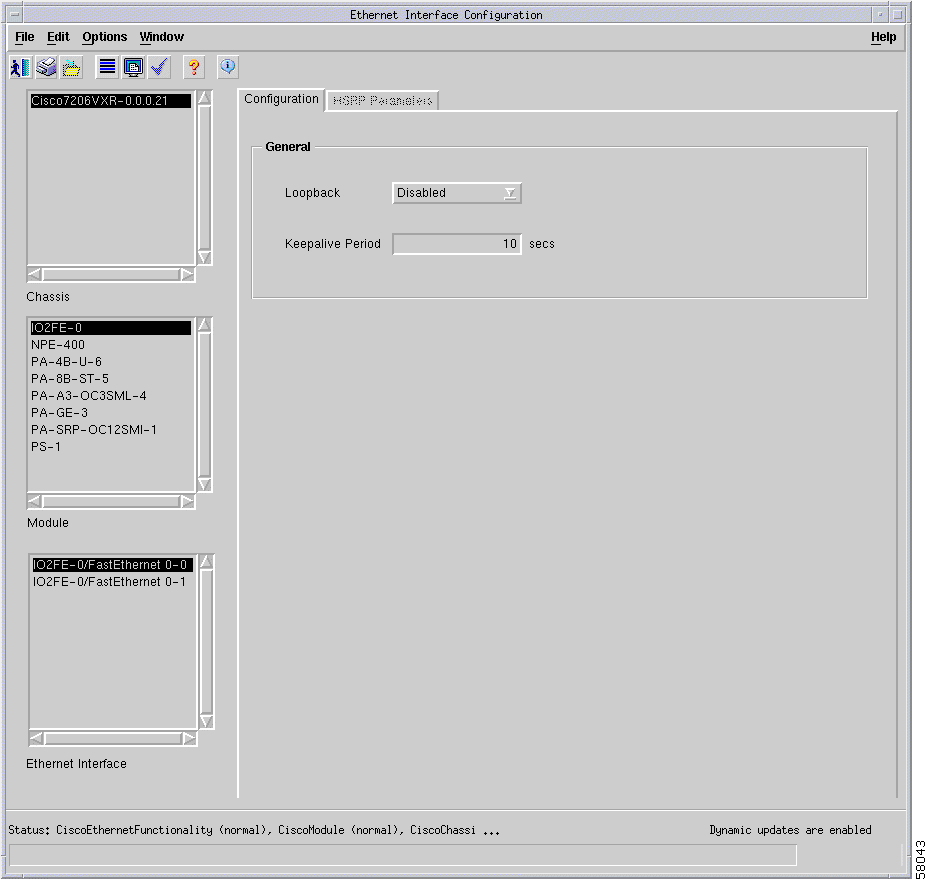
The Ethernet Interface Configuration window allows you to configure Ethernet fields, such as loopback and keepalive period.
In order to successfully configure an interface, the interface must be in a commissioned state. To commission an interface, see the "Commissioning an Interface" section.
To configure an Ethernet interface, proceed as follows:
The Ethernet Interface Configuration window appears displaying the Configuration tab.
Step 2 Select a chassis from the Chassis list box on the left-hand side of the window, select a module from the Module list box, then select an interface from the Ethernet Interface list box.
Configuration data for the selected interface appears on the Configuration and HSRP Parameters tabs. If configuration has not yet taken place from the EM, configuration data populates the attributes according to the information available on the device.
Step 3 Ensure that the interface is in a post-commissioning state by reviewing the interface status in the lower left-hand corner of the window.
If the interface is in the normal state or any other post-commissioned state, you may proceed. If the interface is in the decommissioned state, you must first commission the interface before continuing with the interface configuration. To commission an interface, see the "Interface Configuration" section.
|
TimeSaver In order to save time configuring interfaces, you can apply an existing profile to populate the configuration parameters. Choose Edit > Apply Profile, then choose the existing profile you wish to apply from the profiles listed. The configuration settings copy from the profile to the configuration of the interface. If you prefer to copy and paste individual parameters, or only a single tab of the configuration, you can copy and paste data between profiles as needed. Select the profile from which you want to copy data, then click the tab where the data you want to copy exists. To copy a specific setting, select the item you want to copy, then choose the Edit > Copy. To copy all settings on a specific tab, choose Edit > Copy Page Configuration. Select the profile to which you want to add the information, click the appropriate tab as necessary. If applicable, select the individual parameter. Choose Edit > Paste to paste to the information. The settings which copy appear in blue. |
Step 4 Configure the parameters in the General area as follows:
If the communication link to the Cisco router is lost, it cannot be switched on again from Cisco EMF. Access to the Cisco router is required before the link can be re-enabled.
Step 5 Click the Save icon on the toolbar to save the parameter configuration.
Step 6 Choose File > Close to close the Ethernet Interface Configuration window.
In order to successfully configure an interface, the interface must be in a commissioned state. To commission an interface, see the "Commissioning an Interface" section.
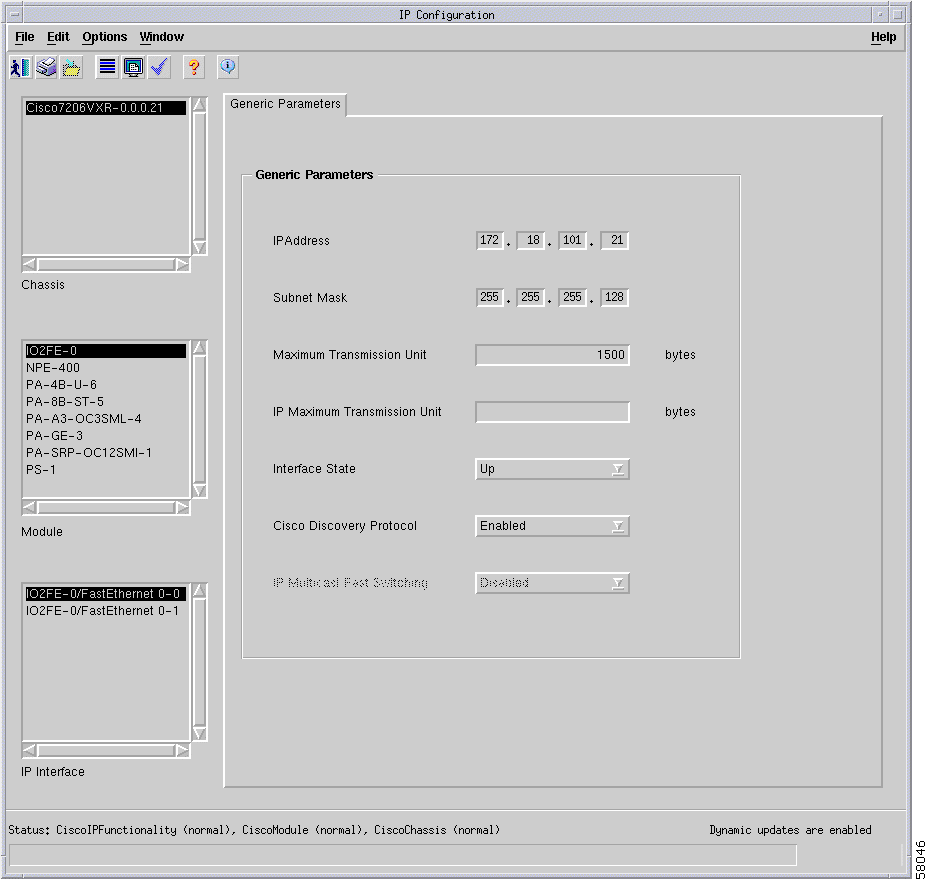
To configure an IP interface, proceed as follows:
The IP Configuration window appears.
Step 2 Select a chassis from the Chassis list box on the left-hand side of the window, select a module from the Module list box, then select an interface from the IP Interface list box.
Configuration data for the selected interface appears in the Generic Parameters panel. If configuration has not yet taken place from the EM, configuration data populates the attributes according to the information available on the device.
Step 3 Ensure that the interface is in a post-commissioning state by reviewing the interface status in the lower left-hand corner of the window.
If the interface is in the normal state or any other post-commissioned state, you may proceed. If the interface is in the decommissioned state, you must first commission the interface before continuing with the interface configuration. To commission an interface, see the "Interface Configuration" section.
|
TimeSaver In order to save time configuring interfaces, you can apply an existing profile to populate the configuration parameters. Choose Edit > Apply Profile, then choose the existing profile you wish to apply from the profiles which appear. The configuration settings are copied from the profile to the configuration of the interface. If you prefer to copy and paste individual parameters, or only a single tab of the configuration, you can copy and paste data between profiles as needed. Select the profile from which you want to copy data, then click the tab where the data you want to copy exists. To copy a specific setting, select the item you want to copy, then choose the Edit > Copy. To copy all settings on a specific tab, choose Edit > Copy Page Configuration. Select the profile to which you want to add the information, click the appropriate tab as necessary. If applicable, select the individual parameter. Choose Edit > Paste to paste to the information. The settings which copy appear in blue. |
Step 4 Configure the parameters in the Generic Parameters panel as follows:
Step 5 Click the Save icon on the toolbar to save the parameter configuration.
Step 6 Choose File > Close to close the IP Configuration window.
Cisco 7000 Series Manager enables you to configure logical voice interfaces such as voice ports (DS0, PRI, or TDM groups) and serial interfaces (channel groups). A group is a set of time slots bundled under a specific identifier (group number). T1 configurations support a maximum of 24 groups and E1 configurations support up to 31 groups.
In order to successfully configure an interface, the interface must be in a commissioned state. To commission an interface, see the "Commissioning an Interface" section.
To configure a voice interface, proceed as follows:
The DS1 Configuration window appears.
Step 2 Ensure that the interface is in a post-commissioning state by reviewing the interface status in the lower left-hand corner of the window.
If the interface is in the normal state or any other post-commissioned state, you may proceed. If the interface is in the decommissioned state, you must first commission the interface before continuing with the interface configuration. To commission an interface, see the "Interface Configuration" section.
|
TimeSaver In order to save time configuring interfaces, you can apply an existing profile to populate the configuration parameters. Choose Edit > Apply Profile, then choose the existing profile you wish to apply from the profiles which appear. The configuration settings are copied from the profile to the configuration of the interface. If you prefer to copy and paste individual parameters, or only a single tab of the configuration, you can copy and paste data between profiles as needed. Select the profile from which you want to copy data, then click the tab where the data you want to copy exists. To copy a specific setting, select the item you want to copy, then choose the Edit > Copy. To copy all settings on a specific tab, choose Edit > Copy Page Configuration. Select the profile to which you want to add the information, click the appropriate tab as necessary. If applicable, select the individual parameter. Choose Edit > Paste to paste to the information. The settings which copy appear in blue. |
Step 3 Refer to the following sections for more information on how to configure different types of voice interfaces:
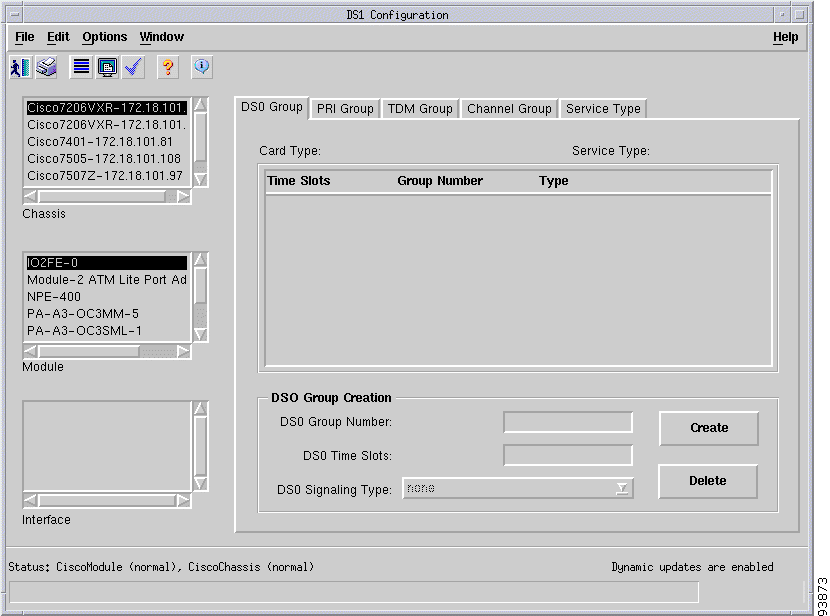
Digital service level 0 (DS0) represents a 64-kbps single-channel signal generated by a T1 terminal device such as a channel bank, multiplexer (MUX), or digital PBX. Cisco 7000 Series Manager enables you to create or delete DS0 groups. Before creating a DS0 group, you must configure the service type of the MCX controller. You can configure MCX controllers for voice or data transmissions. Possible configurations include common channel signaling (CCS) voice, channel associated signaling (CAS) voice, or data.
To configure DS0 groups, proceed as follows:
The Service Type tab displays (see Figure 5-24.)
The MCX controller service type is configured.
Step 2 Click the DS0 Group tab.
Step 3 Choose the desired interface by selecting the appropriate chassis, module, and interface from the corresponding list boxes on the left side of the window.
Configuration data for the selected interface appears. If configuration has not yet taken place from the EM, configuration data populates the attributes according to the information available on the device.
Step 4 To create a new DS0 group:
a. In the DS0 Group Number field, enter a unique numerical identifier for the new DS0 group you are creating.
|
Note T1 interfaces support up to 24 groups (valid entries are 0 to 23.) E1 interfaces support up to 31 groups (valid entries are 0 to 30.) |
b. In the DS0 Time Slots field, enter a unique time slot or range of time slots for the new DS0 group you are creating.
|
Note T1 interfaces support up to 24 time slots (valid entries are 1-24.) E1 interfaces support up to 31 time slots (valid entries are 1-31.) |
c. From the DS0 Signaling Type menu, select the desired signaling type for the DS0 group you are creating. Available options depend upon whether the selected interface is an T1 or E1 configuration. Refer to Table 5-2 and Table 5-3 for more details.
Table 5-2 DS0 Signaling Type Options for T1
| none | |
| e&m-delay-dial | |
| e&m-fgd | |
| e&m-immediate-start | |
| e&m-wink-start | |
| ext-sig | |
| fxo-ground-start | |
| fxo-loop-start | |
| fxs-ground-start | |
| fxs-loop-start | |
| fgd-eana |
Table 5-3 DS0 Signaling Type Options for E1
| Signaling Type | Description |
|---|---|
R2 ITU Supplement 7 Noncompelled Register Signaling with ANI |
|
R2 ITU Supplement 7 Semi-Compelled Register Signaling with ANI |
A new interface group is created and added to the displayed list in the upper portion of the window.
Step 5 To delete a DS0 group:
|
Note You cannot delete time slots within a group. You must delete the group and then recreate the group with the desired time slot. |
The selected interface group is deleted from the system and is removed from the displayed list in the upper portion of the window.
Step 6 Click the Save icon on the toolbar to save the parameter configuration.
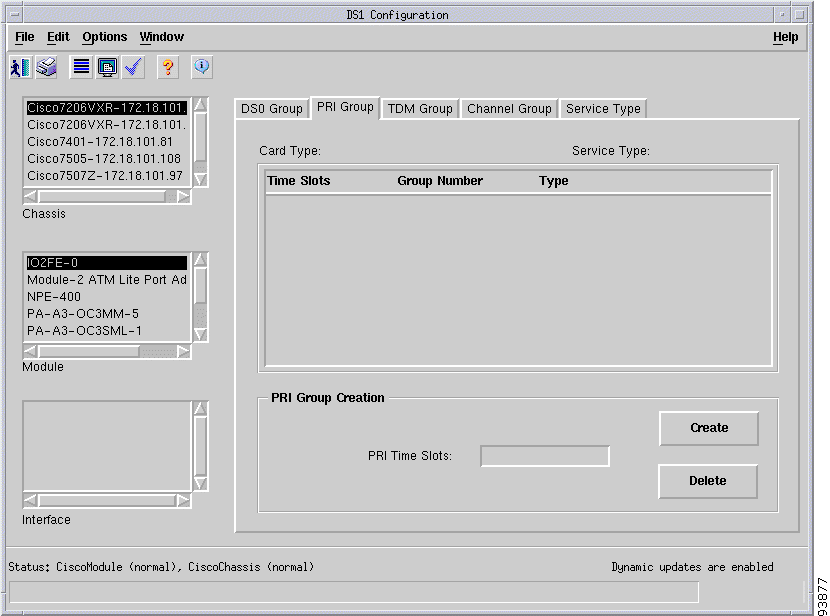
ISDN is an interface to the PRI. PRI provides access through a single 64-kbps D channel plus 23 (T1) or 30 (E1) B channels for voice or data. Cisco 7000 Series Manager allows you to create or delete PRI groups. You must configure the ISDN switch type before creating a PRI group.
To configure PRI groups, proceed as follows:
isdn switch-type <switch name>
Where <switch name> refers to:
Step 2 From the DS1 Configuration window, click the PRI Group tab.
The PRI Group tab displays (see Figure 5-25.)
Step 3 Choose the desired interface by selecting the appropriate chassis, module, and interface from the corresponding list boxes on the left side of the window.
Configuration data for the selected interface appears. If configuration has not yet taken place from the EM, configuration data populates the attributes according to the information available on the device.
Step 4 To create a new PRI group:
a. In the PRI Time Slots field, enter a unique time slot or range of time slots for the new PRI group you are creating.
|
Note T1 interfaces support up to 24 time slots (valid entries are 1-24.) E1 interfaces support up to 31 time slots (valid entries are 1-31.) |
A new PRI interface group is created and added to the displayed list in the upper portion of the window. The system assigns a unique number to the group and updates the ISDN signaling type accordingly.
Step 5 To delete a PRI group:
|
Note You cannot delete time slots within a group. You must delete the group and then recreate the group with the desired time slot. |
The selected interface group is deleted from the system and removed from the displayed list in the upper portion of the window.
Step 6 Click the Save icon on the toolbar to save the parameter configuration.
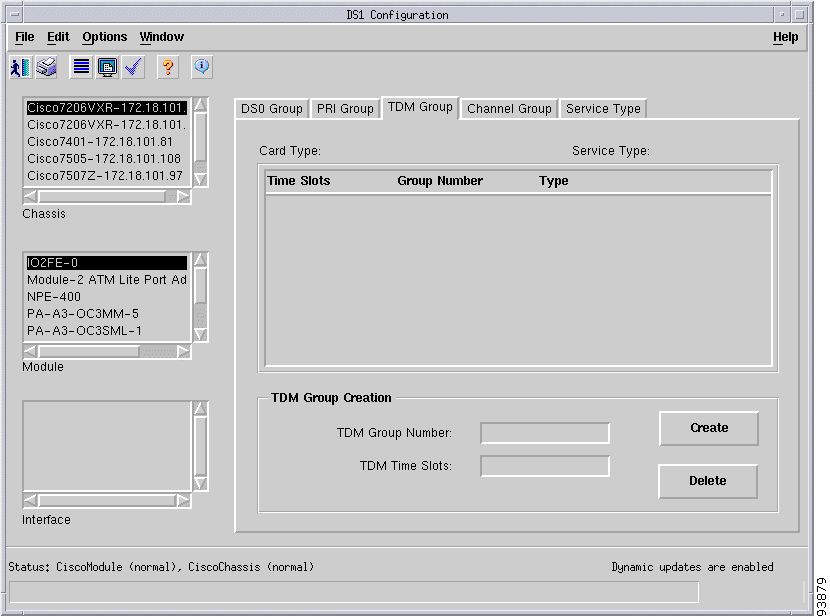
Time-division multiplexing (TDM) allows for information from multiple channels to be allocated as bandwidth on a single wire based on preassigned time slots, therefore enabling simultaneous support for voice, data, and video transmission over a single network link. Pieces of data from each signal are interwoven into a single link transmission and reconstructed at the destination point. TDM groups are made up of cross-connects referred to as clear channel groups or pass-throughs. Cisco 7000 Series Manager allows you to create and delete TDM groups.
The TDM Group tab displays (see Figure 5-26.)
Step 2 Choose the desired interface by selecting the appropriate chassis, module, and interface from the corresponding list boxes on the left side of the window.
Configuration data for the selected interface appears. If configuration has not yet taken place from the EM, configuration data populates the attributes according to the information available on the device.
Step 3 To create a new TDM group:
a. In the TDM Group Number field, enter a unique numerical identifier for the new TDM group you are creating.
|
Note T1 interfaces support up to 24 groups (valid entries are 0 to 23.) E1 interfaces support up to 31 groups (valid entries are 0 to 30.) |
b. In the TDM Time Slots field, enter a unique time slot or range of time slots for the new TDM group you are creating.
|
Note T1 interfaces support up to 24 time slots (valid entries are 1-24.) E1 interfaces support up to 31 time slots (valid entries are 1-31.) |
A new TDM interface group is created and added to the displayed list in the upper portion of the window.
Step 4 To delete a TDM group:
|
Note You cannot delete time slots within a group. You must delete the group and then recreate the group with the desired time slot. |
The selected interface group is deleted from the system and removed from the displayed list in the upper portion of the window.
Step 5 Click the Save icon on the toolbar to save the parameter configuration.
A channel is the smallest subdivision of a communication path on a digital, multiplexed signal for which information can be provided in one direction. Multiple channels can be multiplexed over a single cable in certain environments. Channel groups also referred to as serial interfaces. Cisco 7000 Series Manager enables you to create and delete channel groups.
The Channel Group tab displays (see Figure 5-27.)
Step 2 Choose the desired interface by selecting the appropriate chassis, module, and interface from the corresponding list boxes on the left side of the window.
Configuration data for the selected interface appears. If configuration has not yet taken place from the EM, configuration data populates the attributes according to the information available on the device.
Step 3 To create a new channel group:
a. In the Channel Group Number field, enter a unique numerical identifier for the new channel group you are creating.
|
Note T1 interfaces support up to 24 groups (valid entries are 0 to 23.) E1 interfaces support up to 31 groups (valid entries are 0 to 30.) |
b. In the Channel Time Slots field, enter a unique time slot or range of time slots for the new channel group you are creating.
|
Note T1 interfaces support up to 24 time slots (valid entries are 1-24.) E1 interfaces support up to 31 time slots (valid entries are 1-31.) |
A new interface group is created and added to the displayed list in the upper portion of the window.
Step 4 To delete a channel group:
|
Note You cannot delete time slots within a group. You must delete the entire group and then recreate the group with the desired time slot. |
The selected interface group is deleted from the system and removed from the list in the upper portion of the window.
Step 5 Click the Save icon on the toolbar to save the parameter configuration.
The Service Type tab displays (see Figure 5-28.)
Step 2 Choose the interface for which you want to configure the service type by selecting the appropriate chassis, module, and interface from the corresponding list boxes on the left side of the window.
Step 3 From the Service Type menu, select the desired service type configuration. Options are:
The selected service type is configured.
Step 5 Repeat steps 2 through 4 to configure the service types of other interfaces as necessary.
In order to successfully configure an interface, the interface must be in a commissioned state. To commission an interface, see the "Commissioning an Interface" section.
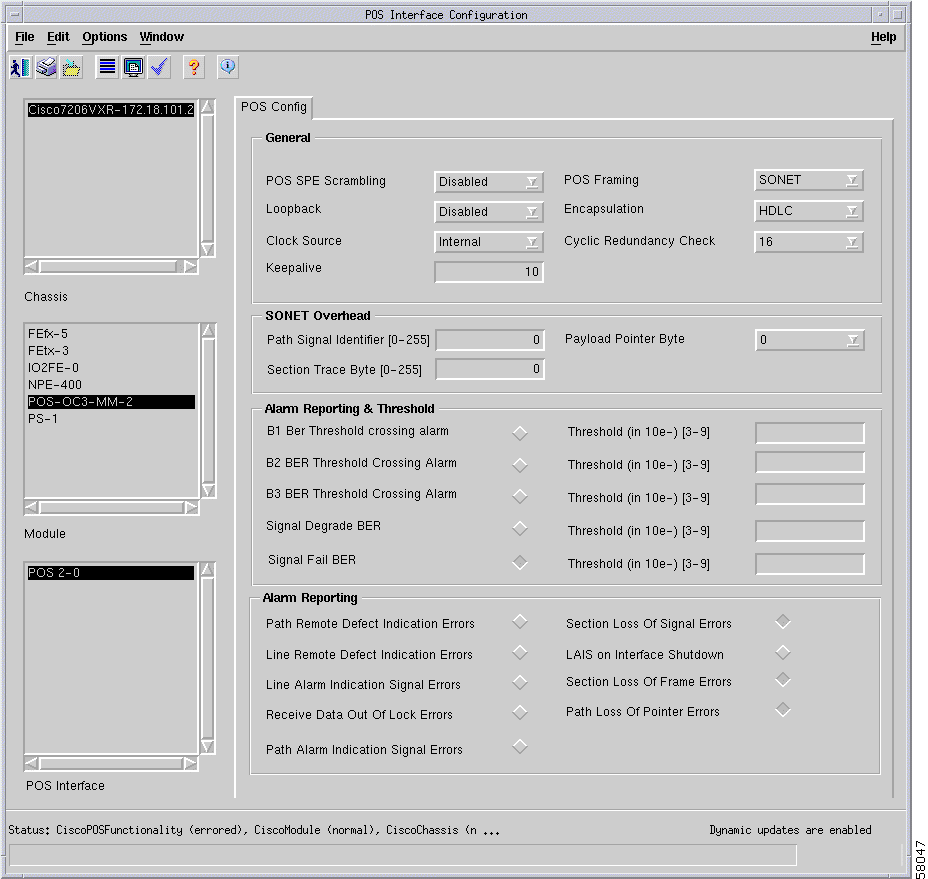
To configure an POS interface, proceed as follows:
The POS Interface Configuration window appears.
Step 2 Select a chassis from the Chassis list box on the left-hand side of the window, select a module from the Module list box, then select an interface from the POS Interface list box.
Configuration data for the selected interface appears in each panel in the window. If configuration has not yet taken place from the EM, configuration data populates the attributes according to the information available on the device.
Step 3 Ensure that the interface is in a post-commissioning state by reviewing the interface status in the lower left-hand corner of the window.
If the interface is in the normal state or any other post-commissioned state, you may proceed. If the interface is in the decommissioned state, you must first commission the interface before continuing with the interface configuration. To commission an interface, see the "Interface Configuration" section.
|
TimeSaver In order to save time configuring interfaces, you can apply an existing profile to populate the configuration parameters. Choose Edit > Apply Profile, then choose the existing profile you wish to apply from the profiles which appear. The configuration settings are copied from the profile to the configuration of the interface. If you prefer to copy and paste individual parameters, or only a single tab of the configuration, you can copy and paste data between profiles as needed. Select the profile from which you want to copy data, then click the tab where the data you want to copy exists. To copy a specific setting, select the item you want to copy, then choose the Edit > Copy. To copy all settings on a specific tab, choose Edit > Copy Page Configuration. Select the profile to which you want to add the information, click the appropriate tab as necessary. If applicable, select the individual parameter. Choose Edit > Paste to paste to the information. The settings which copy appear in blue. |
Step 4 Configure the parameters in the General area as follows:
Step 5 Configure the parameters in the SONET Overhead area as follows:
Step 6 Configure the parameters in the Alarm Reporting & Threshold area as follows:
Step 7 Configure the parameters in the Alarm Reporting area as follows:
Step 8 Click the Save icon on the toolbar to save the parameter configuration.
Step 9 Choose File > Close to close the POS Interface Configuration window.
ATM connections are objects that you can deploy beneath an ATM interface. The EM supports the following types of ATM connections:
A PVC is a permanent logical connection between two ATM interfaces on a network element. The PVC consists of two
VCLs allow for connections to pass (i.e., a cross-connection) between permanent virtual circuits (PVCs) which are logical connections between two ATM interfaces on a network element. PVCs save bandwidth associated with establishing a circuit when a virtual circuit must exist all the time. You can deploy a VCL, apply a QoS profile to the VCL, then create the connection on the device. Deploying and creating a VCL creates a cross-connection within one device.
It is important to mention that ATM connection objects only appear within the Component Managed view of the EM.
This section includes the following:
ATM connections exist within the EM and on the device. In order to manage ATM connections, you must create the connection within the EM, then create the connection on the device using the EM software.
Establishing ATM connections within the EM may occur by either uploading from the device or deploying through the EM templates. As part of manual deployment you may choose to apply an existing configuration profile, allowing for automatic configuration. You may also choose to automatically create the connection on the device following successful deployment. For instructions on uploading connection information from the device, see the "Uploading Existing ATM Connections and ATM QoS Profiles" section.
Should you opt not to automatically configure the connection during deployment, you may manually configure a connection by applying an existing ATM QoS profile or by setting configuration details on a per-connection basis. The "Managing ATM QoS Connection Profiles" section provides instructions for creating, editing, and deleting profiles which you can apply to connections in lieu of manually configuring. For further information on connection configuration, see the "Applying ATM QoS Profiles to Connections" section.
Likewise, if you did not select the option to automatically create the connection on the device as part of the deployment process, you may manually initiate the connection on the device and commission the connection within in the EM. Creating the connection on the device automatically commissions the connection within the EM and allows for object management by the EM.
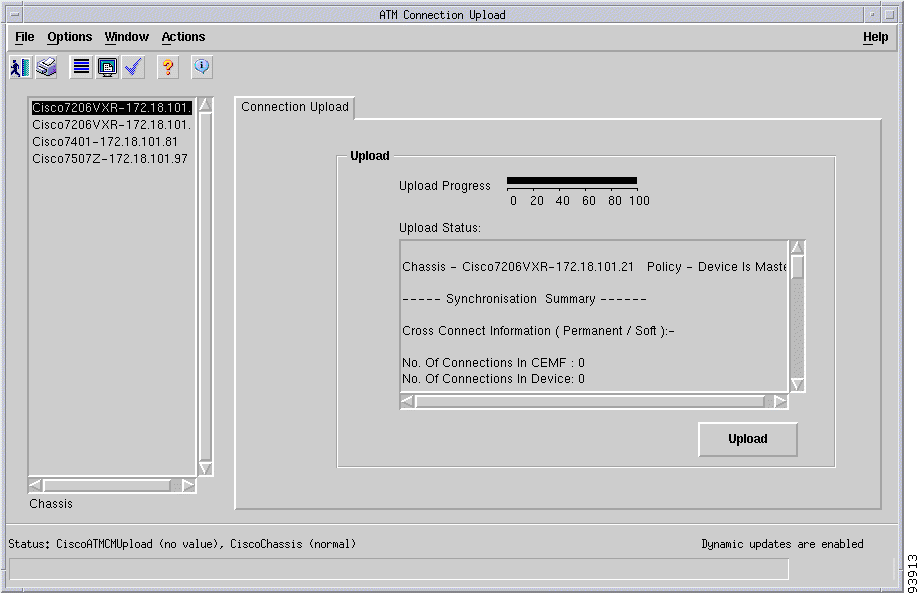
ATM connections and profiles previously configured on a Cisco device can upload into the EM application. Uploading saves time and effort re-configuring ATM connections and profiles that already exist on the device.
When you upload VCLs, any corresponding ATM QoS profiles also upload. VCLs discover and move into the normal state, so that management of these connections can begin automatically. Once these connections and/or profiles upload, you can view and adjust them within the EM.
To upload ATM connections and ATM QoS profiles, proceed as follows:
The ATM Connection Upload window appears.
Step 2 Select a chassis from the Chassis list box on the left-hand side of the window.
Upload progress and status data for the selected chassis appears in the Upload panel. If an upload is not currently underway, the results of the last upload display.
Before you can upload any connections or profiles, ensure telnet passwords configuration is correct in the EM. For further details, see the "Managing Username and Passwords" section.
Step 3 Click Upload.
A pop-up dialog appears asking you to confirm that you wish to proceed with the upload.
Step 4 Click Yes to upload.
All ATM connections and ATM QoS profiles currently configured on the selected device upload to the EM. Upload progress and status data display in the Upload panel and update as the upload progresses. ATM connection uploads and ATM QoS profiles automatically name according to the following:
For example, an uploaded ATM connection automatically named PVC_0-1-0_1.35_0-1-1_1.35 indicates that the connection is a PVC with a source endpoint of 0-1-0 (slot-subslot-port) and a destination endpoint of 0-1-1. The VPI/VCI values are 1 and 35 respectively.
Step 5 Choose File > Close to close the ATM Connection Upload window.
Modification of ATM connection uploads is possible using the information in the "Applying ATM QoS Profiles to Connections" section. Modifications to ATM profile uploads is possible using the information in the "Profile Management" section.
You can apply the ATM QoS profiles you created earlier to a managed PVC or SPVC.
In order to apply a profile to a connection, the connection must be in the decommissioned state. After applying the profile and ensuring the connection configuration, you may re-commission the connection.
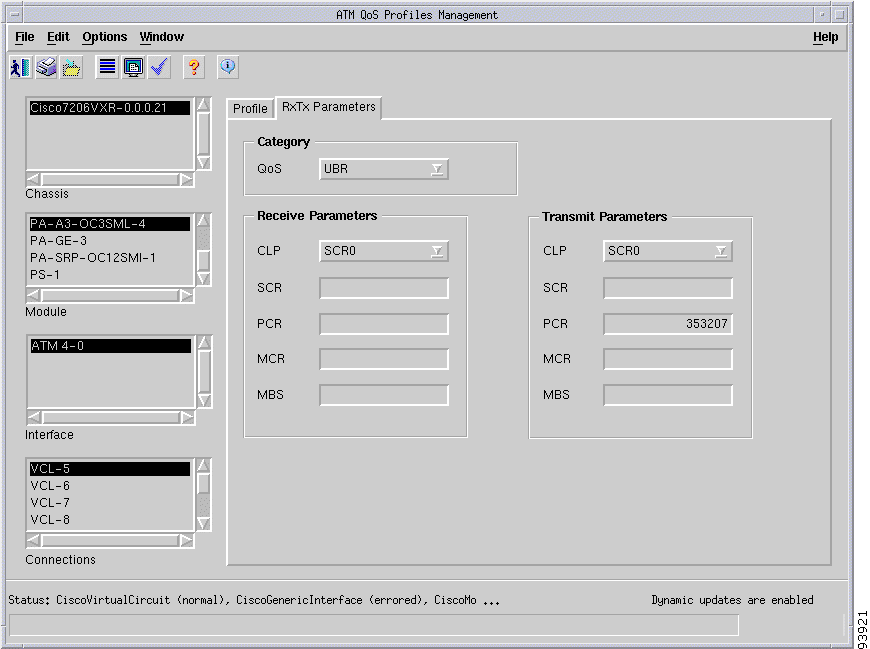
To apply an ATM QoS profile to a connection, proceed as follows:
The ATM QoS Profiles Management window appears displaying the Profile tab.
Step 2 Select a chassis from the Chassis list box on the left-hand side of the window, select a module from the Module list box, select an interface from the Interface list box, then select a connection (PVC or SPVC) from the Connections list box which you want to apply an ATM QoS profile.
If an ATM QoS profile is currently applied to the connection, its data displays.
Step 3 Ensure that the connection is in the decommissioned (disconnected) state by reviewing the connection status in the lower left-hand corner of the window.
If the connection is in the decommissioned state, you may proceed. If the connection is in the normal state or any other post-commissioned state, you must first decommission the connection before applying a profile.
Step 4 Choose Edit > Apply Profile, then choose the existing profile you wish to apply from the profiles listed.
The configuration settings copy from the profile to the connection. The profile attributes display in the Profile Parameters area as follows:
Step 5 Click the RxTx Parameters tab to view additional profile data.
The ATM QoS Profiles Management window appears displaying the RxTx Parameters tab.
The settings which copy appear in blue.
The Category area displays the QoS service category for the profile. Depending on the service category selection, the fields on the window activate/deactivate and display parameters accordingly. The following table lists the applicable (i.e., active) fields for each service category.
Table 5-4 QoS Service Category Parameters
| QoS Service Categories | Applicable Receive/Transmit Parameters |
|---|---|
It is possible to apply a service category that is not supported, for example ABR and UBR+. However, this will be detected when an attempt is made to create the connection on the device and the operator informed.
The fields in the Receive Parameters and Transmit Parameters area display as follows. Each of these areas contain the same fields, therefore only one description of each field follows:
Step 6 Click the Save icon on the toolbar to save your changes.
Step 7 Choose File > Close to close the ATM Connections Management window.
Following the application of the configuration profile to the decommissioned connection, you may connect (and commission) the connection.
When you create an ATM connection, Virtual Channel Link(s) (VCLs) create automatically. Upon creation of ATM connections with Cisco EMF end-points, two VCLs create where one VCL represents the source, or incoming, port and the other VCL represents the destination, or outgoing, port.
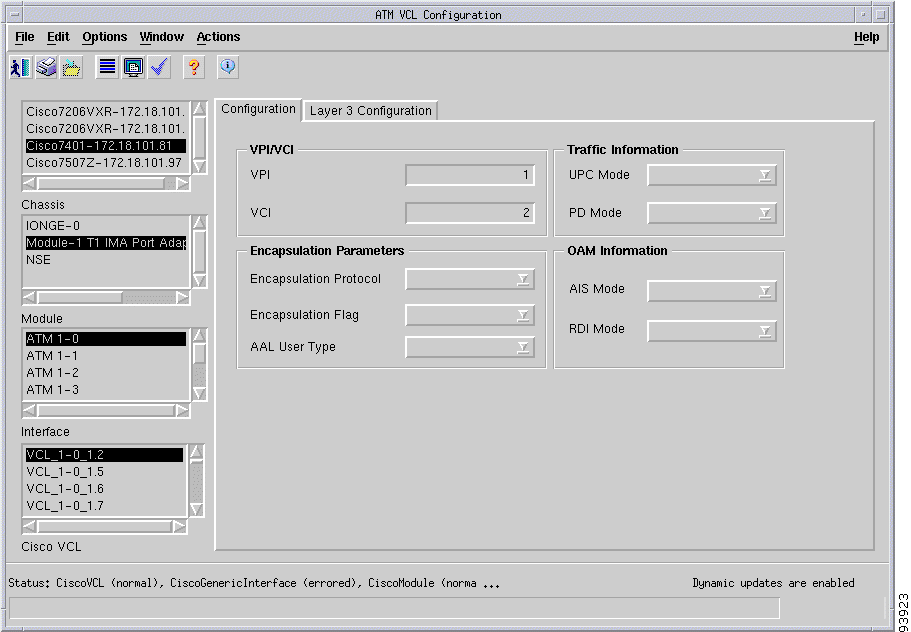
To configure an ATM VCL, proceed as follows:
The ATM VCL Configuration window appears, displaying the Configuration tab.
Step 2 Select a chassis from the Chassis list box on the left-hand side of the window, select a module from the Module list box, select an interface from the Interface list box, then select a VCL from the Cisco VCL list box which you want to configure.
The VPI/VCI area includes the following fields:
Depending on the state of the VCL, commissioned (normal) or decommissioned, the fields within the VPI/VCI area behave differently. If the VCL is in a managed state, the VPI and VCI fields are not modifiable (i.e., display only). If the VCL is in the decommissioned state (disconnected), the VPI and VCI fields allow for configuration, however; when recommissioned, the VPI and VCI values which display in the VPI/VCI area of the ATM VCL Configuration window are written from the values in the corresponding fields on the ATM Connections Management window.
Step 3 Configure the Traffic Information area as follows:
Step 4 Configure the Encapsulation Parameters area as follows:
Step 5 Configure the OAM Information area as follows:
In ATM, when the physical layer detects loss of signal or cell synchronization, RDI cells are used to report a VPC or VCC failure. RDI cells are sent upstream by a VPC or VCC endpoint to notify the VPC or VCC endpoint of the downstream failure.
Step 6 Click the Save icon on the toolbar to save the parameter configuration.
Step 7 Choose File > Close to close the ATM VCL Configuration window.
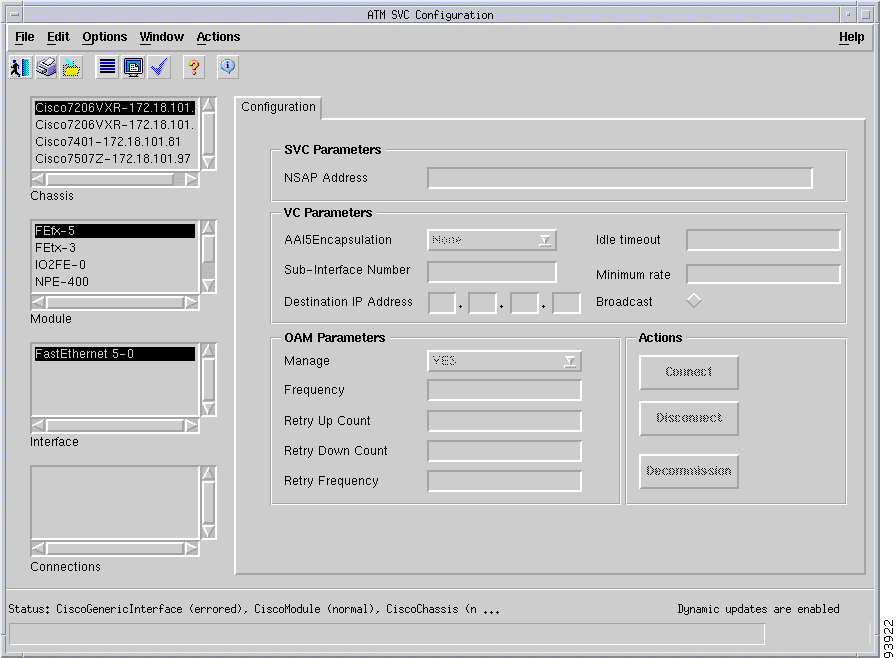
You can use the ATM SVC Configuration window to configure an SVC connection, connect (or disconnect) an SVC, and commission (or decommission) an SVC. Connecting an SVC creates the SVC on the device to establish it as a real working connection. The SVC is automatically commissioned when created. Decommissioning does not disconnect the SVC; it simply stops active management of the connection.
To configure an ATM SVC, proceed as follows:
The ATM SVC Configuration window appears, displaying the Configuration tab.
Step 2 Select a chassis from the Chassis list box on the left-hand side of the window, select a module from the Module list box, select an interface from the Interface list box, then select an SVC from the Connections list box which you want to configure.
Step 3 Configure the SVC Parameters area as follows:
Step 4 Configure the VC Parameters area as follows:
Step 5 Configure the OAM Parameters area as follows:
Step 6 Click Connect to connect the selected SVC, creating the connection on the device, making it a real and active connection. Commissioning of the connection is also initiated.
Step 7 Click Disconnect to disconnect the selected SVC, disconnecting the connection on the device, making it inactive. Commissioning activities are also stopped by selecting this option.
Step 8 Click Decommission to decommission the selected SVC, stopping performance polling and alarm reporting on the selected connection. The SVC is placed in the Decommissioned state.
Step 9 Click the Save icon on the toolbar to save the parameter configuration.
Step 10 Choose File > Close to close the ATM SVC Configuration window.
![]()
![]()
![]()
![]()
![]()
![]()
![]()
![]()
Posted: Thu Jun 26 16:14:36 PDT 2003
All contents are Copyright © 1992--2003 Cisco Systems, Inc. All rights reserved.
Important Notices and Privacy Statement.