This chapter explains how to create and administer Cisco ONS 15454 SDH VC high-order path circuits and VC low-order path tunnels. Table 6-1 lists the chapter topics. Table 6-2 lists circuit and tunnel procedures on the Cisco ONS 15454 SDH.
You can create VC high-order path circuits and VC low-order path tunnels across and within ONS 15454 SDH nodes and assign different attributes to circuits. For example, you can:
Create one-way, two-way, or broadcast circuits.
Assign user-defined names to circuits.
Assign different circuit sizes. The E3 and DS3I cards must use VC low-order path tunnels. E1 cards, optical cards, and Ethernet cards use VC high-order path circuits. Available sizes are VC4, VC4-2c, VC4-3c, VC4-4c, VC4-8c, VC4-16c, and VC4-64c for optical cards and some Ethernet cards depending on the card type. Of the Ethernet cards, only the G-1000 can use VC4-3c and VC4-8c.
Automatically or manually route VC high-order path circuits.
Automatically route VC low-order path tunnels.
Automatically create multiple circuits.
Provide full protection to the circuit path.
Provide only protected sources and destinations for circuits.
Define a secondary circuit source or destination that allows you to interoperate an ONS 15454 SDH subnetwork connection protection (SNCP) ring with third-party equipment SNCPs.
Create PCA circuits. You can provision circuits to carry traffic on MS-SPRing protection channels when conditions are fault-free. Traffic routed on MS-SPRing protection channels, called extra traffic, has lower priority than the traffic on the working channels and has no means for protection.
During ring or span switches, protection channel circuits are pre-empted and squelched. For example, in a 2-fiber STM-16 MS-SPRing, VC4s 9-16 can carry extra traffic when no ring switches are active, but protection channel circuits on these VC4s are pre-empted when a ring switch occurs. When the conditions that caused the ring switch are corrected and the ring switch removed, protection channel circuits are restored (assuming the MS-SPRing is provisioned as revertive).
If MS-SPRings are provisioned as non-revertive, protection channel circuits will not be restored following a ring or span switch until the MS-SPRing is manually switched.
Protection channel circuits will be routed on working channels when you upgrade an MS-SPRing, either from a a 2-fiber to a 4-fiber, or from one optical speed to a higher one. For example, if you upgrade a 2-fiber STM-16 MS-SPRing to an STM-64, VC4s 9-16 on the STM-16 MS-SPRing become working channels on the STM-64 MS-SPRing.
Note In this chapter, "cross-connect" and "circuit" have the following meanings:
Cross-connect refers to the connections that occur within a single ONS 15454
SDH to allow a circuit to enter and exit an ONS 15454 SDH. Circuit refers to
the series of connections from a traffic source (where traffic enters the ONS
15454 SDH network) to the drop or destination (where traffic exits an ONS
15454 SDH network).
You can create unidirectional or bidirectional, revertive or non-revertive, high-order path circuits. CTC can route circuits automatically or you can use CTC to manually route circuits.
You can provision circuits at any of the following points:
Before cards are installed. The ONS 15454 SDH allows you to provision slots and circuits before installing the traffic cards. (To provision an empty slot, right-click it and select a card from the shortcut menu.) However, circuits cannot carry traffic until you install the cards and place their ports in service. For card installation procedures, see the "Install Optical, Electrical, and Ethernet Cards" procedure. For ring-related procedures, see "SDH Topologies."
After cards are installed, but before their ports are in service (enabled). You must place the ports in service before circuits will carry traffic.
After cards are installed and their ports are in service. Circuits will carry traffic as soon as the signal is received.
Note Circuits assigned to a state other than OOS using an E1, E3, and DS3I card for the source and
destination ports can change to IS even though a signal is not present on the ports. Some cross
connects transition to IS, while others are OOS_AINS. A circuit state called partial may appear
during a manual transition for some abnormal reason, such as a CTC crash, communication error, or
one of the connections could not be changed.
Procedure: Create an Automatically Routed High-Order Path Circuit
Purpose
Use this procedure to create an automatically routed, high-order path circuit. The auto-range feature eliminates the need to individually build circuits of the same type; CTC can create additional sequential circuits if you specify the number of circuits you need and build the first circuit.
Prerequisite Procedures
If you want to route circuits on protected drops, create the card protection groups before creating circuits. See the "Create Protection Groups" procedure.
Onsite/Remote
Onsite or remote
Step 1 Log into a node on the network where you will create the circuit.
Note Circuits can be created from the network view, node view, or card view.
Step 2 From the View menu, select Go to Network View.
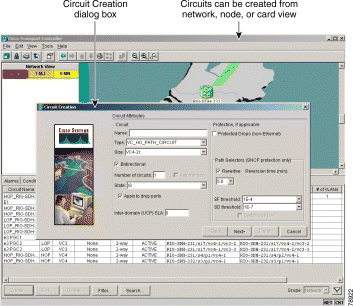
Step 3 Click the Circuits tab, then click Create (Figure 6-1).
Figure 6-1 Creating an automatically routed circuit (high-order path circuit)
Step 4 In the Circuit Creation dialog box, complete the following fields:
Name—Assign a name to the circuit. The name can be alphanumeric and up to 48 characters (including spaces). If you leave the Name field blank, CTC assigns a default name to the circuit.
Note If you will ever create a monitor circuit on this circuit, do not make the name longer than
44 characters because monitor circuits will add "_MON" (four characters) to the circuit
name.
Type—Select VC_HO_Path_Circuit (HOP). The circuit type determines the circuit-provisioning options that are displayed. The E3 and DS3I cards must use VC low-order path tunnels. See the "Creating VC Low-Order Path Tunnels for Port Grouping" section for more information.
Size—Select the circuit size (VC_HO_Path_Circuits only). VC high-order path circuits can be VC4, VC4-2c, VC4-3c, VC4-4c, VC4-8c, VC4-16c, or VC4-64c for optical cards and some Ethernet cards depending on the card type. Of the Ethernet cards, only the G-1000 can use VC4-3c and VC4-8c. The "c" indicates concatenated VC4s.
Bidirectional—Check this box to create a two-way circuit; uncheck it to create a one-way circuit.
Number of circuits—Type the number of circuits you want to create. The default is 1. If you enter more than one, you can use auto-ranging to create the additional circuits automatically.
Auto-ranged—This check box is automatically selected when you enter more than 1 in the Number of circuits field. Leave the box checked if you are creating multiple optical circuits with the same source and destination and you want CTC to create the circuits automatically. Uncheck the box if you do not want to create circuits automatically.
State—Choose one of the following service states to apply to the circuit:
OOS—The circuit is out of service. Traffic is not passed on the circuit until it is in service.
IS—The circuit is in service.
OOS-AINS—(default) The circuit is in service when it receives a valid signal; until then, the circuit is out of service.
OOS-MT—The circuit is in a maintenance state. The maintenance state does not interrupt traffic flow; it suppresses alarms and conditions and allows loopbacks to be performed on the circuit. Use OOS-MT for circuit testing or to suppress circuit alarms temporarily. Change the state to IS, OOS, or OOS-AINS when testing is complete.
Apply to drop ports—Check this box to apply the state chosen in the State field to the circuit source and destination ports. CTC applies the circuit state to the ports if the circuit is in full control of the port. If not, a Warning dialog box displays the ports where the circuit state could not be applied. If not checked, CTC will not change the state of the source and destination ports.
Note LOS alarms display if in service (IS) ports are not receiving signals.
Inter-domain (UCP) SLA—If the circuit will travel on a unified control plane (UCP) channel, enter the service level agreement number. Otherwise, leave the field set to zero.
Protected Drops—Select this box if you want the circuit routed to protected drops only, that is, to ONS 15454 SDH cards that are in 1:1, 1:N, or 1+1 protection. If you select this box, CTC only displays protected cards as source and destination choices.
Step 5 If the circuit will be routed on an SNCP, set the following SNCP path selector defaults as follows:
Revertive—Check this box if you want traffic to revert to the working path when the conditions that diverted it to the protect path are repaired. If Revertive is not chosen, traffic remains on the protect path after the switch.
Reversion time—If Revertive is checked, set the reversion time. This is the amount of time that will elapse before the traffic reverts to the working path. Traffic can revert when conditions causing the switch are cleared. (The default reversion time is 5 minutes.)
SF threshold—Choose from one E-3, one E-4, or one E-5.
SD threshold—Choose from one E-5, one E-6, one E-7, one E-8, or one E-9.
Switch on PDI-P—Check this box if you want traffic to switch when a VC4 payload defect indicator is received (VC4 circuits only).
Step 6 Click Next.
Step 7 In the Circuit Source dialog box, set the circuit source.
Options include node, slot, port, and VC4. The options displayed depend on the circuit type, the circuit properties selected in Step 4, and the cards installed in the node. Click Use Secondary Source if you need to create an SNCP bridge/selector circuit entry point in a multivendor SNCP.
Note E1 cards use VC4 circuits. All 12 of the E1 ports use VC4 bandwidth.
Step 9 In the Circuit Destination dialog box, enter the appropriate information for the circuit destination. If the circuit is bidirectional, click Use Secondary Destination if you need to create an SNCP bridge/selector circuit destination point in a multivendor SNCP. (To add secondary destinations to unidirectional circuits, see the "Create a Unidirectional Circuit with Multiple Drops" procedure.)
Step 10 Click Next.
Step 11 Under Circuit Routing Preferences (Figure 6-2), choose Route Automatically. The following options are available:
Using Required Nodes/Spans—Select this check box to specify nodes and spans to include or exclude in the CTC-generated circuit route.
Review Route Before Creation—Select this check box to review and edit the circuit route before the circuit is created.
Figure 6-2 Setting circuit routing preferences
Step 12 Set the circuit path protection as follows:
To route the circuit on a protected path, leave Fully Protected Path checked (default) and go to Step 13. CTC creates a fully protected circuit route based on the path diversity option you choose. Fully protected paths might or might not have SNCP path segments with primary and alternate paths. The path diversity options only apply to SNCP path segments, if any exist.
To create an unprotected circuit, uncheck Fully Protected Path and go to Step 14.
To route the circuit on an MS-SPRing protection channel, uncheck Fully Protected Path, check Protection Channel Access, click OK on the Warning dialog box, then go to Step 14.
Caution Circuits routed on PCA are not protected and are preempted during MS-SPRing and span switches.
Step 13 If you selected Fully Protected Path, choose one of the following:
Nodal Diversity Required—Ensures that the primary and alternate paths within the extended SNCP mesh network portions of the complete circuit path are nodally diverse. (For information about extended SNCP, see the "Extended SNCP Mesh Networks" section.)
Nodal Diversity Desired—Specifies that node diversity is preferred, but if node diversity is not possible, CTC creates link-diverse paths for the extended SNCP mesh network portion of the complete circuit path.
Link Diversity Only—Specifies that only link-diverse primary and alternate paths for extended SNCP mesh network portions of the complete circuit path are needed. The paths might be node-diverse, but CTC does not check for node diversity.
Step 14 If you selected Using Required Nodes/Spans in Step 11, complete the following substeps. If you did not select this check box, proceed to Step 15.
a. Click Next to display the Circuit Route Constraints screen (Figure 6-3).
b. On the circuit map, click a node or span. (Span is also called link in CTC.)
c. Click Includeto include the node or span in the circuit. Click Exclude to exclude the node or span from the circuit. The order in which you select included nodes and spans sets the circuit sequence. Click spans twice to change the circuit direction.
d. Repeat Step c for each node or span you want to include or exclude.
e. Review the circuit route. After you add the spans and nodes, you can use the Up and Down buttons to change the circuit routing order.
f. Click Remove to remove a node or span.
g. If you selected Review Route Before Creation in Step 11, click Next and followStep 15. When you are finished, click Finish and go to Step 16.
Figure 6-3 Specifying circuit constraints
Step 15 If you selected Review Route Before Creation in Step 11, click Next to display the route. If you did not select this check box proceed to Step 16. The following options are available:
To add or delete a circuit span, select a node on the circuit route.
Blue arrows show the circuit route.
Green arrows indicate spans that you can add.
Click a span arrowhead, then click Include to include the span or Remove to remove the span.
Step 16 After you click Finish, CTC creates the circuit and returns to the Circuits window. If you entered more than one in the Number of Circuits field in Step 4, the Circuit Source dialog box is displayed so you can create the remaining circuits. If Auto-Ranged is checked, CTC automatically creates the number of sequential circuits that you entered in Number of Circuits. Otherwise, proceed to Step 17.
Procedure: Create a Manually Routed High-Order Path Circuit
Purpose
Use this procedure to create a manually routed high-order path circuit.
Prerequisite Procedures
If you want to route circuits on protected drops, create the card protection groups before creating circuits. See the "Create Protection Groups" procedure.
Onsite/Remote
Onsite or remote
Step 1 Log into a node on the network where you will create the circuit.
Note Circuits can be created from the network view, node view, or card view.
Step 2 From the View menu, select Go to Network View.
Step 3 Click the Circuits tab, then click Create.
Step 4 In the Circuit Creation dialog box (Figure 6-4), complete the following fields:
Name—Assign a name to the circuit. The name can be alphanumeric and up to 48 characters (including spaces). If you leave the Name field blank, CTC assigns a default name to the circuit.
Note If you will ever create a monitor circuit on this circuit, do not make the name longer than
44 characters because monitor circuits will add "_MON" (four characters) to the circuit
name.
Type—Select VC_HO_Path_Circuit (HOP). The circuit type determines the circuit-provisioning options that are displayed. The E1, E3, and DS3I cards must use VC low-order path tunnels. See the "Creating VC Low-Order Path Tunnels for Port Grouping" section.
Size—Select the circuit size (VC_HO_Path_Circuits only). VC high-order path circuits can be VC4, VC4-2c, VC4-3c, VC4-4c, VC4-8c, VC4-16c, or VC4-64c for optical cards and some Ethernet cards depending on the card type. Of the Ethernet cards, only the G-1000 can use VC4-3c and VC4-8c. The "c" indicates concatenated VC4s.
Bidirectional—For this procedure, leave the Bidirectional check box checked (default).
Number of circuits—Type the number of circuits you want to create. CTC returns to the Circuit Source page after you create each circuit until you finish creating the number of circuits specified here.
Auto-ranged—Deselect the box if you do not want to create multiple circuits automatically. This check box is automatically selected when you enter more than 1 in the Number of circuits field. Leave the box selected if you are creating multiple optical circuits with the same source and destination and you want CTC to create the circuits automatically.
State—Choose one of the following service states to apply to the circuit:
OOS—The circuit is out of service. Traffic is not passed on the circuit until it is in service.
IS—The circuit is in service.
OOS-AINS—(default) The circuit is in service when it receives a valid signal; until then, the circuit is out of service.
OOS-MT—The circuit is in a maintenance state. The maintenance state does not interrupt traffic flow; it suppresses alarms and conditions and allows loopbacks to be performed on the circuit. Use OOS-MT for circuit testing or to suppress circuit alarms temporarily. Change the state to IS, OOS, or OOS-AINS when testing is complete.
Apply to drop ports—Check this box to apply the state chosen in the State field to the circuit source and destination ports. CTC applies the circuit state to the ports if the circuit is in full control of the port. If not, a Warning dialog box displays the ports where the circuit state could not be applied. If not checked, CTC will not change the state of the source and destination ports.
Note LOS alarms display if in service (IS) ports are not receiving signals.
Inter-domain (UCP) SLA—If the circuit will travel on a UCP channel, enter the service level agreement number. Otherwise, leave the field set to zero.
Protected Drops—Check this box if you want the circuit routed to protected drops only, that is, to ONS 15454 SDH cards that are in 1:1, 1:N, or 1+1 protection. If you check this box, CTC only displays protected cards as source and destination choices.
Figure 6-4 Creating a manually routed circuit
Step 5 If the circuit will be routed on an SNCP, set the following SNCP path selector defaults as follows:
Revertive—Check this box if you want traffic to revert to the working path when the conditions that diverted traffic to the protect path are repaired. If Revertive is not chosen, traffic remains on the protect path after the switch.
Reversion time—If Revertive is checked, set the reversion time. This is the amount of time that will elapse before the traffic reverts to the working path. Traffic can revert when conditions causing the switch are cleared. (The default reversion time is 5 minutes.)
SF threshold—Choose from one E-3, one E-4, or one E-5.
SD threshold—Choose from one E-5, one E-6, one E-7, one E-8, or one E-9.
(VC4 circuits only) Switch on PDI-P—Check this box if you want traffic to switch when a VC4 payload defect indicator is received.
Step 6 Click Next.
Step 7 In the Circuit Source dialog box, set the circuit source.
Options include node, slot, port, and VC4. The options displayed depend on the circuit type, the circuit properties selected in Step 4, and the cards installed in the node.
Note E1 cards use VC4 circuits. All 12 of the E1 ports use VC4 bandwidth.
Step 8 Click Use Secondary Source if you need to create an SNCP bridge/selector circuit entry point in a multivendor SNCP.
Step 9 Click Next.
Step 10 In the Circuit Destination dialog box, enter the appropriate information for the circuit destination. If the circuit is bidirectional, click Use Secondary Destination if you need to create an SNCP bridge/selector circuit destination point in a multivendor SNCP.
Step 13 Set the circuit path protection as follows:
To route the circuit on a protected path, leave Fully Protected Path checked (default) and go to Step 14. CTC creates a fully protected circuit route based on the path diversity option you choose. Fully protected paths might or might not have SNCP path segments with primary and alternate paths. The path diversity options only apply to SNCP path segments, if any exist.
To create an unprotected circuit, uncheck Fully Protected Path and go to Step 15.
To route the circuit on an MS-SPRing protection channel, uncheck Fully Protected Path, check Protection Channel Access, click OK on the Warning dialog box, then go to Step 15.
Caution Circuits routed on PCA are not protected and are preempted during MS-SPRing and span switches.
Step 14 If you selected Fully Protected Path in Step 13, choose one of the following. If you did not select Fully Protected Path, go to Step 15.
Nodal Diversity Required—Ensures that the primary and alternate paths within the extended SNCP mesh network portions of the complete circuit path are nodally diverse. (For information about extended SNCP, see the "Extended SNCP Mesh Networks" section.)
Nodal Diversity Desired—Specifies that node diversity is preferred, but if node diversity is not possible, CTC creates link-diverse paths for the extended SNCP mesh network portion of the complete circuit path.
Link Diversity Only—Specifies that only link-diverse primary and alternate paths for extended SNCP mesh network portions of the complete circuit path are needed. The paths might be node-diverse, but CTC does not check for node diversity.
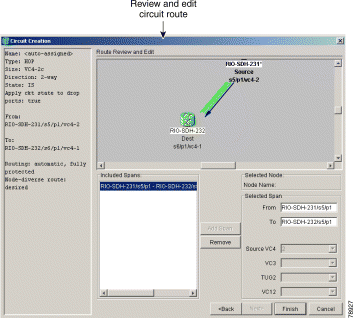
Step 15 Click Next. The Route Review and Edit screen is displayed for you to manually route the circuit. The green arrows pointing from the source node to other network nodes indicate spans that are available for routing the circuit.
Step 16 Set the circuit route.
a. Click the arrowhead of the span you want the circuit to travel.
b. If you want to change the source VC4, change it in the Source VC4 fields.
c. Click Add Span.
The span is added to the Included Spans list and the span arrow turns blue.
Step 17 Repeat Step 16 until the circuit is provisioned from the source to the destination node.
When provisioning a protected circuit, you need to select only one path of MS-SPRing or 1+1 spans from the source to the drop. In SNCP, you must select both paths around the ring for the circuit to be protected.
Step 18 When the circuit is provisioned, click Finish.
If you entered more than one in the Number of Circuits field in the Circuit Attributes dialog box in Step 4, the Circuit Source dialog box is displayed so you can create the remaining circuits.
VC low-order path tunnels (VC_LO_PATH_TUNNEL) are automatically set to bidirectional with port grouping enabled. Three ports form a port group. For example, in one E3 or one DS3I card, there are four port groups: Ports 1 to 3 = PG1, Ports 4 to 6 = PG2, Ports 7 to 9 = PG3, and Ports 10 to 12 = PG4.
Note CTC shows VC3-level port groups, but the XC10G creates only VC4-level port groups. VC4 tunnels
must be used to transport VC3 signal rates.
Tunnels are routed automatically. The following rules apply to port-grouped circuits:
A port group goes through a VC_LO_PATH_TUNNEL circuit, with a set size of VC4.
The circuit must be bidirectional and cannot use multiple drops.
The circuit number must be set to one.
The Auto-ranged field must be set to Yes.
The Use secondary destination field must be set to No.
The Route Automatically field must be set to Yes.
Monitor circuits cannot be created on a VC3 circuit in a port group.
Circuits assigned to a state other than OOS using an E1, E3, and DS3I card for the source and destination ports can change to IS even though a signal is not present on the ports. Some cross connects transition to IS, while others are OOS_AINS. A circuit state called partial may appear during a manual transition for some abnormal reason, such as a CTC crash, communication error, or one of the connections could not be changed.
You can provision circuits at any of the following points:
Before cards are installed. The ONS 15454 SDH allows you to provision slots and circuits before installing the traffic cards. (To provision an empty slot, right-click it and select a card from the shortcut menu.) For card installation procedures, see the "Install Optical, Electrical, and Ethernet Cards" procedure. For ring-related procedures, see "SDH Topologies."
After cards are installed, but before ports are in service (enabled). You must place the ports in service before circuits will carry traffic.
After cards are installed and their ports are in service. Circuits will carry traffic when the signal is received.
Procedure: Create a Low-Order Path Tunnel for Port Grouping
Purpose
Use this procedure to create an automatically routed, low-order path tunnel for port grouping.
Prerequisite Procedures
If you want to route circuits on protected drops, create the card protection groups before creating circuits. See the "Create Protection Groups" procedure.
Onsite/Remote
Onsite or remote
Step 1 Log into a node on the network where you will create the circuit.
Note Circuits can be created from the network view, node view, or card view.
Step 2 From the View menu, select Go to Network View.
Step 3 Click the Circuits tab, then click Create.
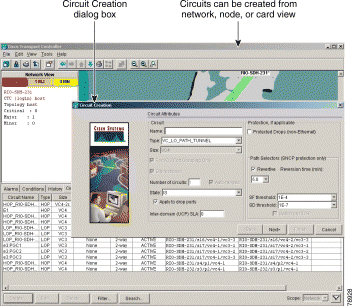
Step 4 In the Circuit Creation dialog box (Figure 6-5), complete the following fields:
Name—(optional) Assign a name to the circuit. The name can be alphanumeric and up to 48 characters (including spaces). If you leave the Name field blank, CTC assigns a default name to the circuit.
Note If you will ever create a monitor circuit on this circuit, do not make the name longer than
44 characters because monitor circuits will add "_MON" (four characters) to the circuit
name.
Type—Select VC_LO_Path_Tunnel. The circuit type determines the circuit-provisioning options that are displayed. The E3 and DS3I cards must use VC low-order path tunnels.
Size—This field is automatically set to VC4.
For VC3 Port Grouping Only—The check box is automatically selected.
Bidirectional—The check box is automatically selected. (VC low-order path tunnels are bidirectional.)
Number of circuits—This field automatically lists one port group.
Three ports form one port group. For example, in one E3 or one DS3I card, there are four port groups: Ports 1 to 3 = PG1, Ports 4 to 6 = PG2, Ports 7 to 9 = PG3, and Ports 10 to 12 = PG4. Low-order path tunneling is performed at the VC3 level.
Auto-ranged—The check box is automatically selected.
If you select the source and destination of one circuit, CTC automatically determines the source and destination for the remaining circuits in the Number of circuits field and creates them. To determine the source and destination, CTC increments the most specific part of the end point. An end point can be a port or a VC4. If CTC cannot find a valid destination, or selects an end point that is already in use, CTC stops and allows you to either select a valid end point or cancel. If you select a valid end point and continue, auto-ranging begins after you click Finish for the current circuit.
State—Choose one of the following service states to apply to the circuit:
OOS—The circuit is out of service. Traffic is not passed on the circuit until it is in service.
IS—The circuit is in service.
OOS-AINS—(default) The circuit is in service when it receives a valid signal; until then, the circuit is out of service.
OOS-MT—The circuit is in a maintenance state. The maintenance state does not interrupt traffic flow; it suppresses alarms and conditions and allows loopbacks to be performed on the circuit. Use OOS-MT for circuit testing or to suppress circuit alarms temporarily. Change the state to IS, OOS, or OOS-AINS when testing is complete.
Apply to drop ports—Check this box to apply the state chosen in the State field to the circuit source and destination ports. CTC applies the circuit state to the ports if the circuit is in full control of the port. If not, a Warning dialog box displays the ports where the circuit state could not be applied. If not checked, CTC will not change the state of the source and destination ports.
Note LOS alarms display if in service (IS) ports are not receiving signals.
Inter-domain (UCP) SLA—If the circuit will travel on a UCP channel, enter the service level agreement number. Otherwise, leave the field set to zero.
Protected Drops—Select this box if you want the circuit routed to protected drops only, that is, to ONS 15454 SDH cards that are in 1:1, 1:N, or 1+1 protection. If you select this box, CTC only displays protected cards as source and destination choices.
Figure 6-5 Creating an automatically routed circuit (low-order path tunnel)
Step 5 If the circuit will be routed on an SNCP, set the SNCP path selector defaults as follows:
Revertive—Check this box if you want traffic to revert to the working path when the conditions that diverted the traffic to the protect path are repaired. If Revertive is not chosen, traffic remains on the protect path after the switch.
Reversion time—If Revertive is checked, set the reversion time. This is the amount of time that will elapse before the traffic reverts to the working path. Traffic can revert when conditions causing the switch are cleared. (The default reversion time is 5 minutes.)
SF threshold—Choose from one E-3, one E-4, or one E-5.
SD threshold—Choose from one E-5, one E-6, one E-7, one E-8, or one E-9.
Switch on PDI-P—The check box is automatically deselected.
Step 6 Click Next.
Step 7 In the Circuit Source dialog box, set the circuit source.
Step 9 In the Circuit Destination dialog box, enter the appropriate information for the circuit destination.
Options include node, slot, and VC4. The options displayed depend on the circuit type, the circuit properties selected in Step 4, and the cards installed in the node.
Step 10 Click Next. Under Circuit Routing Preferences, Route Automatically is selected.
Step 11 Set the circuit path protection as follows:
To route the circuit on a protected path, leave Fully Protected Path checked (default) and go to Step 12. CTC creates a fully protected circuit route based on the path diversity option you choose. Fully protected paths might or might not have SNCP path segments with primary and alternate paths. The path diversity options only apply to SNCP path segments, if any exist.
To create an unprotected circuit, uncheck Fully Protected Path and go to Step 13.
To route the circuit on an MS-SPRing protection channel, uncheck Fully Protected Path, check Protection Channel Access, click OK on the Warning dialog box, then go to Step 13.
Caution Circuits routed on PCA are not protected and are preempted during MS-SPRing and span switches.
Step 12 If you selected Fully Protected Path, choose one of the following. If you did not select Fully Protected Path, go to Step 13.
Nodal Diversity Required—Ensures that the primary and alternate paths within the extended SNCP mesh network portions of the complete circuit path are nodally diverse. (For information about extended SNCP, see the "Extended SNCP Mesh Networks" section.)
Nodal Diversity Desired—Specifies that node diversity is preferred, but if node diversity is not possible, CTC creates link-diverse paths for the extended SNCP mesh network portion of the complete circuit path.
Link Diversity Only—Specifies that only link-diverse primary and alternate paths for extended SNCP mesh network portions of the complete circuit path are needed. The paths might be node-diverse, but CTC does not check for node diversity.
Step 13 Click Finish. CTC creates the circuit and returns to the Circuits window.
6.4 Creating Multiple Drops for Unidirectional Circuits
Unidirectional circuits can have multiple drops for use in broadcast circuit schemes. In broadcast scenarios, one source transmits traffic to multiple destinations, but traffic is not returned back to the source.
When you create a unidirectional circuit, the card that does not have its backplane receive (Rx) input terminated with a valid input signal generates a loss of service (LOS) alarm. To mask the alarm, create an alarm profile suppressing the LOS alarm and apply it to the port that does not have its Rx input terminated. See the "Using Alarm Profiles" section for information.
Procedure: Create a Unidirectional Circuit with Multiple Drops
Purpose
Use this procedure to create a unidirectional circuit with multiple drops.
Step 2 After the unidirectional circuit is created, in network, node or card view select the Circuits tab.
Step 3 Select the unidirectional circuit and click Edit (or double-click the circuit).
Step 4 In the Drops tab of the Edit Circuits dialog box, click Create or, if Show Detailed Map is selected, right-click a node on the circuit map and select Add Drop.
Step 5 In the Define New Drop dialog box, complete the appropriate fields to define the new circuit drop: Node, Slot, Port, and VC4.
Step 6 Under Target Circuit State, choose one of the following service states to apply to the circuit:
OOS—The circuit is out of service. Traffic is not passed on the circuit until it is in service.
IS—The circuit is in service.
OOS-AINS—The circuit is in service when it receives a valid signal; until then, the circuit is out of service.
OOS-MT—The circuit is in a maintenance state. The maintenance state does not interrupt traffic flow; it suppresses alarms and conditions and allows loopbacks to be performed on the circuit. Use OOS-MT for circuit testing or to suppress circuit alarms temporarily. Change the state to IS, OOS, or OOS-AINS when testing is complete.
No change—(default) The circuit remains in the current state.
Step 7 Set the circuit path protection as follows:
To route the circuit on a protected path, leave Fully Protected Path checked (default) and go to Step 8. CTC creates a fully protected circuit route based on the path diversity option you choose. Fully protected paths might or might not have SNCP path segments with primary and alternate paths. The path diversity options only apply to SNCP path segments, if any exist.
To create an unprotected circuit, uncheck Fully Protected Path and go to Step 9.
To route the circuit on an MS-SPRing protection channel, uncheck Fully Protected Path, check Protection Channel Access, click OK on the Warning dialog box, then go to Step 9.
Caution Circuits routed on PCA are not protected and are preempted during MS-SPRing and span switches.
Step 8 If you selected Fully Protected Path, choose one of the following. If you did not select Fully Protected Path, go to Step 9.
Nodal Diversity Required—Ensures that the primary and alternate paths within the extended SNCP mesh network portions of the complete circuit path are nodally diverse. (For information about extended SNCP, see the "Extended SNCP Mesh Networks" section.)
Nodal Diversity Desired—Specifies that node diversity is preferred, but if node diversity is not possible, CTC creates link-diverse paths for the extended SNCP mesh network portion of the complete circuit path.
Link Diversity Only—Specifies that only link-diverse primary and alternate paths for extended SNCP mesh network portions of the complete circuit path are needed. The paths might be node-diverse, but CTC does not check for node diversity.
Step 9 Click OK.
Step 10 If you need to create additional drops, repeat Steps 4 to 9. If not, click Close. The Close button is represented as an icon in the upper right hand corner of the screen.
Step 11 Verify that the new drops appear on the Edit Circuit map as follows:
If Show Detailed Map is selected, a D enclosed by circles appears on each side of the node graphic.
If Show Detailed Map is not selected, the text "Drop #1, Drop #2" appears under the node graphic.
6.5 Creating Monitor Circuits
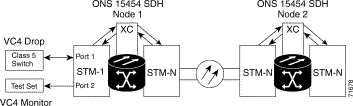
You can set up secondary circuits to monitor traffic on primary bidirectional circuits. Monitor circuits can be created on E1 or STM-N cards. Figure 6-6 shows an example of a monitor circuit. At Node 1, a VC4 is dropped from Port 1 of an STM-1 card. To monitor the VC4 traffic, test equipment is plugged into Port 2 of the STM-1 card and a monitor circuit to Port 2 is provisioned in CTC. Circuit monitors are one-way. The monitor circuit in Figure 6-6 is used to monitor VC4 traffic received by Port 1 of the STM-1 card.
Note Monitor circuits cannot be used with EtherSwitch circuits.
Figure 6-6 VC4 monitor circuit received at an STM-1 port
Procedure: Create a Monitor Circuit
Purpose
Use this procedure to set up secondary circuits to monitor traffic on primary bidirectional circuits.
Prerequisite Procedures
For unidirectional circuits, create a drop to the port where the test equipment is attached.
Onsite/Remote
Onsite or remote
Step 1 In node view, choose the Circuits tab.
Step 2 Click the bidirectional circuit that you want to monitor. Click Edit.
Step 3 In the Edit Circuit dialog box, click the Monitors tab.
The Monitors tab displays ports that you can use to monitor the circuit you selected in Step 2.
Step 4 Choose a port.The monitor circuit displays traffic coming into the node at the card/port you select.
Step 5 Click Create Monitor Circuit.
Step 6 In the Circuit Creation dialog box, choose the destination node, slot, port, and VC4 for the monitored circuit. In the Figure 6-6 example, this is Port 2 on the STM-1 card.
Step 7 If Use Secondary Destination is chosen, enter the slot, port, and VC4.
Step 8 Click Next.
Step 9 In the Circuit Creation dialog box confirmation, review the monitor circuit information. To route the monitor circuit on an MS-SPRing protection channel, check Protection Channel Access and click OK on the Warning dialog box.
Step 10 Click Finish.
Step 11 In the Edit Circuit dialog box, click Close. The Close button is represented as an icon in the upper right hand corner of the screen. The new monitor circuit displays on the Circuits tab.
6.6 Searching for Circuits
CTC provides the ability to search for ONS 15454 SDH circuits using the circuit name. You can conduct a search at the network, node, or card level, and search for whole words and/or include capitalization as a search parameter.
Procedure: Search for ONS 15454 SDH Circuits
Purpose
Use this procedure to search for ONS 15454 SDH circuits based on circuit name.
Step 1 Log into the source or drop node of the SNCP circuit.
Step 2 Click the Circuits tab.
Step 3 Click the circuit you want to edit, then click Edit.
Step 4 In the Edit Circuit window, click the SNCP Selectors tab.
Step 5 Edit the SNCP selectors.
Revert Time—Controls whether traffic reverts to the working path when conditions that diverted it to the protect path are repaired. If you select Never, traffic does not revert. Selecting a time sets the amount of time that will elapse before traffic reverts to the working path.
SF Ber Level—(VC4 circuits only) Sets the SNCP signal failure BER threshold.
SD Ber Level—(VC4 circuits only) Sets the SNCP signal degrade BER threshold.
PDI-P—(VC4 circuits only) When checked, traffic switches if a VC4 payload defect indication is received.
Switch State—Switches circuit traffic between the working and protect paths. The color of the Working Path and Protect Path fields indicates the active path. Normally, the working path is green and the protect path is purple. If the protect path is green, working traffic has switched to the protect path.
CLEAR—Removes a previously set switch command.
LOCKOUT OF PROTECT—Prevents traffic from switching to the protect circuit path.
FORCE TO WORKING—Forces traffic to switch to the working circuit path, regardless of whether the path is error free.
FORCE TO PROTECT—Forces traffic to switch to the protect circuit path, regardless of whether the path is error free.
MANUAL TO WORKING—Switches traffic to the working circuit path when the working path is error free.
MANUAL TO PROTECT—Switches traffic to the protect circuit path when the protect path is error free.
Caution The FORCE and LOCKOUT commands override normal protection switching mechanisms. Applying these commands incorrectly can cause traffic outages.
Step 6 Click Apply, then verify that the selector switches as you expect.
6.8 Creating a Path Trace
Use a J1 path trace to monitor interruptions or changes to circuit traffic. The J1 path trace for each drop port transmits a repeated, fixed-length string. If the string received at a circuit drop port along the circuit does not match the string the port expects to receive, an alarm is raised. To set up path trace on the ports, you must repeat the following procedure for each port. Table 6-3 shows the ONS 15454 SDH cards that support path trace. Cards not listed in the table do not support the J1 byte.
Table 6-3 ONS 15454 SDH Cards Supporting J1 Path Trace
J1 Function
Card
Transmit and Receive
E3
DS3I
G1000-4
Receive Only
OC3 IR 4/STM1 SH 1310
OC48 IR/STM16 SH AS 1310
OC48 LR/STM16 LH AS 1550
OC192 LR/STM64 LH 1550
Note There are two types of J1 bytes, high-order (HO-J1) and low-order (LO-J1). The electrical cards
support LO-J1 (VC3). The optical cards support HO-J1 (VC4) and cannot monitor the LO-J1 byte.
Note Path trace is available for VC3 and VC4 circuits. In ONS 15454 SDH Software R3.4 and earlier, you
can set the VC3 J1 transmit string on E3 and DS3I cards, but VC3 is not monitored by STM-N cards.
Procedure: Create a J1 Path Trace
Purpose
Use this procedure to create a path trace on a circuit source and destination port. This procedure assumes you are setting up a path trace on a bidirectional circuit, and you will set transmit strings at the circuit source and destination.
Tools/Equipment
ONS 15454 SDH cards capable of path trace. See Table 6-3.
Step 1 Log into a node on the network where you will create the path trace.
Step 2 From node view, click the Circuits tab.
Step 3 For the circuit you want to monitor, verify that the source and destination ports are on a card that can transmit and receive the path trace string (E3, DS3I, or G1000-4). See Table 6-3 for a complete list of cards.
If neither port is on a transmit/receive card, you will not be able to complete this procedure. If one port is on a transmit/receive card and the other is on a receive-only card, you can set up the transmit string at the transmit/receive port and the receive string at the receive-only port, but you will not be able to transmit in both directions.
Step 4 Click the circuit you want to trace, then click Edit.
Step 5 In the Edit Circuit window, check the Show Detailed Map box at the bottom of the window. A detailed map of the source and destination ports is displayed.
Step 6 Provision the circuit source transmit string:
a. On the detailed circuit map, right-click the circuit source port (the square on the left or right of the source node icon) and choose Edit Path Trace from the shortcut menu (Figure 6-7).
Figure 6-7 Selecting the detailed circuit map
b. Choose the format of the transmit string by clicking either the 16 byte or the 64 byte selection button.
c. In the New Transmit String field, enter the circuit source transmit string. Enter a string that makes the source port easy to identify, such as the node IP address, node name, circuit name, or another string. If the New Transmit String field is left blank, the J1 transmits a string of null characters.
d. Click Apply, then click Close.
Step 7 Provision the circuit destination transmit string.
a. In the Edit Circuit window, right-click the circuit destination port and choose Edit Path Trace from the shortcut menu.
b. In the New Transmit String field, enter the string that you want the circuit destination to transmit. Enter a string that makes the destination port easy to identify, such as the node IP address, node name, circuit name, or another string. If the New Transmit String field is left blank, the J1 transmits a string of null characters.
c. Click Apply.
Step 8 Provision the circuit destination expected string.
a. In the Circuit Path Trace window, enable the path trace expected string by choosing Auto or Manual from the Path Trace Mode drop-down menu.
Auto—The first string received from the source port is the baseline. An alarm is raised when a string that differs from the baseline is received. Continue with Substep b.
Manual—The string entered in Current Expected String is the baseline. An alarm is raised when a string that differs from the Current Expected String is received. Enter the string that the circuit destination should receive from the circuit source in the New Expected String field.
b. Click the Disable AIS on TIM-P check box if you want to suppress the alarm indication signal when the Path Trace Identifier Mismatch Path (TIM-P) alarm is displayed. Refer to the Cisco ONS 15454 SDH Troubleshooting and Maintenance Guide for descriptions of alarms and conditions.
c. Click Apply, then click Close.
Step 9 Provision the circuit source expected string.
a. In the Edit Circuit window, right-click the circuit source port and choose Edit Path Tracefrom the shortcut menu.
b. In the Circuit Path Trace window, enable the path trace expected string by choosing Auto or Manual from the Path Trace Mode drop-down menu.
Auto—Uses the first string received from the port at the other end as the baseline string. An alarm is raised when a string that differs from the baseline is received. Continue with Substep c.
Manual—Uses the Current Expected String field as the baseline string. An alarm is raised when a string that differs from the Current Expected String is received. Enter the string that the circuit source should receive from the circuit destination in the New Expected String field.
c. Click the Disable AIS on TIM-P check box if you want to suppress the alarm indication signal when the TIM-P alarm is displayed. Refer to the Cisco ONS 15454 SDH Troubleshooting and Maintenance Guide for descriptions of alarms and conditions.
d. Click Apply, then click Close.
Step 10 After you set up the path trace, the received string is displayed in the Received box on the path trace setup window. The following options are available:
Click Switch Mode to toggle between ASCII and hexadecimal display.
Click the Reset button to reread values from the port.
Click Default to return to the path trace default settings (Path Trace Mode is set to Off and the New Transmit and New Expected Strings are null).
Caution Clicking Default will generate alarms if the port on the other end is provisioned with a different string.
The Expect and Receive strings are updated every few seconds only if Path Trace Mode is set to Auto or Manual.
When you display the detailed circuit window, path trace is indicated by an M (manual path trace) or an A (automatic path trace) at the circuit source and destination ports.
Procedure: Monitor a Path Trace on STM-N Ports
Purpose
Use this task to monitor a path trace on STM-N ports within the circuit path.
Tools/Equipment
ONS 15454 SDH cards capable of receiving path trace must be installed at the STM-N circuit ports. See Table 6-3.
Step 1 Start CTC on a node in the network where path trace was provisioned on the circuit source and destination ports.
Step 2 Click Circuits.
Step 3 Choose the VC4 circuit that has path trace provisioned on the source and destination ports, then click Edit.
Step 4 In the Edit Circuit window, click the Show Detailed Map box at the bottom of the window. A detailed circuit graphic showing source and destination ports is displayed.
Step 5 On the detailed circuit map, right-click the circuit STM-N port (the square on the left or right of the source node icon) and choose Edit Path Trace from the shortcut menu.
Note The STM-N port must be on a receive-only card listed in
Table 6-3. If not, the
Edit Path Trace menu item will not display.
Step 6 In the Circuit Path Trace window, enable the path trace expected string by choosing Auto or Manual from the Path Trace Mode drop-down menu:
Auto—Uses the first string received from the port at the other end as the baseline string. An alarm is raised when a string that differs from the baseline is received. For STM-N ports, Auto is recommended, since Manual mode requires you to trace the circuit on the Edit Circuit window to determine whether the port is the source or destination path.
Manual—Uses the Current Expected String field as the baseline string. An alarm is raised when a string that differs from the Current Expected String is received.
Step 7 If you set Path Trace Mode to Manual, enter the string that the STM-N port should receive in the New Expected String field. To do this, trace the circuit path on the detailed circuit window to determine whether the port is in the circuit source or destination path, then set the New Expected String to the string transmitted by the circuit source or destination. If you set Path Trace Mode to Auto, ignore the New Expected String field.
Step 8 The Disable AIS on TIM-P check box cannot be selected.
Note SDH Software R3.4 and earlier does not support changes to the Disable AIS on TIM-P field.
The STM-N path trace monitoring does not generate AIS on TIM-P.
Step 9 Click Apply, then click Close.
6.9 Creating Half Circuits
The following procedures describe how to create STM-N circuits from a drop to an STM-N card on the same node in an MS-SPRing or 1+1 topology, and how to create an STM-N circuit from a drop to an STM-N card on the same node in an SNCP.
Procedure: Create a Half Circuit using an STM-N Card as a Destination in an MS-SPRing or 1+1 Topology
Purpose
Use this procedure to create a high-order path circuit from a drop to an E1 or STM-N card on the same node in an MS-SPRing or 1+1 topology.
Tools/Equipment
—
Prerequisite Procedures
—
Step 1 From node view, go to the View menu and select Go to Network View.
Step 2 Click the Circuits tab, then click Create.
Step 3 In the Circuit Creation dialog box, complete the following fields:
Name—Assign a name to the circuit. The name can be alphanumeric and up to 48 characters (including spaces). If you leave the Name field blank, CTC assigns a default name to the circuit.
Note If you will ever create a monitor circuit on this circuit, do not make the name longer than
44 characters because monitor circuits will add "_MON" (four characters) to the circuit
name.
Type—Select VC_HO_Path_Circuit (HOP). The circuit type determines the circuit-provisioning options that are displayed. The E3 and DS3I cards must use VC low-order path tunnels. See the "Creating VC Low-Order Path Tunnels for Port Grouping" section for more information.
Size—Select the circuit size (VC_HO_Path_Circuits only). VC high-order path circuits can be VC4, VC4-2c, VC4-3c, VC4-4c, VC4-8c, VC4-16c, or VC4-64c for optical cards and some Ethernet cards depending on the card type. Of the Ethernet cards, only the G-1000 can use VC4-3c and VC4-8c. The "c" indicates concatenated VC4s.
Bidirectional—Leave this box checked (default).
Number of circuits—Type the number of circuits you want to create. The default is 1.
Auto-ranged—Deselect this box. This check box is automatically selected when you enter more than 1 in the Number of circuits field.
State—Choose one of the following service states to apply to the circuit:
IS—The circuit is in service.
OOS—The circuit is out of service. Traffic is not passed on the circuit until it is in service.
OOS-AINS—(default) The circuit is in service when it receives a valid signal; until then, the circuit is out of service.
OOS-MT—The circuit is in a maintenance state. The maintenance state does not interrupt traffic flow; it suppresses alarms and conditions and allows loopbacks to be performed on the circuit. Use OOS-MT for circuit testing or to suppress circuit alarms temporarily. Change the state to IS, OOS, or OOS-AINS when testing is complete.
Apply to drop ports—Check this box if you want to apply the state chosen in the State field to the circuit source and destination ports. CTC will apply the circuit state to the ports if the circuit is in full control of the port. If not, a Warning dialog box displays the ports where the circuit state could not be applied. If not checked, CTC will not change the state of the source and destination ports.
Note LOS alarms display if in service (IS) ports are not receiving signals.
Inter-domain (UCP) SLA—If the circuit will travel on a UCP channel, enter the service level agreement number. Otherwise, leave the field set to zero.
Protected Drops—Uncheck this box.
Step 4 Click Next.
Step 5 Provision the circuit source.
a. From the Node pull-down menu, choose the node that will contain the circuit.
b. From the Slot pull-down menu, choose the slot containing the card where the circuit will originate.
c. From the Port pull-down menu, choose the port where the circuit will originate.
Step 6 Click Next.
Step 7 Provision the circuit destination.
a. From the Node pull-down menu, select the node chosen in Step 5a.
b. From the Slot pull-down menu, choose the STM-N or E1 card to map the high-order path circuit to a VC-4.
c. Choose the destination VC-4 from the submenus that display.
Step 8 Click Finish. If you entered more than 1 in the Number of circuits field and did not select Auto-ranged, the Circuit Creation dialog box is displayed so you can create the remaining circuits. Repeat this procedure for each additional circuit.
After completing the circuit(s), CTC displays the Circuits window.
Step 9 In the Circuits window, verify that the newly created circuit(s) appear in the circuits list.
Procedure: Create a Half Circuit using an STM-N as a Destination in an SNCP
Purpose
Use this procedure to create a high-order path circuit from a drop to an E1 or STM-N card on the same node in an SNCP.
Tools/Equipment
—
Prerequisite Procedures
—
Step 1 From node view, go to the View menu and select Go to Network View.
Step 2 Click the Circuits tab, then click Create.
Step 3 In the Circuit Creation dialog box, complete the following fields:
Name—Assign a name to the circuit. The name can be alphanumeric and up to 48 characters (including spaces). If you leave the field blank, CTC assigns a default name to the circuit.
Note If you will ever create a monitor circuit on this circuit, do not make the name longer than
44 characters because monitor circuits will add "_MON" (four characters) to the circuit
name.
Type—Select VC_HO_Path_Circuit (HOP). The circuit type determines the circuit-provisioning options that are displayed. The E3 and DS3I cards must use VC low-order path tunnels. See the "Creating VC Low-Order Path Tunnels for Port Grouping" section for more information.
Size—Select the circuit size (VC_HO_Path_Circuits only). VC high-order path circuits can be VC4, VC4-2c, VC4-3c, VC4-4c, VC4-8c, VC4-16c, or VC4-64c for optical cards and some Ethernet cards depending on the card type. Of the Ethernet cards, only the G-1000 can use VC4-3c and VC4-8c. The "c" indicates concatenated VC4s.
Bidirectional—Leave checked for this circuit (default).
Number of circuits—Type the number of circuits you want to create. The default is 1.
Auto-ranged—Deselect this check box. This check box is automatically selected when you enter more than 1 in the Number of circuits field.
State—Choose one of the following service states to apply to the circuit:
IS—The circuit is in service.
OOS—The circuit is out of service. Traffic is not passed on the circuit until it is in service.
OOS-AINS—(default) The circuit is in service when it receives a valid signal; until then, the circuit is out of service.
OOS-MT—The circuit is in a maintenance state. The maintenance state does not interrupt traffic flow; it suppresses alarms and conditions and allows loopbacks to be performed on the circuit. Use OOS-MT for circuit testing or to suppress circuit alarms temporarily. Change the state to IS, OOS, or OOS-AINS when testing is complete.
Apply to drop ports—Check this box if you want to apply the state chosen in the State field to the circuit source and destination ports. CTC will apply the circuit state to the ports if the circuit is in full control of the port. If not, a Warning dialog box displays the ports where the circuit state could not be applied. If not checked, CTC will not change the state of the source and destination ports.
Note LOS alarms display if in service (IS) ports are not receiving signals.
Inter-domain (UCP) SLA—If the circuit will travel on a UCP channel, enter the service level agreement number. Otherwise, leave the field set to zero.
Protected Drops—Leave this box unchecked.
Step 4 If the circuit will be routed on an SNCP, set the SNCP path selector defaults as follows:
Revertive—Check this box if you want traffic to revert to the working path when the conditions that diverted traffic to the protect path are repaired. If Revertive is not chosen, traffic remains on the protect path after the switch.
Reversion time—If Revertive is checked, set the reversion time. This is the amount of time that will elapse before the traffic reverts to the working path. Traffic can revert when conditions causing the switch are cleared. (The default reversion time is 5 minutes.)
SF threshold—Choose from one E-3, one E-4, or one E-5.
SD threshold—Choose from one E-5, one E-6, one E-7, one E-8, or one E-9.
Switch on PDI-P—(VC4 circuits only) Check this box if you want traffic to switch when a VC4 payload defect indicator is received.
Step 5 Click Next.
Step 6 Provision the circuit source.
a. From the Node pull-down menu, choose the node that will contain the circuit.
b. From the Slot pull-down menu, choose the slot containing the card where the circuit will terminate.
c. From the Port pull-down menu, choose the port where the circuit will terminate.
Step 7 Click Next.
Step 8 Provision the circuit destination.
a. From the Node pull-down menu, select the node that will contain the circuit. This will be the same as the node chosen in Step 6a.
b. Choose the choose the STM-N or E1 card to map the high-order path circuit to a VC-4.
c. Choose the destination VC-4 from the submenus that display.
Step 9 Click Use Secondary Destination and repeat Steps 6 to 9 to define the secondary destination.
Step 10 Click Finish. If you entered more than 1 in the Number of circuits field and did not check the Auto-ranged check box, the Circuit Creation dialog box is displayed so you can create the remaining circuits. Repeat this procedure for each additional circuit.
After completing the circuit(s), CTC displays the Circuits window.
Step 11 In the Circuits window, verify that the newly created circuit(s) appear in the circuits list.
6.10 Filtering, Viewing, and Changing Circuit Options
Use the following procedures to set up circuit filters, view circuits on an ONS 15454 SDH span, change the state of a circuit, edit a circuit name, or change the color of active (working) and standby (protect) circuit spans.
Procedure: Filter the Display of Circuits
Purpose
This procedure filters the display of circuits in the ONS 15454 SDH network, node, or card view.
Step 1 Switch to the appropriate CTC view, as follows:
To filter network circuits, from the View menu, choose Go to Network View.
To filter circuits that originate, terminate, or pass through a specific node, from the View menu, choose Go to Other Node; then, choose the node you want to search and click OK.
To filter circuits that originate, terminate, or pass through a specific card, switch to node view, then double-click the card on the shelf graphic to display the card in card view.
Step 2 Click the Circuits tab.
Step 3 Set the attributes for filtering the circuit display.
a. Click the Filter button.
b. In the Filter Dialog, set the filter attributes:
Name—Enter a complete or partial circuit name to filter circuits based on circuit name; otherwise leave the field blank.
Direction—Choose one of the following options: Any (direction not used to filter circuits), 1-way (display only one-way circuits), or 2-way (display only two-way circuits).
Status—Choose one of the following options: Any (status not used to filter circuits), Active (display only active circuits), Incomplete (display only incomplete circuits, that is, circuits missing a connection or span to form a complete path), or Upgradable (display only upgradable circuits).
Slot—Enter a slot number to filter circuits based on source or destination slot; otherwise leave the field blank.
Port—Enter a port number to filter circuits based on source or destination port; otherwise leave the field blank.
Type—Choose one of the following options: Any (type not used to filter circuits), VC_HO_PATH_CIRCUIT (displays only high-order path circuits), VC_LO_PATH_CIRCUIT (displays only low-order path circuits), or VC_LO_PATH_TUNNEL (displays only low-order path tunnels).
Size—Click the appropriate check boxes to filter circuits based on size: VC3, VC4, VC4-2c, VC4-3c, VC4-4c, VC4-8c, VC4-16c, or VC4-64c. The check boxes displayed depend on the entry selected in the Type field.
Step 4 Click OK. Circuits matching the attributes in the Filter Circuits dialog box are displayed in the Circuits window.
Step 5 To turn filtering off, click the Filter icon in the lower right corner of the Circuits window. Click the icon again to turn filtering on, and click the Filter button to change the filter attributes.
Step 1 From the View menu on the node view, choose Go to Network View.
Step 2 Place your mouse cursor directly over the span (green line) containing the circuits you want to view, press the right mouse button, and choose one of the following:
Circuits—To view MS-SPRing, SNCP, 1+1, or unprotected circuits on the span.
PCA Circuits—To view circuits routed on a MS-SPRing protected channel. (This option does not display if the span you right-clicked is not a MS-SPRing span.)
Step 3 In the Circuits on Span dialog box, view the following information for circuits provisioned on the span:
VC4—The number of VC4s used by the circuits
VC3—The number of VC3s used by the circuits
TUG2—The number of TUG2s used by the circuits
VC12—The number of VC12s used by the circuits
SNCP—(SNCP span only) Checked for SNCP circuits
Circuit—Displays the circuit name
Switch State—(SNCP span only) Displays the switch state of the circuit, that is, whether any span switches are active. For SNCP spans, switch types include: CLEAR (no spans are switched), MANUAL SWITCH AWAY (a manual switch is active), FORCE SWITCH AWAY (a force switch is active), and LOCKOUT OF PROTECTION (a span lockout is active).
Note You can perform other procedures from the Circuits on Span dialog box. If the span is in a
SNCP, you can switch the span traffic. If you want to edit a circuit on the span, double-click
the circuit. See the "Edit a Circuit
Name" procedure for instructions.
Procedure: Change a Circuit State
Purpose
Use this procedure to change the state of a circuit.
Step 2 Click the circuit with the state you want to change.
Step 3 From the Tools menu, choose Circuits > Set Circuit State.
Note Alternatively, you can click the Edit button, then click the State tab on the Edit Circuits
window.
Step 4 In the Set Circuit State dialog box change the circuit state by choosing one of the following from the Target Circuit State drop-down menu:
IS—Places the circuit in service.
OOS—Places the circuit out of service.
OOS-AINS—Places the circuit in an out of service, auto in service state.
OOS-MT—Places the circuit in an out of service, maintenance state.
Step 5 If you want to apply the state to the circuit source and destination ports, check the Apply to Drop Ports check box.
Step 6 Click OK.
Note CTC will not change the state of the circuit source and destination port in certain
circumstances, for example, if the circuit size is smaller than the port and you change the
state from IS to OOS. If this occurs, a message is displayed and you will need to change the
port state manually.
Step 2 Click the circuit you want to rename, then click Edit (or you can double-click the circuit).
Step 3 In the General tab, click the Name field and edit or rename the circuit. Names can be up to 48 alphanumeric and/or special characters.
Note If you will ever create a monitor circuit on this circuit, do not make the name longer than 44
characters because monitor circuits will add "_MON" (four characters) to the circuit name.
Step 4 Click the Apply button.
Step 5 From File menu, select Close.
Step 6 In the Circuits window, verify that the circuit was correctly renamed.
Procedure: Change Active and Standby Span Color
Purpose
Use this procedure to change the color of active (working) and standby (protect) circuit spans displayed on the detailed circuit map of the Edit Circuits window. By default, working spans are green and protect spans are purple.
Step 2 In the Preferences dialog box, click the Circuits tab.
Step 3 Complete one or more of the following steps, as required:
To change the color of the active (working) span, go to Step 4.
To change the color of the standby (protect) span, go to Step 5.
To return active and standby spans to the default colors, go to Step 6.
Step 4 To change the color of the active span:
a. Next to Active Span Color, click the Color button.
b. In the Pick a Color dialog box, click the color for the active span, or click the Reset button if you want the active span to display the last applied (saved) color.
c. Click OK to close the Pick a Color dialog box. If you want to change the standby span color, go to Step 5. If not, click OK to save the change and close the Preferences dialog box, or click Apply to save the change and keep the Preferences dialog box displayed.
Step 5 To change the color of the standby span:
a. Next to Standby Span Color, click the Color button.
b. In the Pick a Color dialog box, click the color for the standby span, or click the Reset button if you want the standby span to display the last applied (saved) color.
c. Click OK to save the change and close the Preferences dialog box, or click Apply to save the change and keep the Preferences dialog box displayed.
Step 6 If you want to return the active and standby spans to their default colors:
a. From the Edit menu, choose Preferences.
b. In the Preferences dialog box, click the Circuits tab.
c. Click the Reset to Defaults button.
d. Click OK to save the change and close the Preferences dialog box, or click Apply to save the change and keep the Preferences dialog box displayed.
6.11 Cross-Connect Card Capacities
The XC10G is required to operate the ONS 15454 SDH. XC10Gs support high-order cross-connections (VC4 and above). The XC10G does not support any low-order circuits such as VC-11, VC-12, and VC3. The XC10G card works with the TCC-I card to maintain connections and set up cross-connects within the node. You can create circuits using Cisco Transport Controller (CTC). The XC10G card cross connects standard VC4, VC4-4c, VC4-16c, and VC4-64c signal rates and non-standard VC4-2c, VC4-3c, and VC4-8c signal rates, providing a maximum of 384 x 384 VC4 cross-connections. Any VC4 on any port can be connected to any other port, meaning that the VC cross-connection capacity is non-blocking. The XC10G card manages up to 192 bidirectional VC4 cross-connects.
VC4 tunnels must be used with the E3 and DS3I cards to transport VC3 signal rates. Three ports form a port group. For example, in one E3 or one DS3I card, there are four port groups: Ports 1 to 3 = PG1, Ports 4 to 6 = PG2, Ports 7 to 9 = PG3, and Ports 10 to 12 = PG4.
Note The Cisco ONS 15454 SDH Troubleshooting and Maintenance Guide contains detailed specifications
of the XC10G card.
6.12 Creating DCC Tunnels
SDH provides four data communications channels (DCCs) for network element operations, administration, maintenance, and provisioning: one on the SDH regenerator section layer and three on the SDH multiplex section layer. The ONS 15454 SDH uses regenerator section DCC for inter-15454 data communications. It does not use the multiplex section DCCs; therefore, the multiplex section DCCs are available to tunnel DCCs from third-party equipment across ONS 15454 SDH networks. If D4 through D12 are used as data DCCs, they cannot be used for DCC tunneling.
A DCC tunnel end-point is defined by slot, port, and DCC, where DCC can be either the regenerator section DCC, Tunnel 1, Tunnel 2, or Tunnel 3. You can link a regenerator section DCC to a multiplex section DCC (Tunnel 1, Tunnel 2, or Tunnel 3) and a multiplex section DCC to a regenerator section DCC. You can also link multiplex section DCCs to multiplex section DCCs and link regenerator section DCCs to regenerator section DCCs. To create a DCC tunnel, you connect the tunnel end points from one ONS 15454 SDH optical port to another.
Each ONS 15454 SDH can support up to 32 DCC tunnel connections. Table 6-4 shows the DCC tunnels that you can create.
Table 6-4 DCC Tunnels
DCC
SDHLayer
SDHBytes
STM-1 (All Ports)
STM-4, STM-16, STM-64
SDCC
Regenerator Section
D1 - D3
Yes
Yes
Tunnel 1
Multiplex Section
D4 - D6
No
Yes
Tunnel 2
Multiplex Section
D7 - D9
No
Yes
Tunnel 3
Multiplex Section
D10 - D12
No
Yes
Figure 6-8 shows a DCC tunnel example. Third-party equipment is connected to STM-1 cards at Node 1/Slot 3/Port 1 and Node 3/Slot 3/Port 1. Each ONS 15454 SDH node is connected by STM-16 trunk cards. In the example, three tunnel connections are created, one at Node 1 (STM-1 to STM-16), one at Node 2 (STM-16 to STM-16), and one at Node 3 (STM-16 to STM-1).
Note A DCC will not function on a mixed network of ONS 15454 SDH nodes and ONS 15454 SONET
nodes. DCC tunneling is required for ONS 15454 SDH nodes transporting data through ONS 15454
SONET nodes.
Figure 6-8 DCC tunnel
When you create DCC tunnels, keep the following guidelines in mind:
Each ONS 15454 SDH can have a maximum of 32 DCC tunnel connections.
Each ONS 15454 SDH can have a maximum of 10 regenerator section DCC terminations.
A regenerator section DCC that is terminated cannot be used as a DCC tunnel end-point.
A regenerator section DCC that is used as a DCC tunnel end-point cannot be terminated.
All DCC tunnel connections are bidirectional.
Note A multiplex section DCC cannot be used for tunneling if a data DCC is assigned.
Procedure: Provision a DCC Tunnel
Purpose
Use this procedure to create a DCC tunnel to transport traffic from ONS 15454 SONET platforms or from third-party SDH equipment across ONS 15454 SDH networks.
Note Each ONS 15454 SDH can have up to 32 DCC tunnel connections. Terminated regenerator section DCCs
used by the ONS 15454 SDH cannot be used as a DCC tunnel end-point, and a regenerator section DCC
that is used as a DCC tunnel end-point cannot be terminated. All DCC tunnel connections are
bidirectional.
Step 1 Log into an ONS 15454 SDH that is connected to the non-ONS 15454 SDH network.
Step 2 From the node view, choose Go to Network View.
Step 3 Click the Provisioning > Overhead Circuits tabs.
Step 5 In the Circuit Creation dialog box, provision the DCC tunnel as follows:
Name—Type the tunnel name.
Type—Choose one of the following options:
DCC Tunnel-D1-D3—Allows you to choose either the regenerator section DCC (D1-D3) or a multiplex section DCC (D4-D6, D7-D9, or D10-D12) as the source or destination endpoints.
DCC Tunnel-D4-D12—Provisions the full multiplex section DCC as a tunnel.
Source Node—Choose the source node.
Slot—Choose the source slot.
Port—If displayed, select the source port.
Channel—Displayed if you chose DCC Tunnel-D1-D3 as the tunnel type. Choose one of the following:
DCC1 (D1-D3)—The regenerator section DCC
DCC2 (D4-D6)—Multiplex section DCC 1
DCC3 (D7-D9)—Multiplex section DCC 2
DCC4 (D10-D12)—Multiplex section DCC 3
Note DCC options are not displayed if they are used by the ONS 15454 SDH (regenerator
section DCC) or other tunnels.
DCC provisioning is now complete for one node. Repeat these steps for all slots/ports that are part of the DCC tunnel, including any intermediate nodes that will pass traffic from third party equipment. The procedure is confirmed when the third-party network elements successfully communicate over the newly-established DCC tunnel.