|
|

This chapter describes the Cisco ONS 15200 Network Control Board (NCB) module. For information about software configuration, refer to the Cisco ONS 15200 Command Line Interface Manual.
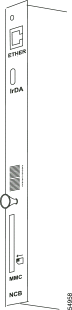
Figure 2-1 shows the front panel of the NCB module.
The NCB module is the central processor unit with all of its peripherals.
The SNM software on the NCB controls the Client Layer Interface Port (CLIP) modules on the internal bus. In addition to controlling all of the ONS 15200 system CLIP modules, the NCB module collects information about system status, alarms, parameters, and actions on the internal data bus. You can also store performance monitoring data on the NCB and upload the data to external media.
With certain limitations described below, you can configure one or two active NCBs as CLIP managers in a network; an NCB in a network that is not provisioned as an active manager of a CLIP can still inventory the CLIP. Both these functions are limited to a distance of two CAN bus extensions and two QPP jumps.
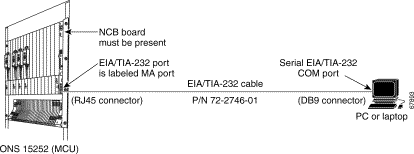
Read the status of the NCB board and the entire subnetwork on the Communication Interface module (CIM) immediately beneath it.
Access the NCB board from the Ethernet port on the front panel or the MA port on the CIM. On the CIM, use the RS-232 adapter (P/N 72-2746); the EIA/TIA-232 interface requires the parameters in Table 2-1.
The NCB hosts the Subnetwork Manager (SNM) software. The SNM supervises the CLIP modules and manages the communication channels to other management systems.
 |
Note The CLIP modules, when powered on, synchronize with their respective mates. Traffic comes up without the assistance of an NCB. |
Table 2-3 shows the NCB module connectors on the front panel.
Table 2-2 NCB connectors
| Connector | Significance |
|---|---|
Indicators for the NCB are visible on the front panel of the Communication Interface module (CIM).
Table 2-3 shows the NCB module LEDs on the front panel of the CIM.
|
Note When the red and yellow LEDs are flashing simultaneously, the NCB is rebooting. If the LEDs flash continuously, the NCB has made the maximum number of reboot attempts and has entered boot mode. Refer to the Cisco ONS 15200 Command Line Interface Manual for further information. |
This section covers optical, electrical, environmental, and mechanical specifications for the NCB module. Optical specifications and default thresholds do not apply.
Two independent external voltages are used:
 |
Warning Dispose of the battery and/or the NCB in an environmentally friendly way. Ultimate disposal of the lithium battery and the NCB module must be handled according to all applicable international, national, and local laws and regulations. |
Table 2-4 lists the normal climate-related limits.
Table 2-4 NCB Environmental Specifications
| Item | Specification |
|---|---|
|
Short term operating temperature |
|
Normal operating relative humidity Short term operating relative humidity (per GR-63, NEBS level 3) |
Table 2-5 lists physical dimensions.
This section explains how to remove and replace NCB modules.
|
Note Under normal circumstances, removing the NCB is non-service affecting. |
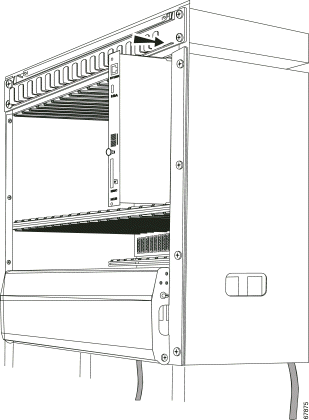
The NCB module is positioned in Slot 17 in the Cisco ONS 15252 Multichannel Unit (MCU) as shown in Figure 2-2.
Step 2 Disconnect the front panel Ethernet cable from the NCB module.
Step 3 Loosen the thumbscrews.
Step 4 Carefully remove the NCB module from the ONS 15252 MCU.
Step 5 If you will not immediately replace the NCB, install a 20 mm (0.8")-wide dummy front where the NCB was removed from the ONS 15252 MCU.
Step 2 Telnet to the NCB. To do so, at the C:\> prompt, type telnet <ipaddress> where <ipaddress> is the IP address of the NCB. Press Enter. You should get a login prompt from the NCB
Step 3 Log into the 15200 as an administrator user:
a. At the NCB login prompt type a username with administrator privileges and press Enter.
b. At the password prompt type the password for the administrator user and press Enter.
If the login is successful you should see the NCB:> prompt.
|
Note More than one user with the same username cannot be logged in at the same time. Each username can log in once per session. |
Step 4 Determine the current software and hardware version.
a. At the NCB:> prompt type configure system and press Enter. You should now see the NCB:= prompt
b. At the NCB:= prompt type version and press Enter. Write down the NCB Revision number and the SNM Version Number.
Step 5 List the files that reside in the NCB. To do so, at the NCB:= prompt, type list 0 and press Enter. You will see the names of all the files that currently reside in the NCB. Record the number of files. In the next section of this procedure you will backup these files to your PC.
Step 6 Determine if you need to defrag the NCB, i.e. if any of the files listed have the word "deleted" next to them. If none of the files listed have the word [deleted] next to the file name, skip this step.
a. To remove files marked as deleted, at the NCB:= prompt, type defrag 0 and press Enter. You will see the message "Defragmentation in progress..." This command will take up to 2 minutes to complete.
b. When the process is complete, you will see the NCB:= prompt again. Type list 0 and press Enter. Verify that no file shows the word [deleted] next to it.
Step 7 Verify the IP configuration. To do so, at the NCB:= prompt type ipconf and press Enter. You will see the current NCB IP address, the subnet mask, and the gateway. Record this information for later use.
Step 8 Logout of the NCB. To do so, at the NCB:= prompt, type exit and press Enter.
At the NCB:> prompt, type exit and press Enter.
Complete the following steps to backup all of the NCB files to your PC.
Step 2 Create a directory to save the backup files.
a. At the C:\> prompt, type mkdir <foldername> and press Enter where foldername is the name of the directory you want to create.
b. Go to the directory that will hold the backup files. At the C:> prompt, type cd <foldername>, where foldername is the destination folder. Press Enter.
Step 3 Open an FTP session to the NCB.
a. At the c:\foldername> prompt, type ftp <ipaddress>, where ipaddress is the IP address of the 15200 system NCB. Press Enter.
b. At the User prompt, type an ONS 15200 username with administrator privileges, followed by the password. If the username and password are correct you should see a message showing that the username is logged in.
Step 4 At the ftp> prompt, type dir and press Enter. You will see a list of all the files in the NCB.
Step 5 Copy all the files in the NCB to the backup directory in your PC. Start with the file that contains the snm.out NCB software.
Step 6 Back up the rest of the files that reside in the NCB to your PC.
a. At the ftp> prompt type ascii and press Enter.
b. At the ftp> prompt type get <filename>, where filename is each of the files that reside in the NCB, except snm.out. Press Enter.
c. Repeat for each of the remaining files in the NCB. The only exception should be the snm.out file; you have already backed up this file.
Step 7 In your PC or laptop open Windows Explorer and verify that all of the files originally listed in the NCB are now in the backup directory.
Step 8 Once you verify that you have copied all the NCB files to the PC backup directory, close the ftp window. To do so, at the ftp> prompt, type bye and press Enter. This will take you back to the c:\foldername> prompt.
Before replacing the NCB, back up all files as described in the "Back up Files from the Network Control Board" procedure.
Step 2 Loosen the thumbscrews.
Step 3 Carefully remove the NCB module from the ONS 15252 MCU.
Step 4 Align the replacement NCB module with the NCB module slot.
Step 5 Carefully insert the module into the slot.
|
Note Make sure that the backplane connector and the NCB module connector are correctly mated and that no optical fibers are pinched. |
Step 6 Tighten the thumbscrews.
Step 7 Connect the Ethernet cable to the NCB module.
Step 2 Connect your PC or Laptop serial COM port to the ONS 15252 MCU management access (MA) port on the CIM board.
Step 3 Make sure that the connection to the NCB is has been terminated. Otherwise the Hyper Terminal cannot connect to the system.
Step 4 On the PC or laptop, open the terminal emulation program such as Hyper Terminal and configure the COM port.
Step 2 Press Cancel.
Step 3 In the File pull-down menu, select Properties (the window is called "New Connection Properties").
Step 4 In Connect using, select the COMx Port. Press Configure.
Step 5 In the "COMx properties" window, select:
Baud rate 19200 Baud
Data bits 8
Parity None
Stop bits 1
Flow control None
Step 6 Press OK.
Step 7 In New Connection Properties, select the Settings menu.
Step 8 Select VT100 as the emulation.
Step 9 Go to ASCII settings. Mark Send line ends with line feeds (all other fields are not marked). The Hyperterminal screen appears.
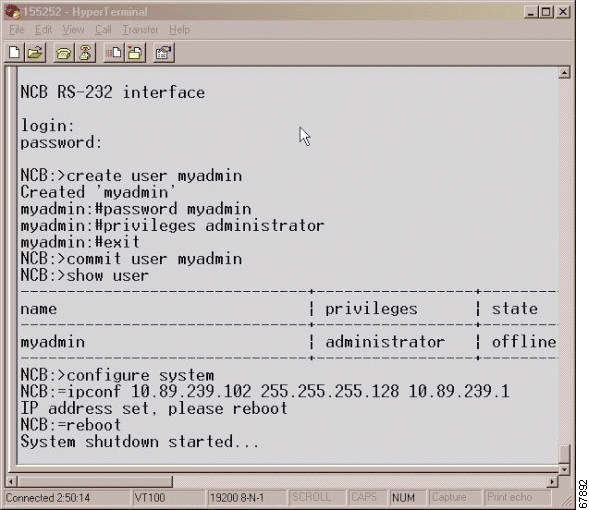
Step 10 Press Enter. The system responds with a login prompt. Press Enter again. Because no password is needed press Enter a third time. You should now see the NCB:> prompt.
Step 11 Create a user with administrator privileges:
a. At the NCB:> prompt, type create user <user1> and press Enter. The system responds with a "Created <user1>" message. The user1:# prompt appears on the screen.
b. At the user1:# prompt, type password <password1> and press Enter to create a password for a new user.
c. At the user1:# prompt, type privileges administrator and press Enter.
Step 12 Set the IP address of the NCB module.
a. At the NCB:> prompt, type configure system and press Enter.
b. At the NCB:= prompt, type ipconf <ipaddr> <subnet> <gateway> where ipaddr is the chosen IP address, subnet the chosen subnet mask, and gateway the gateway for the new NCB. Press Enter.
Step 13 Disconnect the CIM RS-232 adapter cable.
The Subnetwork Manager on the NCB module now has an IP address and can be accessed directly at the Ethernet port on the NCB module.
This procedure explains how to copy all the files, except the snm.out and qdbs.cfg files, from the PC backup directory to the new NCB.
|
Note We do not copy the snm.out and qdbs.cfg files to the new NCB because the new NCB should already have these files. These two files are installed at the factory. |
Step 2 Open a Command prompt window. To do so, select Start >Programs and select Command Prompt (it may be under Accessories).
Step 3 Go to the directory where you backed up the original NCB files. To do so, at the C:> prompt type cd <foldername>, where foldername is the folder where the backed up files reside. Press Enter.
Step 4 Start an ftp session to the NCB. To do so, at the C:\foldername> prompt type ftp <ipaddress>, where ipaddress is the IP address of the new NCB. Press Enter.
Step 5 Log into the system.
a. At the NCB ftp> User login prompt, type the username of the administrator that you created in the "Initialize the NCB" procedure and press Enter.
b. At the password prompt, type the password and press Enter. You should receive a message saying that you were successful logging in.
Step 6 Determine which files are already on the NCB. To do so, at the ftp> prompt type dir and press Enter. You will see a list of all files in the NCB. At minimum you should see the snm.out and qdbs.cfg files.
Step 7 Type ascii and press Enter.
Step 8 One at a time, move the files (except for snm.out and qdbs.cfg) from the backup directory to the new NCB. To do so, at the ftp> prompt, type put <filename> and press Enter, where filename is the file that you want to move from the backup directory to the new NCB. You should see a message showing that the file has been successfully transferred.
Step 9 Repeat Step 8 for each of the files that you wish to transfer to the new NCB. If the snm.out and the qdbs.cfg files are present on the original NCB, do not put these two files on the new NCB.
Step 10 Verify that the new NCB shows the same files that the original NCB. To do so, at the ftp> prompt type dir and press Enter. Verify that you count the same number of files as were in the original NCB.
Step 11 Close the ftp window. At the ftp> prompt, type bye.
Step 12 Reboot the NCB for the downloaded configuration to take effect.
a. Telnet to the NCB using the administrator username and password you created earlier (see the "Initialize the NCB" procedure).
b. At the NCB:> prompt, type configure system and press Enter.
d. Telnet to the new NCB with an administrator username that existed previously in the original NCB.
|
Note The user name you created in the "Initialize the NCB" procedure is no longer valid after the reboot. |
Step 13 Check the new NCB software version.
a. At the NCB:> prompt type configure system and press Enter.
b. At the NCB:= prompt type version and press Enter. Verify that the software version is the same as in the original NCB.
![]()
![]()
![]()
![]()
![]()
![]()
![]()
![]()
Posted: Thu Apr 17 15:13:46 PDT 2003
All contents are Copyright © 1992--2002 Cisco Systems, Inc. All rights reserved.
Important Notices and Privacy Statement.