|
|

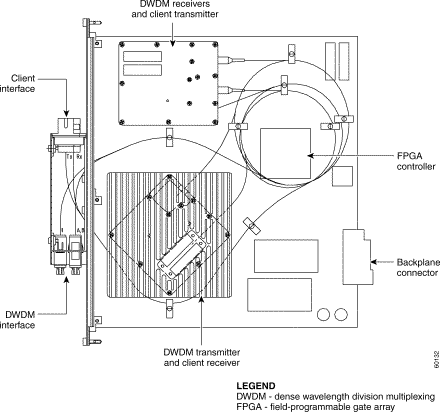
This chapter describes the Client Layer Interface Port (CLIP) module.
The CLIP module can be mounted in either the ONS 15201 Single-Channel Unit (SCU) or the ONS 15252 Multichannel Unit (MCU).
The CLIP module controls the electro-optical and high-speed electronic circuits used for extraction and addition of a single wavelength signal in dense wave division multiplexing (DWDM) networks. The CLIP module is controlled through an amplitude-modulated signal on the traffic signal and/or a Controller Area Network (CAN) electrical interface.
The CLIP module translates a designated incoming client-layer signal to a DWDM-layer signal with a designated wavelength and amplitude. Additionally, the CLIP module translates a designated DWDM-layer signal and provides an outgoing client-layer signal.
The CLIP can be configured in four ways:
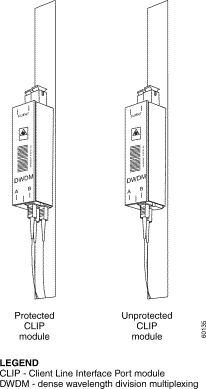
The protected and unprotected configurations of the CLIP module are shown in Figure 4-4. The unprotected CLIP module does not have a receiver in the B port.
In multichannel units, LED indicators on the Network Adaptation module are used to monitor CLIP operating parameters. In single-channel units, the LED indicators are mounted on the SCU front panel. Monitored items include the alarms, power, and status. Table 4-1 lists the conditions indicated by the LEDs.
Table 4-1 CLIP LED Indicators (NAM and SCU)
| LED | Orientation | Condition (When Lit) |
|---|---|---|
Indicate active (A) and standby (S) |
This section provides optical, electrical, environmental and mechanical specifications for the CLIP module. Default thresholds are also included.
Table 4-2 lists optical operating frequencies.
 |
Note The DWDM side (TxTP) has 1800 ps/nm dispersion tolerance with a 2.0 dB penalty for medium reach and 2.5 dB penalty for long reach. |
|
Note All CLIPs are 3R. |
At maximum operating temperature and input voltage, the CLIP module consumes 8 watts, at most.
Temperature and current characteristics for the CLIP module are listed in the next five tables. The bias currents specified are at calibration time.
Table 4-3 CLIP Peltier Current
| Threshold | Percentage (of maximum current) |
|---|---|
Table 4-4 CLIP Board Temperature
| Threshold | Degrees Celsius |
|---|---|
Table 4-5 DWDM Laser Temperature Deviation
| Threshold | Degrees Celsius |
|---|---|
Table 4-6 DWDM Laser Bias Current
| Threshold | Percentage (of calibration current) |
|---|---|
Table 4-7 Client Laser Bias Current
| Threshold | Percentage (of calibration current) |
|---|---|
|
Note The data rate is STM-16/OC-48. The switchmode (for protected channels) is automatic. Alarm suppression is off. |
The optical transmitter output level (toward the client) is -9 dBm nominal.
The optical receiver thresholds (from the client) are specified in Table 4-8.
The optical transmitter output level (toward the DWDM line) is 0 dBm (nominal) for medium range and +7 dBm (nominal) for long range.
The optical receiver thresholds (from the DWDM line) are specified in Table 4-9.
Table 4-10 lists the physical dimensions of the CLIP module.
This section explains the removal and replacement of the Client Layer Interface Port (CLIP) module for protected and unprotected channels. This module is used in both the ONS 15252 Multichannel Unit (MCU) and the ONS 15201 Single-Channel Unit (SCU). Figure 4-4 shows an unprotected and a protected CLIP module.
The following removal and replacement instructions assume that the CLIP module being removed is the same type as the replacement CLIP module.
In applications with unprotected channels, the fiber on the B side of the CLIP is not connected to the NAM.
A protected CLIP module must be installed in conjunction with a NAM with a splitting ratio of 50/50, 10/90, or 90/10. An unprotected CLIP module must be installed in conjunction with a NAM with a splitting ratio of 100/0 or 0/100.
 |
Caution Be careful not to pull or make sharp bends in the optical fibers. Always clean and inspect MU or SC connectors with proper tools before inserting them into the adapters. |
The following paragraphs described the removal procedures for CLIP modules for both protected and unprotected channels.
Before removing a CLIP module, you should retrieve and write down the switchmode and data rate settings for the CLIP module using the ONS 15200 web-based interface Path Summary screen, the Command Line Interface (CLI), or Maintenance Manager CLIP Module Summary screen. To use the CLI for retrieving and setting the switchmode, see the "Set the Switchmode for a Client Layer Interface Port Module" section. To use the CLI for retrieving and setting the datarate, see the "Set the Data Rate" section. The default CLI setting for switchmode is automatic, and the default setting for datarate is stm_16.
Step 2 Protect the fiber ends with SC dust caps.
Step 3 Plug the ports with SC dust plugs.
Step 4 Disconnect the DWDM-layer Tx-to-CLIP module optical fiber.
Step 5 Protect the connector with an MU fiber cap.
Step 6 Plug the associated MU adapter on the CLIP module front panel with an MU dust plug.
Step 7 Disconnect the DWDM receiver A-side and B-side optical fiber connectors from the CLIP module, one at a time.
Step 8 Protect the connectors with MU fiber caps.
Step 9 Plug the associated MU adapters on the CLIP module front panel with MU dust plugs.
Step 10 Loosen the CLIP module mounting thumbscrews.
Step 11 Carefully remove the CLIP module from the ONS 15252 MCU or the ONS 15201 SCU. Make sure that the optical fibers are not harmed in the process.
Step 12 Install a CLIP module dummy front where the CLIP module was removed from the ONS 15252 MCU or the ONS 15201 SCU unit, unless you will replace it immediately.
Before removing a CLIP module, you should retrieve and write down the switchmode and data rate settings for the CLIP module. The default CLI setting for switchmode is automatic, and the default setting for datarate is stm_16.
Step 2 Protect the fiber ends with dust caps.
Step 3 Plug the ports with SC dust plugs.
Step 4 Disconnect the DWDM-layer Tx-to-CLIP module optical fiber.
Step 5 Protect the connector with an MU fiber cap.
Step 6 Plug the associated MU adapter on the CLIP module front panel with an MU dust plug.
Step 7 Disconnect the DWDM receiver A-side optical fiber connector from the CLIP module.
Step 8 Protect the connector with an SC fiber cap.
Step 9 Plug the associated MU adapter on the CLIP module front panel with an MU dust plug.
Step 10 Loosen the CLIP module mounting thumbscrews.
Step 11 Carefully remove the CLIP module from the ONS 15252 MCU or the ONS 15201 SCU. Ensure that the optical fibers are not harmed in the process.
Step 12 Install a CLIP module dummy front where the CLIP was removed from the ONS 15252 MCU or the ONS 15201 SCU, unless you plan to immediately replace the CLIP.
The following paragraphs describe the replacement procedures for CLIP modules for both protected and unprotected channels.
Step 2 Align the CLIP module with the CLIP module slot.
Step 3 Carefully insert the CLIP module into the slot. Be sure that the backplane connector and the CLIP module connector are correctly mated and that no optical fibers are damaged in the process.
Step 4 Tighten the CLIP module mounting thumbscrews.
Step 5 Remove the DWDM receiver dust plug from the A-side MU adapter on the CLIP module front.
Step 6 Remove the fiber cap from the A-side DWDM receiver optical fiber coming from the NAM (MCU) or CFM (SCU).
Step 7 Clean and inspect the fiber end and insert it into the A-side MU adapter.
Step 8 Remove the DWDM receiver dust plug from the B-side MU adapter on the CLIP module front.
Step 9 Remove the fiber cap from the DWDM B-side optical fiber coming from the NAM or the CFM.
Step 10 Clean and inspect the fiber end and insert it into the B-side MU adapter.
Step 11 Remove the dust plug from the CLIP module DWDM-layer transmit MU adapter.
Step 12 Remove the fiber cap from the DWDM-layer transmit fiber coming from the NAM or the CFM.
Step 13 Clean and inspect the fiber end and insert it into the DWDM-layer transmit adapter on the CLIP module.
Step 14 Remove the dust plug from the client-layer receive input on the CLIP module.
Step 15 Remove the fiber cap from the client-layer optical fiber intended for the client-layer receive port.
Step 16 Clean and inspect the fiber end and insert it into the client-layer receive port.
Step 17 Remove the dust plug from the client layer transmit port.
Step 18 Remove the fiber cap from the optical fiber intended for the client layer transmit port.
Step 19 Clean and inspect the fiber end and insert it into the client layer transmit port.
Step 20 Check the switchmode and datarate setting of the CLIP. To modify the settings, use the Maintenance Manager CLIP Module Summary screen or the CLI. To use the CLI for setting the switchmode, see the "Set the Switchmode for a Client Layer Interface Port Module" section. To use the CLI for setting the datarate, see the "Set the Data Rate" section.
Step 2 Align the CLIP module with the CLIP module slot.
Step 3 Carefully insert the CLIP module into the slot. Be sure that the backplane connector and the CLIP module connector are correctly mated and that no optical fibers are damaged in the process.
Step 4 Tighten the CLIP module thumbscrews.
Step 5 Remove the DWDM receiver dust plug from the A-side MU adapter on the CLIP module front.
|
Note Do not remove the B-side dust plug under any circumstances. |
Step 6 Remove the fiber cap from the DWDM receiver optical fiber coming from the NAM (MCU) or CFM (SCU).
Step 7 Clean and inspect the fiber end and insert it into the A-side MU adapter.
Step 8 Remove the dust plug from the DWDM-layer transmit MU adapter.
Step 9 Remove the fiber cap from the DWDM-layer transmit fiber coming from the NAM or CFM.
Step 10 Clean and inspect the fiber end and insert it into the DWDM-layer transmit port.
Step 11 Remove the dust plug from the client-layer receive port.
Step 12 Remove the fiber cap from optical fiber that is intended for the client-layer receive port.
Step 13 Clean and inspect the fiber end and insert it into the client-layer receive port or input adapter.
Step 14 Remove the dust plug from the client-layer transmit port.
Step 15 Remove the fiber cap from the optical fiber intended for the client-layer transmit port.
Step 16 Clean and inspect the fiber end and insert it into the CLIP module client-layer transmit port.
Step 17 Check the switchmode and datarate setting of the CLIP. To modify the settings, use the Maintenance Manager CLIP Module Summary screen or the CLI. To use the CLI for setting the switchmode, see the "Set the Switchmode for a Client Layer Interface Port Module" section. To use the CLI for setting the datarate, see the "Set the Data Rate" section.
This section includes procedures for setting the switchmode and datarate for a CLIP module.
Step 2 Type cd dwdm and press Enter.
Step 3 Type list value to view the summary data. Press Enter. Verify the switchmode setting.
Step 4 Type switchmode <mode>, where mode can be automatic, forced_a, forced_b, cond_a, or cond_b. Press Enter.
Step 5 Type list value and press Enter to verify that the change was accepted.
Step 6 Type exit to quit the CLIP module.
Step 7 Repeat Steps 1 through 6 to configure the switchmode for another CLIP module, if necessary.
Step 2 Type list value to view the summary data. Press Enter. Verify the data rate setting.
Step 3 Type datarate <rate>, where rate can be stm_1 for OC-3, stm_4 for OC-12, stm_16 for OC-48, or gbit_eth. Press Enter.
Step 4 Type list value and press Enter to verify that the change was accepted.
Step 5 Type exit to quit the CLIP module.
Step 6 Repeat Steps 1 - 5 to configure the data rate for another CLIP module, if necessary.
The EEPROM holds important information about identity, parameters, and calibration constants. The EEPROM has a size of 16 K and a serial interface.
![]()
![]()
![]()
![]()
![]()
![]()
![]()
![]()
Posted: Thu Apr 17 14:26:00 PDT 2003
All contents are Copyright © 1992--2002 Cisco Systems, Inc. All rights reserved.
Important Notices and Privacy Statement.