|
|

1. Check the packing slip to ensure that all the proper components are present.
2. Ensure the site is set up properly:
3. Obtain the following equipment:
4. Ensure your safety when installing the Catalyst 5509 switch:
5. Take steps to prevent ESD damage to electronic components:
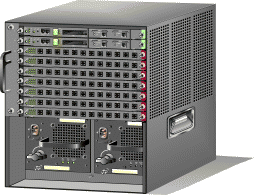
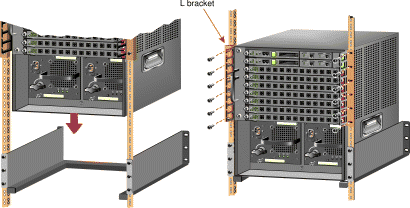
To rack-mount the Catalyst 5509 switch:
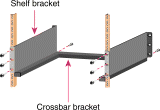
1. Install the shelf brackets and crossbar bracket
1. Secure each shelf bracket to the rack using six (three per side) 12-24 or 10-32 screws.
2. Attach the crossbar bracket to the back of the shelf brackets using two (one per side) M3 screws.
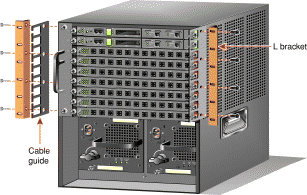
1. Attach the L brackets to the chassis using the eight M4 Phillips countersunk-head screws provided in the rack-mount kit.
2. (Optional) Attach the cable guide using the screws provided in the cable management kit.
1. Position one person on each side of the chassis. Lift the switch and position it on the shelf brackets and crossbar.
2. Align the mounting holes in the L brackets with the mounting holes in the rack.
3. Have the third person secure the chassis by inserting the mounting screws through the holes in the L brackets and into the threaded holes in the mounting posts.
4. Use a tape measure and level to ensure the chassis is installed straight and level.
To connect the Catalyst 5509 switch to the network:
| Caution To prevent ESD damage to electronic components, always use an ESD wrist strap when handling modules or coming into contact with internal components. |
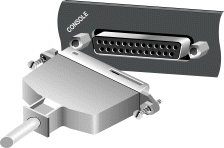
To connect a terminal to the Supervisor Engine I or II console port, plug an EIA/TIA-232 (RS-232) DCE DB-25-to-DTE DB-25 straight-through cable into the console port.
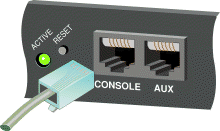
To connect a terminal to the Supervisor Engine II G, III, III G, III FSX or III FLX console port, plug an RJ-45-to-RJ-45 straight-through cable into the console port jack. Use an RJ-45-to-DB-25 or RJ-45-to-DB-9 adapter to connect to the terminal.
The Catalyst 5000 series modules use the following connection types:
To connect to modules with RJ-45 interfaces, use Category 5 UTP (100BaseTX, 10/100BaseTX, CDDI, Token Ring, ATM), Category 3 UTP (10BaseT), or Type 1 FTP (Token Ring) cables with male RJ-45 interfaces.
Supervisor Engine I and II modules with 100BaseTX uplinks have MII ports in addition to RJ-45 ports. To connect to the MII interfaces, use Category 5 UTP cables with male MII connectors.
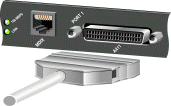
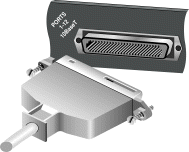
To connect to modules with RJ-21 Telco interfaces, use Category 3 UTP cable with male RJ-21 Telco connectors.
To connect to modules with SC-type fiber-optic interfaces, use single-mode or multimode fiber-optic cable with male SC-type connectors.

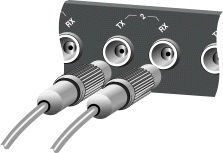
To connect to modules with ST-type fiber-optic interfaces, use single-mode (FDDI) or multimode (10BaseFL) fiber-optic cable with male ST-type connectors.
To connect to modules with MT-RJ interfaces, use multimode fiber-optic cables with MT-RJ connectors.
To connect to the FDDI module MMF (WS-X5101), use multimode fiber-optic cable with a male MIC-type connector.
To connect to the ATM dual PHY DS3 module (WS-X5166), use 75-ohm RG-59 coaxial cable with male BNC connectors.
| Caution To prevent ESD damage to electronic components, always use an ESD wrist strap when handling modules or coming into contact with internal components. |
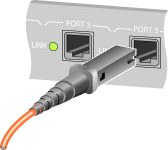
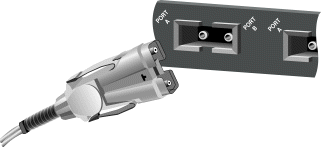
A GBIC is a hot-swappable input/output device that plugs into the uplink ports of the Supervisor Engines II G and III G, and the Gigabit Ethernet ports of the Gigabit Ethernet switching modules.
1. Remove the GBIC from its protective packaging.
2. Grip the sides of the GBIC with your thumb and forefinger. Insert the GBIC into the slot on the front of the supervisor engine or switching module (see figure).

3. Slide the GBIC through the flap covering the slot opening until you hear a click.
4. Remove the plug from the GBIC and save it for future use.
5. Attach the fiber-optic cable with male SC-type connectors to the GBIC.
| Warning Before you work on any equipment, be aware of the hazards involved with electrical circuitry and be familiar with standard practices for preventing accidents. |
| Caution To prevent ESD damage to electronic components, always use an ESD wrist strap when handling modules or coming into contact with internal components. |
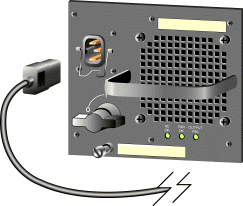
Use the procedure appropriate for the type of power supplies you have installed in your Catalyst 5509 switch:
1. Verify that each power supply is properly installed in its bay. Make sure the power supplies are off (0).
2. Connect an AC power cable to each power supply. Use the retaining clip to secure the cord to each power supply connection.
3. Attach each power cable to a grounded outlet. If possible, connect each cable to an outlet on a separate circuit. Make sure that the source power is within range.
| Warning Before performing the following procedure, remove power to the DC-input circuit by turning the circuit breaker OFF. |
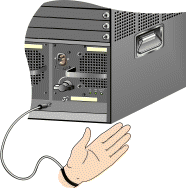
1. Verify that each power supply is correctly installed in its bay and that the power switches are off (0).
2. On each power supply, remove the screws securing the terminal block cover and slide the cover straight off the terminal block.
3. Attach the appropriate lugs to the DC-input wires. (Suggested lugs are AMP 322985 or 52941; suggested DC-input wires are 10-AWG copper conductors.)
4. Wire the DC-input power supply to the terminal block (see figure), ensuring that all wire connections are secure:
a) Connect the ground wire to the ground terminal (you should always connect the ground wire first and disconnect it last)
b) Connect the -48V wire to the - terminal
c) Connect the -48V return to the + terminal
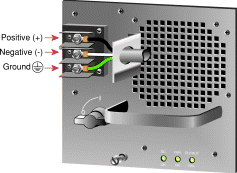
5. Replace the terminal block cover.
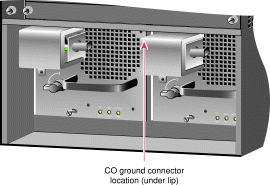
6. On a new installation, remove the adhesive strip covering the CO ground connector (see figure for connector location).
7. Connect a 10- to 12-AWG, copper conductor, ground wire to the CO ground connector. Use a ground wire lug that is 0.320 of an inch (7.8 mm) or less.
8. Restore power to the DC-input circuit by turning the circuit breaker on.
1. Before you start the system, verify the following:
2. Turn the power supplies on (|). The switch begins the boot process.
3. During the boot process:
4. Press Return at the Enter Password prompt to access the console command line.
| Caution To prevent ESD damage to electronic components, always use an ESD wrist strap when handling modules or coming into contact with internal components. |
Use the following procedures when inserting or removing Catalyst 5000 series modules:
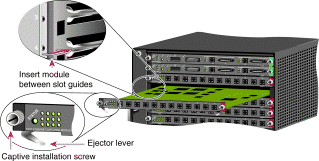
1. Align the edges of the module with the slot guides on the sides of the chassis (see figure).
2. Ensure that the ejector levers are in the out position. Keeping the module horizontal, slide the module into the slot until the ejector levers contact the chassis.
3. Push both ejector levers in simultaneously to seat the module in the backplane connector.
4. Tighten the captive screws with a flat-blade screwdriver.
1. Loosen the captive screws on the module using a flat-blade screwdriver.
2. Pull the ejector levers outward simultaneously to release the module from the backplane connector.
3. Pull the module straight out of the slot and place it on an antistatic mat or in an antistatic bag.
| Caution To prevent ESD damage to electronic components, always use an ESD wrist strap when handling modules or coming into contact with internal components. |
Use the following procedures when inserting or removing Catalyst 5000 series power supplies:
1. Ensure that the power supply is disconnected and the switch is turned off (0).
2. Slide the power supply straight into the power supply bay (see figure).
3. Use a flat-blade screwdriver to tighten the captive installation screw.
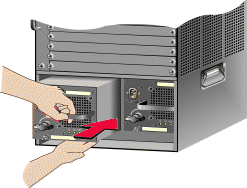
1. Turn off (0) the power switch. Disconnect the power cord from the power source and from the power supply.
2. Use a flat-blade screwdriver to loosen the captive installation screw.
3. Grasp the power supply handle and pull the supply straight out of the bay, supporting the supply with your other hand (see figure). Install a filler plate if the bay is to remain empty.
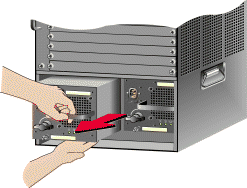
1. Turn off (0) the power switch on the power supply.
2. Turn off the power to the DC circuit connected to the power supply.
3. Remove the terminal block cover from the power supply. Disconnect the DC-input wires from the terminal block. Disconnect the ground wire last.
4. Disconnect the central office (CO) ground from the CO ground connector.
5. Use a flat-blade screwdriver to loosen the captive screw on the power supply.
6. Grasp the power supply handle and pull the supply straight out of the bay, supporting the supply with your other hand (see figure). Install a filler plate if the bay is to remain empty.
![]()
![]()
![]()
![]()
![]()
![]()
![]()
![]()
Posted: Thu Jun 17 09:57:46 PDT 1999
Copyright 1989-1999©Cisco Systems Inc.


