|
|

This publication contains procedures for installing and verifying the operation of the Catalyst 5000 family Supervisor Engine III and uplink modules.
 |
Note For translations of the warnings in this note, see the "Translated Safety Warnings" section. |
This publication contains the following sections:
The Catalyst 5000 family consists of five modular LAN switches:
All switches share the same set of modules and software features, which provide scalability while maintaining interoperability across all platforms.
Table 1 describes the Catalyst 5000 family switches.
| Switch | Description | Features | ||
|---|---|---|---|---|
2-slot switch |
| |||
5-slot switch |
| |||
5-slot switch |
| |||
9-slot switch |
| |||
13-slot switch |
|
The Supervisor Engine III hardware allows all three 1.2-Gbps backplanes in the Catalyst 5500 series switches to operate independently, providing 3.6-Gbps throughput (when traffic does not have to cross the backplane bus segments).
The Supervisor Engine III boots differently from the earlier supervisor engines. The Supervisor Engine III boot process uses two images: ROM monitor and Catalyst 5000 family supervisor engine software. The ROM monitor is the first software to run when the switch is powered up or reset. Based on how the ROM monitor has been configured, the switch either stays in ROM monitor mode or loads the supervisor engine software (refer to the Software Configuration Guide for your switch for detailed information about using ROM monitor mode).
A configuration register allows you to configure the ROM monitor, and the BOOT environment variable allows you to specify the location and filename of images to boot.
This section describes the Supervisor Engine III physical components.
Supervisor Engine III is available in three base units that can be configured with any of the available uplink modules:
See the "Supervisor Engine III Uplink Modules" section for uplink module descriptions.

Table 2 shows the available uplink modules including product numbers and descriptions.
| Product Number | Description |
|---|---|
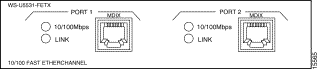
WS-U5531-FETX | Dual-port 10/100BASE-TX RJ-45 |
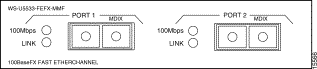
WS-U5533-FEFX-MMF | Dual-port 100BASE-FX MMF SC |
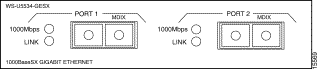
WS-U5534-GESX | Dual-port 1000BASE-SX SC |
WS-U5535-FEFX-SMF | Dual-port 100BASE-FX SMF SC |
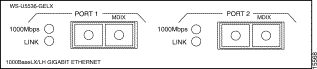
WS-U5536-GELX | Dual-port 1000BASE-LX/LH SC |
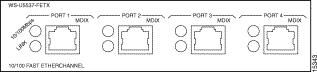
WS-U5537-FETX | Four-port 10/100BASE-TX RJ-45 |
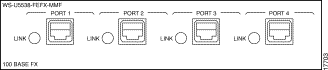
WS-U5538-FEFX-MMF | Four-port 100BASE-FX MTRJ |
The uplink module faceplates are displayed in Figure 4 through Figure 10.

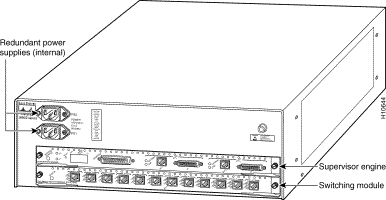
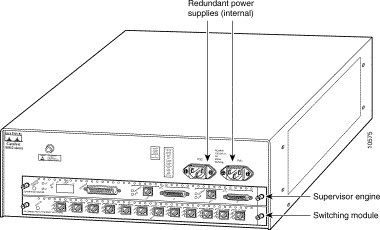
This section describes the front panel features of the Supervisor Engine III. (See Figure 11.)
|
Note The Supervisor Engine III shown here features the dual-port 10/100BASE-TX Fast EtherChannel uplink module. All the available uplink modules are described in the "Supervisor Engine III Uplink Modules" section. |
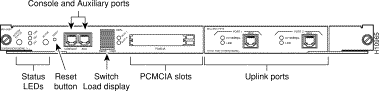
The LEDs on the supervisor engine front panel indicate the status of the system, which includes the status of the supervisor engine, the power supplies, and the fan assembly. Table 3 describes LED operation.
| LED | State | Description | ||
|---|---|---|---|---|
| Indicates the results of a series of self-tests and diagnostic tests. | |||
| Green | All the tests pass. | ||
| Red | During system boot if the module is disabled, or if any test fails. | ||
| Orange |
| ||
|
|
| ||
| Indicates whether or not the fan is operational. | |||
| Green | The fan is operational. | ||
| Red | The fan is not operational. | ||
| Indicates whether or not the power supply in the left bay is operational. | |||
| Catalyst 5000, Catalyst 5505, Catalyst 5509, and Catalyst 5500 switches: | |||
| Green | The power supply in the left bay is operational. | ||
| Red | The power supply in the left bay is not operational, switched off, or not receiving input power. | ||
| Off | The power supply in the left bay is off or not installed.
| ||
| Catalyst 5002 switch: | |||
| Green | The power supply associated with the PS1 AC receptacle or DC terminal block is operational. | ||
| Red | The power supply associated with the PS1 AC receptacle or DC terminal block is not receiving input power. | ||
| Indicates whether or not the power supply in the right bay is operational. | |||
| Catalyst 5000, Catalyst 5505, Catalyst 5509, and Catalyst 5500 switches: | |||
| Green | The power supply in the right bay is operational. | ||
| Red | The power supply in the right bay is not operational, switched off, or not receiving input power. | ||
| Off | The power supply in the right bay is off or not installed.
| ||
| Catalyst 5002 switch: | |||
| Green | The power supply associated with the PS2 AC receptacle or DC terminal block is operational. | ||
| Red | The power supply associated with the PS2 AC receptacle or DC terminal block is not receiving input power. | ||
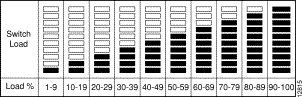
1-100% | If the switch is operational, the switch load display indicates (as an approximate percentage) the current traffic load over the backplane (see Figure 12). | |||
Green | The supervisor engine is operational and active. | |||
| Orange | The supervisor engine is in standby mode. | ||
| Supervisor Engine III only: The Flash PC Card SLOT 1 and SLOT 0 LEDs light when their respective slot 1 and slot 0 Flash PC Card devices are accessed by the switch. | |||
Green | The port is operating at 100 Mbps. | |||
1000 Mbps | Green | The port is operating at 1000 Mbps. | ||
Green | The port is operational. | |||
| Orange | The link has been disabled by software. | ||
| Flashing orange | The link is bad and has been disabled due to a hardware failure. | ||
| Off | No signal is detected. | ||
The Reset button allows you to restart the switch.
|
Note Use a paper clip or other small, pointed object to access the Reset button. |
The Switch Load display (See Figure 12) provides you with a visual approximation of the current aggregate traffic load across all buses.
The console port allows you to perform the following functions:
The console port is an EIA/TIA-232 asynchronous, serial, full-featured data terminal equipment (DTE) connection with hardware flow control and an RJ-45 connector. A console port accessory kit with the necessary cabling and adapters is provided for making your terminal connections.
See the "Using Flash PC Cards" section for terminal connection and configuration information.
The AUX port is currently not supported.
The Fast Ethernet ports operate in full- or half-duplex mode. These ports support the following connectivity:
The Gigabit Ethernet ports operate in full-duplex mode only. These ports support the 1000BASE-SX MMF interface using SC-type connectors with multimode fiber-optic cable and 1000BASE-LX/LH MMF or SMF interfaces using SC-type connectors with multimode or single-mode fiber-optic cable.
 |
Caution When connecting the 1000BASE-LX/LH uplink module port with 62.5-micron diameter multimode fiber (MMF), we recommend that you install a mode-conditioning patch cord (Cisco product number CAB-GELX-625 or equivalent) between the uplink port and the MMF cable on both the transmit and receive ends of the link. The patch cord is required for link distances greater than 984 feet (300 meters). Otherwise, an effect called differential mode delay might degrade link performance. For more information, refer to the Catalyst 5000 Family Supervisor Engine Installation Guide. |
Refer to Chapter 2, "Installing the Supervisor Engine," in the Catalyst 5000 Family Supervisor Engine Installation Guide for detailed information on using these ports.
The Flash PC card (PCMCIA) slots are for additional system Flash memory. You can use this Flash memory to store and run supervisor engine software images or to serve as an I/O device. For information on using the Flash PC cards, see the "Removing and Replacing the Supervisor Engine" section.
Onboard memory consists of dynamic random-access memory (DRAM) for the default system software, Flash memory for downloading the system software, and nonvolatile RAM (NVRAM) for the configuration file. Refer to the Release Notes for your supervisor engine software release for the minimum requirements for each supervisor engine.
Flash memory allows you to load and store system software images. You can download a new software image over the network or from a local Trivial File Transfer Protocol (TFTP) server and add the new image to Flash memory or replace an existing file in Flash memory. The Supervisor Engine III Flash memory contains a file system, which includes the following:
You can use several commands to manage the file system (such as cd, pwd, dir, delete, and copy).
For information on using the Flash PC card, see the "Removing and Replacing the Supervisor Engine" section. For information on configuring Supervisor Engine III to boot from Flash PC card memory devices, see the "Standards Compliance Specifications" section.
An electronically erasable programmable read-only memory (EEPROM) component on the supervisor engine stores module-specific information, such as the module serial number, part number, controller type, hardware revision, configuration information, and other details unique to each module. The supervisor engine EEPROM also contains an address allocator, which is a bank of 1024 hardware or media access control (MAC)-level addresses, one for each possible virtual local area network (VLAN) in the system.
The configuration file is stored in nonvolatile random-access memory (NVRAM).
 |
Warning This warning symbol means danger. You are in a situation that could cause bodily injury. Before you work on any equipment, be aware of the hazards involved with electrical circuitry and be familiar with standard practices for preventing accidents. To see translations of the warnings that appear in this publication, refer to the "Translated Safety Warnings" section in this document. |
|
Warning Before you install, operate, or service the system, read the Site Preparation and Safety Guide. This guide contains important safety information you should know before working with the system. |
These tools are required to install a supervisor engine in the Catalyst 5000 family switches:
Whenever you handle a supervisor engine, always use a wrist strap or other grounding device to prevent electrostatic discharge (ESD). For information on preventing ESD, see the "Preventing ESD" section of the Site Preparation and Safety Guide.
The following sections describe the supervisor engine removal and replacement procedures:
|
Note To support supervisor engine redundant operation, both the supervisor engines must have the same type of EARL card—two EARLs or two NFFCs. |
|
Note Catalyst 5505, Catalyst 5509, and Catalyst 5500 switches—When two supervisor engines are installed, hot swapping allows you to remove and replace one of the supervisor engines without turning off the system power. |
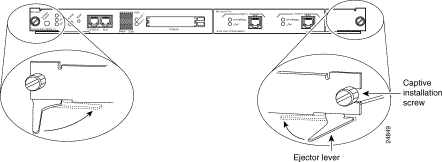
The ejector levers on the supervisor engine and switching modules align and seat the module connectors in the backplane. (See Figure 13.) If you fail to use the ejector levers to insert the module, you can disrupt the order in which the pins make contact with the backplane. When removing a module, use the ejector levers to ensure that the module connector pins disconnect from the backplane properly. Any supervisor engine or switching module that is only partially connected to the backplane can disrupt the system.

Before you remove a supervisor engine, you should first upload the current configuration to a server. This saves time when bringing the supervisor engine back online.
Enter the write network command to upload the configuration file to the network. Refer to the write, show config, and write config commands in the Command Reference for your switch for examples.
Enter the copy command to download the current configuration to a Flash memory device on the new supervisor engine.
|
Caution To prevent ESD damage, handle switching modules by the carrier edges only. |
|
Warning During this procedure, wear grounding wrist straps to avoid ESD damage to the card. Do not directly touch the backplane with your hand or any metal tool, or you could shock yourself. |
To remove a supervisor engine, perform the following steps:
Step 2 Use a screwdriver to loosen the captive installation screws at the left and right sides of the module.
Step 3 Grasp the left and right ejector levers. Simultaneously pull the left lever to the left and the right lever to the right to release the module from the backplane connector.
Step 4 Grasp the handle of the module with one hand and place your other hand under the carrier to support and guide the module out of the slot. Avoid touching the module itself.
Step 5 Carefully pull the module straight out of the slot, keeping your other hand under the carrier to guide it. Keep the module at a 90-degree orientation to the backplane.
Step 6 Place the removed module on an antistatic mat or antistatic foam.
Step 7 If the slot is to remain empty, install a module filler plate to keep dust out of the chassis and to maintain proper airflow through the module compartment.
|
Warning Blank faceplates and cover panels serve three important functions: they prevent exposure to hazardous voltages and currents inside the chassis; they contain electromagnetic interference (EMI) that might disrupt other equipment; and they direct the flow of cooling air through the chassis. Do not operate the system unless all cards, faceplates, front covers, and rear covers are in place. |
|
Note When you remove and replace the supervisor engine, the system provides status messages on the console screen. The messages are for information only. Enter the show system and show module commands to view specific information. For additional information, refer to the Software Configuration Guide and Command Reference for your switch. |
When installing the supervisor engine, note that it must go in a specific slot:
|
Caution To prevent ESD damage, handle switching modules by the carrier edges only. |
|
Warning During this procedure, wear grounding wrist straps to avoid ESD damage to the card. Do not directly touch the backplane with your hand or any metal tool, or you could shock yourself. |
To install the supervisor engine, follow these steps:
Step 2 Align the edges of the supervisor engine carrier with the slot guides on the sides of the switch chassis.
Step 3 Pivot the two module ejector levers out away from the faceplate. The ejector levers are shown pivoted out in Figure 14.
Step 4 Keeping one hand under the carrier to guide the supervisor engine, carefully slide it into the slot on the Catalyst 5000 family switch until the ejector levers click into place on the chassis. Be sure to keep the module horizontal to the backplane and avoid touching any of the components on the module.
Step 5 Using the thumb and forefinger of each hand, simultaneously pivot in both ejector levers, as shown in Figure 14, to fully seat the switching module in the backplane connector.
|
Caution Always use the ejector levers when installing or removing switching modules. A module that is partially seated in the backplane will cause the system to halt and subsequently crash. |
Step 6 Use a screwdriver to tighten the captive installation screws at the left and right sides of the module.
This section describes how to remove and replace supervisor engine uplink modules. If you have a supervisor engine with an uplink module already installed and you are replacing the uplink module, see the "Replacing an Uplink Module" section. If you are installing an uplink module into a supervisor engine with no uplink module, see the "Adding an Uplink Module" section.
Use this procedure to remove and replace an uplink module:
Step 2 Use a Phillips-head screwdriver to remove the four screws securing the uplink module to the supervisor engine. (See Figure 15.)
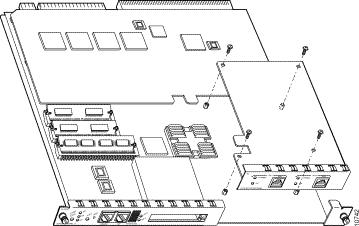
Step 3 Carefully pull the uplink module up and out of the supervisor engine.
|
Note The rear of the uplink module connects to the supervisor engine through connectors on the bottom side of the uplink module. Use care when unseating the uplink module from these connectors. |
Step 4 Place the removed uplink module in an antistatic bag.
Step 5 Remove the new uplink module from its antistatic bag and install it in the supervisor engine. Use care when seating the rear of the uplink module into the connectors.
Step 6 Ensure that the uplink module is securely seated in the supervisor engine.
|
Caution Ensure that the module is securely seated before installing and tightening the securing screws. Using the screws to seat the module could warp the module. |
Step 7 Use a Phillips-head screwdriver to install the four screws that secure the uplink module to the supervisor engine.
Step 8 Install the supervisor engine into the Catalyst 5000 family switch. See the "Installing the Supervisor Engine" section.
Use this procedure to add an uplink module to a supervisor engine with no uplink module:
Step 2 Use a Phillips-head screwdriver to remove the two screws securing the blank uplink module filler plate from the supervisor engine. Set the screws in a secure place because they will be reused.
Step 3 Use a Phillips-head screwdriver to remove the two screws from the two standoffs that will secure the rear of the uplink module. Set the screws in a secure place because they will be reused.
Step 4 Remove the new uplink module from its antistatic bag and install it in the supervisor engine. Use care when seating the rear of the uplink module into the connectors.
Step 5 Ensure that the uplink module is securely seated in the supervisor engine.
Step 6 Use a Phillips-head screwdriver to install the four screws that secure the uplink module to the supervisor engine. (See Figure 15.)
|
Caution Ensure that the module is securely seated before installing and tightening the securing screws. Using the screws to seat the module could warp the module. |
Step 7 Install the supervisor engine into the Catalyst 5000 family switch. See the "Installing the Supervisor Engine" section.
|
Note Flash PC cards must either be formatted on the Supervisor Engine III or on a route switch processor (RSP)-based Cisco 7500 series router running software at the same level or later as the Supervisor Engine III. Flash PC cards previously formatted on a route processor (RP)-based Cisco 7000 series router cannot be used on the Supervisor Engine III. Note that Flash PC cards formatted on the Supervisor Engine III can be used on RSP-based Cisco 7500 series routers (but not on RP-based Cisco 7000 series routers). |
The Supervisor Engine III has two Flash PC card slots: slot 0 (bottom) and slot 1 (top). The Flash PC cards are available in two sizes: 16 and 20 MB.
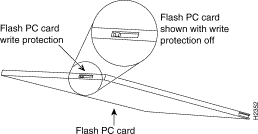
Before you install a card, verify that the Flash PC card's write protection is off. The write-protection switch is located on the front edge of the card when oriented with the printing right side up and the edge connector end away from you. (See Figure 16.)
|
Note You can insert and remove the Flash PC card with the power on. |
To install and remove a Flash PC card, follow this procedure:
Step 2 Insert the card into the appropriate slot until the card completely seats in the connector at the back of the slot and the eject button pops out toward you. Note that the card does not insert all the way inside the slot; a portion of the card remains outside the slot. Do not attempt to force the card past this point.
Step 3 To eject a card, press the appropriate ejector button until the card is free of the connector at the back of the slot.
Step 4 Remove the card from the slot and place it in an antistatic bag.
For information on the boot process using Flash PC card memory, see the "Standards Compliance Specifications" section. For Flash PC card formatting instructions, refer to the Catalyst 5000 Family Installation Guide.
Connect the terminal using a thin, flat, RJ-45-to-RJ-45 cable (looks like a telephone cable) and an RJ-45-to-DB-9, RJ-45-to-D-subminiature female, or RJ-45-to-D-subminiature male adapter.
|
Note An RJ-45-to-RJ-45 cable and adapters are provided in the console port accessory kit shipped with your Supervisor Engine III. |
Table 4 lists the pinouts for the console port.
| Console Port | Console Device |
|---|---|
| Pin (signal) | Connect to |
1 is looped to pin 8 |
|
2 (DTR) | DSR |
3 (RxD) | TxD |
4 (GND) | GND |
5 (GND) | GND |
6 (TxD) | RxD |
7 (DSR) | DTR |
8 is looped to pin 1 |
|
|
Note The console port is an asynchronous serial port; any device connected to this port must be capable of asynchronous transmission. |
Before connecting the console port, check the terminal documentation to determine the baud rate. The baud rate of the terminal must match the default baud rate (9600 baud) of the console port. Set up the terminal as follows:
The Supervisor Engine III has the following interface ports:
The 10/100BASE-TX and 100BASE-FX ports operate in full- or half-duplex mode. The 1000BASE-SX MMF and 1000BASE- LX/LH MMF and SMF ports operate in full-duplex mode only.
For information on interface cables and equipment, such as Ethernet transceivers, refer to the Catalyst 5000 Family Supervisor Engine Installation Guide.
The 10/100BASE-TX RJ-45 port cable connector is shown in Figure 17.

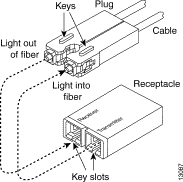
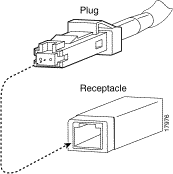
Use SC-type fiber-optic connectors (see Figure 18) to connect to the 100BASE-FX (dual port), 1000BASE-SX, and 1000BASE-LX/LH ports. Use MTRJ fiber-optic connectors (see Figure 19) to connect to the 100BASE-FX (four port) ports. Always keep caps and plugs on the fiber-optic connectors on the cable and on the switch when they are not in use.
After all interfaces are connected, check all connections, and then perform the following steps to verify that the switch is operational:
Step 2 Verify that the appropriate PS1 and PS2 LEDs on the supervisor engine front panel are green.
Step 3 While the system initializes, check that the System Status LED on the supervisor engine is orange until the boot is complete.
Step 4 Some interface LEDs might go on or blink for a short time. Some LEDs, such as the Link LED, stay on during the entire boot process. If an interface is already configured, the LEDs might be on steadily as they detect traffic on the line. Wait until the system boot is complete before attempting to verify the switching module LED indications.
|
Note Catalyst 5505, Catalyst 5509, and Catalyst 5500—If you have a redundant supervisor engine, refer to the "Using Redundant Supervisor Engines" chapter of the Software Configuration Guide for your switch for a detailed description of supervisor engine operation in a redundant configuration. By default, the supervisor engine in slot 1 is the active supervisor; the second supervisor in slot 2 is the standby supervisor. |
|
Note Many of the switching module LEDs are not on until you configure the interfaces. |
Step 5 When the system boot is complete (it takes a few seconds), the supervisor engine begins to initialize the switching modules.
During this initialization, the LEDs on each switching module behave differently (most flash on and off). The System Status LED on each switching module goes on when initialization is complete, and the console screen displays a script and system banner.
|
Note When the switching module LEDs are on, the interface ports are not necessarily functional or enabled. Although the LEDs for many interface types go on at the initial system startup, they do not indicate an accurate status until the interface is configured. For detailed module-specific LED descriptions, refer to the Catalyst 5000 Family Module Installation Guide. |
|
Note Catalyst 5500 only—The Asynchronous Transfer Mode (ATM) system processor (ASP), ATM port adapter carrier, and ATM adapter module LEDs are described in the LightStream 1010 ATM Switch User Guide. The Catalyst 8510 Campus Switch Router (CSR) Switch Route Processor (SRP) is described in the Catalyst 8510 Campus Switch Router documentation. These publications are available on the Cisco Connection Documentation CD and in print. |
Step 6 Your hardware installation is now complete. Refer to the Software Configuration Guide and Command Reference for your switch for complete software configuration instructions.
Table 5 lists standards compliance specifications for the Catalyst 5000 family supervisor engine.
| Specification | Description | |
Compliance | CE1 Marking |
|
Safety | UL2 1950, CSA3-C22.2 No. 950, EN460950, IEC5 950, TS6 001, AS/NZS7 3260 | |
EMI8 | FCC9 Class A (47 CFR10, Part 15), ICES11-003 Class A, EN55022 Class A, CISPR22 Class A, AS/NZS 3548 Class A, and VCCI12 Class A with UTP13 EN55022 Class B, CISPR22 Class B, AS/NZS 3548 Class B, and VCCI Class B with FTP14 cables | |
This equipment has been tested and found to comply with the limits for a Class A digital device, pursuant to part 15 of the FCC rules. These limits are designed to provide reasonable protection against harmful interference when the equipment is operated in a commercial environment. This equipment generates, uses, and can radiate radio-frequency energy and, if not installed and used in accordance with the instruction manual, may cause harmful interference to radio communications. Operation of this equipment in a residential area is likely to cause harmful interference, in which case users will be required to correct the interference at their own expense.
You can determine whether your equipment is causing interference by turning it off. If the interference stops, it was probably caused by the Cisco equipment or one of its peripheral devices. If the equipment causes interference to radio or television reception, try to correct the interference by using one or more of the following measures:
Modifications to this product not authorized by Cisco Systems could void the FCC approval and negate your authority to operate this product.
| |||
Waarschuwing | Dit waarschuwingssymbool betekent gevaar. U verkeert in een situatie die lichamelijk letsel kan veroorzaken. Voordat u aan enige apparatuur gaat werken, dient u zich bewust te zijn van de bij elektrische schakelingen betrokken risico's en dient u op de hoogte te zijn van standaard maatregelen om ongelukken te voorkomen. Voor vertalingen van de waarschuwingen die in deze publicatie verschijnen, kunt u het gedeelte "Translated Safety Warnings" (Vertalingen van veiligheidsvoorschriften) raadplegen in dit document. | ||
Varoitus | Tämä varoitusmerkki merkitsee vaaraa. Olet tilanteessa, joka voi johtaa ruumiinvammaan. Ennen kuin työskentelet minkään laitteiston parissa, ota selvää sähkökytkentöihin liittyvistä vaaroista ja tavanomaisista onnettomuuksien ehkäisykeinoista. Tässä julkaisussa esiintyvien varoitusten käännökset löydät tämän asiakirjan "Translated Safety Warnings" (käännetyt turvallisuutta koskevat varoitukset). | ||
Attention | Ce symbole d'avertissement indique un danger. Vous vous trouvez dans une situation pouvant causer des blessures ou des dommages corporels. Avant de travailler sur un équipement, soyez conscient des dangers posés par les circuits électriques et familiarisez-vous avec les procédures couramment utilisées pour éviter les accidents. Pour prendre connaissance des traductions d'avertissements figurant dans cette publication, consultez la section « Translated Safety Warnings » (Traduction des avis de sécurité) de ce document. | ||
Warnung | Dieses Warnsymbol bedeutet Gefahr. Sie befinden sich in einer Situation, die zu einer Körperverletzung führen könnte. Bevor Sie mit der Arbeit an irgendeinem Gerät beginnen, seien Sie sich der mit elektrischen Stromkreisen verbundenen Gefahren und der Standardpraktiken zur Vermeidung von Unfällen bewußt. Übersetzungen der in dieser Veröffentlichung enthaltenen Warnhinweise finden Sie im Abschnitt "Translated Safety Warnings" (Übersetzung der Warnhinweise) in diesem Dokument. | ||
Avvertenza | Questo simbolo di avvertenza indica un pericolo. La situazione potrebbe causare infortuni alle persone. Prima di lavorare su qualsiasi apparecchiatura, occorre conoscere i pericoli relativi ai circuiti elettrici ed essere al corrente delle pratiche standard per la prevenzione di incidenti. La traduzione delle avvertenze riportate in questa pubblicazione si trova nella documento "Translated Safety Warnings" (Traduzione delle avvertenze di sicurezza) nel presente documento. | ||
Advarsel | Dette varselsymbolet betyr fare. Du befinner deg i en situasjon som kan føre til personskade. Før du utfører arbeid på utstyr, må du vare oppmerksom på de faremomentene som elektriske kretser innebærer, samt gjøre deg kjent med vanlig praksis når det gjelder å unngå ulykker. Hvis du vil se oversettelser av de advarslene som finnes i denne publikasjonen, kan du se i avsnittet "Translated Safety Warnings" [Oversatte sikkerhetsadvarsler] i dette dokumentet. | ||
Aviso | Este símbolo de aviso indica perigo. Encontra-se numa situação que lhe poderá causar danos físicos. Antes de começar a trabalhar com qualquer equipamento, familiarize-se com os perigos relacionados com circuitos eléctricos, e com quaisquer práticas comuns que possam prevenir possíveis acidentes. Para ver as traduções dos avisos que constam desta publicação, consulte a secção "Translated Safety Warnings" - "Traduções dos Avisos de Segurança" neste documento. | ||
¡Advertencia! | Este símbolo de aviso significa peligro. Existe riesgo para su integridad física. Antes de manipular cualquier equipo, considerar los riesgos que entraña la corriente eléctrica y familiarizarse con los procedimientos estándar de prevención de accidentes. Para ver una traducción de las advertencias que aparecen en esta publicación, consultar la sección titulada "Translated Safety Warnings" que aparece en este documento. | ||
Varning! | Denna varningssymbol signalerar fara. Du befinner dig i en situation som kan leda till personskada. Innan du utför arbete på någon utrustning måste du vara medveten om farorna med elkretsar och känna till vanligt förfarande för att förebygga skador. Om du vill se översättningar av de varningar som visas i denna publikation, se avsnittet "Translated Safety Warnings" [Översatta säkerhetsvarningar] i detta dokument. | ||
| |||
Waarschuwing | Lees de handleiding Voorbereiding en veiligheid van de locatie Handleiding voordat u het systeem installeert of gebruikt of voordat u onderhoud aan het systeem uitvoert. Deze handleiding bevat belangrijke beveiligingsvoorschriften waarvan u op de hoogte moet zijn voordat u met het systeem gaat werken. | ||
Varoitus | Ennen kuin asennat järjestelmän tai käytät tai huollat sitä, lue Asennuspaikan valmistelu-jaturvaopas -opasta. Tässä oppaassa on tärkeitä turvallisuustietoja, jotka tulisi tietää ennen järjestelmän käyttämistä. | ||
Attention | Avant d'installer le système, de l'utiliser ou d'assurer son entretien, veuillez lire le Guide de sécurité et de préparation du site. Celui-ci présente des informations importantes relatives à la sécurité, dont vous devriez prendre connaissance. | ||
Warnung | Warnhinweis Bevor Sie das System installieren, in Betrieb setzen oder warten, lesen Sie die Anleitung zur Standortvorbereitung und Sicherheitshinweise. Dieses Handbuch enthält wichtige Informationen zur Sicherheit, mit denen Sie sich vor dem Verwenden des Systems vertraut machen sollten. | ||
Avvertenza | Prima di installare, mettere in funzione o effettuare interventi di manutenzione sul sistema, leggere le informazioni contenute nella documentazione sulla Guida alla sicurezza. Tale guida contiene importanti informazioni che è necessario acquisire prima di iniziare qualsiasi intervento sul sistema. | ||
Advarsel | Før du installerer, tar i bruk eller utfører vedlikehold på systemet, må du lese Veiledning for stedsklargjøring og sikkerhet. Denne håndboken inneholder viktig informasjon om sikkerhet som du bør være kjent med før du begynner å arbeide med systemet. | ||
Aviso | Antes de instalar, funcionar com, ou prestar assistência ao sistema, leia o Guia de Preparação e Segurança do Local. Este guia contém informações de segurança importantes que deve conhecer antes de trabalhar com o sistema. | ||
¡Advertencia! | Antes de instalar, manejar o arreglar el sistema, le aconsejamos que consulte la Guía de prevención y preparación de una instalación. Esta guía contiene importante información para su seguridad que debe saber antes de comenzar a trabajar con el sistema. | ||
Varning! | Innan du installerar, använder eller utför service på systemet ska du läsa Förberedelser och säkerhet Handbok. Denna handbok innehåller viktig säkerhetsinformation som du bör känna till innan du arbetar med systemet. | ||
| |||
Waarschuwing | Draag tijdens deze procedure aardingspolsbanden om te vermijden dat de kaart beschadigd wordt door elektrostatische ontlading. Raak het achterbord niet rechtstreeks aan met uw hand of met een metalen werktuig, omdat u anders een elektrische schok zou kunnen oplopen. | ||
Varoitus | Käytä tämän toimenpiteen aikana maadoitettuja rannesuojia estääksesi kortin vaurioitumisen sähköstaattisen purkauksen vuoksi. Älä kosketa taustalevyä suoraan kädelläsi tai metallisella työkalulla sähköiskuvaaran takia. | ||
Attention | Lors de cette procédure, toujours porter des bracelets antistatiques pour éviter que des décharges électriques n'endommagent la carte. Pour éviter l'électrocution, ne pas toucher le fond de panier directement avec la main ni avec un outil métallique. | ||
Warnung | Zur Vermeidung einer Beschädigung der Karte durch elektrostatische Entladung während dieses Verfahrens ein Erdungsband am Handgelenk tragen. Bei Berührung der Rückwand mit der Hand oder einem metallenen Werkzeug besteht Elektroschockgefahr. | ||
Avvertenza | Durante questa procedura, indossare bracciali antistatici per evitare danni alla scheda causati da un'eventuale scarica elettrostatica. Non toccare direttamente il pannello delle connessioni, né con le mani né con un qualsiasi utensile metallico, perché esiste il pericolo di folgorazione. | ||
Advarsel | Bruk jordingsarmbånd under prosedyren for å unngå ESD-skader på kortet. Unngå direkte berøring av bakplanet med hånden eller metallverktøy, slik at di ikke får elektrisk støt. | ||
Aviso | Durante este procedimento e para evitar danos ESD causados à placa, use fitas de ligação à terra para os pulsos. Para evitar o risco de choque eléctrico, não toque directamente na parte posterior com a mão ou com qualquer ferramenta metálica. | ||
Advertencia | Usartiras conectadas a tierra en las muñecas durante este procedimiento para evitar daños en la tarjeta causados por descargas electrostáticas. No tocar el plano posterior con las manos ni con ninguna herramienta metálica, ya que podría producir un choque eléctrico. | ||
Varning! | Använd jordade armbandsremmar under denna procedur för att förhindra elektrostatisk skada på kortet. Rör inte vid baksidan med handen eller metallverktyg då detta kan orsaka elektrisk stöt. | ||
| |||
Waarschuwing | Lege vlakplaten en afdekpanelen vervullen drie belangrijke functies: ze voorkomen blootstelling aan gevaarlijke voltages en stroom binnenin het frame, ze bevatten elektromagnetische storing (EMI) hetgeen andere apparaten kan verstoren en ze leiden de stroom van koellucht door het frame. Het systeem niet bedienen tenzij alle kaarten, vlakplaten en afdekkingen aan de voor- en achterkant zich op hun plaats bevinden. | ||
Varoitus | Tyhjillä tasolaikoilla ja suojapaneeleilla on kolme tärkeää käyttötarkoitusta: Ne suojaavat asennuspohjan sisäisille vaarallisille jännitteille ja sähkövirralle altistumiselta; ne pitävät sisällään elektromagneettisen häiriön (EMI), joka voi häiritä muita laitteita; ja ne suuntaavat tuuletusilman asennuspohjan läpi. Järjestelmää ei saa käyttää, elleivät kaikki tasolaikat, etukannet ja takakannet ole kunnolla paikoillaan. | ||
Attention | Ne jamais faire fonctionner le système sans que l'intégralité des cartes, des plaques métalliques et des panneaux avant et arrière ne soient fixés à leur emplacement. Ceux-ci remplissent trois fonctions essentielles : ils évitent tout risque de contact avec des tensions et des courants dangereux à l'intérieur du châssis, ils évitent toute diffusion d'interférences électromagnétiques qui pourraient perturber le fonctionnement des autres équipements, et ils canalisent le flux d'air de refroidissement dans le châssis. | ||
Warnung | Blanke Faceplates und Abdeckungen haben drei wichtigen Funktionen: (1) Sie schützen vor gefährlichen Spannungen und Strom innerhalb des Chassis; (2) sie halten elektromagnetische Interferenzen (EMI) zurück, die andere Geräte stören könnten; (3) sie lenken den kühlenden Luftstrom durch das Chassis. Das System darf nur betrieben werden, wenn alle Karten, Faceplates, Voder- und Rückabdeckungen an Ort und Stelle sind. | ||
Avvertenza | Le piattaforme bianche e i panelli di protezione hanno tre funzioni importanti: Evitano l'esposizione a voltaggi e correnti elettriche pericolose nello chassis, trattengono le interferenze elettromagnetiche (EMI) che potrebbero scombussolare altri apparati e dirigono il flusso di aria per il raffreddamento attraverso lo chassis. Non mettete in funzione il sistema se le schede, le piattaforme, i panelli frontali e posteriori non sono in posizione. | ||
Advarsel | Blanke ytterplater og deksler sørger for tre viktige funksjoner: de forhindrer utsettelse for farlig spenning og strøm inni kabinettet; de inneholder elektromagnetisk forstyrrelse (EMI) som kan avbryte annet utstyr, og de dirigerer luftavkjølingsstrømmen gjennom kabinettet. Betjen ikke systemet med mindre alle kort, ytterplater, frontdeksler og bakdeksler sitter på plass. | ||
Aviso | As faces furadas e os painéis de protecção desempenham três importantes funções: previnem contra uma exposição perigosa a voltagens e correntes existentes no interior do chassis; previnem contra interferência electromagnética (EMI) que poderá danificar outro equipamento; e canalizam o fluxo do ar de refrigeração através do chassis. Não deverá operar o sistema sem que todas as placas, faces, protecções anteriores e posteriores estejam nos seus lugares. | ||
¡Advertencia! | Las placas frontales y los paneles de relleno cumplen tres funciones importantes: evitan la exposición a niveles peligrosos de voltaje y corriente dentro del chasis; reducen la interferencia electromagnética (EMI) que podría perturbar la operación de otros equipos y dirigen el flujo de aire de enfriamiento a través del chasis. No haga funcionar el sistema a menos que todas las tarjetas, placas frontales, cubiertas frontales y cubiertas traseras estén en su lugar. | ||
Varning! | Tomma framplattor och skyddspaneler har tre viktiga funktioner: de förhindrar att personer utsätts för farlig spänning och ström som finns inuti chassit; de innehåller elektromagnetisk interferens (EMI) som kan störa annan utrustning; och de styr riktningen på kylluftsflödet genom chassit. Använd inte systemet om inte alla kort, framplattor, fram- och bakskydd är på plats. | ||
For more detailed installation and configuration information, refer to the following publications:
You can access the most current Cisco documentation on the World Wide Web at http://www.cisco.com, http://www-china.cisco.com, or http://www-europe.cisco.com.
Cisco documentation and additional literature are available in a CD-ROM package, which ships with your product. The Documentation CD-ROM is updated monthly. Therefore, it is probably more current than printed documentation. The CD-ROM package is available as a single unit or as an annual subscription.
Registered CCO users can order the Documentation CD-ROM and other Cisco Product documentation through our online Subscription Services at http://www.cisco.com/cgi-bin/subcat/kaojump.cgi.
Nonregistered CCO users can order documentation through a local account representative by calling Cisco's corporate headquarters (California, USA) at 408 526-4000 or, in North America, call 800 553-NETS (6387).
Cisco provides Cisco Connection Online (CCO) as a starting point for all technical assistance. Warranty or maintenance contract customers can use the Technical Assistance Center. All customers can submit technical feedback on Cisco documentation using the web, e-mail, a self-addressed stamped response card included in many printed docs, or by sending mail to Cisco.
Cisco continues to revolutionize how business is done on the Internet. Cisco Connection Online is the foundation of a suite of interactive, networked services that provides immediate, open access to Cisco information and resources at anytime, from anywhere in the world. This highly integrated Internet application is a powerful, easy-to-use tool for doing business with Cisco.
CCO's broad range of features and services helps customers and partners to streamline business processes and improve productivity. Through CCO, you will find information about Cisco and our networking solutions, services, and programs. In addition, you can resolve technical issues with online support services, download and test software packages, and order Cisco learning materials and merchandise. Valuable online skill assessment, training, and certification programs are also available.
Customers and partners can self-register on CCO to obtain additional personalized information and services. Registered users may order products, check on the status of an order and view benefits specific to their relationships with Cisco.
You can access CCO in the following ways:
You can e-mail questions about using CCO to cco-team@cisco.com.
The Cisco Technical Assistance Center (TAC) is available to warranty or maintenance contract customers who need technical assistance with a Cisco product that is under warranty or covered by a maintenance contract.
To display the TAC web site that includes links to technical support information and software upgrades and for requesting TAC support, use www.cisco.com/techsupport.
To contact by e-mail, use one of the following:
| Language | E-mail Address |
|---|---|
English | tac@cisco.com |
Hanzi (Chinese) | chinese-tac@cisco.com |
Kanji (Japanese) | japan-tac@cisco.com |
Hangul (Korean) | korea-tac@cisco.com |
Spanish | tac@cisco.com |
Thai | thai-tac@cisco.com |
In North America, TAC can be reached at 800 553-2447 or 408 526-7209. For other telephone numbers and TAC e-mail addresses worldwide, consult the following web site: http://www.cisco.com/warp/public/687/Directory/DirTAC.shtml.
If you are reading Cisco product documentation on the World Wide Web, you can submit technical comments electronically. Click Feedback in the toolbar and select Documentation. After you complete the form, click Submit to send it to Cisco.
You can e-mail your comments to bug-doc@cisco.com.
To submit your comments by mail, for your convenience many documents contain a response card behind the front cover. Otherwise, you can mail your comments to the following address:
Cisco Systems, Inc.
Document Resource Connection
170 West Tasman Drive
San Jose, CA 95134-9883
We appreciate and value your comments.

![]()
![]()
![]()
![]()
![]()
![]()
![]()
![]()
Posted: Tue Jan 30 12:04:03 PST 2001
All contents are Copyright © 1992--2001 Cisco Systems, Inc. All rights reserved.
Important Notices and Privacy Statement.