|
|

Product Numbers: MEM-S3-FLC8M(=), MEM-S3-FLC16M(=), MEM-S3-FLC20M(=)
This installation note contains the procedure to install a Flash memory card in Catalyst 5000 series Supervisor Engine III module.
Cisco documentation and additional literature are available in a CD-ROM package, which ships with your product. The Documentation CD-ROM, a member of the Cisco Connection Family, is updated monthly. Therefore, it might be more current than printed documentation. To order additional copies of the Documentation CD-ROM, contact your local sales representative or call customer service. The CD-ROM package is available as a single package or as an annual subscription. You can also access Cisco documentation on the World Wide Web at http://www.cisco.com, http://www-china.cisco.com, or http://www-europe.cisco.com.
If you are reading Cisco product documentation on the World Wide Web, you can submit comments electronically. Click Feedback in the toolbar and select Documentation. After you complete the form, click Submit to send it to Cisco. We appreciate your comments.
This installation note contains the following sections:
The Supervisor Engine III Flash memory cards are Intel Series 2+ cards that conform with the PCMCIA format. There are three models available, as follows:
All Supervisor Engine III Flash memory cards are formatted for the Catalyst 5000 series Supervisor Engine III module and are ready to use.
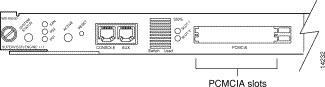
Flash memory cards are used to store and boot software images. They can also be used as servers to store software images for other systems. Each Supervisor Engine III module can be configured with up to two Flash memory cards: one in slot0 and one in slot1. The 8-, 16-, and 20- MB Flash memory cards can be used together in redundant configurations. Figure 1 shows the front panel of a Supervisor Engine III module with two PCMCIA Flash memory card slots, slot 0 (lower) and slot 1 (upper).
For information on using the PCMCIA Flash memory cards, refer to the "Using Flash Memory Cards" section.
Follow these guidelines to prevent electrostatic discharge (ESD) damage:
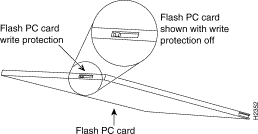
Before you install a Flash memory card, verify that the card's write-protect switch is off. When the card is oriented with the printing side up and the edge connector end away from you, the write-protect switch is located on the front edge of the card, as shown in Figure 2.
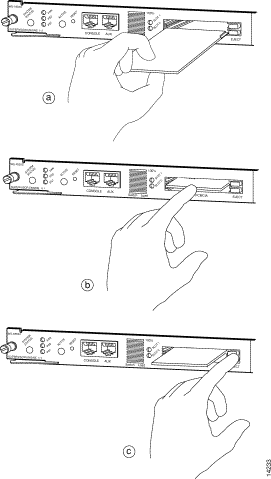
Use the following procedure for installing and removing a Flash memory card (see Figure 3):
Step 2 Face the front panel of the switch and hold the Flash memory card with the connector end of the card toward the slot, as shown in Figure 3a. The connector end of the card is opposite the end with the write-protect switch.
Step 3 Insert the card into the appropriate slot until the card completely seats in the connector at the back of the slot and the eject button pops out toward you, as shown in Figure 3b.
Note The card does not insert all the way inside the slot; a portion of the card remains outside the slot. Do not attempt to force the card past this point.
Step 4 To eject a Flash memory card, press the appropriate ejector button until the card is free of the connector at the back of the slot, as shown in Figure 3c.
Step 5 Remove the card from the slot and place it in an antistatic bag.
All Catalyst 5000 series Flash memory cards are formatted for the Supervisor Engine III module at the factory and are ready to use on receipt.
Table 1 shows many of the commands available for using and managing Flash devices, including the Flash memory cards. To perform specific tasks, use these commands either alone or combined with other commands. For example, to copy a file from a TFTP server to a Flash memory card, set the BOOT environment variable so that the system will boot from this new image, and verify these actions, perform the following steps in privileged mode:
Step 2 Set the BOOT environment variable so that the system boots from slot0:
Step 3 Display the contents of the BOOT environment variable:
For complete descriptions of these commands and how to use them, see the Catalyst 5000 Series Software Configuration Guide and the Catalyst 5000 Series Command Reference.
Refer to the following documents for additional information on Supervisor Engine III Flash devices:
Cisco Connection Online (CCO) is Cisco Systems' primary, real-time support channel. Maintenance customers and partners can self-register on CCO to obtain additional information and services.
Available 24 hours a day, 7 days a week, CCO provides a wealth of standard and value-added services to Cisco's customers and business partners. CCO services include product information, product documentation, software updates, release notes, technical tips, the Bug Navigator, configuration notes, brochures, descriptions of service offerings, and download access to public and authorized files.
CCO serves a wide variety of users through two interfaces that are updated and enhanced simultaneously: a character-based version and a multimedia version that resides on the World Wide Web (WWW). The character-based CCO supports Zmodem, Kermit, Xmodem, FTP, and Internet e-mail, and it is excellent for quick access to information over lower bandwidths. The WWW version of CCO provides richly formatted documents with photographs, figures, graphics, and video, as well as hyperlinks to related information.
You can access CCO in the following ways:
For a copy of CCO's Frequently Asked Questions (FAQ), contact cco-help@cisco.com. For additional information, contact cco-team@cisco.com.
Note If you are a network administrator and need personal technical assistance with a Cisco product that is under warranty or covered by a maintenance contract, contact Cisco's Technical Assistance Center (TAC) at 800 553-2447, 408 526-7209, or tac@cisco.com. To obtain general information about Cisco Systems, Cisco products, or upgrades, contact 800 553-6387, 408 526-7208, or cs-rep@cisco.com.
![]()
![]()
![]()
![]()
![]()
![]()
![]()
![]()
Posted: Sat Jan 18 06:22:57 PST 2003
All contents are Copyright © 1992--2002 Cisco Systems, Inc. All rights reserved.
Important Notices and Privacy Statement.