|
|

Part Numbers:
WS-X5509-BOOT=
WS-X5530-BOOT=
This document describes how to check if you need to upgrade the network management processor (NMP) and master communication processor (MCP) boot ROMs on your Catalyst 5000 series supervisor engine module and describes how to upgrade the boot ROMs on the supervisor engine module.
This document consists of these sections:
If your Supervisor Engine II module shipped prior to the release of the Catalyst 5509, you must upgrade both the NMP boot ROM and the MCP boot ROM before using the module in the Catalyst 5509 chassis.
To check if you need to upgrade the boot ROMs on your Supervisor Engine II, follow these steps:
Step 2 With the switch up and running, enter the show version command to check the boot ROM version numbers on the Supervisor Engine II.
Check the Fw and Fw1 version levels. The Fw version number is the NMP boot ROM version level. The Fw1 version number is the MCP boot ROM version level.
If the NMP version level is lower than release 4.2(1), you must upgrade the NMP boot ROM on the module before using it in a Catalyst 5509 chassis. If the MCP version level is lower than release 4.3(1), you must upgrade the MCP boot ROM on the module before using it in a Catalyst 5509 chassis
This example shows how to check the boot ROM version levels on a Supervisor Engine II module:
In this example, the NMP boot ROM (Fw) version level is release 3.1(2), and the MCP boot ROM (Fw1) version level is release 3.1(1). Before using the Supervisor Engine II module in the Catalyst 5509 chassis, you must upgrade both the NMP and MCP boot ROMs.
Note If your Supervisor Engine II module was manufactured prior to the release of the Catalyst 5509, you must upgrade both the NMP boot ROM and the MCP boot ROM before using the module in the Catalyst 5509 chassis.
To upgrade the NMP and MCP boot ROMs in the Supervisor Engine II module, follow these steps:
Step 2 Place the supervisor engine module on an antistatic mat or foam.
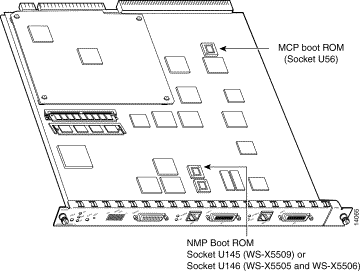
Step 3 Locate the NMP boot ROM on the Supervisor Engine II.
On the 100BaseTX Supervisor Engine II module (WS-X5509), the NMP boot ROM is located in socket U145 of the motherboard (see Figure 1).
On the 100BaseFX single-mode or multimode fiber Supervisor Engine II module (WS-X5505 and WS-X5506), the NMP boot ROM is located in socket U146 of the motherboard (see Figure 1).
Note The NMP boot ROM socket is physically in the same location on all Supervisor Engine II modules; only the socket number is different.
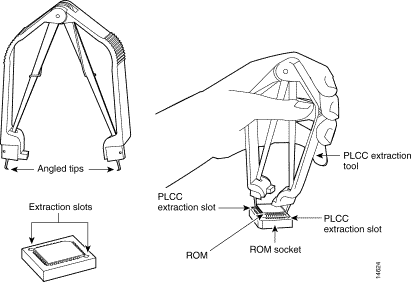
Step 4 To extract the NMP boot ROM from the motherboard, slide the tips of the programmable logic controller chip (PLCC) extractor tool into the socket extraction slots until the angled tips are beneath the boot ROM device (see Figure 2).
Holding the tool as shown in Figure 2, remove the chip from the socket by squeezing the handles of the extraction tool evenly and pulling the boot ROM device straight upward until it is released from the socket. Use care not to damage the boot ROM device or the socket.
Step 5 Place the extracted NMP boot ROM in an antistatic bag.
Step 6 Carefully remove the new release 4.2(1) NMP boot ROM from its packaging.
Note The NMP boot ROM chip has the Cisco part number 17-3419-09 etched on the top of the chip. Ensure that you are working with the NMP boot ROM and not the MCP boot ROM.
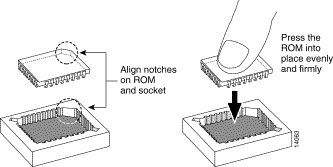
Step 7 Insert the NMP boot ROM in socket U145 (WS-X5509) or U146 (WS-X5505 or WS-X5506) on the motherboard. Be sure to orient the boot ROM so that the notched corner of the chip matches the notched corner of the socket (see Figure 3). Press the boot ROM into place evenly and firmly until it is completely seated in the socket.
Step 8 Locate the MCP boot ROM on the Supervisor Engine II. The MCP boot ROM is located in socket U56 of the motherboard (see Figure 1).
Step 9 To extract the MCP boot ROM from the motherboard, slide the tips of the PLCC extractor tool into the socket extraction slots until the angled tips are beneath the boot ROM device (see Figure 2).
Holding the tool as shown in Figure 2, remove the chip from the socket by squeezing the handles of the extraction tool evenly and pulling the boot ROM device straight upward until it is released from the socket. Use care not to damage the boot ROM or the socket.
Step 10 Place the extracted MCP boot ROM in an antistatic bag.
Step 11 Carefully remove the new release 4.3(1) MCP boot ROM from its packaging.
Note The MCP boot ROM chip has the Cisco part number 17-3420-09 etched on the top of the chip. Ensure that you are working with the MCP boot ROM and not the NMP boot ROM.
Step 12 Insert the MCP boot ROM in socket U56 on the motherboard. Be sure to orient the boot ROM so that the notched corner of the chip matches the notched corner of the socket (see Figure 3). Press the boot ROM into place evenly and firmly until it is completely seated in the socket.
Step 13 Install the supervisor engine in the Catalyst 5000 series switch (refer to the Catalyst 5000 Series Supervisor Engine Installation Guide for installation instructions) and boot the switch.
Step 14 When the system comes online, use the show version command to verify that the supervisor engine Fw (NMP) version level is release 4.2(1) and that the Fw1 (MCP) version level is release 4.3(1):
If your Supervisor Engine III module shipped prior to the release of the Catalyst 5509, you must upgrade the MCP boot ROM before using the module in the Catalyst 5509 chassis.
To check if you need to upgrade the MCP boot ROM on your Supervisor Engine II, follow these steps:
Step 2 With the switch up and running, enter the show version command to check the MCP boot ROM version number on the Supervisor Engine III.
Check the Fw1 version level. The Fw1 version number is the MCP boot ROM version level. If the version level is lower than release 4.2(1), you must upgrade the MCP boot ROM before using the module in a Catalyst 5509 chassis.
This example shows how to check the MCP boot ROM version level on a Supervisor Engine III module:
In this example, the MCP boot ROM (Fw1) version level is release 3.1(1). Before using this Supervisor Engine III module in the Catalyst 5509 chassis, you must upgrade the MCP boot ROM.
Note If your Supervisor Engine III module was manufactured prior to the release of the Catalyst 5509, you must upgrade the MCP boot ROM before using the module in the Catalyst 5509 chassis.
To upgrade the MCP boot ROM in the Supervisor Engine III module, follow these steps:
Step 2 Place the supervisor engine module on an antistatic mat or foam.
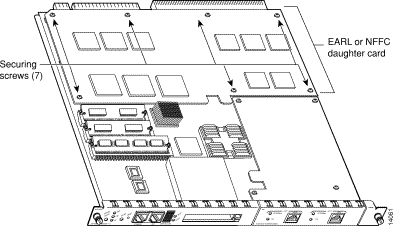
Step 3 Use a Phillips-head screwdriver to remove the seven screws securing the Enhanced Address Recognition Logic (EARL) or NetFlow Feature Card (NFFC) daughter card to the supervisor engine standoffs (see Figure 4).
Step 4 Carefully pull the daughter card up to disconnect it from the bus connectors on the supervisor engine motherboard.
Step 5 Place the daughter card in an antistatic bag or other appropriate location.
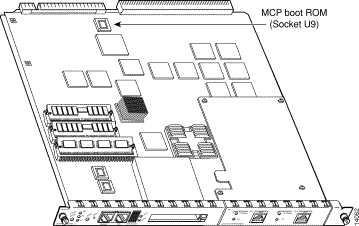
Step 6 Locate the MCP boot ROM on the Supervisor Engine III. The boot ROM is in socket U9 of the motherboard, near the backplane connector (see Figure 5).
Step 7 To extract the MCP boot ROM from the motherboard, slide the tips of the PLCC extractor tool into the socket extraction slots until the angled tips are beneath the boot ROM device (see Figure 6).
Holding the tool as shown in Figure 6, remove the chip from the socket by squeezing the handles of the extraction tool evenly and pulling the boot ROM device straight upward until it is released from the socket. Use care not to damage the boot ROM device or the socket.
Step 8 Place the extracted boot ROM in an antistatic bag.
Step 9 Carefully remove the new release 4.2(1) MCP boot ROM from its packaging. The MCP boot ROM has the Cisco part number 17-4062-07 etched on the top of the chip.
Step 10 Insert the new MCP boot ROM in socket U9 on the motherboard. Be sure to orient the boot ROM so that the notched corner of the chip matches the notched corner of the socket (see Figure 7). Press the boot ROM into place evenly and firmly until it is completely seated in the socket.
Step 11 Reinstall the EARL or NFFC daughter card on the supervisor engine motherboard. Line up the bus connectors and carefully press the daughter card evenly and firmly into the connectors to seat the card.
Step 12 Secure the daughter card to the supervisor engine standoffs using the seven screws you removed in Step 3.
Step 13 Install the supervisor engine in the Catalyst 5000 series switch (refer to the Catalyst 5000 Series Supervisor Engine Installation Guide for installation instructions) and boot the switch.
Step 14 When the system comes online, use the show version command to verify that the supervisor engine Fw1 version is release 4.2(1):
Cisco documentation and additional literature are available in a CD-ROM package, which ships with your product. The Documentation CD-ROM, a member of the Cisco Connection Family, is updated monthly. Therefore, it might be more current than printed documentation. To order additional copies of the Documentation CD-ROM, contact your local sales representative or call customer service. The CD-ROM package is available as a single package or as an annual subscription. You can also access Cisco documentation on the World Wide Web at http://www.cisco.com, http://www-china.cisco.com, or http://www-europe.cisco.com.
If you are reading Cisco product documentation on the World Wide Web, you can submit comments electronically. Click Feedback in the toolbar and select Documentation. After you complete the form, click Submit to send it to Cisco. We appreciate your comments.
Cisco Connection Online (CCO) is Cisco Systems' primary, real-time support channel. Maintenance customers and partners can self-register on CCO to obtain additional information and services.
Available 24 hours a day, 7 days a week, CCO provides a wealth of standard and value-added services to Cisco's customers and business partners. CCO services include product information, product documentation, software updates, release notes, technical tips, the Bug Navigator, configuration notes, brochures, descriptions of service offerings, and download access to public and authorized files.
CCO serves a wide variety of users through two interfaces that are updated and enhanced simultaneously: a character-based version and a multimedia version that resides on the World Wide Web (WWW). The character-based CCO supports Zmodem, Kermit, Xmodem, FTP, and Internet e-mail, and it is excellent for quick access to information over lower bandwidths. The WWW version of CCO provides richly formatted documents with photographs, figures, graphics, and video, as well as hyperlinks to related information.
You can access CCO in the following ways:
For a copy of CCO's Frequently Asked Questions (FAQ), contact cco-help@cisco.com. For additional information, contact cco-team@cisco.com.
Note If you are a network administrator and need personal technical assistance with a Cisco product that is under warranty or covered by a maintenance contract, contact Cisco's Technical Assistance Center (TAC) at 800 553-2447, 408 526-7209, or tac@cisco.com. To obtain general information about Cisco Systems, Cisco products, or upgrades, contact 800 553-6387, 408 526-7208, or cs-rep@cisco.com.
![]()
![]()
![]()
![]()
![]()
![]()
![]()
![]()
Posted: Sat Jan 18 06:05:08 PST 2003
All contents are Copyright © 1992--2002 Cisco Systems, Inc. All rights reserved.
Important Notices and Privacy Statement.