|
|

Product Numbers: WS-X5303-15, WS-X5303-40, WS-X5304
This configuration note provides instructions for installing, configuring, and maintaining the Catalyst Versatile Interface Processor 2-15 (VIP2-15) and VIP2-40 when used with the Route Switch Module (RSM) in Catalyst 5000 series switches. See the "Software and Hardware Prerequisites" section for specific compatibility requirements.
Note This configuration note refers to the Catalyst VIP2-15 and VIP2-40 modules as the Catalyst VIP2. The VIP2-15 and VIP2-40 vary only in the amount of onboard SRAM and DRAM.
This configuration note includes Catalyst VIP2 hardware installation steps and basic Catalyst VIP2 configuration steps and examples. It also includes procedures for upgrading user-configurable Catalyst VIP2 components. For complete descriptions of interface subcommands and the configuration options available for Catalyst VIP2-related interfaces, refer to the publications listed in the "If You Need More Information" section.
Note CiscoView Caveat: Due to differences between CiscoView for the Cisco 7500 series routers and CiscoView for the Catalyst 5000 series switches, port adapters in the Catalyst VIP2 are displayed at a smaller scale than they actually are in the switch chassis.
This configuration note includes the following sections:
The Cisco IOS software that runs your router contains extensive features and functionality. The effective use of many of these features is easier if you have more information at hand. For additional information on configuring and maintaining the Catalyst VIP2, refer to the following documentation:
If you are reading Cisco product documentation on the World Wide Web, you can submit comments electronically. Click Feedback on the title bar, and then select Documentation. After you complete the form, click Submit to send it to Cisco. We appreciate your comments.
The standalone RSM, which is a full-featured Cisco IOS router similar to a Cisco 7500 series router, is designed for interVLAN multiprotocol routing within and between Catalyst 5000 series switches. You can use the RSM as a standalone interVLAN router or add a Catalyst VIP2 to provide direct external network connections through a variety of media with the same port adapters used on
Cisco 7500 series routers. The RSM/VIP2 combination provides routing between Catalyst VIP2 port adapters and between VLANs and Catalyst VIP2 port adapters. The Catalyst VIP2 supports any combination of Catalyst VIP2 port adapter-based network interface types. The RSM/VIP2 is a double-wide card module that occupies two consecutive Catalyst 5000, Catalyst 5505, or
Catalyst 5500 slots. Figure 1 shows the RSM and Catalyst VIP2 in a Catalyst 5500 switch. The Catalyst VIP2 data and control interface is through two ribbon cables. Power to the Catalyst VIP2 is through the Catalyst VIP2 backplane connector.
For software and hardware requirements, refer to the "Software and Hardware Prerequisites" section.
Note Earlier versions of the RSM have a slot restriction that should be taken into consideration when installing the RSM in a Catalyst 5500. Refer to the Catalyst 5000 Series Route Switch Module Installation and Configuration Note that shipped with the RSM for detailed information.
The Catalyst VIP2 uses a single motherboard that accepts two port adapters. The port adapters provide WAN or LAN/WAN interface ports for the Catalyst 5000 series switches.
The Catalyst VIP2 is available in the following DRAM and SRAM configurations:
The Catalyst VIP2-15 SRAM and DRAM memory-configuration can be upgraded to a Catalyst VIP2-40 (use product number Catalyst VIP215/40-UPG=).
Software licenses are included to use Distributed Switching and Distributed Services.
Note Refer to the "Software and Hardware Prerequisites" section for additional DRAM and SRAM prerequisites.
The Catalyst VIP2 requires that the RSM runs Cisco IOS Release 11.2(9)P or later and that the supervisor engine runs Catalyst 5000 series supervisor engine software release 2.3(1) or later. Table 1 lists model requirements for using distributed switching (DSW) and distributed services (DS).
| Catalyst VIP2 Models | Distributed Switching (DSW) Supported | Distributed Services (DS) Supported |
|---|---|---|
| 1Software licenses are required to use DSW and DS. |
Note When DSW is enabled on a VIP2-15 or VIP2-40, the routing table generated by the RSM is downloaded to the Catalyst VIP2 DRAM. Depending on the size of the routing table, you might need to upgrade to the Catalyst VIP2-40 if you are using a Catalyst VIP2-15. Table 2 lists which VIP2 model to use given the number of network nodes.
| 1Recommended. |
The Catalyst VIP2 central processing unit (CPU) is a Reduced Instruction Set Computer (RISC), Mips 4700 processor, with an internal operating frequency of 100 MHz and a 50-MHz system bus interface. The Catalyst VIP2 has 128 KB of nonvolatile random-access memory (NVRAM).
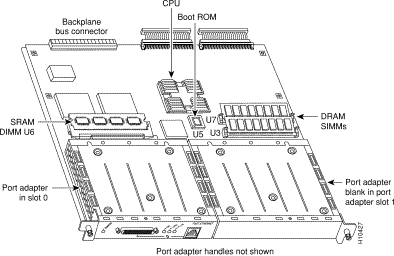
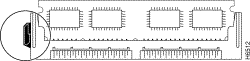
Figure 2 shows a Catalyst VIP2 with one port adapter. The port adapters have handles that allow for easy installation and removal. The Catalyst VIP2 firmware (microcode) contains card-specific software instructions and resides in a programmable read-only memory (PROM) device. Single in-line memory modules (SIMMs) contain the DRAM (U3 and U7) and a dual in-line memory module (DIMM) contains the SRAM (U6). The boot ROM is installed in U5.
The port adapters attach to the Catalyst VIP2 motherboard (see Figure 2). Each port adapter contains the physical connections for the Catalyst VIP2 interface types to connect to your network. For the available electrical interfaces supported by the Catalyst VIP2, refer to the Cisco Products Catalog.
The Catalyst VIP2 microcode (firmware) is an image that provides card-specific software instructions. A PROM device on the Catalyst VIP2 contains a default microcode boot image that assists the system in finding and loading the microcode image from the Cisco IOS bundle or Flash memory. The RSM/VIP2 supports downloadable microcode, which enables you to upgrade microcode versions by downloading new microcode images, storing them in system Flash memory, and instructing the system to load its image from Flash. You can store multiple images for an interface type and, with a configuration command, instruct the system to load any image or the default microcode image. The microcode boot image in the boot PROM initializes the Catalyst VIP2 and then assists downloading the Catalyst VIP2 microcode image. All installed Catalyst VIP2s load the same microcode image, either from the microcode image bundled with the Cisco IOS or from an image stored in system Flash. Although multiple microcode versions for a specific interface type can be stored concurrently in Flash, only one image can load at startup.
The show controllers cbus command displays the currently loaded and running microcode version for the RSM (displays as C5IP) and Catalyst VIP2 (displays as VIP2). The show startup-config EXEC command shows the current system instructions for loading microcode at startup.
Note The slot values displayed by some commands (such as show diag and show cont cbus) are not relevant to any physical connection; please disregard these slot values.
Software and Catalyst VIP2 microcode images are carefully optimized and bundled to work together. Overriding the bundle can result in system incompatibilities. Cisco recommends that you use the microcode included in the software bundle. For a complete description of microcode downloading procedures, refer to the "Upgrading Catalyst VIP2 Microcode" section.
This section provides installation procedures for the RSM/VIP2.
This section provides a list of parts and tools you need to perform the installation, and it also includes safety and electrostatic discharge (ESD)-prevention guidelines to help you avoid injury and damage to the equipment. This section also provides a detailed description of the online insertion and removal (OIR) function to help you perform online installation successfully and avoid error messages and system restarts.
Note If you are installing a new Catalyst VIP2 and preparing your site and planning network connections, be sure to review the equipment descriptions and interface cable distance limitations in the appropriate section in the port adapter configuration notes, which accompanied your port adapters.
You need the following tools and parts to install or upgrade a Catalyst VIP2. If you need additional equipment, contact a service representative for ordering information.
Follow the safety guidelines in this section when working with any equipment that connects to electrical power or telephone wiring.
Follow these basic guidelines when working with any electrical equipment:
Use the following guidelines when working with any equipment that is connected to telephone wiring or to other network cabling:
ESD damage, which can occur when electronic cards or components are improperly handled, results in complete or intermittent failures. Port adapters and the RSM and Catalyst VIP2 comprise printed circuit boards that are fixed in metal carriers. Electromagnetic interference (EMI) shielding and connectors are integral components of the carrier. Although the metal carrier helps to protect the board from ESD, use a preventive antistatic strap during handling.
Follow these guidelines to prevent ESD damage:
The OIR feature allows you to remove and replace the RSM/VIP2 while the system is operating; you do not need to notify the software or shut down the system power.
The ejector levers on the RSM align and seat the card connectors in the backplane. Failure to use the ejector levers and insert the RSM/VIP2 properly can disrupt the order in which the pins make contact with the backplane.
Use the ejector levers when removing the RSM/VIP2 to ensure that the backplane connector pins disconnect from the RSM/VIP2 in the sequence expected by the system. Any RSM/VIP2 that is only partially connected to the backplane can interfere with switching bus operation. Steps for correctly performing OIR are included with the following procedures for installing and removing the RSM/VIP2.
If your Catalyst VIP2 was shipped attached to the RSM, start the installation procedure with step 12. If you are adding a VIP2 to your RSM, start the installation procedure here.
The Catalyst VIP2 is mounted on top of the RSM and secured to the RSM using five standoffs, five Phillips-head screws, and two flat-head screws. Two ribbon cables connect the two modules. The RSM/VIP2 requires two slots in the switch.
The Catalyst 5000 and 5505 switches have five slots. The first slot is for the supervisor engine module. The Catalyst 5505 supports a redundant supervisor engine module, it would go in slot 2; otherwise, slot 2 can be used for other modules. The remaining slots are available for any combination of Ethernet, Fast Ethernet, Asynchronous Transfer Mode (ATM) LAN emulation, Fiber Distributed Data Interface (FDDI), Copper Distributed Data Interface (CDDI) modules, or the RSM/VIP2.
The Catalyst 5500 switch has 13 slots. Slot 1 is reserved for the supervisor engine module. If a redundant supervisor engine module is used, it would go in slot 2; otherwise, slot 2 can be used for other modules. Slot 13 is a dedicated slot, reserved for the ATM Switch Processor (ASP) module. The RSM/VIP2 can be installed in any of the remaining slots (for an exception to this, see the following Caution).
Follow these steps to install the RSM/VIP2:
(a). Use a straight-through EIA/TIA-232 cable with DB-25 male connectors on each end to connect to the DCE console port DB-25 female connector and to the DB-25 female connectors used on the DTE ports on most terminals.
Note EIA/TIA-232 was known as recommended standard RS-232 before its acceptance as a standard by the Electronic Industries Association (EIA) and Telecommunications Industry Association (TIA).
(b). Configure the terminal or PC terminal emulation software to the default parameters for the console port:
Note You should not have to connect a terminal to the RSM console port. At the end of the installation procedure, you use the session command to access the RSM/VIP2 for router configuration.
Step 2 If the RSM is already installed in the switch, remove it and place it on an antistatic mat on a table or workbench.
Step 3 Place the Catalyst VIP2 next to the RSM on the table or workbench. Remove the accessory kit that came with the Catalyst VIP2. It should contain five standoffs and two flat-head screws.
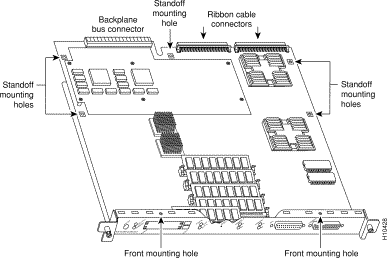
Step 4 On the RSM, remove the five Phillips-head screws from the standoff mounting holes (see Figure 3 for standoff mounting hole locations). Set the screws in a secure place as they will be reused.
Step 5 Screw the five standoff posts into the captive nuts that held the five Phillips-head screws on the RSM. Do not overtighten the standoff posts.
Step 6 Carefully position the Catalyst VIP2 over the RSM, aligning the Catalyst VIP2 standoff mounting holes with the five RSM standoff posts (see Figure 4 for Catalyst VIP2 standoff mounting hole locations).
Step 7 Use the five Phillips-head screws removed earlier to secure the Catalyst VIP2 to the standoff posts.
Step 8 Connect the two ribbon cables to the RSM taking care not to bend the connector pins.
Step 9 Remove the Phillips-head screws securing the port adapter blanks or existing port adapters and then remove the blanks or existing port adapters from the Catalyst VIP2. (See the "Installing or Replacing a Catalyst VIP2 Port Adapter" section.)
Step 10 Locate the two front mounting holes on the Catalyst VIP2 (see Figure 4) and use the two flat-head screws that shipped with the Catalyst VIP2 to secure the front of the Catalyst VIP2 to the RSM.
Step 11 Reinstall the port adapters or blanks and secure them with the Phillips-head screws removed in step 9. (See the "Installing or Replacing a Catalyst VIP2 Port Adapter" section.)
Step 12 Guide the RSM/VIP2 into the switch slots, aligning the sides of the RSM with the guides in the slots (avoid touching the components on the boards).
Step 13 While keeping the modules oriented horizontally, carefully slide them into the slots until the RSM front panel contacts the ejector levers.
Step 14 Using the thumb and forefinger of each hand, simultaneously push the left and right levers in to fully seat the RSM and Catalyst VIP2 into their respective backplane connectors.
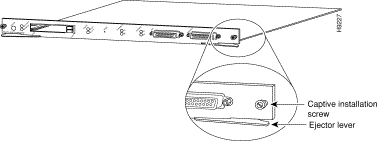
Step 15 Use a screwdriver to tighten the captive installation screws to the chassis on the left and right sides of the RSM and Catalyst VIP2. (See Figure 5.)
Step 16 Check the status of the RSM/VIP2, as follows:
The Catalyst VIP2 is listed as Route Switch Ext Port with no model information or status.
The RSM is listed as Route Switch and should be reported as ok.
Step 17 After verifying that the system acknowledges the RSM and Catalyst VIP2, enter the session mod/num command (mod/num is the RSM slot number) at the Cat5k> prompt. You should now be at the router> prompt.
Step 18 To verify operation of the Catalyst VIP2, proceed to the "Checking the Installation and Verifying Status" section.
This section provides procedures to verify the operation of the Catalyst VIP2 and installed port adapters.
To perform system verification and configuration, enter the privileged level of the EXEC command interpreter with the enable command. The system prompts you for a password if one has been set.
The system prompt for the privileged level ends with a pound sign (#) instead of an angle bracket (>). At the console terminal, enter the privileged level, as follows:
Step 2 Enter the password (the password is case sensitive). For security purposes, the password is not displayed on your console.
Step 3 When you enter the correct password and press Return, the system displays the privileged-mode system prompt (#) as follows:
After you install the RSM/VIP2 and connect cables (use connection procedures in the respective port adapter installation and configuration notes), verify the installation by observing the LED states and the console display. When the system has reinitialized all interfaces, the enabled LED on the
Catalyst VIP2 should go on. Port adapter LEDs should be on, depending on your connection. The console screen should display a message as the system discovers each interface during its reinitialization.
When you remove and replace the RSM/VIP2, the system provides status messages about the port adapter ports on the console screen. The messages are for information only. After removing the RSM/VIP2, the messages indicate that the port adapter ports are down. When the RSM VIP2 is reinserted, the system automatically brings up the ports that were up when the RSM/VIP2 was removed.
Note When you insert a new RSM/VIP2 or move an RSM/VIP2 to a new slot, the system recognizes the new interfaces, but leaves them in the shutdown state until you configure them and change their state to up with the configure command.
Verify that the RSM/VIP2 is installed correctly, as follows:
Step 2 When reinitialization is complete, verify that the enabled LED on each port adapter goes on and remains on. If it does, proceed to step 5. If it does not, proceed to the next step.
Step 3 If the enabled LED on a port adapter fails to go on, suspect that the Catalyst VIP2 board connector is not fully seated in the backplane. Loosen the captive installation screws on the RSM/VIP2, and then firmly push both ejector levers into place on the RSM until they are approximately in the same orientation as the RSM faceplate. Tighten the captive installation screws on both modules. After the system reinitializes the interfaces, the enabled LED on the port adapter should go on. If it does, proceed to step 5. If it does not, proceed to step 4.
Step 4 If the enabled LED still fails to go on, remove the RSM/VIP2 and try installing it in other available switch slots.
Note If the enabled LED goes on when the RSM/VIP2 is installed in the new slots, suspect a failed backplane port in the original switch slots.
Step 5 If the Catalyst VIP2 is new and not a replacement, you have to configure the new interfaces. Proceed to the appropriate configuration section for your port adapter. (This does not have to be done immediately, but new interfaces will not be available until you configure them.)
Step 6 If the Catalyst VIP2 is a replacement, use the show interfaces interface type/port adapter slot/interface port number or show controllers cbus command to verify the status of the interfaces. (Refer to the "Verifying Status Using show Commands" section)
Note The slot values displayed by some commands (such as show diag and show cont cbus) are not relevant to any physical connection; please disregard these slot values.
If you replaced a Catalyst VIP2 with a Catalyst VIP2 with more ports (for example, if you replaced a single-port adapter Catalyst VIP2 with a dual-port adapter Catalyst VIP2), the system recognizes the interfaces on the previously configured port adapter, but does not recognize the additional port adapter interfaces. The new interfaces remain in the shutdown state until you configure them.
Step 7 When the interfaces are up, check the activity of each interface by observing the status LEDs, which are described in the appropriate LED section for your port adapter type.
Step 8 If an interface's LED fails to go on and a cable is connected to the port, check the cable connection and make certain it is properly seated in the connector.
If an error message displays on the console terminal, refer to the System Error Messages publication for error message definitions. If you experience other problems that you are unable to solve, contact a service representative for assistance.
This completes the RSM/VIP2 installation. If you installed a new Catalyst VIP2 or if you installed a replacement Catalyst VIP2 with an additional port, you must now configure the new interface as described in the following section and in the appropriate Cisco IOS configuration documentation listed in the "If You Need More Information" section. All documentation is also available on CCO and the Documentation CD-ROM.
The following steps use show commands to verify that the new interfaces are configured and operating correctly.
Step 2 Display all interfaces with the show controllers cbus command.
Step 3 Specify one of the new interfaces with the show interfaces interface type/port adapter number/interface port number command and verify that the interface and line protocol are in the correct state: up or down.
Step 4 Display the protocols configured for the entire system and specific interfaces with the show protocols command. If necessary, return to Configuration mode to add or remove protocol routing on the system or specific interfaces.
Step 5 Display the running configuration file with the show running-config command. Display the configuration stored in NVRAM by using the show startup-config command. Verify that the configuration is accurate for the system and each interface.
If the interface is down and you configured it as up, or if the displays indicate that the hardware is not functioning properly, ensure that the network interface is properly connected and terminated. If you still have problems bringing the interface up, contact a service representative for assistance.
The show controllers cbus command displays the internal status of the VIP2, including the hardware version and the currently-running microcode version. It also lists each interface type, physical (port adapter slot/interface port number) address, and hardware (station address) of each interface. The following example shows a Catalyst VIP2 with an FDDI port adapter installed in port adapter slot 0 and a 4-port Ethernet port adapter in port adapter slot 1.
Note The slot values displayed by some commands (such as show diag and show cont cbus) are not relevant to any physical connection; please disregard these slot values.
To determine the type of port adapter installed in a Catalyst VIP2, use the show diag command. Specific port adapter information is displayed, as shown in the following example:
The show startup-config command displays the contents of the system configuration file stored in nonvolatile memory (NVRAM or Flash memory). This file should reflect all new configuration changes you made and wrote to memory with the show running-config command. (A Fast Ethernet interface is used in this example.)
The show protocols command displays the global (system-wide) and interface-specific status of any configured Level 3 protocol.
These sections provide maintenance procedures for your Catalyst VIP2 and port adapters:
Note Refer to the "Catalyst VIP2 Microcode Overview" section for a description of the Catalyst VIP2 microcode.
Note For instructions on upgrading the system software image, refer to the Catalyst 5000 Series Route Switch Module Installation and Configuration Note that shipped with your RSM.
The Catalyst VIP2 supports downloadable microcode, which enables you to upgrade microcode versions over the network. You can download new microcode versions and store multiple versions in Flash memory, and you can then boot from them just as you can with the system software images. System software upgrades can also contain upgraded microcode images, which will load automatically when the new software image is loaded (unless the configuration states otherwise).
Note System software and Catalyst VIP2 microcode images are carefully optimized and bundled to work together. Overriding the bundle can result in system incompatibilities. Cisco recommends that you use the microcode included in the software bundle.
You can download microcode to Flash memory by copying the Trivial File Transfer Protocol (TFTP) image of a microcode version to Flash memory. When the microcode image is stored in Flash memory, you have to configure the router to use that image via the microcode vip2 flash command. You can use the microcode reload command to manually load the new microcode file. You can then use the configure command to instruct the system to load the new image automatically at each system boot.
To compare the size of the microcode image and the amount of Flash memory available, you must know the size of the new microcode image. The image size is specified in the README file included on the floppy disk with the new image.
Note Note the size of the new image before proceeding to ensure that you have sufficient available Flash memory for the new image.
Follow these steps to download (copy) a microcode version from a TFTP server to Flash memory.
Step 2 Compare the amount of available Flash memory (last line in the preceding example) to the size of the new microcode image on the floppy disk. If you attempt to copy in a new image, and the size of the new image exceeds the available space in Flash, only part of the new image is copied, and the following error message is displayed:
where xxxx/xxxx is the number of bytes read in/number of bytes available.
Step 3 After you verify that sufficient space is available in Flash memory for the new image, use the command copy tftp:filename [ flash | slot0 | slot1 ]:filename to copy an image to Flash memory. (tftp:filename is the file's source and [ flash | slot0 | slot1]:filename is the destination in onboard Flash memory or on either of the Flash memory cards.)
An example of the copy tftp:filename command follows:
Step 4 Use the show flash command to verify that the microcode has been copied to Flash. The output should display the filename of the image you copied to Flash (vip11-1 in the following example):
Step 5 To ensure that you use the new microcode when you reboot the system, add the appropriate commands to the configuration file. To modify the configuration file, enter the configure terminal command, as follows:
Step 6 Specify that you are changing the microcode for the Catalyst VIP2 (microcode vip2), and that it will load from Flash memory (flash slot0 or slot1). Then add the filename of the new microcode image to be loaded from Flash:
Step 7 To exit Configuration mode, press CNTL/Z.
Step 8 Copy the new configuration to NVRAM:
The microcode reload command is automatically added to your running configuration. The new Catalyst VIP2 microcode image will load automatically the next time the system boots or reinitializes.
Step 9 To load the new microcode immediately, you can issue the microcode reload configuration command (you must be in Configuration mode to enter this command):
After you enter the microcode reload command, press Return, and the system reloads all microcode. Configuration mode remains enabled; after the reload is complete, press CNTL/Z to exit from Configuration mode and return to the system prompt.
Step 10 To verify that the Catalyst VIP2 is using the correct microcode, issue the show startup-config or show controllers cbus command, which indicates the currently loaded and running microcode version for the Catalyst VIP2.
This completes the procedure for downloading microcode to Flash memory.
The following sections describe how to upgrade the two DRAM SIMMs and the one SRAM dual in-line memory module (DIMM) on the Catalyst VIP2, or to replace the DRAM or SRAM if a system problem has indicated their replacement. Depending on your system configuration and the Cisco IOS your system is running, you might need to upgrade DRAM and SRAM.
The current Catalyst VIP2 products have the following DRAM and SRAM configurations:
The following sections describe how to upgrade DRAM and SRAM:
The DRAM on the Catalyst VIP2 is contained in two SIMMs located in sockets U3 and U7 (see Figure 6). Depending on your system configuration, a memory upgrade might be required. Also, if a system problem is determined to be caused by a SIMM, a SIMM replacement might be required. Use the following procedures to replace the DRAM SIMMs on your Catalyst VIP2.
Follow these steps to remove the existing SIMMs:
Step 2 Place the RSM/VIP2 on an antistatic mat or pad and ensure that you are wearing an antistatic device, such as a wrist strap. Position the RSM/VIP2 so that the bus connector is toward you—opposite of the position shown in Figure 6.
Step 3 Locate the SIMMs. The DRAM SIMMs occupy sockets U3 and U7 (see Figure 6).
Step 4 Release the spring clips from the SIMM that you want to remove and release the SIMM from the socket (see Figure 7).
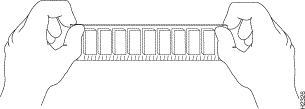
Step 5 When both ends of the SIMM are released from the socket, grasp the ends of the SIMM with your thumb and forefinger and pull the SIMM completely out of the socket. Handle the edges of the SIMM only; avoid touching the memory modules, pins, or the metal traces or fingers, along the socket edge.
Step 6 Place the SIMM in an antistatic container to protect it from ESD damage.
Step 7 Repeat steps 4 through 6 for the remaining SIMM, as required for this replacement.
This completes the SIMM removal procedure. Proceed to the next section to install the new SIMMs.
SIMMs are sensitive components that are susceptible to ESD damage. Handle SIMMs by the edges only; avoid touching the memory modules, pins, or traces (the metal fingers along the connector edge of the SIMM). (See Figure 8.)
Follow these steps to install the new SIMMs:
Step 2 Remove a new SIMM from the antistatic container.
Step 3 Hold the SIMM component side up, with the connector edge (the metal fingers) closest to you.
Step 4 Hold the sides of the SIMM between your thumb and middle finger, with your forefinger against the far edge, opposite the connector edge (see Figure 8).
Step 5 Tilt the SIMM to approximately the same angle as the socket and insert the connector edge into the socket.
Step 6 Gently push the SIMM into the socket until the spring clips snap over the ends of the SIMM. If necessary, rock the SIMM gently back and forth to seat it properly.
Step 7 Repeat steps 2 through 6 for the remaining SIMMs.
Step 8 When both SIMMs are installed, check all four alignment holes (two on each SIMM) and ensure that the spring retainer is visible. If it is not, the SIMM is not seated properly. If any SIMM appears misaligned, carefully remove it and reseat it in the socket. Push the SIMM firmly back into the socket until the retainer springs snap into place.
This completes the DRAM SIMM replacement procedure. To replace the Catalyst VIP2 SRAM DIMM, proceed to the "Replacing the Catalyst VIP2 SRAM DIMM" section. If you are only replacing the DRAM SIMM, go to the "Installation Procedure" section to reinstall the RSM/VIP2 in the chassis; then restart the system for an installation check. The installation check is provided in the "Checking a DRAM and SRAM Upgrade" section.
The SRAM on the Catalyst VIP2 is contained in a DIMM and located in socket U6 (see Figure 6 on page 22). Depending on your system configuration, a memory upgrade might be required. Also, if a system problem is determined to be caused by the DIMM, a DIMM replacement might be required. Use the following procedures to replace the SRAM DIMM on your Catalyst VIP2.
Follow these steps to remove the existing DIMM:
Step 2 Place the RSM/VIP2 on an antistatic mat or pad, and ensure that you are wearing an antistatic device, such as a wrist strap. Position the RSM/VIP2 so that the bus connector faces away from you.
Step 3 Locate the DIMM. The SRAM DIMM occupies socket U6 (see Figure 6).
Step 4 Locate the release lever on the DIMM socket (see circle in Figure 9) and release the DIMM from the socket as shown.
Step 5 When one end of the DIMM is released from the socket (see Figure 9), grasp the ends of the DIMM with your thumb and forefinger and pull the DIMM completely out of the socket. Handle the edges of the DIMM only (see Figure 10).
Step 6 Place the DIMM in an antistatic container to protect it from ESD damage.
This completes the DIMM removal procedure. Proceed to the next section to install the new DIMM.
The DIMM is a sensitive component that is susceptible to ESD damage. Handle the DIMM by the edges only; avoid touching the memory modules, pins, or traces (the metal fingers along the connector edge of the DIMM). (See Figure 10.)
Follow these steps to install the new DIMM:
Step 2 Remove the new DIMM from the antistatic container.
Step 3 Hold the DIMM component side up, with the connector edge (the metal fingers) down (see Figure 10). Hold the sides of the DIMM between your thumb and middle finger.
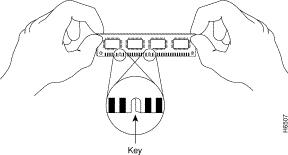
Step 4 Tilt the DIMM to approximately the same an angle as the socket and insert the connector edge into the socket. Note the two notches (keys) on the connector edge of the DIMM (see Figure 10). These keys are intended to assure correct orientation of the DIMM in the socket.
Step 5 Note the orientation of the socket key on the SRAM DIMM and the DIMM socket and gently push the DIMM into the socket until the release lever is flush against the side of the DIMM socket (see Figure 11) and the DIMM's edge connector is fully inserted. If necessary, rock the DIMM gently back and forth to seat it properly.
Step 6 When the DIMM is installed, check that the release lever is flush against the side of the DIMM socket (see Figure 11). If it is not, the DIMM might not be seated properly. If the DIMM appears misaligned, carefully remove it according to the removal procedure, and reseat it in the socket. Push the DIMM firmly back into the socket until the release lever is flush against the side of the DIMM socket.
This completes the DIMM replacement procedure.
Proceed to the "Installation Procedure" section to replace the RSM/VIP2 in the chassis; then restart the system for an installation check. The installation check is provided in the "Checking a DRAM and SRAM Upgrade" section.
If, after a DRAM or SRAM upgrade or replacement, the system fails to boot properly, or if the console terminal displays a checksum or memory error, check the following:
Refer to the "Checking the RSM/VIP2 Installation" section, as required. If after several attempts the system fails to restart properly, contact a service representative for assistance. Before you call, note any error messages, unusual LED states, or other indications that might help solve the problem.
This section provides procedures to install or replace Catalyst VIP2 port adapters.
Each port adapter circuit board mounts to a metal carrier and is sensitive to ESD damage. The following procedures should be performed by a Cisco-certified service provider only. While the RSM/VIP2 combination supports online insertion and removal (OIR), individual port adapters do not. To replace port adapters, you must first remove the RSM/VIP2 from the chassis, and then install or replace port adapters, as required. If a blank port adapter is installed in the Catalyst VIP2 in which you want to install a new port adapter, you must first remove the RSM/VIP2 from the chassis, and then remove the blank port adapter.
When only one port adapter is installed in a Catalyst VIP2 , a blank port adapter must fill the empty slot to allow the Catalyst VIP2 and switch chassis to conform to EMI emissions requirements, and to permit proper airflow through the chassis. If you plan to install a new port adapter, you must first remove the blank port adapter.
Follow this procedure to remove and replace any type of port adapter on the Catalyst VIP2:
Note If you want to install a new port adapter on a Catalyst VIP2 with a single port adapter, you must first remove the blank port adapter from the port adapter slot in which you want to install the new port adapter.
Step 2 For a new port adapter installation or a port adapter replacement, first disconnect any interface cables from the ports on the front of the port adapter, although, this is not required. You can remove Catalyst VIP2s with cables attached; however, we do not recommend it.
Step 3 Follow the appropriate steps (in reverse order) in the "Installation Procedure" section to remove the RSM/VIP2 from the switch.
Step 4 Place the removed RSM/VIP2 on an antistatic mat.
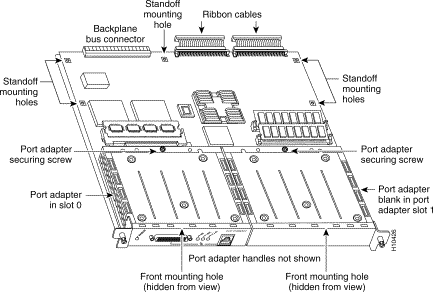
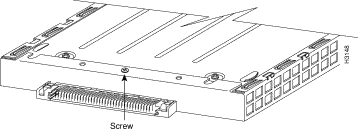
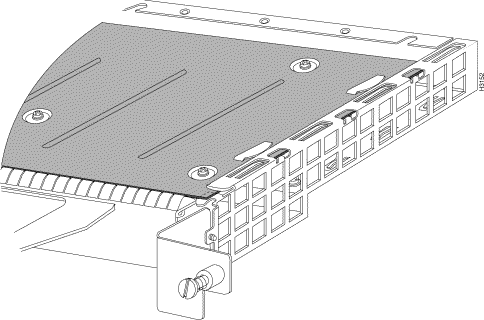
Step 5 Locate the screw at the rear of the port adapter (or blank port adapter) to be replaced (see Figure 12). This screw secures the port adapter (or blank port adapter) to its slot.
Step 6 Remove the screw that secures the port adapter (or blank port adapter).
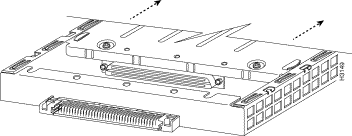
Step 7 With the screw removed, grasp the handle on the front of the port adapter (or blank port adapter) and carefully pull it out of its slot, away from the edge connector at the rear of the slot (see Figure 13).
Step 8 If you removed a port adapter, place it in an antistatic container for safe storage or shipment back to the factory. If you removed a blank port adapter, no special handling is required; however, store the blank port adapter for potential future use.
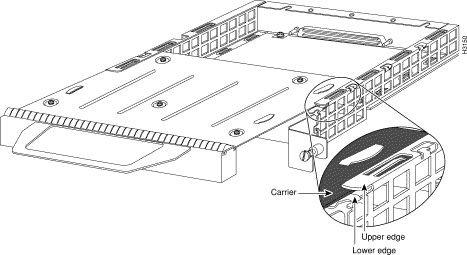
Step 9 Remove the new port adapter from its antistatic container and position it at the opening of the slot (see Figure 13).
Step 10 Before you begin to insert the new port adapter in its slot, verify that the port adapter carrier should be between the upper and lower slot edges, as shown in Figure 13. Do not jam the carrier between the slot edges.
Step 11 Carefully slide the new port adapter into the port adapter slot until the connector on the port adapter completely mates with the connector on the motherboard.
Step 12 Replace the screw in the rear of the port adapter slot (see Figure 12 for its location). Do not overtighten this screw.
Step 13 To replace the RSM/VIP2 in the chassis, follow the steps in the "Installation Procedure" section.
Step 14 If disconnected, reconnect the interface cables to the interface processor.
This completes the procedure for installing a new port adapter or replacing a port adapter.
Cisco Connection Online (CCO) is Cisco Systems' primary, real-time support channel. Maintenance customers and partners can self-register on CCO to obtain additional information and services.
Available 24 hours a day, 7 days a week, CCO provides a wealth of standard and value-added services to Cisco's customers and business partners. CCO services include product information, product documentation, software updates, release notes, technical tips, the Bug Navigator, configuration notes, brochures, descriptions of service offerings, and download access to public and authorized files.
CCO serves a wide variety of users through two interfaces that are updated and enhanced simultaneously: a character-based version and a multimedia version that resides on the World Wide Web (WWW). The character-based CCO supports Zmodem, Kermit, Xmodem, FTP, and Internet e-mail, and it is excellent for quick access to information over lower bandwidths. The WWW version of CCO provides richly formatted documents with photographs, figures, graphics, and video, as well as hyperlinks to related information.
You can access CCO in the following ways:
For a copy of CCO's Frequently Asked Questions (FAQ), contact cco-help@cisco.com. For additional information, contact cco-team@cisco.com.
Note If you are a network administrator and need personal technical assistance with a Cisco product that is under warranty or covered by a maintenance contract, contact Cisco's Technical Assistance Center (TAC) at 800 553-2447, 408 526-7209, or tac@cisco.com. To obtain general information about Cisco Systems, Cisco products, or upgrades, contact 800 553-6387, 408 526-7208, or cs-rep@cisco.com.
![]()
![]()
![]()
![]()
![]()
![]()
![]()
![]()
Posted: Sat Jan 18 13:07:18 PST 2003
All contents are Copyright © 1992--2002 Cisco Systems, Inc. All rights reserved.
Important Notices and Privacy Statement.