|
|

Product Number: WS-X4014 = Catalyst 4000 Family Supervisor Engine III
This publication describes how to install and verify the operation of the Catalyst 4000 family Supervisor Engine III. Refer to the software configuration guide for your switch for configuration information for the supervisor engines and switching modules.
This document includes these sections:
Throughout this publication, safety warnings appear in procedures that can harm you if performed incorrectly. A warning symbol precedes each warning statement.
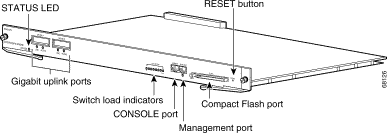
This section describes the Catalyst 4000 family Supervisor Engine III (WS-X4014). This supervisor engine provides data paths and data control for all network interfaces.
The supervisor engine is hot swappable, but packets are not forwarded when the supervisor engine has been removed. When a supervisor engine is reinserted, the system reboots.
The supervisor engine includes interfaces for SNMP, console, and Telnet, and provides management functions, such as environmental status monitoring.
The following sections describe the LEDs, connectors, and switches on the Catalyst 4000 family Supervisor Engine III:
Table 1 describes the LEDs on the supervisor engine front panel.
Table 1 Supervisor Engine LEDs (WS-X4014)
|
The Gigabit Ethernet uplink ports operate in full-duplex mode only. These ports use the 1000BASE-SX, 1000BASE-LX/LH, and 1000BASE-ZX Gigabit Interface Converters (GBICs). GBICs have SC connectors to interface with multimode fiber (MMF) and single-mode fiber (SMF) cable. For more information on GBICs, see the "GBIC Handling Installation and Guidelines" section.
The Ethernet management port is used (in ROMMON mode only) to recover a switch software image that has been corrupted or destroyed due to a network catastrophe. This port is not active while the switch is operating normally.
The Catalyst 4000 family Supervisor Engine III console port has an EIA/TIA-232 RJ-45 connector. The console port allows you to perform the following functions:
The Reset button is used to restart the switch.
 |
Note Use a paper clip or other small, pointed object to press the Reset button. |
The Flash port accepts a Type 1 compact Flash card. You can use it for file transfer tasks such as loading a new software image. The Flash card (MEM-C4K-FLD64M= or MEM-C4K-FLD128M=) is optional.
For more information, refer to Using the Compact Flash on the Catalyst 4000 Family Supervisor Engine III and IV at the following URL:
http://www.cisco.com/univercd/cc/td/doc/product/lan/cat4000/inst_nts/ol_2058.htm
This section provides port cabling specifications and includes the following subsections:
The length of your networks and the distances between connections depend on the type of signal, the signal speed, and the transmission medium (the type of cabling used to transmit the signals). The distance and rate limits specified in this document are the IEEE-recommended maximum speeds and distances for signaling. Table 2 shows the transmission speed and the distance.
Table 2 EIA/TIA-232 Transmission Speed in Contrast with Distance
|
Table 3 shows the maximum cable distances for transceiver speed and cable type.
Table 3 Maximum Cable Distances
|
Table 4 provides cabling specifications for the GBICs that you install in the Gigabit Ethernet port modules. All GBIC ports have SC-type connectors, and the minimum cable distance for all GBICs listed is 6.5 feet (2 meters).
Table 4 GBIC Port Cabling Specifications
|
|
1 MMF only. 2 Patch cord required (see the "Using a Patch Cord" section for details). 3 Dispersion-shifted single-mode fiber-optic. |
When using the LX/LH GBIC with 62.5-micron diameter MMF, you must install a mode-conditioning patch cord (Cisco product number CAB-GELX-625 or equivalent) between the GBIC and the MMF cable on both the transmit and receive ends of the link.
The patch cord is required for link distances greater than 984 feet (300 meters) and must comply with IEEE standards. The IEEE found that link distances could not be met with certain types of fiber-optic cable due to a problem in the center of some fiber-optic cable cores. The solution is to launch light from the laser at a precise offset from the center by using the patch cord. At the output of the patch cord, the LX/LH GBIC is compliant with the IEEE 802.3z standard for 1000BASE-LX. For more information, refer to the Catalyst 4000 Series Installation Guide and Catalyst 4500 Series Installation Guide.
|
Note We do not recommend using the LX/LH GBIC with MMF without a patch cord for very short link distances (tens of meters). The result could be an elevated bit error rate (BER). |
Cisco Gigabit Ethernet products have been tested and evaluated to comply with the standards listed in Appendix A, "Specifications," of the Catalyst 4000 Series Installation Guide and Catalyst 4500 Series Installation Guide. All equivalent cables should also meet the standards specified in the guide.
All Catalyst 4000 family switches support hot swapping, which lets you install, remove, replace, and rearrange supervisor engines and switching modules without power ing the system off. When the system detects that a switching module has been installed or removed, it runs diagnostic and discovery routines automatically, acknowledges the presence or absence of the module, and resumes system operation with no operator intervention.
This section contains the following subsections:
You will need these tools to install a supervisor engine in a Catalyst 4000 family switch:
|
Note Whenever you handle supervisor engines, use a wrist strap or other grounding device to prevent ESD damage. |
Catalyst 4000 family switches have horizontal chassis slots that are numbered from top to bottom. You can install the Catalyst 4000 family supervisor engine in slot 1 only.
 |
Warning During this procedure, wear grounding wrist straps to avoid ESD damage to the card. Do not directly touch the backplane with your hand or any metal tool, or you could shock yourself. |
 |
Caution To prevent ESD damage, handle supervisor engines by the carrier edges only. |
To install a supervisor engine in a Catalyst 4000 family switch, follow this procedure:
Step 2 Ensure that you have enough clearance to accommodate any interface equipment that you will connect directly to the supervisor engine ports.
Step 3 Loosen the captive installation screws that secure the switching-module filler plate or the existing supervisor engine (whichever is present) and remove it.
Step 4 Remove the supervisor engine filler plate or the existing supervisor engine from slot 1. If a switching module filler plate was installed, save it for future use. If you are removing an existing supervisor engine, see the "Removing the Supervisor Engine" section.
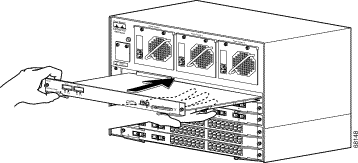
Step 5 To install the new supervisor engine, grasp the switching module front panel with one hand and place your other hand under the carrier to support the supervisor engine, as shown in Figure 2. Do not touch the printed circuit boards or connector pins.
Step 6 Align the edges of the supervisor engine carrier with the slot guides on the sides of the switch chassis, as shown in Figure 2.
Step 7 Pivot the two module ejector levers out and away from the faceplate.
Step 8 Carefully slide the supervisor engine into slot 1 until the notches on both ejector levers engage the chassis sides.
Step 9 Using the thumb and forefinger of each hand, simultaneously pivot in both ejector levers to fully seat the supervisor engine in the backplane connector.
|
Caution Always use the ejector levers when installing or removing a supervisor engine. A supervisor engine that is partially seated in the backplane will not function correctly. |
Step 10 Use a screwdriver to tighten the captive installation screws on each end of the supervisor engine faceplate.
You have now completed the installation procedure.
To check the status of the module, perform these steps:
Step 2 When the switch is online, enter the show module command. Verify that the system acknowledges the new module and that the module's status is good.
Step 3 If the module is not operational, reseat it. If the module is still not operational, contact your customer service representative.
|
Warning Because invisible radiation may be emitted from the aperture of the port when no fiber cable is connected, avoid exposure to radiation and do not stare into open apertures. |
|
Warning During this procedure, wear grounding wrist straps to avoid ESD damage to the card. Do not directly touch the backplane with your hand or any metal tool, or you could shock yourself. |
|
Caution To prevent ESD damage, handle supervisor engines by the carrier edges only. |
To remove a supervisor engine from a Catalyst 4000 family switch, follow this procedure:
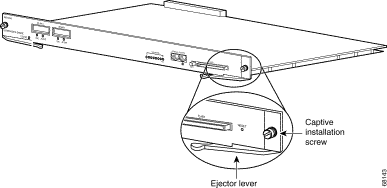
Step 2 Loosen the captive installation screws (see Figure 3).
Step 3 Grasp the left and right ejector levers and simultaneously pivot the levers outward to release the supervisor engine from the backplane connector. Figure 3 shows a close-up of the right ejector lever.
Step 4 Grasp the front panel of the supervisor engine with one hand and place your other hand under the carrier to support and guide it out of the slot. Do not touch the printed circuit boards or connector pins.
Step 5 Carefully pull the supervisor engine straight out of the slot, keeping your other hand under the carrier to guide it.
Step 6 Place the supervisor engine on an antistatic mat or antistatic foam, or immediately install it in another slot.
|
Warning Blank faceplates and cover panels serve three important functions: they prevent exposure to hazardous voltages and currents inside the chassis; they contain electromagnetic interference (EMI) that might disrupt other equipment; and they direct the flow of cooling air through the chassis. Do not operate the system unless all cards, faceplates, front covers, and rear covers are in place. |
Step 7 If the slot is to remain empty, install a switching-module filler plate (part number 800-00292-01).
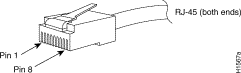
Figure 4 and Figure 5 show the connector types used to attach interface cables to the supervisor engine.
|
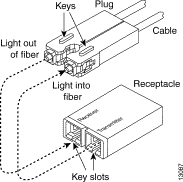
Note Always keep caps and plugs on the fiber-optic connectors on the cable and the switch when they are not in use. |
|
Warning Because invisible radiation may be emitted from the aperture of the port when no fiber cable is connected, avoid exposure to radiation and do not stare into open apertures. |
For information and commands to configure your supervisor engine, refer to the software configuration guide for your switch.
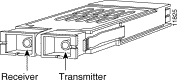
A GBIC (see Figure 6) is a hot swappable input/output device that plugs into the Gigabit Ethernet port of a supervisor engine and links the supervisor engine with a fiber-optic network. GBICs are online swappable.
The following GBIC media types are supported:
|
Caution Because of interoperability issues, Cisco does not support GBICs purchased from third-party vendors. |
Cisco 1000BASE-LX/LH interfaces fully comply with the IEEE 802.3z 1000BASE-LX standard. However, their higher optical quality allows them to reach 10 km over SMF cable instead of the 5 km specified in the standard.
If an LX/LH GBIC designed for operation on an SMF cable is directly coupled to an MMF cable, an effect known as Differential Mode Delay (DMD) might occur. See the Catalyst 4000 Family Module Installation Guide for more information.
This section describes the following topics:
A supervisor engine can be shipped with or without GBICs installed.
|
Caution When removing or inserting a GBIC, always wear an ESD wrist strap connected to the ESD wrist strap connector. |
|
Caution Unnecessary removal or insertion of a GBIC can lead to premature failure of the GBIC. A GBIC has a lifetime of 100 to 500 removals and insertions. |
|
Note This product has been evaluated to and complies with acceptable-safety-emission limits for Class 1 lasers. However, you should still take general precautions when working with lasers. |
|
Warning Because invisible radiation may be emitted from the aperture of the port when no fiber cable is connected, avoid exposure to radiation and do not stare into open apertures. |
To install a GBIC, follow this procedure:
Step 2 Verify that the GBIC is the correct type for your network by checking the GBIC part number. The part number indicates whether it is 1000BASE-SX, 1000BASE-LX/LH, or 1000BASE-ZX.
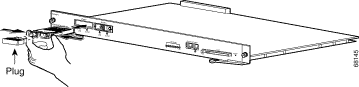
Step 3 Grasp the sides of the GBIC with your thumb and forefinger; insert the GBIC into the appropriate slot on the front of the module (see Figure 7).
|
Note GBICs are keyed to prevent incorrect insertion into a slot. |
Step 4 Slide the GBIC into the slot until you hear a click. The click indicates that the GBIC is locked into the slot.
Step 5 When you are ready to attach the fiber-optic cable, remove the plug from the GBIC and save it for future use.
|
Caution Do not remove the plugs from the GBIC optical bores or the fiber-optic cable until you are ready to connect the cable. The plugs protect the GBIC optical bores and cable from contamination. |
Step 6 Remove the plugs from the SC-type connector on the fiber-optic cable (see Figure 5 on). Insert the connector into the GBIC.
You have now completed the installation procedure.
|
Note When you plug the SC-type connector into the GBIC, ensure that you fully insert the Tx and Rx fiber-optic cables into the SC-type connector. |
|
Note If you are using the LX/LH GBIC with MMF, you need to install a patch cord between the GBIC and the MMF cable. See the "Using a Patch Cord" section on for details. |
|
Warning Because invisible radiation may be emitted from the aperture of the port when no fiber cable is connected, avoid exposure to radiation and do not stare into open apertures. |
To remove a GBIC, follow this procedure:
Step 2 Release the GBIC from the slot by simultaneously squeezing the plastic tabs (one on each side of the GBIC).
Step 3 Slide the GBIC out of the slot.
Step 4 Install the two plugs into the GBIC optical bores, and place the GBIC in its protective packaging.
You have now completed the removal procedure.
To properly maintain GBICs, follow these guidelines:
When installed in a system, the Catalyst 4000 family modules comply with the standards listed in Table 5:
Table 5 Standards Compliance Specifications
|
|
1 CE = European Compliance 2 UL = Underwriters Laboratory 3 CSA = Canadian Standards Association 4 EN = European Norm 5 IEC = International Electrotechnical Commission 6 TS = technical specifications 7 AS/NZS = Australia Standards/New Zealand Standards 8 EMC = electromagnetic compatibility 9 FCC = U.S. Federal Communications Commission 10 CFR = Code of Federal Regulations 11 ICES = Interference-Causing Equipment Standard 12 CISPR = Comite International Special des Perturbation Radioelectriques 13 VCCI = Voluntary Control Council for Information Technology Equipment 14 UTP = unshielded twisted-pair |
The following modules have been found to comply with the limits for a Class A digital device per FCC (CFR 47) Part 15, ICES 003, EN55022, CISPR22, AS/NZS 3548, and VCCI with UTP cables, and complies with the limits for a Class B digital device per EN55022, CISPR22, AS/NZS 3548, and VCCI with shielded FTP cables with the following modules:
|
|
For more detailed installation and configuration information, refer to the following:
The following sections explain how to obtain documentation from Cisco Systems.
You can access the most current Cisco documentation on the World Wide Web at the following URL:
Translated documentation is available at the following URL:
http://www.cisco.com/public/countries_languages.shtml
Cisco documentation and additional literature are available in a Cisco Documentation CD-ROM package, which is shipped with your product. The Documentation CD-ROM is updated monthly and may be more current than printed documentation. The CD-ROM package is available as a single unit or through an annual subscription.
Cisco documentation is available in the following ways:
http://www.cisco.com/cgi-bin/order/order_root.pl
http://www.cisco.com/go/subscription
If you are reading Cisco product documentation on Cisco.com, you can submit technical comments electronically. Click Leave Feedback at the bottom of the Cisco Documentation home page. After you complete the form, print it out and fax it to Cisco at 408 527-0730.
You can e-mail your comments to bug-doc@cisco.com.
To submit your comments by mail, use the response card behind the front cover of your document, or write to the following address:
Cisco Systems
Attn: Document Resource Connection
170 West Tasman Drive
San Jose, CA 95134-9883
Cisco provides Cisco.com as a starting point for all technical assistance. Customers and partners can obtain documentation, troubleshooting tips, and sample configurations from online tools by using the Cisco Technical Assistance Center (TAC) Web Site. Cisco.com registered users have complete access to the technical support resources on the Cisco TAC Web Site.
Cisco.com is the foundation of a suite of interactive, networked services that provides immediate, open access to Cisco information, networking solutions, services, programs, and resources at any time, from anywhere in the world.
Cisco.com is a highly integrated Internet application and a powerful, easy-to-use tool that provides a broad range of features and services to help you to
You can self-register on Cisco.com to obtain customized information and service. To access Cisco.com, go to the following URL:
The Cisco TAC is available to all customers who need technical assistance with a Cisco product, technology, or solution. Two types of support are available through the Cisco TAC: the Cisco TAC Web Site and the Cisco TAC Escalation Center.
Inquiries to Cisco TAC are categorized according to the urgency of the issue:
Which Cisco TAC resource you choose is based on the priority of the problem and the conditions of service contracts, when applicable.
The Cisco TAC Web Site allows you to resolve P3 and P4 issues yourself, saving both cost and time. The site provides around-the-clock access to online tools, knowledge bases, and software. To access the Cisco TAC Web Site, go to the following URL:
All customers, partners, and resellers who have a valid Cisco services contract have complete access to the technical support resources on the Cisco TAC Web Site. The Cisco TAC Web Site requires a Cisco.com login ID and password. If you have a valid service contract but do not have a login ID or password, go to the following URL to register:
http://www.cisco.com/register/
If you cannot resolve your technical issues by using the Cisco TAC Web Site, and you are a Cisco.com registered user, you can open a case online by using the TAC Case Open tool at the following URL:
http://www.cisco.com/tac/caseopen
If you have Internet access, it is recommended that you open P3 and P4 cases through the Cisco TAC Web Site.
The Cisco TAC Escalation Center addresses issues that are classified as priority level 1 or priority level 2; these classifications are assigned when severe network degradation significantly impacts business operations. When you contact the TAC Escalation Center with a P1 or P2 problem, a Cisco TAC engineer will automatically open a case.
To obtain a directory of toll-free Cisco TAC telephone numbers for your country, go to the following URL:
http://www.cisco.com/warp/public/687/Directory/DirTAC.shtml
Before calling, please check with your network operations center to determine the level of Cisco support services to which your company is entitled; for example, SMARTnet, SMARTnet Onsite, or Network Supported Accounts (NSA). In addition, please have available your service agreement number and your product serial number.
![]()
![]()
![]()
![]()
![]()
![]()
![]()
![]()
Posted: Tue Feb 10 13:10:24 PST 2004
All contents are Copyright © 1992--2004 Cisco Systems, Inc. All rights reserved.
Important Notices and Privacy Statement.