|
|

This Configuration Note provides information specific to expansion modules for the Catalyst 3000 series switches.
This note discusses the following topics:
For detailed information about configuring any Catalyst 3000 series expansion module, refer to the Installation and Configuration Guide of an appropriate model of a Catalyst 3000 series switch.
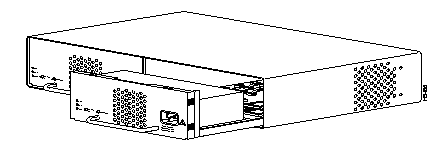
A Catalyst Matrix module can be installed in either the left side, right side, or in both positions of the Catalyst Matrix chassis. If a module fails, it can be replaced easily. The only tool needed is a #2 bit Phillips screwdriver. The following procedure describes how to add or replace a Catalyst Matrix module.
Use the following steps for installing or replacing a Catalyst Matrix module. If you are installing a module into an open slot, proceed to Step 5.
Step 1 If there is a blank cover over the expansion module slot, remove it by unscrewing the two attachment screws.
Step 2 Disconnect power from the module. (See previous note pertaining to power to the module.)
Step 3 Remove the screw located at the top center of the front of the module.
Step 4 Use the handle on the front of the module to pull the module straight out from the chassis.
Step 5 Insert the module into the open slot. Figure 1 shows the insertion of the secondary module into the chassis. Place the bottom of the module against the bottom of the slot and slide the module into the slot. You should feel some resistance as the module connector mates with the Matrix connector. If you feel solid resistance, pull the module back a little and try again while moving the module slightly to the left or right until you feel the two connectors engage. After the connectors start to engage, you should be able to insert the module approximately one-half inch further or until you feel hard resistance. The connectors should be seated at that point. If the module fails to work properly, remove it and try this step again.
Step 6 Install the screw at the top center of the module's front plate.
Step 7 Connect the power cord to the module.
Step 8 Bring the module on line by pressing the ACTIVATE push-button.
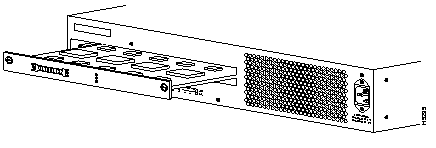
The following section explains the installation and use of the WS-X3004 Catalyst Stack Port connection module, which enables two or more Catalyst 3000 series switches to work together
as a Stack.
The Catalyst Stack Port is a single-port expansion module with a special 50-pin connector. (For a detailed description of the Catalyst Stack refer to a Catalyst 3000 series Installation and Configuration Guide for your particular model.) With the Catalyst Stack Port, two types of Stacks can be created:
Figure 2 displays the insertion of the Stack Port module into its expansion slot.
 | Caution Catalyst Stack Port modules are not hot-swappable. Always be sure that the power is off before installing or removing a Catalyst Stack Port module. If the power is on, damage to the equipment may result. |
| **before**Do not touch the components or connectors on the Catalyst Stack Port module. Do not touch the connector pins on a cable when the other end is plugged into a component. Damage may result from static discharge.@@before@@ | Caution **after**Do not touch the components or connectors on the Catalyst Stack Port module. Do not touch the connector pins on a cable when the other end is plugged into a component. Damage may result from static discharge.@@after@@ |
| **before**During installation, the connector on the Catalyst Stack Port module must line up evenly with the connector inside the expansion slot. Misalignment may cause the connector pins to bend. When inserting the Catalyst Stack Port module into the expansion slot, be sure that the board is level and that the left and right sides slide evenly into the slot.@@before@@ | Caution **after**During installation, the connector on the Catalyst Stack Port module must line up evenly with the connector inside the expansion slot. Misalignment may cause the connector pins to bend. When inserting the Catalyst Stack Port module into the expansion slot, be sure that the board is level and that the left and right sides slide evenly into the slot.@@after@@ |
Use the following steps when installing a Catalyst Stack Port module into the rear expansion slot of the Catalyst switch chassis.
Step 1 Disconnect the power to the Catalyst switch.
Step 2 Remove the cover (if there is a blank cover over the expansion module slot) by unscrewing the two attachment screws.
Step 3 Hold the module by the edges to prevent static damage. Be careful not to touch the top or bottom.
Step 4 Slide the module into the slot evenly, taking care to line up the edges with the guides.
Step 5 Seat the module by pressing the front of the module with your thumbs.
Step 6 Secure the module to the chassis by tightening the thumb (panel) screws at the left and right edges of the expansion modules front panel. Do not overtighten the screws.
Step 7 Return power to the switch.
The Catalyst Stack Port module has a connector designed to accept special 50-pin Stack-port cables. Do not attempt to use a SCSI-2 cable. For more information about these cables, contact Cisco support.
This section covers the installation of the following expansion modules:
| Caution Expansion modules are not hot-swappable. Always be sure that the power is off before installing or removing an expansion module. If the power is on, damage to the equipment may result. |
The single-port 100BaseTX expansion module (WS-X3001) is used to connect to computers, hubs, servers, and other high-speed network devices. The following sections explain the installation, cable connection, and network connection for the 100BaseTX expansion module. For a functional description of the 100BaseTX and the Catalyst switch, see the chapter that discusses the theory of operation in a Catalyst 3000 series Installation and Configuration Guide for your model of Catalyst switch.
The 100BaseTX expansion module is shown in Figure 3.
The modules can be inserted in either of the two expansion slots, as shown in Figure 4.
Use the following steps when installing a module into an expansion slot of the Catalyst chassis.
| Caution The Catalyst expansion modules are not hot-swappable. Power must be disconnected from the Catalyst chassis before an expansion module is inserted or removed. |
| **before**Do not touch the components or connectors on the expansion module. Do not touch cable connector pins when the other end is plugged in. Damage may result from static discharge.@@before@@ | Caution **after**Do not touch the components or connectors on the expansion module. Do not touch cable connector pins when the other end is plugged in. Damage may result from static discharge.@@after@@ |
| **before**During installation, the connector on the expansion module must line up evenly with the connector inside the expansion slot. Misalignment may cause the connector pins to bend. When inserting the module into the expansion slot, be sure that the board is level and that the left and right sides slide evenly into the slot.@@before@@ | Caution **after**During installation, the connector on the expansion module must line up evenly with the connector inside the expansion slot. Misalignment may cause the connector pins to bend. When inserting the module into the expansion slot, be sure that the board is level and that the left and right sides slide evenly into the slot.@@after@@ |
Step 1 Disconnect the power to the Catalyst switch.
Step 2 If there is a blank cover over the expansion module slot, or if the slot has an installed module, remove it by unscrewing the two attachment screws.
Step 3 Hold the module by the edges to prevent static damage. Be careful not to touch the top or bottom.
Step 4 Slide the module into the slot evenly, taking care to line up the edges with the guides.
Step 5 Seat the module by pressing the front of the module with your thumbs.
Step 6 Secure the module to the chassis by tightening the thumb (panel) screws at the left and right edges of the expansion modules front panel. Do not overtighten the screws.
Step 7 Return power to the switch.
The 100BaseTX module's network port is an RJ-45 connector that uses 100BaseTX cable.
The 100BaseTX module's network port is an RJ-45, 100BaseTX type that is always in MDI-X mode. Cabling the 100BaseTX to different types of equipment that have MDI or MDI-X ports requires different types of 100BaseTX cable. The cable types are described below.
As a reference for 100BaseTX cable, use the 10BaseT cable information in "Appendix A" in a Catalyst 3000 series Installation and Configuration Guide.
Connect cables to the RJ-45 port on the front of the 100BaseTX module as follows:
Step 1 Determine if the unit is operating in half-duplex or full-duplex mode. If the Catalyst switch is an enhanced version, see the section "Configuring Full-Duplex Communications" in a Catalyst 3000 series Installation and Configuration Guide for a detailed explanation on how to determine whether the communication mode is half- or full-duplex. The Catalyst switch and the 100BaseTX operate in half-duplex mode only for unenhanced Catalyst switch units. Set the DUPLEX switch on the front of the module to the appropriate position: down for half-duplex, or up for full-duplex. Set to half-duplex only for unenhanced Catalyst switch units.
Step 2 Determine that you have the correct cable. Refer to "Appendix A" in a Catalyst 3000 series Installation and Configuration Guide for a description of 100BaseTX cables.
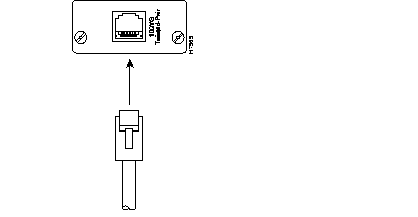
Step 3 Connect a 100BaseTX cable from a hub or end-node device to the RJ-45 jack on the front of the expansion module.
Step 4 Insert the cable's 8-pin (RJ-45) plug into the jack until it clicks into place (see Figure 5).
When the connection is established, the LNK/FDX LED is on: green in half-duplex mode, or yellow in full-duplex mode. If the LED is not on, there may be a cable problem. Verify that you are using the correct type of cable, then check if the cable is bad by trying a different one.
If, after installation, there is poor system performance or the 100BaseTX module does not work at all, remove the module and check for any damage or bent connector pins. You may need a bright light to see inside the expansion module slot to check for bent pins. Also, verify that the module is set firmly in place. If you cannot find an immediate cause for the problem, refer to the chapter that discusses troubleshooting in a Catalyst 3000 series Installation and Configuration Guide.
The following tables, Table 1, Table 2, and Table 3, describe the connectors, LEDs, and switches on the 100BaseTX module.
| Name | Description |
| Network Port | 8-pin, RJ-45, 100BaseTX |
| Name | Description |
| XMIT | A packet has been transmitted to the attached segment. |
| RCV | A packet has been received from the attached segment. |
| LNK/FDX | Off = link not detected.
Green = half-duplex, Yellow = full-duplex (Enhanced version only). |
| DIAG | Running diagnostic. In normal operation DIAG should be off. |
| Name | Description |
| Duplex | Establishes the communication mode of the network port if the Catalyst 3000 is an enhanced version. Only set to half-duplex for unenhanced versions.
Full-duplex (up) or half-duplex (down). |
The four-port 10BaseT expansion module (WS-X3002) is used for connections to computers, hubs, servers, and other network devices. The 10BaseT module is shown in Figure 6.

Expansion modules are installed in the expansion slots on the front of the Catalyst switch. All front expansion modules are installed in a similar way. Use the previous section "Installing The WS-X3001 (100Base TX) Module" as an example for detailed installation instructions and precautions for the 10BaseT module.
The 10BaseT module's network ports are RJ-45 connectors that use 10BaseT cable.
The 10BaseT module's network ports are RJ-45, 10BaseT types that are always in MDI-X mode. Cabling the 10BaseT to different types of equipment that have MDI or MDI-X ports requires different types of 10BaseT cable. The cable types are described below.
For detailed information on 10BaseT cables see "Appendix A" in a Catalyst 3000 series Installation and Configuration Guide.
Connect cables to the RJ-45 ports on the front of the 10BaseT expansion module as follows:
Step 1 Determine if the unit is operating in half-duplex or full-duplex mode. If the Catalyst switch is an enhanced version, see the section "Configuring Full-Duplex Communications" in a Catalyst 3000 series Installation and Configuration Guide for a detailed explanation on how to determine whether the communication mode is half- or full-duplex. The Catalyst switch and the 10BaseT module operate in half-duplex mode only for an unenhanced Catalyst switch unit. Set the DUPLEX switches on the front of the module to the appropriate position: down for half-duplex, or up for full-duplex. Set to half-duplex only for an unenhanced Catalyst switch.
Step 2 Determine that you have the correct cable. Refer to the appendix that discusses cables in a Catalyst 3000 series Installation and Configuration Guide for a description of 10BaseT cables.
Step 3 Connect a 10BaseT cable from a hub or end-node device to each RJ-45 jack on the front of the expansion module (see Figure 7).
Step 4 Insert the cable's 8-pin (RJ-45) plug into a jack until it clicks into place.
The three-port 10BaseF expansion module (WS-X3003) is used for fiber-optic connections to computers, hubs, servers, and other high-speed network devices. The 10BaseF expansion module is shown in Figure 8.

Expansion modules are installed in the expansion slots on the front of the Catalyst switch. All front expansion modules are installed in a similar way. Use the previous section "Installing The WS-X3001 (100Base TX) Module" as an example for detailed installation instructions and precautions for the 10BaseF module.
The 10BaseF module's network ports are multimode fiber-optic interfaces with ST type connectors.
In full-duplex or half-duplex operating modes, the 10BaseF supports connection distances up to 2 km.
Enhanced versions of the Catalyst switch Stack support full-duplex operating mode. Unenhanced versions of the Stack only support half-duplex operating mode. To set the half-duplex or full-duplex mode, see Step 1 in the following cabling instructions.
Connect cables to the ST ports on the front of the 10BaseF module as follows:
Observe the following warnings and notes when cabling an expansion module with fiber-optic cable.
 | Warning Laser radiation is present when the system is open. |
Warning Do not stare into the laser beam.
Step 1 Determine if the unit is operating in half-duplex or full-duplex mode. The Catalyst switch and the 10BaseF only operate in half-duplex mode for unenhanced Catalyst switch units. Locate the desired DUPLEX switch for the port on the front of the module, and set it to the appropriate position: down for half-duplex, or up for full-duplex. Set to half-duplex for unenhanced Catalyst switch units.
Step 2 Determine that you have the correct cable
Step 3 Connect 10BaseF cables from a hub or end-node device to the ST ports on the front of the 10BaseF expansion module.
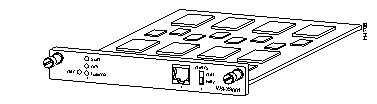
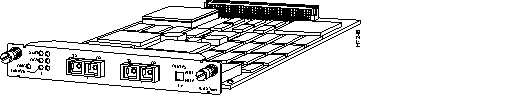
The 100BaseF expansion module (WS-X3005) is a single-port 100BaseFx expansion module used for high-bandwidth fiber-optic connections to computers, hubs, servers, and other high-speed network devices. The 100BaseF expansion module is shown in Figure 9.

Expansion modules are installed in the expansion slots on the front of the Catalyst switch. All front expansion modules are installed in a similar way. Use the previous section "Installing The WS-X3001 (100Base TX) Module" as an example for detailed installation instructions and precautions for the 100BaseF module.
The 100BaseF module's network port has 1300 nm multimode fiber-optic ST type connectors.
In full-duplex operating mode, the 100BaseF supports connection distances up to 2 km. In half-duplex operating mode, the 100BaseF supports connection distances up to 400 meters.
Enhanced versions of the Catalyst switch support half- or full-duplex operating mode, while the unenhanced version supports only half-duplex mode. If the Catalyst switch in which the 100BaseF is being installed is an enhanced version, refer to the section "Configuring Full-Duplex Communications" in a Catalyst 3000 series Installation and Configuration Guide. That section provides details about half-duplex or full-duplex communication mode.
Connect cables to the ST ports on the front of the 100BaseF module as follows:
Observe the following warnings and notes when cabling an expansion module with fiber-optic cable.
| Warning Laser radiation is present when the system is open. |
Warning Do not stare into the laser beam.
Step 1 Determine if the unit is operating in half-duplex or full-duplex mode. The Catalyst switch and the 100BaseF operate only in half-duplex mode for unenhanced Catalyst switch units. Set the DUPLEX switch on the front of the module to the appropriate position: down for half-duplex, or up for full-duplex. Set to half-duplex for unenhanced Catalyst switch units.
Step 2 Determine that you have the correct cable.
Step 3 Connect a 100BaseFx cable from an end-node device to the ST ports on the front of the expansion module.
Two versions of the Catalyst 3000 series ATM expansion module are available:
The WS-X3006A (also referred to as WS-X3006) is described in the following sections. WS-X3006B information follows the description of the WS-X3006A.
The WS-X3006 is a single-port ATM expansion module that is used to establish a high-speed 155 Mbps ATM connection between Catalyst 3000 series devices and ATM networks. For an operational explanation of the WS-X3006, see the ATM functional descriptions later in this document. For a complete description of how to configure the ATM module, see the configuration chapters in the appropriate model of the Catalyst 3000 series Installation and Configuration Guide. The ATM expansion module is shown in Figure 10.

The WS-X3006 ATM expansion module performs packet/cell conversions. Cells enter through the ATM physical interface and are processed by the module and converted to packets at network
layer 2. Outbound data is converted from packets to cells and transmitted through the ATM physical interface.
The following table (Table 4) displays the specifications for the WS-X3006 ATM expansion module.
| Function | Specification |
|---|---|
| Throughput | 65,000 packets per second in each direction |
| Number of VLANS | 64 |
| Number of SVCs | 1912 in each direction |
| Number of PVPs | One |
| Packet Buffers | 512K Bytes in each direction |
| Operating Temperature | 10 to 40 degrees Centigrade |
| Non-operating Temperature | -25 to 75 degrees Centigrade |
| Relative Humidity: operating | 8 to 80%, non-condensing |
| Non-operating Altitude | 40,000 feet |
| Safety | UL 1950
UL-C EN 60950 CE Mark |
| EMI Certifications | FCC Class A (Part 15)
EN 55022 A VCCI Class 1 |
Expansion modules are installed in the expansion slots on the front of the Catalyst switch. All front expansion modules are installed in a similar way. Use the previous section, "Installing The WS-X3001 (100Base TX) Module" as an example for detailed installation instructions and precautions for the ATM module.
The ATM module's network port is an OC-3 interface with an SC Duplex connector that uses 62.5/125 multimode fiber-optic cable rated for 155 Mbps ATM data transfer rate.
The ATM module supports cable lengths up to 2 km.
The ATM expansion module is a full-duplex device. For its multiple VLAN (virtual LAN) features to be enabled, The ATM module must be installed in an enhanced version of the Catalyst switch. Refer to the chapter that covers installation in an appropriate model of a Catalyst 3000 series Installation and Configuration Guide for more information on the differences between enhanced and unenhanced versions.
(If the ATM module is installed in a unenhanced version of the Catalyst switch, the unit supports creation of a single VLAN within its Stack, but does not support creation of multiple-stack VLANs.)
The ATM module supports connection distances up to 2 km. Connect cables to the front of the ATM module as follows:
Observe the following warnings and notes when cabling an expansion module with fiber-optic cable.
| Warning Laser radiation is present when the system is open. |
Warning Do not stare into the laser beam.
The ports on the module, and the fiber-optic network to which it is connected, use laser light. Do not stare into a fiber-optic port or into the end of a cable that is connected to a fiber-optic port.
Step 1 Determine that you have the proper cable.
Step 2 Connect an ATM cable from a switch or network device to the SC Duplex ports on the front of the expansion module.
Step 3 Verify that the connection has the proper polarity. Be sure the Tx connector on the ATM module is linked to the Rx connector on the other device, and that the Rx connector on the ATM module is linked to the Tx connector on the other device. (ATM Duplex SC connectors are "keyed" to indicate proper polarity, but the polarity of your connector cables may not be clearly marked.)
The following tables describe the connectors, LEDs, and switches on the WS-X3006 module.
| Name | Description |
| LINK | Off = link not detected
Green = link detected |
| DIAG | Running self-diagnostic or if ATM module fails |
| Name | Description |
| Network Port | SC type multi-mode optical fiber connector |
When the link is established, the LINK LED is on. The LED should be green. If the LED is not on, or if the LED is an amber color, try the following tests:
If the above tests do not correct the problem, contact Cisco support.
If, after installation, there is poor system performance or the ATM module does not work at all, remove the module and check for any damage or bent connector pins. You may need a bright light to see inside the expansion module slot to check for bent pins. If you cannot find an immediate cause for the problem, contact Cisco support.
The new WS-X3006B model of the ATM expansion module is installed, configured, and managed the same as the WS-X3006A model (refer to the section "WS-X3006 ATM Module A and B Versions," for additional information). The WS-X3006B is identified by the "WS-X3006B SINGLE MODE ATM" label on the faceplate.
The following section describes the cabling specifications for the WS-X3006B ATM expansion module.
The WS-X3006B ATM expansion module cabling specifications are listed in Table 4.
| Function | Specification |
|---|---|
| Optical Specifications: | |
|
-14 to -8 dBm |
|
-32.5 to -8 dBm |
|
1261 to 1360 nm |
|
Laser |
|
6.2 mi (10 km) |
| Fiber Type | 8.3 x 125 micron core |
The 100VG module is an expansion module that can be added to a Catalyst switch to provide 100VG high speed connectivity. The 100VG module is compatible with the IEEE 802.12 standard.
The 100VG expansion module is available in the following two models. Each model has two high-speed 100VG ports.
The following topics for the 100VG expansion module are discussed in this section:

Physical
Dimensions
Width: 6.00 cm (6.30 in)
Depth: 1.89 cm (8.62 in)
Height: 2.36 cm (0.93 in)
Weight: 86.33 g (10.10 oz) (with no transceivers installed)
Environmental
Operating temperature: 0C to 40C (41F to 104F)
Nonoperating temperature: 40C to 70C (-40F to 158F)
Relative humidity: 5% to 80% at 40C (104F) non-condensing
Maximum operating altitude: 3.1 km (10,000 feet)
Electromagnetic
Emissions
FCC part 15 Class A
EN55022 / CISPR-22 Class A
VCCI Level 1
Immunity
Complies with Canadian EMC Class A requirements.
Declaration of Conformity for the 100VG Module complies with ISO/IEC Guide 22 and EN 45014. The declaration identifies the product, the manufacturer's name and address, and the applicable specifications that are recognized in the European community.
Expansion modules are installed in the expansion slots on the front of the Catalyst switch. All front expansion modules are installed in a similar way. Use the previous section "Installing The WS-X3001 (100Base TX) Module" as an example for detailed installation instructions and precautions for the 100VG module.
Connect the Catalyst switch to a power source and it will begin its power-on self-test diagnostics. The following lists the LED pattern that occurs during the diagnostics.
When the self-tests of the Catalyst switch and the 100VG Module complete successfully, the Catalyst switch and its module(s) are now operational. Connect the appropriate cable to your transceiver.
See the transceiver section for the cable specifications and instructions.
If the diagnostics fail or if the FAULT LED is on or blinking, refer to the Troubleshooting section at the end of this document.
The following sections describe the 100VG Recessed Transceivers. Use this section to cable a compatible network device to a specific 100VG Module transceiver.
Each 100VG Module has preinstalled transceivers, but if a transceiver must be replaced, refer to this section for removal or installation instructions. If there is a problem with a transceiver, use the following sections to verify the installation or to troubleshoot the problem.
The 100VG Recessed Transceivers provide connection to various network media for the 100VG Module. The transceivers are installed into the Xcvr Slots of the 100VG Module.
Figure 12 shows the Unshielded Twisted-Pair Recessed Transceiver for the WS-X3007 model of the 100VG Expansion Module.
Figure 13 shows the Fiber-Optic Multimode ST Recessed Transceiver for the WS-X3008 model.


Physical
Dimensions
All Transceivers
Width: 4.14 cm (1.63 in)
Depth: 9.22 cm (3.63 in)
Height: 2.36 cm (.93 in)
Weight: 50 g
Environmental
Operating temperature: 0C to 55C (32F to 131F)
Nonoperating temperature: 40C to 70C (-40F to 158F)
Relative humidity: 5% to 95% at 40C (104F) non-condensing
Maximum operating altitude: 4.6 km (15,000 feet)
Electromagnetic
Emissions
FCC part 15 Class A
EN55022 / CISPR-22 Class A
VCCI Level 1
Immunity
Complies with Canadian EMC Class A requirements.
Declaration of Conformity for the 100VG Module complies with ISO/IEC Guide 22 and EN 45014. The declaration identifies the product, the manufacturer's name and address, and the applicable specifications that are recognized in the European community.
| Caution Disconnect the power to the device in which the transceiver is to be removed or installed. |
Use the following steps to install a 100VG Recessed Transceivers. Reverse the installation procedure to remove a transceiver.
Step 1 Disconnect AC power from the networking device or device module; then, using a flat-bladed or Torx T-10 screwdriver, unscrew the two retaining screws on the 100VG Xcvr cover plate, or existing transceiver, and remove it from the networking device or device module.
Step 2 Touch a grounded, metal object (such as a powered-on hub) to discharge any static electricity on your body, then carefully remove the transceiver from its protective anti-static packaging. Hold the transceiver by its edges, taking care not touch any of its metal connectors.
Step 3 Slide the transceiver firmly into the 100VG Xcvr slot as far as it will go. The transceiver's faceplate should touch the face of the device.
The following illustration, Figure 14, shows two twisted-pair transceivers sliding into a 100VG Module.

Step 4 Using the flat-bladed or Torx T-10 screwdriver, tighten the spring-loaded retaining screws on the transceiver until they are snug. Be careful that you do not overtighten the screws.
Step 5 Connect network cables to the transceiver or port.
Step 6 Return power to the unit.
The cabling instructions for each transceiver are different and are described in following sections of this guide. For cabling details, find the section that corresponds to your transceiver.
The Recessed 100VG Twisted-Pair Transceiver connects a networking device to an unshielded twisted-pair (UTP) network.
This transceiver is compatible with IEEE 802.12 standard.
Use the following information for cabling a UTP Transceiver.
The Recessed Fiber-Optic Multimode ST Transceiver connects a networking device to a fiber-optic network. This transceiver is compatible with the IEEE 802.12 and its wavelength is 1300nm. Optical fibers conforming to the ISO/IEC DIS 11801 standard will work with this transceiver.
Use the following steps to cable a Fiber-Optic Transceiver:
Observe the following warnings and notes when cabling a Dual Port Fast Ethernet expansion module with fiber-optic cable.
| Warning Laser radiation is present when the system is open. |
Warning Do not stare into the laser beam.
The ports on the module, and the fiber-optic network to which it is connected, use laser light. Do not stare into a fiber-optic port or into the end of a cable that is connected to a fiber-optic port.
Step 1 Remove the plastic dust covers from the cable connectors and the transceiver jacks.
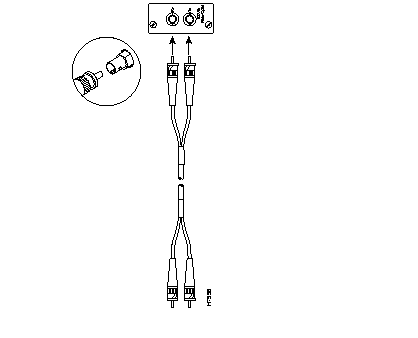
Step 2 Check the polarity of each side of the fiber-optic cable. Use one side of the fiber-optic cable to connect from the transmit (Tx) side of a 100VG Module to the receive (Rx) side of another device. Use the other side of the cable to connect the receive side of the 100VG Module to the transmit side of the other device.
Step 3 Match the "key" on the connector of one of the fibers to the slot in the transceiver's jack. See Figure 16.
Step 4 Press and twist the connector onto the jack so that the pins on the jack slide into the diagonal slots on the connector and the connector snaps securely into place.
Step 5 Repeat the previous steps for the other fiber. Connect it to the other jack on the transceiver.
Step 6 When power is applied to this transceiver in its module, the Link or port LED should be ON. If the LED is off, see the Troubleshooting section.
If the 100VG module is not working properly, the following problems may exist:
By default, the 100VG ports are enabled and do not need configuring. The default Mode setting for the 100VG ports is Auto Detect (Auto). If a 100VG port needs a specific configuration other than the default, use the following information to configure that port.
The following sections describe the Catalyst switch console menus that are used to configure ports and to show the statistics for the 100VG Module.
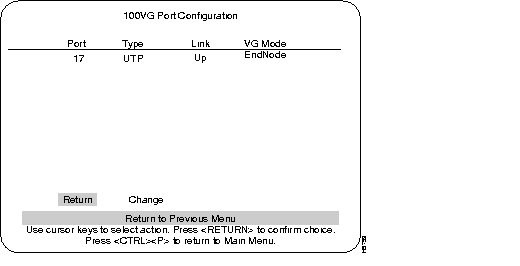
The 100VG Port Configuration screen is shown in Figure 17, and a 100 VG Port Configuration table is shown in Table 8. The 100VG Port Configuration screen is accessed from the Configuration screen.
Use the following list in Table 8 for configuration information for a 100VG port.
| Menu Item | Description |
|---|---|
| Port | The port on the 100VG Module or modules. Possible values: (17, 19, 21, or 23) |
| Type | The type of transceiver installed in the 100VG Module: UTP is the abbreviation for unshielded twisted-pair. STP is the abbreviation for shielded twisted-pair. F27 is the abbreviation for the Recessed 100VG Fiber-Optic Multimode ST Transceiver. VG-Empty indicates no transceiver is installed. |
| Link | Specifies whether this port has trained or not. |
| VG Mode | Either:
EndNode. Select EndNode if you will connect this port to a hub downlink port. Master. Select Master if you are connecting this port to an end node PC or another Catalyst switch. For a Catalyst switch to a Catalyst switch connection, one module should be set to Master mode and the other should be set to EndNode. Auto. Auto tests the cable to see if the port should be a Master or EndNode mode and automatically selects the correct mode. After the software selects Master or End Node, either A-Master or A-EndNode appears in this column. Always connect the cable from the module to a downlink port on a hub. Do not connect the cable to an uplink port on the hub. |
This screen is accessed from the Statistics screen. The following table, Table 9, lists and describes the terms used in the IEEE 802.12 screen.
| Menu Item | Description |
|---|---|
| All Transmitted Frames | Total frames transmitted from this port. |
| Transmitted High Priority Frames | Total high priority rather than normal priority frames transmitted from this port. |
| All Transmitted Octets | Total octets transmitted from this port. |
| All Received Frames | Total frames received by this port. |
| Forwarded Frames | Total frames sent from this port to another port. |
| Received Local Frames | Total frames received that had a destination on that local segment. The frames are not routed through the Catalyst switch but are dropped from the receive queue. |
| Received Broadcast Frames | Total number of broadcast frames received by this port. |
| Received Multicast Frames | Total number of multicast frames received by this port. |
| Received Error Frames | Total received frames that contained errors. |
| Dropped Frames | Total frames that were never sent out of this port because the buffer overflowed. |
| Reset Statistics | Change all counters back to zero for this screen. |
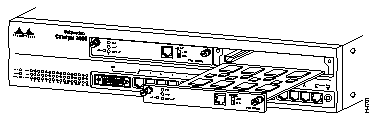
The Fast Ethernet (100Mbps) expansion module is a dual-port interface that is used to establish a connection between Catalyst 3000 series switches and high-speed devices, such as servers or routers. Each of the dual-ports can be configured as Fast Ethernet or ISL mode. 100Mbps Fast Ethernet is described in a Catalyst 3000 series Installation and Configuration Guide. For an explanation of ISL configurations see the section "ISL Functional Overview and Specifications" later in this document. For configuring ISL trunk ports from a console connection, see the "Console Configuration" chapter in a Catalyst 3000 series Installation and Configuration Guide. The dual-port Fast Ethernet expansion module with ISL is available in two models:
The following topics are discussed in this section:

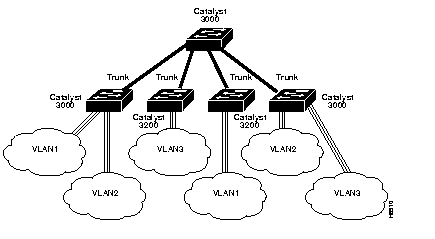
ISL is used to interconnect VLAN-capable Fast Ethernet devices like Catalyst 3000 and Catalyst 5000 switches and Cisco 7000 and Cisco 7500 routers to network servers, or to high-performance backbone devices such as Fast Ethernet hubs, switches, and routers. The ISL protocol tags a standard Ethernet frame with the VLAN information associated with that frame. VLAN packet tagging allows networks to contain VLAN trunks.
A trunk is a physical link between two Catalyst switches, or between Catalyst switches and routers, that carries the traffic of multiple VLANs. Trunks allow you to extend VLANs from one Catalyst switch to another. Users usually connect switches to each other and to routers using high-speed interfaces, such as Fast Ethernet, FDDI, and ATM.
The Catalyst series switch provides a means of multiplexing VLANs between switches and routers by using ISL on Fast Ethernet or LAN emulation on ATM protocols:
You can use any combination of these trunk technologies to form enterprise-wide VLANs. You can choose between low-cost copper and long-distance fiber connections for your trunks. An ISL trunk is like a continuation of the switching backbone. It provides a means for the Catalyst to multiplex VLANs between switches and routers.
Figure 20 and Figure 21 are examples of a Fast Ethernet ISL configuration.

The following table, Table 10, displays the specifications for the Dual-port Fast Ethernet with ISL module.
| Function | Specification |
|---|---|
| Dimensions (w x d x h) | 6.2 x 9 x 0.9 in. |
| Packet Buffers | 256K in each direction per port |
| Operating Temperature | 10 to 50 degrees Centigrade |
| Non-operating Temperature | -25 to 75 degrees Centigrade |
| Relative Humidity: operating | 8 to 80%, non-condensing |
| Non-operating Altitude | 40,000 feet |
| Safety | UL 1950, UL-C, EN 60950 |
| EMI Certifications | FCC Class A (Part 15), VCCI Class 2
EN 55022 A (CE Mark), CISPR-22B |
The following tables, Table 11, Table 12, and Table 13 describe the connector, LEDs, and switches on the Dual Port Fast Ethernet module.
| Name | Description |
| Network Ports (2) | RJ-45; UTP Category 5 Ethernet cable
SC type; multimode fiber optic cable |
| Name | Color | Description |
| XMIT (Transmit) | Green | Transmitting data |
| RCV (Receive) | Green | Receiving data |
| LINK | Off
Green Amber | Link not detected
Half-duplex link detected Full-duplex link detected |
| DIAG | Amber | Running self-diagnostic |
| Name | Position | Description |
| Duplex | Up
Down | Full
Half |
Expansion modules are installed in the expansion slots on the front of the Catalyst switch. All front expansion modules are installed in a similar way. Use the previous section "Installing The WS-X3001 (100Base TX) Module" as an example for detailed installation instructions and precautions for the Dual Port Fast Ethernet module.
The Dual Port Fast Ethernet module's network port is either a RJ-45 or SC style connector, depending upon the model type. The RJ-45 connector uses UTP Ethernet Category 5 cable. The SC connector uses 1300 nm multimode fiber optic cable. (See a Catalyst 3000 series Installation and Configuration Guide for details on cables, connectors, and connections.)
Observe the following warnings and notes when cabling a dual-port Fast Ethernet expansion module with fiber-optic cable.
| Warning Laser radiation is present when the system is open. |
Warning Do not stare into the laser beam.
The ports on the module, and the fiber-optic network that it is connected to, use laser light. Do not stare into a fiber-optic port or into the end of a cable that is connected to a fiber-optic port.
When cabling the Dual Port Fast Ethernet modules, the polarity of the fiber cable connectors must be "crossed-over." The TX (transmit) connector of one device goes to the RX (receive) connector of the other device. Check the polarity of each side of the fiber-optic cable. Use one side of the fiber-optic cable to connect from the transmit (Tx) side of a dual-port Fast Ethernet module to the receive (Rx) side of another device. Use the other side of the cable to connect the receive side of the dual-port Fast Ethernet module to the transmit side of the other device.
When the link is established, the LINK LED is on. If the LED is not on, try the following tests:
If the above tests do not correct the problem, contact Cisco support.
If, after installation, there is poor system performance or the Dual Port Fast Ethernet module does not work at all, remove the module and check for any damage or bent connector pins. You may need a bright light to see inside the expansion module slot to check for bent pins. If you cannot find an immediate cause for the problem, contact Cisco support.
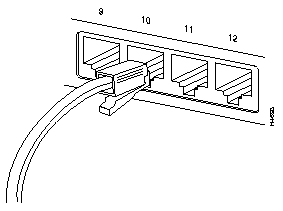
The 10Base2 expansion module is used for connection to computers, hubs, servers, and other high-speed network devices. Each module provides up to three additional 10 Mbps ports. The 10Base2 expansion module is shown in Figure 3. The following sections describe the front panel, cable connection, and network connection for the 10Base2 expansion module.

The following tables list and describe the connectors, switches, and status LEDs on the front panel of the 10Base2 expansion module.
| Name | Description |
|---|---|
| 1, 2, and 3 | Three BNC connectors |
| Name | Description |
|---|---|
| INT/EXT TERMINATION | Toggle switches to set termination (internal or external |
| Name | Color | Description |
|---|---|---|
| DIAG | Amber | When lit, indicates running self-diagnostics. In normal operation DIAG should be off. |
| LINK | Green | The link LED provides a guide to the network segment status. The LED turns on when good traffic is detected and turns off if (approximately) 25 continuous collisions with no good packets are detected. |
| XMIT | Green | When lit, indicates a packet is being transmitted to the attached segment. |
| RCV | Green | When lit, indicates a packet is being received from the attached segment. |
The 10Base2 expansion module can be inserted in any of the front expansion slots of any
Catalyst 3000 series switch. All front expansion modules are installed in a similar way. Use the previous section "Installing The WS-X3001 (100Base TX) Module" as an example for detailed installation instructions and precautions for the 10Base2 module.
Observe the following Cautions when installing a module into an expansion slot of the Catalyst 3000 series switch chassis.
| Caution The Catalyst expansion modules are not hot-swappable. Power must be disconnected from the Catalyst chassis before an expansion module is inserted or removed. |
| Caution Do not touch the components or connectors on the expansion module. Do not touch cable connector pins when the other end is plugged in. Damage may result from static discharge. |
| Caution During installation, the connector on the expansion module must line up evenly with the connector inside the expansion slot. Misalignment may cause the connector pins to bend. When inserting the module into the expansion slot, be sure that the board is level and that the left and right sides slide evenly into the slot. |
The 10Base2 expansion module network ports are 50-ohm thin coaxial cables with BNC-type connectors.
The 10Base2 expansion module supports connection distances up to 607 feet (185 meters).
Connect cables to the BNC port(s) on the front of the 10Base2 expansion module as follows:
Step 1 Determine that you have the correct cable.
Step 2 Determine if this is the end of the network segment, then perform one of the following:
When the connection is established, the network should pass packets with no errors. If there are excessive errors or collisions, check the following:
If, after installation, there is poor system performance or the 10Base2 expansion module does not work at all, remove the module and check for any damage or bent connector pins. You may need a bright light to see inside the expansion module slot to check for bent pins. Also verify that the 10Base2 expansion module is set firmly in place. If you cannot find an immediate cause for the problem, refer to the next section, "10Base2 Expansion Module Troubleshooting."
If you cannot find an immediate cause for a problem, try the following tests:
If the above tests do not correct the problem, contact the Cisco Systems Technical Assistance Center.
For service and support for a product purchased from a reseller, contact the reseller. Resellers offer a wide variety of Cisco service and support programs, which are described in the section "Service and Support" in the information packet that shipped with your chassis.
For service and support for a product purchased directly from Cisco, use CCO.
CCO is Cisco Systems' primary, real-time support channel. SMARTnet customers and partners can self-register on CCO to obtain additional content and services.
Available 24 hours a day, 7 days a week, CCO provides a wealth of standard and value-added services to Cisco's customers and business partners. CCO services include product information, software updates, release notes, technical tips, the Bug Navigator, configuration notes, brochures, descriptions of service offerings, and download access to public and authorized files.
CCO serves a wide variety of users through two interfaces that are updated and enhanced simultaneously--a character-based version and a multimedia version that resides on the World Wide Web (WWW). The character-based CCO supports Zmodem, Kermit, Xmodem, FTP, and Internet e-mail, and is excellent for quick access to information over lower bandwidths. The WWW version of CCO provides richly formatted documents with photographs, figures, graphics, and video, as well as hyperlinks to related information.
You can access CCO in the following ways:
For a copy of CCO's Frequently Asked Questions (FAQ), contact cco-help@cisco.com. For additional information, contact cco-team@cisco.com.
Please use CCO to obtain general information about Cisco Systems, Cisco products, or upgrades. If CCO is not accessible, contact 800 553-6387, 408 526-7208, or cs-rep@cisco.com.
|
|