|
|

This chapter explains the process you should follow to install the Catalyst 3920 Token Ring Switch.
 | Warning Read the installation instructions before you connect the system to its power source. |
If you have a large network, we recommend that you create a sketch of the network to which you will add one or more Catalyst 3920 switches. Include major network elements such as hubs and concentrators, servers, bridges, and routers.
To plan for the installation of a Catalyst 3920, obtain all connectivity and physical planning information about the network segments to which you will attach. In addition, if you are planning to use permanently installed telecommunications wiring, you should have information about the cabling installation that will allow you to determine the termination points of every cable, the cable type, connector type (if any), and the distance between termination points. Building floorplans and telecommunications closet layouts are also useful.
Devices attached to the RJ-45 jacks on the front of the Catalyst 3920 should conform to the cabling rules established in the EIA/TIA 568A and ISO/IEC 11801:1995. Straight-through cables should always be used for the Token Ring ports. Because all ports operate at 120-ohm, no impedance-matching balun or filtering is required for UTP or STP.
For more information about cabling distances and specifications, refer to the "Cable and Pin Information" appendix for cable design specifications.
The basic installation steps are as follows:
To unpack the Catalyst 3920, follow these steps:
Step 1 Open the carton. Along with the Catalyst 3920 Token Ring Switch User Guide, the package should contain:
If any item is missing or damaged, contact your Cisco Systems representative.
Step 2 Remove the power cord and bag containing the accessory kit.
Step 3 Remove the Catalyst 3920 from its protective packaging.
Step 4 Visually inspect the Catalyst 3920 to ensure that it was not damaged during shipment.
To install the Catalyst 3920, you need the following items:
Determine whether the switch will be mounted in a rack or as standalone equipment on a surface, such as on a tabletop.
Warning
To prevent bodily injury when mounting or servicing this unit in a rack, you must take special precautions to ensure that the system remains stable. The following guidelines are provided to ensure your safety:
Step 1 Look at the rack inventory chart provided by your network administrator to determine where in the rack the Catalyst 3920 should be mounted.
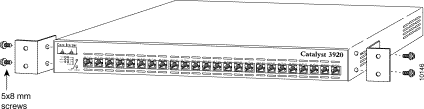
Step 2 Obtain the L-shaped mounting brackets and four 8-mm M5 screws that are supplied with the unit in the accessory kit.
Step 3 Using a Phillips (cross-head) screwdriver, attach an L-shaped mounting bracket to each side of the Catalyst 3920 with two 8-mm M5 screws (see Figure 3-1).
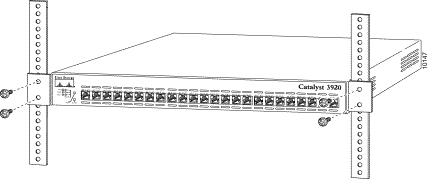
Step 4 Position the Catalyst 3920 in the rack or cabinet and slide it up or down until the rack holes line up with the bracket holes. Attach the Catalyst 3920 to the rack with the appropriate mounting screws (see Figure 3-2).
Step 5 Go to the instructions in the "Cabling the Catalyst 3920" section.
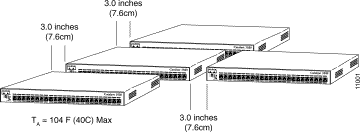
| Warning To prevent the switch from overheating, do not operate it in an area that exceeds the maximum recommended ambient temperature of 104° F (40° C). To prevent airflow restriction, allow at least 3 inches (7.6 cm) of clearance around the ventilation openings. |
Follow these steps to mount the Catalyst 3920 as a standalone unit:
Step 1 Obtain the chassis feet from the accessory kit.
Step 2 Remove the protective paper from the adhesive surface of the feet and place the four feet in each of the four embossed, recessed areas located in the corners of the bottom of the Catalyst 3920.
Step 3 Place the Catalyst 3920 on the surface where it is to be used.
Step 4 Continue with the instructions in the "Cabling the Catalyst 3920" section.
If you will use in-the-wall cables (building wiring), go to the "Connecting Devices to the Token Ring Ports Using Building Wiring" section.
Step 1 Using the Cabling Chart provided by your network administrator as a guide, connect the cables between the Catalyst 3920 and the other devices. Depending on the cable type you use, the device end of the cable may also have a 9-pin D-shell or 150-ohm data connector.
Step 2 Label both ends of each cable so that it will be easy to find the device if you have to troubleshoot a network problem.
The label should indicate: the room location of the device at the other end, a unique cable identification number, the MAC address of the connected device, and the number of the port to which the cable is attached.
Step 3 Continue with the instructions in the "Powering On the Catalyst 3920" section.
Use this procedure if you will use in-the-wall cables to connect devices to the Catalyst 3920.
Step 1 Using the Cabling Chart provided by your administrator as a guide, connect the cables between the devices and the faceplates.
Step 2 Label the faceplate, so that it will be easier to find the device if you have to troubleshoot a network problem.
Step 3 In the wiring closet, connect a cable to the Token Ring connector on the patch panel or other equipment where the building wiring terminates.
Step 4 Label this cable.
Step 5 Continue with the instructions in the "Powering On the Catalyst 3920" section.
The next two sections describe how to cable the Catalyst stack equipment. The first section explains connecting two Catalyst switches back-to-back. The second section describes how to connect Catalyst switches to the Catalyst Matrix.
Keep the following in mind when you install two Catalyst switches in a back-to-back configuration.
1. One stack port cable is used to connect to the I/O stack port on each switch.
2. The stack port cable can be connected or disconnected, when power to either Catalyst switch is on or off.
3. To prevent bending the pins, do not install the stack port cable connector at an angle. Use care when inserting the cable connector straight into the stack port connector.
To install two Catalyst switches in a back-to-back configuration, follow these steps:
Step 1 Connect one end of the stack port cable to the stack port on one Catalyst switch. It does not matter which end of the cable is used. Either end of the stack port cable can be connected to either one of the Catalyst switches.
Step 2 Connect the other end of the cable to the stack port on the other Catalyst switch.
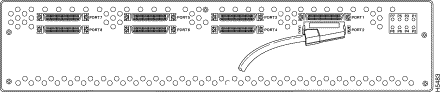
Figure 3-4 and Figure 3-5 show how two Catalyst switches are cabled together (the cable connector is shown at an angle for illustration purposes only).

Step 1 Attach one end of the stack port cable to Port 1 (recommended port to use first) on the Catalyst Matrix (Figure 3-6). It does not matter which end of the cable is used and it does not matter if the Catalyst switch or Catalyst Matrix is powered on or off.
 | Caution When installing the stack port cable connector, keep the connector straight as you insert it in the stack port connector. Inserting the connector at an angle may cause the pins to bend. (The cable connector in the following figures are shown at an angle for illustration purposes only.) |
Step 2 Attach the other end of the cable to the stack port of a Catalyst switch (Figure 3-7). Repeat these steps for each Catalyst switch using the next lowest numbered port on the Catalyst Matrix.
| Warning This product relies on the building's existing wiring installation for short-circuit (overcurrent) protection. Ensure that a fuse or circuit breaker no larger than 120 VAC, 15A U.S. (240 VAC, 10A international) is used on the phase conductors (all current-carrying conductors). |
| Warning This equipment is intended to be grounded. Ensure that the host is connected to an earth ground during normal use. |
Warning T
his unit might have more than one power cord. To reduce the risk of electric shock, disconnect the two power supply cords before servicing the unit.
Step 1 Connect the power cord to the Catalyst 3920 and then to an electrical outlet. The Catalyst 3920 is powered on when you plug in the power cord. There is no power switch.
Step 2 If you are using an RPS system, connect the RPS port of the Catalyst 3920 to the RPS system.
 | Caution If a fully-redundant configuration is used, do not connect the AC power cord to the Catalyst 3920 as this may cause damage to the Catalyst 3920 or the RPS. |
Step 3 Verify that the power (PWR) LED on the left side of the front panel is on. If it is not, make sure that the outlet is working correctly. If the outlet is working but the PWR LED is off, contact your Cisco Systems representative.
Step 4 Verify that diagnostics have been completed successfully.
The Catalyst 3920 automatically performs a self-test when connected to a power supply. During the test, the LEDs should behave as follows:
Note that the Tx/Rx LEDs next to each port blink during self-test even when a device is not attached to the port.
If the self-test is successful (the PWR LED is on and the Mode and FLT LEDs are off), physical installation of the Catalyst 3920 is complete.
If the LEDs are not in the normal state, refer to the "Hardware Troubleshooting" appendix.
If you install your Catalyst 3920 in a Catalyst stack formation, use the following steps to power on your Catalyst stack units:
Step 1 Using the supplied power cables, plug the female end of the cables into the AC receptacles on the Catalyst 3920 or each Catalyst Matrix module.
For the Catalyst 3920, the receptacle is on the left side of the back panel. For the Catalyst Matrix, it is at the lower right hand corner on the front panel of each module.
Step 2 Plug the male end of the power cords into a properly grounded electrical outlet.
Step 3 Verify that the PWR LED is on for each module in the Catalyst Matrix. For the Catalyst 3920, verify that the PWR LED on the left side of the front panel is on. If it is not on, ensure that the outlet is working correctly. If the outlet is working but the PWR LED is off, contact your Cisco Systems representative
Step 4 Verify that the diagnostics have been completed successfully.
The Catalyst 3920 automatically performs a self-test when connected to a power supply. During the test, the LEDs should do the following:
Note that the Tx/Rx LEDs next to each port blink during self-test even when a device is not attached to the port.
If the self-test is successful (the PWR LED is on and the Mode and FLT LEDs are off), physical installation of the Catalyst 3920 is complete. If the LEDs are not in the correct state, refer to the "Hardware Troubleshooting" appendix.
![]()
![]()
![]()
![]()
![]()
![]()
![]()
![]()
Posted: Wed Oct 2 03:12:57 PDT 2002
All contents are Copyright © 1992--2002 Cisco Systems, Inc. All rights reserved.
Important Notices and Privacy Statement.