|
|

The Security menu allows you to configure system security on the Cisco Catalyst 1800 Token Ring switch.
You can create filters that allow or prevent the access of certain MAC addresss (or ranges of MAC addresses) to the Catalyst 1800 switch. You can also create filters that allow or prevent the access of SNAP or 802.2 encapsulsated frames to the Catalyst 1800 switch.
Using the Security Calendar, you can restrict access to a specific port for certain days.
This chapter contains the following sections:
Using the Security Filter menu, you can create filters that do the following:
To access the Security Filter menu, perform these steps:
Step 1 To display the Security Main menu, type this command from the Main menu:
The Security Main menu appears (see Figure 5-1).
Cisco Systems Catalyst 1800 Token Ring Switch
Select From
Filters
Calendar
Catalyst 1800> sec
Step 2 Type fil, then press Return.
The Security Filter menu appears (see Figure 5-2).
Cisco Systems Catalyst 1800 Token Ring Switch
Select From
MAC Addresses
Protocol
Catalyst 1800> sec fil
From this menu you can select options that specify MAC address filter and protocols. Refer to the subsequent sections for instructions.
You can apply a MAC address filter to any port (or all ports). Filters are of two types:
MAC address filtering is useful in circumstances in which you want to prevent a certain node from the switch.
Perform the following procedure to add a Drop or Forward filter.
Step 1 To display the Mac Filter Action menu, type this command from the Main menu:
The MAC Filter Action menu appears (see Figure 5-3) and displays the following prompt:
Cisco Systems Catalyst 1800 Token Ring Switch
Select From
Add
Delete
Display
Catalyst 1800> sec fil mac
Step 2 Type Add and press Return.
The MAC Filter screen appears (see Figure 5-4) and displays the following prompt:
Cisco Systems Catalyst 1800 Token Ring Switch
Select From
Entry Port MAC-Start MAC-End DA/SA In/Out Action
----------------------------------------------------------------------
1 6 000577010203 000000000000 DA In Drop
2 0 0000f62bc901 000000000000 DA In Forward
Catalyst 1800> sec fil mac add 0000f6010203 0000f6090807 drop da in 3
The following table explains the parameters on the MAC Filter screen.
| Parameter | Description |
|---|---|
| Entry | The number of the filter |
| Port | The number of the port to which the filter applies |
| MAC-Start | The starting MAC address to which the filter applies. This is expressed in hexadecimal format. You can specify a range of addresses or only one. |
| MAC-End | Specifies the ending MAC address to which the filter applies. This is expressed in hexadecimal format. If there is only one MAC address, this value is 0. |
| DA/SA | Specifies whether the filter applies to a destination or a source address |
| In/Out | Specifies whether the action occurs on input (when the MAC frame is coming of the cable and into the Token Ring switch) or output (when the MAC frame is coming from the Token Ring switch and into the port). |
| Action | Specifies whether the traffic is to be dropped before passing through the Token Ring switch, or forwarded through the switch. The values are Drop and Forward. |
Step 3 If you are specifying a single MAC address, enter the MAC address, using hexadecimal notation in most significant byte format. Perform one of these actions:
The system displays the following prompt:
Step 4 Type Drop or Forward, depending on whether you want the frame dropped or forwarded through the Token Ring switch.
If you type Drop, no frames from that MAC address(es) can pass through the Token Ring switch. If you type Forward, all frames from that MAC address(es) pass through the Token Ring switch. However, all frames other than those belonging to that MAC address get dropped.
The system displays the following prompt:
Step 5 Specify whether the range is part of a destination or source address by typing DA or SA.
The system displays the following prompt:
Step 6 Specify whether you want the action to occur on input or output by typing Input or Output.
The system displays the following prompt:
Step 7 Enter the port number or 0 for all ports.
The new parameter value appears on the screen.
You can define up to 20 filters across all ports.The order in which you configure filters is important. The first filter for a specific port determines its precedence. For example, you may configure port 1 to forward all DA MACs on input that have the address 0x000577010203. According to the rules of precedence, only DA MACs with that address are forwarded. All other traffic is dropped.
However, you can complement this filter if you add a second filter for port 1. This filter could permit other MACs within a certain range to forward their frames on input.
Perform the following procedure to delete a MAC address drop or forward filter.
Step 1 Type this command from the Security Filter menu:
The MAC Filter Action menu appears (Figure 5-3) and displays the following prompt:
Step 2 Type Delete and press Return.
The MAC Filter menu appears (see Figure 5-4) and displays the following prompt:
Step 3 Type the number of the filter to delete and press Return.
The filter is removed.
You can apply a Protocol filter to any port (or all ports). Protocol filters apply to the following frame types:
The following example demonstrates a practical use of protocol filtering.
A company has two departments using port 7. Finance uses the IPX protocol and marketing uses IP. The company doesn't want the finance department to have access to the wider network, so it filters all frames using the IPX protocol. In this case, protocol filtering effectively provides a firewall security feature.
Perform the following procedure to add a drop or forward protocol filter.
Step 1 Type this command from the Security Filter menu:
The Protocol Filter Action menu appears (see Figure 5-5) and displays the following prompt:
Cisco Systems Catalyst 1800 Token Ring Switch
Select From
Add
Delete
Display
Catalyst 1800> sec fil pro
Step 2 Type Add and press Return.
The Protocol Filter screen appears (Figure 5-6) and displays the following prompt:
Cisco Systems Catalyst 1800 Token Ring Switch
Entry Port Protocol In/Out Action
--------- -------- --------- ------ ------
1 7 00e0 Out Drop
Catalyst 1800> sec fi pro add 1
The following table explains the parameters on the Protocol Filter screen.
| Parameter | Description |
|---|---|
| Entry | The number of the filter |
| Port | The number of the port to which the filter applies |
| Protocol | The protocol to which the filter applies.
If you enter the protocol value in two digits (e.g., 0xe0), the filter checks the DSAP (Destination Service Access Point) of an 802.2 encapsulated frame. If you enter the protocol value in four digits (e.g., 0x8137), the filter checks the protocol type field of a SNAP-encapsulated frame. |
| In/Out | Specifies whether the action occurs on input (when the frame is coming from the cable and into the Token Ring switch) or output (when the frame is coming from the Token Ring switch and into the port). |
| Action | The action performed on the frame using the selected protocol.
If you type Drop, no frames using the selected protocol are allowed to pass through the Token Ring switch. If you type Forward, all frames using the selected protocol pass through the Token Ring switch. However, all frames on the specified port(s) other than those using the protocol get dropped. |
Step 3 Enter the protocol value and press Return.
The system displays the following prompt:
Step 4 Type Drop or Forward, depending on whether you want the frame dropped or forwarded through the Token Ring switch.
The system displays the following prompt:
Step 5 Specify whether you want the action to occur on input or output by typing Input or Output.
The system displays the following prompt:
Step 6 Enter the port number or 0 for all ports.
The new parameter values appear on the screen.
Perform the following procedure to delete a Protocol Drop or Forward filter.
Step 1 To display the Protocol Filter Action menu, type this command from the Security Filter menu:
The Protocol Filter Action menu appears (Figure 5-5) and displays the following prompt:
Step 2 Type Delete and press Return.
The Protocol Filter screen appears (Figure 5-6) and displays the following prompt:
Step 3 Type the number of the filter to delete and press Return.
The filter is removed.
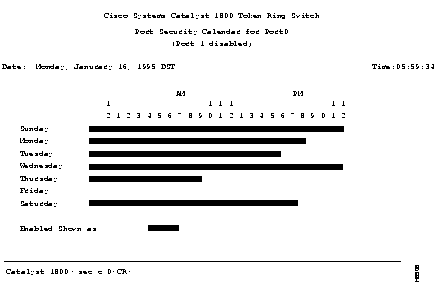
The Port Security Calendar screen allows you to control access to the system on a port by port basis. For example, you can specify that access to a specific port is disabled for a certain day, or even for certain hours on that day. You can also specify that all ports are disabled for certain time periods.
Step 1 Type this command from the Main menu:
The system displays the following prompt:
Step 2 Enter the port number or 0 and press Return.
The Port Security Calendar screen appears (see Figure 5-7). Enabled access time periods appear as solid bars and disabled periods appear as gaps in the bar.
The system displays the following:
Step 3 Type Enabled or Disabled for the port and press Return.
The system displays the following prompt:
Step 4 Type Day or ALL for the port and press Return.
Step 5 Type the name of the specific day (Sunday...Saturday) on which you want to enable or disable access, or type All for all days. The system displays the following prompt:
Step 6 Type the time at which you want to enable or disable access, using standard 24-hour format, and press Return. For example, to disable access starting at 7:00 p.m., type 15. Note that the system accepts only whole-hour values.
The system displays the following prompt:
Step 7 Type the time at which you want enabled or disabled access to end, using standard 24-hour format, and press Return. For example, to disable access ending at 7:00 a.m., type 7.
The system displays the following prompt:
The bar graph at the top changes to reflect your new configuration.
|
|