|
|

June 2001
This installation note provides instructions for attaching wall-mount brackets (Cisco part number wallmount-1ru=) to the Catalyst 2900 LRE XL switches, the Catalyst 3500 XL switches, and the Cisco LRE 48 POTS Splitter and instructions for wall-mounting these products.
The wall-mount brackets attach to the following Cisco products:
This document has the following sections:
This document uses these conventions and symbols for notes and warnings:
 |
Note Means reader take note. Notes contain helpful suggestions or references to materials not contained in this manual |
.
| |||
Waarschuwing | Dit waarschuwingssymbool betekent gevaar. U verkeert in een situatie die lichamelijk letsel kan veroorzaken. Voordat u aan enige apparatuur gaat werken, dient u zich bewust te zijn van de bij elektrische schakelingen betrokken risico's en dient u op de hoogte te zijn van standaard maatregelen om ongelukken te voorkomen. | ||
Varoitus | Tämä varoitusmerkki merkitsee vaaraa. Olet tilanteessa, joka voi johtaa ruumiinvammaan. Ennen kuin työskentelet minkään laitteiston parissa, ota selvää sähkökytkentöihin liittyvistä vaaroista ja tavanomaisista onnettomuuksien ehkäisykeinoista. | ||
Attention | Ce symbole d'avertissement indique un danger. Vous vous trouvez dans une situation pouvant entraîner des blessures. Avant d'accéder à cet équipement, soyez conscient des dangers posés par les circuits électriques et familiarisez-vous avec les procédures courantes de prévention des accidents. | ||
Warnung | Dieses Warnsymbol bedeutet Gefahr. Sie befinden sich in einer Situation, die zu einer Körperverletzung führen könnte. Bevor Sie mit der Arbeit an irgendeinem Gerät beginnen, seien Sie sich der mit elektrischen Stromkreisen verbundenen Gefahren und der Standardpraktiken zur Vermeidung von Unfällen bewußt. | ||
Avvertenza | Questo simbolo di avvertenza indica un pericolo. Si è in una situazione che può causare infortuni. Prima di lavorare su qualsiasi apparecchiatura, occorre conoscere i pericoli relativi ai circuiti elettrici ed essere al corrente delle pratiche standard per la prevenzione di incidenti. | ||
Advarsel | Dette varselsymbolet betyr fare. Du befinner deg i en situasjon som kan føre til personskade. Før du utfører arbeid på utstyr, må du være oppmerksom på de faremomentene som elektriske kretser innebærer, samt gjøre deg kjent med vanlig praksis når det gjelder å unngå ulykker. | ||
Aviso | Este símbolo de aviso indica perigo. Encontra-se numa situação que lhe poderá causar danos fisicos. Antes de começar a trabalhar com qualquer equipamento, familiarize-se com os perigos relacionados com circuitos eléctricos, e com quaisquer práticas comuns que possam prevenir possíveis acidentes. | ||
¡Advertencia! | Este símbolo de aviso significa peligro. Existe riesgo para su integridad física. Antes de manipular cualquier equipo, considerar los riesgos que entraña la corriente eléctrica y familiarizarse con los procedimientos estándar de prevención de accidentes. | ||
Varning! | Denna varningssymbol signalerar fara. Du befinner dig i en situation som kan leda till personskada. Innan du utför arbete på någon utrustning måste du vara medveten om farorna med elkretsar och känna till vanligt förfarande för att förebygga skador. | ||
To install your switch or splitter on a wall, follow the steps in these sections:
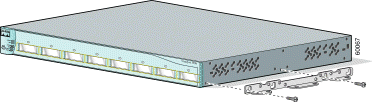
Figure 1 shows the orientation used to attach a bracket to one side of the chassis. Follow the same steps to attach a bracket to the opposite side of the chassis.
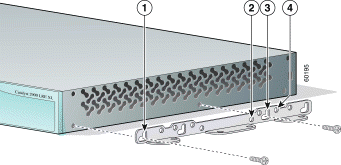
The screws and bracket holes that you use depend on the chassis to which you are attaching the brackets. Table 1 lists the screws used to attach each bracket.
| Chassis | Left Bracket (front) | Left Bracket (rear) | Right Bracket (front) | Right Bracket (rear) |
|---|---|---|---|---|
| Number-8 Phillips truss-head | Number-8 Phillips truss-head | Number-8 Phillips truss-head | Number-8 Phillips truss-head |
| Number-8 Phillips truss-head | Number-6 Phillips pan-head | Number-8 Phillips truss-head | Number-6 Phillips pan-head
|
Figure 2 shows the bracket holes used to attach a bracket to one side of the chassis. Use the same screws and hole positions to attach the second bracket to the opposite side of the chassis.
| Chassis | Bracket Holes Used |
| 1, 3 |
| 1, 2 |
| Catalyst 3548 XL switch | 1, 4 |
If you are not using a redundant power system (RPS) with your switch, use the two number-4 Phillips pan-head screws to install an RPS connector cover to the back of the switch. (See Figure 3.)
 |
Warning If an RPS is not connected to the switch, install an RPS connector cover on the back of the switch. |
| 1 | RPS connector cover |
| 2 | RPS connector |
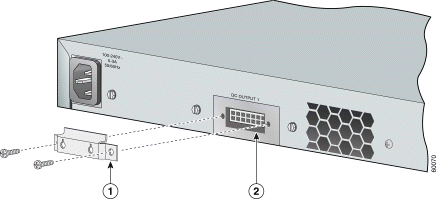
The accessory kit that is shipped with the brackets includes covers for both the Cisco RPS 300 and Cisco RPS 600. Refer to your hardware installation guide to determine which Cisco RPS model supports your switch.
|
Note The Cisco LRE 48 POTS Splitter does not use an RPS. |
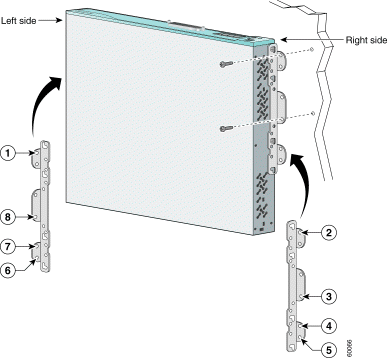
For the best support of the chassis and cables, make sure the chassis is attached securely to wall studs or to a firmly attached plywood mounting backboard. Use two screws (not included) to attach each side of the chassis to the wall.
|
Warning To comply with safety regulations, mount switches on a wall with the front panel facing up. |
Figure 4 shows the orientation and bracket holes used to mount the chassis on a wall.
| Chassis | Left-side bracket holes | Right-side bracket holes |
| 1, 8 | 2, 3 |
Catalyst 3548 XL switch | 1, 7 | 2, 4 |
For additional installation steps, warnings, or cautions, refer to the installation guide that was shipped with your switch or splitter.
You can order printed copies of documents with a DOC-xxxxxx= number.
The following publications provide more information about the switches and the splitter:
This section repeats in multiple languages the warnings in this installation note.
| |||
Waarschuwing | Als er geen redundant voedingssysteem (RPS) aan de schakelaar is gekoppeld, dient u een RPS-connectorkapje op de achterkant van de schakelaar te installeren. | ||
Varoitus | Jos korvautuvaa tehojärjestelmää (redundant power system, RPS) ei ole liitetty kytkimeen, kiinnitä RPS-liittimen suojus kytkimen takapuolelle. | ||
Attention | Si un système d'alimentation électrique redondant (RPS) n'est pas connecté au commutateur, installez un cache de connecteur RPS à l'arrière du commutateur. | ||
Warnung | Wenn keine redundante Stromversorgung (RSV) an den Schalter angeschlossen ist, eine RSV-Steckerabdeckung an der Rückseite des Schalters anbringen. | ||
Avvertenza | Se un sistema RPS (Redundant Power System ) di alimentazione ridondante non è collegato al dispositivo switch, installare un copri-connettore RPS sul retro del switch. | ||
Advarsel | Dersom et redundant strømsystem ( Redundant Power System -RPS) ikke er koblet til bryteren, skal det installeres et RPS-koblingsdeksel på baksiden av bryteren. | ||
Aviso | Se um sistema de alimentação redundante (RPS) não estiver conectado a um switch, instale uma capa de conector RPS na parte de trás do switch. | ||
¡Advertencia! | Si no se conecta un sistema de potencia redundante (RPS) al interruptor, instale una cubierta de conector RPS en la parte posterior del interruptor. | ||
Varning! | Om ett redundant strömförsörjningssystem (redundant power system, RPS) inte finns anslutet till omkopplaren skall ett RPS-kontaktskydd installeras på baksidan av omkopplaren. | ||
| |||
Waarschuwing | Om te voldoen aan de veiligheidsvoorschriften dient u de schakelaars op een muur te monteren met het voorpaneel omhoog. | ||
Varoitus | Turvallisuusmääräykset edellyttävät, että kytkimet kiinnitetään seinään etupaneeli ylöspäin. | ||
Attention | Pour satisfaire aux dispositions de sécurité, installez les commutateurs muraux avec le panneau frontal vers le haut. | ||
Warnung | Zur Einhaltung der Sicherheitsvorschriften die Schalter so an einer Wand montieren, dass die Frontplatte nach oben zeigt. | ||
Avvertenza | In conformità ai regolamenti di sicurezza, installare i dispositivi switch a muro con il pannello frontale rivolto in su. | ||
Advarsel | For å etterkomme sikkerhetsreglene skal brytere monteres på en vegg med frontpanelet vendt opp. | ||
Aviso | Para cumprir com os regulamentos de segurança, faça a montagem de switches em uma parede com o painel frontal virado para cima. | ||
¡Advertencia! | Para cumplir con las reglas de seguridad, instale los interruptores en una pared con el panel del frente hacia arriba. | ||
Varning! | För att uppfylla säkerhetsföreskrifter skall omkopplarna monteras på en vägg med frampanelen riktad uppåt. | ||
The following sections provide sources for obtaining documentation from Cisco Systems.
You can access the most current Cisco documentation on the World Wide Web at the following sites:
Cisco documentation and additional literature are available in a CD-ROM package, which ships with your product. The Cisco Documentation CD-ROM is updated monthly and may be more current than printed documentation. The CD-ROM package is available as a single unit or as an annual subscription.
Cisco documentation is available in the following ways:
If you are reading Cisco product documentation on the World Wide Web, you can submit technical comments electronically. Click Feedback in the toolbar and select Documentation. After you complete the form, click Submit to send it to Cisco.
You can e-mail your comments to bug-doc@cisco.com.
To submit your comments by mail, for your convenience many documents contain a response card behind the front cover. Otherwise, you can mail your comments to the following address:
Cisco Systems, Inc.
Document Resource Connection
170 West Tasman Drive
San Jose, CA 95134-9883
We appreciate your comments.
Cisco provides Cisco.com as a starting point for all technical assistance. Customers and partners can obtain documentation, troubleshooting tips, and sample configurations from online tools. For Cisco.com registered users, additional troubleshooting tools are available from the TAC website.
Cisco.com is the foundation of a suite of interactive, networked services that provides immediate, open access to Cisco information and resources at anytime, from anywhere in the world. This highly integrated Internet application is a powerful, easy-to-use tool for doing business with Cisco.
Cisco.com provides a broad range of features and services to help customers and partners streamline business processes and improve productivity. Through Cisco.com, you can find information about Cisco and our networking solutions, services, and programs. In addition, you can resolve technical issues with online technical support, download and test software packages, and order Cisco learning materials and merchandise. Valuable online skill assessment, training, and certification programs are also available.
Customers and partners can self-register on Cisco.com to obtain additional personalized information and services. Registered users can order products, check on the status of an order, access technical support, and view benefits specific to their relationships with Cisco.
To access Cisco.com, go to the following website:
The Cisco TAC website is available to all customers who need technical assistance with a Cisco product or technology that is under warranty or covered by a maintenance contract.
If you have a priority level 3 (P3) or priority level 4 (P4) problem, contact TAC by going to the TAC website:
P3 and P4 level problems are defined as follows:
In each of the above cases, use the Cisco TAC website to quickly find answers to your questions.
To register for Cisco.com, go to the following website:
http://www.cisco.com/register/
If you cannot resolve your technical issue by using the TAC online resources, Cisco.com registered users can open a case online by using the TAC Case Open tool at the following website:
http://www.cisco.com/tac/caseopen
If you have a priority level 1(P1) or priority level 2 (P2) problem, contact TAC by telephone and immediately open a case. To obtain a directory of toll-free numbers for your country, go to the following website:
http://www.cisco.com/warp/public/687/Directory/DirTAC.shtml
P1 and P2 level problems are defined as follows:
This document is to be used in conjunction with the documents listed in the "Related Publications" section.
AccessPath, AtmDirector, Browse with Me, CCDA, CCDE, CCDP, CCIE, CCNA, CCNP, CCSI, CD-PAC, CiscoLink, the Cisco NetWorks logo, the Cisco Powered Network logo, Cisco Systems Networking Academy, the Cisco Systems Networking Academy logo, Fast Step, Follow Me Browsing, FormShare, FrameShare, GigaStack, IGX, Internet Quotient, IP/VC, iQ Breakthrough, iQ Expertise, iQ FastTrack, the iQ Logo, iQ Net Readiness Scorecard, MGX, the Networkers logo, Packet, RateMUX, ScriptBuilder, ScriptShare, SlideCast, SMARTnet, TransPath, Unity, Voice LAN, Wavelength Router, and WebViewer are trademarks of Cisco Systems, Inc.; Changing the Way We Work, Live, Play, and Learn, Discover All That's Possible, and Empowering the Internet Generation, are service marks of Cisco Systems, Inc.; and Aironet, ASIST, BPX, Catalyst, Cisco, the Cisco Certified Internetwork Expert logo, Cisco IOS, the Cisco IOS logo, Cisco Systems, Cisco Systems Capital, the Cisco Systems logo, Enterprise/Solver, EtherChannel, EtherSwitch, FastHub, FastSwitch, IOS, IP/TV, LightStream, MICA, Network Registrar, PIX, Post-Routing, Pre-Routing, Registrar, StrataView Plus, Stratm, SwitchProbe, TeleRouter, and VCO are registered trademarks of Cisco Systems, Inc. and/or its affiliates in the U.S. and certain other countries.
All other brands, names, or trademarks mentioned in this document or Web site are the property of their respective owners. The use of the word partner does not imply a partnership relationship between Cisco and any other company. (0104R)
Copyright © 2001, Cisco Systems, Inc.
All rights reserved.
![]()
![]()
![]()
![]()
![]()
![]()
![]()
![]()
Posted: Wed Aug 1 19:03:59 PDT 2001
All contents are Copyright © 1992--2001 Cisco Systems, Inc. All rights reserved.
Important Notices and Privacy Statement.