|
|

| Catalyst 1900 series switch | 
|
| Catalyst 1900 Series Quick Start
Catalyst 1900 Series Installation and Configuration Guide |  |
| RJ-45-to-RJ-45 rollover console cable |  |
| Black AC power cable |  |
| RJ-45-to-DB-9 serial connector |  |
| RJ-45-to-DB-25 terminal connector |  |
| Rack-mount kit |  |
| Rubber feet |  |
1 ) Configure your terminal, PC, or laptop to match these characteristics of the CONSOLE port on the switch:
9600 baud, 8 data bits, 1 stop bit,
no parity, and no flow control.
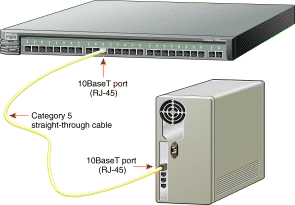
2 ) Connect the supplied rollover cable to the CONSOLE port on the switch.
3 ) Connect the other end of the rollover cable to your terminal, PC, or laptop (use an adapter, if necessary).
4 ) From your terminal, PC, or laptop, start the terminal emulation program.
1 ) Connect one end of the power cord to the switch and the other end to a power source.
2 ) Wait approximately 2 minutes for the switch to complete its power-on self-test (POST) and to discover the network.
Assign an IP address to the switch so that you can use the web console and the switch can communicate with local routers and the Internet. Contact your system administrator for the switch IP information, and record it here.
Switch IP address:
Subnet mask:
Default gateway:
1 ) After POST completes, the Management Console Logon Screen appears on your terminal, PC, or laptop. Enter the [I] IP Configuration option from this logon screen.
Catalyst 1900 Management Console
Copyright (c) Cisco Systems, Inc.   1993-1998
All rights reserved.
Standard Edition Software
Ethernet address:      00-E0-1E-7E-B4-40
PCA Number: 73-2239-01
PCA Serial Number: SAD01200001
Model Number: WS-C1924-A
System Serial Number: FAA01200001
---------------------------------------
      User Interface Menu
      [M] Menus
      [I] IP Configuration
Enter Selection:
The IP Configuration Menu appears.
2 ) Enter the [I] IP address option from the IP Configuration Menu.
Catalyst 1900 - IP Configuration
Ethernet Address:  00-E0-1E-7E-B4-40
-------------Settings------------------
[I] IP address
[S] Subnet mask
[G] Default gateway
[M] IP address of DNS server 1
[N] IP address of DNS server 2
[D] Domain name
[R] Use Routing Information Protocol
-------------Actions-------------------
[P] Ping
[X] Exit to previous menu
Enter Selection:
3 ) Enter the IP address of the switch at the prompt:
Enter administrative IP address in dotted quad format (nnn.nnn.nnn.nnn):
Current setting ===> 0.0.0.0
New setting ===>
The IP address appears on the
IP Configuration Menu.
4 ) If you want, you can also enter the subnet mask and default gateway from the IP Configuration Menu. If the switch is connected to a network that has a DHCP server, the server assigns this information automatically.
5 ) Enter the [X] Exit option until you exit from the menu console.
After you assign an IP address to the switch, you can display the web console.
1 ) Start Netscape Communicator 4.xx or Internet Explorer 4.xx.
If you use Netscape 4.xx, enable JavaScript in the Advanced Preferences list. If you use Explorer 4.xx, JavaScript is enabled by default.
2 ) Enter the IP address of the switch in the Location field if you are using Netscape (the Address field if you are using Internet Explorer), and press Return. The Basic System Configuration page appears. 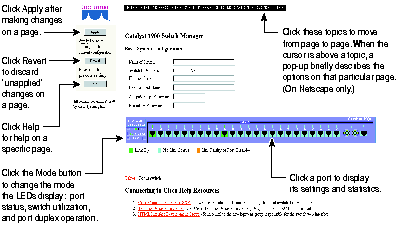
The switch is designed to operate with little or no user intervention. In most cases, you can use it with its default settings as soon as you assign it an IP address. You can also use the web console to change the switch configuration and monitor network conditions and statistics.
|
|