|
|

This Release Note for the Cisco Micro Webserver 200 Stacking Clip describes how to use the stacking clip provided with your Cisco Micro Webserver 200 to stack Cisco Networked Office stack products. Each Micro Webserver 200 comes with the stacking clip and fasteners, which you use to keep multiple Micro Webservers, Micro Webservers and Micro Hubs, or Micro Webservers and Cisco routers together in a stack.
The Cisco Networked Office stack products include Cisco 1600 series routers and 1500 series Ethernet Micro Hubs as well as the Cisco 1548 Micro Switch 10/100 and the Cisco 1528 Micro Hub 10/100. This suite of products delivers high-performance local-area networking, plug-and-play Web hosting, and flexible remote access. You can stack up to five Cisco Micro Webserver 200s directly on top of one another. However, this note primarily describes how to stack the Micro Webserver 200 with a Micro Hub and how to stack a Cisco 1600 series router atop the Micro Webserver 200.
This note contains the following stacking information:
This Release Note supplements other documents shipped with your Micro Webserver 200:

To stack a Micro Hub atop a Micro Webserver 200:
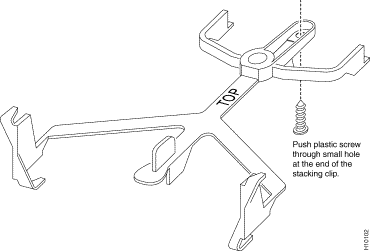
Step 1 Push the plastic fastener through the small hole at the end of the stacking clip to assemble the clip and the screw before stacking.

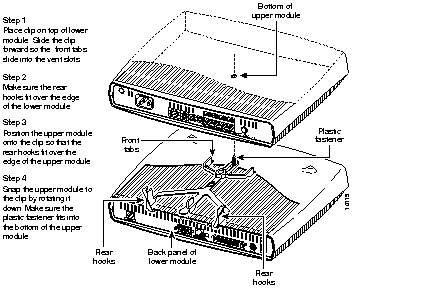
Step 2 After you push the screw into the stacking clip, place the clip on top of the lower module.
Step 3 Slide the clip forward so the front tabs slide into the vent slots. Make sure the rear hooks fit over the edge of the lower module. See Figure 3.
Step 4 Position the upper module clip so that the rear hooks fit over the edge of the upper module. See Figure 3.

Step 5 Snap the upper module to the clip by rotating it down. Make sure the plastic fastener fits into the bottom of the upper module.
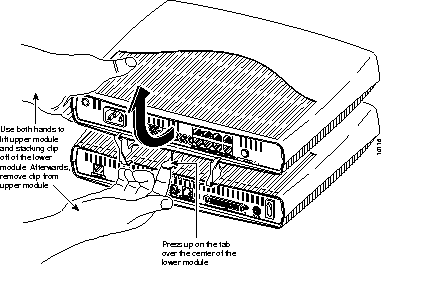
To unstack devices in a stack you must first disengage the modules.
Step 1 Use both hands to lift the upper module and stacking clip off of the lower module. Afterwards, remove the clip from the upper module.
Step 2 Press up on the tab over the center of the lower module.

You can use the stacking clip to stack a Cisco router atop the Micro Webserver 200. The router must be the top device in the stack. Connect the router to the lower module as you would other network devices.
Step 1 Turn the router upside down and slide the stacking clip's rear hooks over the edge of the router's rear panel.
Step 2 Insert the rubber plug through the clip and into the hole on the bottom of the router.
Step 3 Use a standard slot screwdriver to screw the metal screw into the middle of the rubber plug. This fastens the clip to the bottom of the router.
Step 4 Place the router so that the clip's front tabs are aligned with the slots at the end of the lower module's vents.
Step 5 Slide the router forward so that the rear hooks fit over the edge of the hub's rear panel and the front tabs fit into the slots at the end of the lower module's vents.
Cisco Connection Online (CCO) is Cisco Systems' primary, real-time support channel. Maintenance customers and partners can self-register on CCO to obtain additional information and services.
Available 24 hours a day, 7 days a week, CCO provides a wealth of standard and value-added services to Cisco's customers and business partners. CCO services include product information, product documentation, software updates, release notes, technical tips, the Bug Navigator, configuration notes, brochures, descriptions of service offerings, and download access to public and authorized files.
CCO serves a wide variety of users through two interfaces that are updated and enhanced simultaneously: a character-based version and a multimedia version that resides on the World Wide Web (WWW). The character-based CCO supports Zmodem, Kermit, Xmodem, FTP, and Internet e-mail, and it is excellent for quick access to information over lower bandwidths. The WWW version of CCO provides richly formatted documents with photographs, figures, graphics, and video, as well as hyperlinks to related information.
You can access CCO in the following ways:
For a copy of CCO's Frequently Asked Questions (FAQ), contact cco-help@cisco.com. For additional information, contact cco-team@cisco.com.

|
|