Install the LocalDirector User Interface on a PC with the following minimum system requirements:
80486 processor or higher
RAM
Windows NT - 40 MB recommended
Windows 95 - 32 MB recommended
Hard disk space - 2 MB for program files
Operating system - Windows NT 4.0 or Windows 95 OEM Service Release 2 (OSR2)
Note To check the version of Windows 95 on your PC, open a command prompt window (DOS window), then enter the ver command. If the version displayed is 4.00.1111, then the system is running W95 OSR2.
The LocalDirector User Interface is shipped on a 3.5" diskette, or it can be downloaded from CCO as a self-extracting file. Install the user interface program as follows:
Step 1 Insert the program diskette into the diskette drive on the PC.
Step 2 Run the LocalDirector User Interface setup program. In Release 2.2(a), the program is named Lui22a_setup.exe. In previous releases, the file is named lui21x.exe, where x is 1 for Release 2.1.1, 2 for Release 2.1.2, and so forth.
Step 3 Follow the screen installation instructions. After the installation completes, from the Start menu, click Programs, and then Cisco LocalDirector User Interface. Click the LocalDirector User Interface icon, and the main window displays.
Step 1 Copy the self-extracting executable file onto the hard drive of the PC.
Step 2 Run the LocalDirector User Interface setup program. In Release 2.2(a), the program is named Lui22a_setup.exe. In previous releases, the file is named lui21x.exe, where x is 1 for Release 2.1.1, 2 for Release 2.1.2, and so forth.
Step 3 Follow the screen installation instructions. After the installation completes, from the Start menu, click Programs, and then Cisco LocalDirector User Interface. Click the LocalDirector User Interface icon, and the main window displays
Note The LocalDirector User Interface installer performs an operating system version check in the beginning of setup. The LocalDirector User Interface and LocalDirector software must be at the same version level.
The LocalDirector User Interface provides a graphical editor for managing LocalDirector configurations. The main window is divided into three areas as shown in Figure 1.
Tree View - used to add, delete, and bind virtual and real servers.
List View - used to set, copy, and paste properties of virtual and real servers.
Map View - provides a graphical representation of the information that displays in the List View.
Note The Map View is optional and can be permanently hidden by dragging the splitter bar that divides the List View from the Map View to the bottom of the Main window.
The LocalDirector User Interface is most useful for managing large server farm configurations. Additionally, it can isolate you from the LocalDirector command line interface when you use the Primary Configuration function. The Primary Configuration allows you to set the system IP address, passwords, SNMP parameters, and other potions of the configuration that are not expected to change often in most installations.
Note If you choose to set these parameters using the LocalDirector command line interface, skip to "Server Farm Configuration." You must still, however, add a connection configuration, as described in step 3, or alternatively in the section "Configuring Telnet."
Note Initial configuration must be done through the COM port.
Step 2 From the LocalDirector User Interface main menu, select LocalDirector, then Load Primary Configuration. The Select Current LocalDirector screen displays.
Step 3 Click Add to define the connection configuration. Choose the appropriate COM port based on the serial cable connection. A password is not required until you define one using the Passwords tab option (see Figure 2). Click OK to define the new connection, and OK again to load the configuration. The Primary Configuration property sheets display, as shown in Figure 2.
Step 4 Define the LocalDirector IP address and subnet mask. Use the tabs on the Primary Configuration property sheets to configure LocalDirector ARP, Failover, Interfaces, Passwords, Routes, SNMP, SYSLOG, and Telnet settings.
From the Servers menu, define real and virtual servers and their bind associations. An existing server configuration can be imported by selecting Load Server Farm Configuration from the LocalDirector menu.
To configure Telnet access to the LocalDirector, complete the following steps:
Step 1 From the LocalDirector main menu, select LocalDirector and Load Primary Configuration to connect to the LocalDirector via the COM port.
Step 2 From the Primary Configuration property sheets, click the Passwords and Telnet tabs to define authorized Telnet hosts and set the Telnet password.
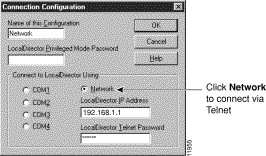
Note If you want to access the LocalDirector via a network connection, the IP address of the PC that is running the LocalDirector User Interface program must be added to the list of authorized Telnet hosts.
When Telnet access is configured, you can define the current LocalDirector as a network connection, as shown in Figure 3.
The following provides troubleshooting information for the LocalDirector User Interface connection:
If you receive one of the following error messages, "Unable to connect to LocalDirector at <IP>" or "login failed," verify that
You can Telnet to this LocalDirector and can enter into configuration mode from the workstation that you are using.
You can ping the LocalDirector IP from the workstation that you are using.
There is a LocalDirector configured with the IP address that you are trying to use.
There is a Telnet entry for the workstation that you are using in the current LocalDirector's configuration.
You have used the valid LocalDirector passwords for Telnet and privileged mode access.
If you receive one of the following error messages, "Unable to connect to LocalDirector via COM <#>" or "login failed," verify that:
This COM port is not being used by another application such as HyperTerminal.
You have used the valid LocalDirector password for privileged mode access.
You can open a LocalDirector console session (HyperTerminal) from the workstation that you are using on this COM port.
Check that the workstation that you are using is physically connected to the LocalDirector via a null modem serial cable.
Verify that the COM port is properly set up for 9600 baud rate, no parity, 8 data bits, 1 stop bit, and no flow control as follows:
In the Windows 95 Control Panel, click the System icon and then the Ports (COM & LPT) icon. Expand the tree to view a list of COM ports. Select the port that is connected to the LocalDirector and click the Properties button and then the Port Settings tab.
In the Windows NT Control Panel, click the Ports icon to view a list of COM ports that are already set up. Select the one that is connected to the LocalDirector and click the Settings button.
The LocalDirector User Interface includes online help that can be accessed by clicking the Help buttons on the screen. In addition, press the F1 key when a menu item is highlighted to display popup help for that menu item.
Cisco LocalDirector User Interface Release 2.2(a) includes the following bug fix.
LUI 2.2, when used with LocalDirector software version 2.2.1 incorrectly reports the "shutdown" (or "enabled") state of interfaces (in the Primary Configuration property dialogs).
When loading or sending a configuration to or from a LocalDirector, the mouse cursor becomes an hour-glass but the screen is not refreshed. Sometimes you may find the cursor is immediately restored to an arrow, but the LocalDirector User Interface does not seem to respond to any mouse click or keyboard input. This can happen when the LocalDirector User Interface is unable to connect to the specified LocalDirector and is waiting for the connect() function call to timeout.
The mouse cursor turns to an hour-glass to indicate that the system is currently busy. It is quite common to find that applications do not respond to mouse clicks and keyboard input when the mouse cursor turns to an hour-glass. [CSCdk24208]
The retail version of Windows95 (otherwise known as Win95A) ships with a system file that is than that required by the LocalDirector User Interface. This system file is automatically upgraded as part of the Microsoft Internet Explorer 3.02 or higher installation, so most Win95A systems already use this system file. If you receive a warning message during installation of the LocalDirector User Interface that notifies you that the version of the system file cannot be determined, or that the system file version is not sufficient for proper operation, you have two choices: upgrade your system file by installing the latest version of the Microsoft Internet Explorer, or use the LocalDirector User Interface as is. The behavior of the list view (upper right corner) will be much like the Windows Explorer system application, in that rows in the list only respond to mouse clicks in the far left column. Aso, you need to double right-click instead of single right-click to view the context menu for rows in that list view.
The LocalDirector User Interface no longer checks for the point release in the LocalDirector version number (the x in 2.2.x). For example, LocalDirector User Interface Release 2.2 works with LocalDirector 2.2.1 and 2.2.2, but does not work with LocalDirector 2.1.x.
The Load Server Farm State menu item has been removed. This same functionality is (and always has been) available by setting the server properties and sending the configuration. Alternatively, you can toggle the current service state of the individual virtual or real servers between "in service" and "out of service" by holding the <ALT> key and double-clicking the desired machine. This can be done in either the list or map view. The resulting configuration can then be sent to the LocalDirector.
The current filename is no longer overwritten with the filename "LocalDirector connection.name" when a configuration is loaded or saved.
The current LocalDirector connection configuration now displays in the lower right "tray" in the main window.
You can now use the keyboard to make multiple selections while in the Tree View. (Previously this functionality was only available by using the mouse.)
You no longer are required to have the current telnet password to change the telnet password if the LocalDirector User Interface is connected via the console/serial cable. This makes the administrative rights more like the LocalDirector itself.
If you open a .lui file, edit the server farm configuration, decide to discard the changes, and then reopen the same file by selecting the File>Open menu option, the LocalDirector User Interface will not reopen the file. There is no problem if you open another file after opening and discarding changes made to a .lui file.
A workaround is to select the File>New menu option to clear the screen, and then select File>Open to reopen the file. [CSCdk24180]
If you load a server farm configuration from a LocalDirector over a COM port or over the network, edit the server farm configuration, and then select the File>New or the File>Open menu option to work on a .lui file, the LocalDirector User Interface displays a prompt such as "Save changes to LocalDirector LD1 (COM1)?" or "Save changes to LocalDirector LD2 (10.0.2.27)?". If you click Yes, the Save (File) As dialog box is displayed and you can save the configuration to a file instead of saving the modified configuration to a LocalDirector.
To save the modified configuration to a LocalDirector, do not click the Yes button; instead, click Cancel and then select the LocalDirector>Save Server Farm Configuration menu option. [CSCdk24199]
When loading or sending a configuration to or from a LocalDirector, the mouse cursor becomes an hour-glass but the screen is not refreshed. Sometimes you may find the cursor is immediately restored to an arrow, but the LocalDirector User Interface does not seem to respond to any mouse click or keyboard input. This can happen when the LocalDirector User Interface is unable to connect to the specified LocalDirector and is waiting for the connect() function call to timeout.
The mouse cursor turns to an hour-glass to indicate that the system is currently busy. It is quite common to find that applications do not respond to mouse clicks and keyboard input when the mouse cursor turns to an hour-glass. [CSCdk24208]
If the primary configuration is loaded from a LocalDirector over a COM port (not over the network) and the Telnet password is changed, when the primary configuration is saved to the LocalDirector the "Re-enter Telnet password" message pops up even if the correct password is provided. This does not happen if LocalDirector User Interface connects to the LocalDirector over the network.
A workaround is to use the command line interface to change the Telnet password. [CSCdk24214]
The LocalDirector User Interface includes the following files:
Filename
Contents
sample.lui
sample server farm configuration file
lui.hlp
help file
lui.cnt
help file
lui.gid
help file
Uninst.isu
file needed for the uninstallation process
readme.rtf
release notes
lui.log
log file
lui_read.txt
log file
lui_writ.txt
log file
The LocalDirector User Interface generates a file called lui.dat that contains a list of user-defined LocalDirector profiles. This information is needed for initiating connection to a LocalDirector unit. The file is not removed when uninstalling the LocalDirector User Interface; therefore, if the LocalDirector User Interface is upgraded, existing profiles do not have to be re-defined.
If the LocalDirector User Interface is installed on two PCs, and either PC will be used to connect to the same set of LocalDirector units, LocalDirector profiles can be defined on one PC and then copied to the other PC. First exit the LocalDirector User Interface program, and then copy the lui.dat file from one PC to the other. To connect to a LocalDirector over the network from the other PC, make sure that a Telnet entry is defined for that PC in the LocalDirector configuration.
The lui.dat file must reside in the same directory as lui.exe.
The LocalDirector User Interface allows you to change the LocalDirector system IP address even if you are going to send the modified primary configuration to the LocalDirector over the network because it is the last item sent. No further items need to be sent after the disconnection caused by changing the LocalDirector's IP address.
Do not include "?" in the LocalDirector command line prompt, otherwise the LocalDirector User Interface responds with the "login failed: invalid Telnet password" or "login failed: invalid privileged mode password" message even if you provide the correct password(s).
The three log files generated by LUI are not automatically truncated.
Cisco Connection Online (CCO) is Cisco Systems' primary, real-time support channel. Maintenance customers and partners can self-register on CCO to obtain additional information and services.
Available 24 hours a day, 7 days a week, CCO provides a wealth of standard and value-added services to Cisco's customers and business partners. CCO services include product information, product documentation, software updates, release notes, technical tips, the Bug Navigator, configuration notes, brochures, descriptions of service offerings, and download access to public and authorized files.
CCO serves a wide variety of users through two interfaces that are updated and enhanced simultaneously: a character-based version and a multimedia version that resides on the World Wide Web (WWW). The character-based CCO supports Zmodem, Kermit, Xmodem, FTP, and Internet e-mail, and it is excellent for quick access to information over lower bandwidths. The WWW version of CCO provides richly formatted documents with photographs, figures, graphics, and video, as well as hyperlinks to related information.
Modem: From North America, 408 526-8070; from Europe, 33 1 64 46 40 82. Use the following terminal settings: VT100 emulation; databits: 8; parity: none; stop bits: 1; and connection rates up to 28.8 kbps.
For a copy of CCO's Frequently Asked Questions (FAQ), contact ccohelp@cisco.com. For additional information, contact ccoteam@cisco.com.
If you are a network administrator and need personal technical assistance with a Cisco product that is under warranty or covered by a maintenance contract, contact Cisco's Technical Assistance Center (TAC) at 800 553-2447, 408 526-7209, or tac@cisco.com. To obtain general information about Cisco Systems, Cisco products, or upgrades, contact 800 553-6387, 408 526-7208, or csrep@cisco.com.
Cisco documentation and additional literature are available in a CD-ROM package, which ships with your product. The Documentation CD-ROM, a member of the Cisco Connection Family, is updated monthly. Therefore, it might be more up to date than printed documentation. To order additional copies of the Documentation CD-ROM, contact your local sales representative or call customer service. The CD-ROM package is available as a single package or as an annual subscription. You can also access Cisco documentation on the World Wide Web at http://www.cisco.com, http://www-china.cisco.com, or http://www-europe.cisco.com.
If you are reading Cisco product documentation on the World Wide Web, you can submit comments electronically. Click Feedback in the toolbar and select Documentation. After you complete the form, click Submit to send it to Cisco. We appreciate your comments.