|
|

Install the LocalDirector User Interface on a PC with the following minimum system requirements:
This section describes the following:
Step 1 Connect the power cord to LocalDirector and plug it in.
Step 2 Connect one end of the null modem serial cable to the LocalDirector DB-9 console port, and connect the other end to an available COM port on your PC.
Step 3 Connect one end of the network cable from the hub or switch containing the physical servers to one of the network interface connections on the back of the LocalDirector, and connect the other end of the cable to the network interface that connects to the outside network.
Step 4 Turn on the LocalDirector power switch.
The LocalDirector User Interface is shipped on a 3.5" diskette, or it can be downloaded from CCO as a self-extracting file. Install the user interface program as follows:
Step 1 Insert the program diskette into the diskette drive on the PC.
Step 2 Run the lui211.exe program.
Step 3 From the Start menu, click Programs, and then Cisco LocalDirector User Interface. Double-click the LocalDirector User Interface icon, and the main window appears.
Step 1 Copy the self-extracting executable file onto the hard drive of the PC.
Step 2 Double-click the file to expand the user interface files.
Step 3 Double-click the LocalDirector user interface icon, and the LocalDirector User Interface main window appears.
The LocalDirector User Interface provides a graphical editor for managing LocalDirector configurations. The main window is divided into three areas as shown in Figure 7-1.

Step 1 Make sure that you are connected to the LocalDirector via the COM port. See "Connecting the LocalDirector Hardware to the PC."
Step 2 From the LocalDirector User Interface main menu, select LocalDirector, then Load Primary Configuration. The Select Current LocalDirector screen appears.
Step 3 Click Add to define the connection configuration. A password is not required until you define one using the Passwords tab option (see Figure 7-2). Click OK to define the new connection, and OK again to load the configuration. The Primary Configuration property sheets appear, as shown in Figure 7-2:

Step 4 Define the LocalDirector IP address and subnet mask. Use the tabs on the Primary Configuration property sheets to configure LocalDirector ARP, Failover, Interfaces, Passwords, Routes, SNMP, SYSLOG, and Telnet settings.
From the Servers menu, define real and virtual servers and their bind associations. An existing server configuration can be imported by selecting Load Server Farm Configuration from the LocalDirector menu.
In order to configure Telnet access to the LocalDirector, complete the following steps:
Step 1 From the LocalDirector main menu, select LocalDirector and Load Primary Configuration to connect to the LocalDirector via the COM port.
Step 2 From the Primary Configuration property sheets, click the Passwords and Telnet tabs in order to define authorized Telnet hosts and set the Telnet password.
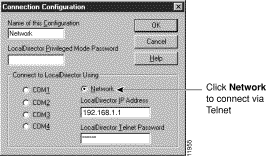
When Telnet access is configured, you can define the current LocalDirector as a network connection, as shown in Figure 7-3.

The following commands are supported by the LocalDirector User Interface:
|
autounfail | name | retry |
| data | out-of-service | threshold |
| in-service | real | timeout |
| maxconns | reassign | weight |
|
assign | in-service | sticky |
| bind | out-of-service | synguard |
| delay | predictor | virtual |
| name | replicate |
|
arp | ip address | route |
| enable password | mtu | secure |
| failover | password | snmp-server |
| failover IP address | ping-allow | syslog |
| interface | rip | telnet |
The following commands are not supported by the LocalDirector User Interface:
| backup | kill | static |
| channel | pager | tftp |
| configure | ping | who |
| failover active | reload | write |
| hostname | restart |
The following information is provided for troubleshooting the LocalDirector User Interface connection:
The LocalDirector User Interface includes online help that can be accessed by clicking the Help buttons on the screen. In addition, press the F1 key when a menu item is highlighted to display popup help for that menu item.
| File name | Contents |
| sample.lui | sample server farm configuration file |
| lui.hlp | help file |
| lui.cnt | help file |
| lui.gid | help file |
| Uninst.isu | file needed for the uninstallation process |
| readme.rtf | release notes |
| lui.log | log file |
| lui_read.txt | log file |
| lui_writ.txt | log file |
|
|