cc/td/doc/product/iaabu/ics/ics10
hometocprevnextglossaryfeedbacksearchhelp
PDF

Table Of Contents

Getting Started

Using the Cisco ICS Web Console

Starting the Web Console

Navigating the Web Console

Using the Device List Tree

Default Settings

Protecting the Network

Testing OPACL and OPSig Matching

Testing OPACL Matching

Testing OPSig Matching


Getting Started


This chapter helps you get started using the Cisco ICS web console and provides an overview of incident control. It contains the following sections:

Using the Cisco ICS Web Console

Default Settings

Protecting the Network

Testing OPACL and OPSig Matching

Using the Cisco ICS Web Console

The web-based management console, or web console, is the central point for incident control.

This section explains how to start and navigate the web console and use the device list tree. It contains the following topics:

Starting the Web Console

Navigating the Web Console

Using the Device List Tree

Starting the Web Console

You can start the web console from any computer on the network that meets the system requirements. For more information, see Minimum System Requirements, page 1-6.

The following are valid URLs for the Cisco ICS web console:

Without SSL:

http://{server}:{port number}/CICS

With SSL:

https://{server}:{port number}/CICS

In the Login window, enter an account username and password. The Outbreak Management Task Summary window is displayed by default.


Note The web console times out after 30 minutes of inactivity.


Navigating the Web Console

The web console consists of the header menu and the main menu.

This section describes the Header and Main menus. It contains the following topics:

Header Menu

Main Menu

Allowing Pop-ups, ActiveX Controls, and Scripts

Header Menu

The header menu provides a link to log off the web console and a drop-down list of items that link to sources of important antivirus and security information.

Log off—Click to log off the web console and return to the login window.

Help list—Contains the following options:

Contents and Index—Opens the Cisco ICS online help.

Products and Services —Opens the Cisco Products and Services website, from which you can access several valuable resources, including product and service details, support information and documentation, learning materials, and items related to partners and resellers.

Technical Support and Documentation—Opens the Cisco support website, where you can find support contact information and download product documentation.

Networking Solutions—Opens the Cisco Networking Solutions website, an overview of solutions for various types of enterprises and organizations.

Ordering—Opens the Cisco website from which you can order products and services.

About—Displays information about Cisco ICS, including the version and build number.

Main Menu

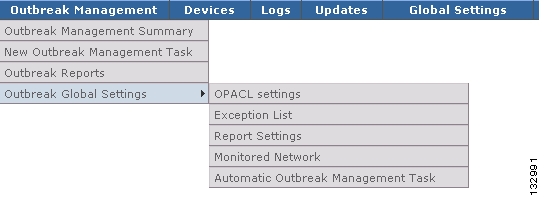
The main menu is a series of drop-down lists that provide access to all Cisco ICS features. Figure 3-1 provides a graphical overview of the main menu with the Outbreak Management > Outbreak Settings drop-down list expanded.

Figure 3-1 Main Menu

The main menu contains the following primary items:

Outbreak ManagementLets you create and configure outbreak management tasks to monitor potential threats on the network.

DevicesLets you manage switches, routers, and IPS devices.

Logs—Lets you query and display logs for incidents, events, and outbreaks.

UpdatesLets you download and deploy OPACLs, OPSigs, and other components.

Global SettingsLets you configure notifications and Syslog server information, verify device connection, manage Cisco ICS accounts, view licensing information, and back up the database.

Allowing Pop-ups, ActiveX Controls, and Scripts

You can configure your web browser to allow pop-up windows to appear. Cisco ICS often uses pop-ups to prompt you to perform additional actions. See your Internet Explorer help for instructions on allowing pop-ups.

To allow the online help to display properly, verify that your browser is not blocking ActiveX and script components.

Using the Device List Tree

The device list tree is an ActiveX control that appears in the main frame of the Device List window. Figure 3-2 provides a graphical overview of the device list tree. For specific instructions on using the links in the top menu, see Using the Device List Window, page 4-3.

Figure 3-2 Device List Tree

1

Directory pane

2

Device list pane


This section describes the device list tree components and how to navigate it. It contains the following topics:

Device List Tree Components

Navigating the Device List Tree

Device List Tree Components

The device list tree consists of the following sections:

Top menuContains the following options:

Search—Searches for devices already registered with Cisco ICS.

Configure—Lets you configure device settings.

Copy Settings—Copies configuration settings from one device type to another.

Verify Connection—Verifies that the Cisco ICS server can successfully connect to a registered device.

Deploy—Deploys the components on the Cisco ICS server to the selected devices.

Add Group—Adds a group folder to the Directory pane.

Add Device—Registers a device with the Cisco ICS server.

AV Locator—Locates an existing Trend Micro OfficeScan server installation.

Remove—Removes a device.

Unregister—Removes a Trend Micro Damage Cleanup Services (DCS) server.

Directory paneContains a hierarchical list of group folders.

Device List paneContains a list of devices in the current group folder.

As in all windows, the Refresh link appears on the top right. You can click Refresh to update the status of devices in the device list pane.

Navigating the Device List Tree

When the Device List window opens, the root directory is selected by default and the contents of the root directory appear in the Device List pane.

You can perform the following actions:

To move from one group folder to another, click the group name next to the group folder icon.

To perform one of the actions in the top menu on a device or on several devices, click the device name. Use the Shift and/or Ctrl keys to select multiple devices. When you select multiple devices, the Configure and Copy Settings links in the top menu are disabled.

To move devices from one group folder to another, click the device and drag it to the desired folder in the Directory pane.


Note Clicking the group folder does not select all devices in that group; it displays only the devices for the group in the device list. Click the devices in the device list to perform actions on them.


Default Settings

By default, critical incident control functions and features are enabled after installation. Verify the default selections after installation. Table 3-1 describes all default settings.

Table 3-1 Default Settings 

Setting
Default Value
Description

Automatic outbreak management tasks

Enabled for red alerts.

OPACLs deployed to all network devices.

Newly released OPACLs are deployed and overwrite older OPACLs.

OPACLs stop after OPSig deployment or after 4 hours.

Automatic outbreak management tasks address critical threats, automatically helping to prevent red alert outbreaks from spreading on your network. For more information, see Automating Outbreak Management, page 6-8.

OPACL mode

Blocking

Devices block the traffic specified in the OPACLs. For more information, see Automating Outbreak Management, page 6-8.

Exception list

TCP port 4343 or 443 (access to the web console using the default web port number during installation).

TCP port 22 (SSH communication with switches and routers).

TCP port 23 (Telnet communication with routers and switches).

TCP port 25 (SMTP for notifications).

TCP port 80 (HTTP communication with IPS devices).

OPACLs do not block these ports, which are required for communication among the Cisco ICS server and the computer accessing the web console, the mail server, and network devices. For more information, see Configuring the Exception List, page 6-9.

Scheduled download

Outbreak management task polling schedule enabled, polling the update source every 5 minutes.

OPSig polling schedule enabled, polling the update source twice daily.

Note After installation is complete, Cisco ICS immediately downloads the latest components from the default update source using HTTPS. This one-time post-installation download is enabled by default and cannot be disabled.

Cisco ICS polls the update source for the latest outbreak management tasks, which include OPACLS, OPSigs, and DCS components to keep up-to-date with the latest threats.

OPSigs and DCS component download follow the OPSig polling schedule when no tasks are active. For more information, see Configuring Scheduled Download, page 5-3 and Scheduled Download Behavior, page 5-3.

Automatic deployment

Enabled.

Cisco ICS deploys all components under the following circumstances:

After an updated component is downloaded.

When a new device is added.

When the status of any device changes to online.

For more information, see Enabling Automatic Deployment, page 5-8.

Report settings

Daily automatic report generation.

Cisco ICS generates reports for each active outbreak management task to provide an overview of incident control. For more information, see To Automatically Generate a Report, page 8-3.

Monitored network

The entire network.

Cisco ICS monitors all hosts on the network for watch list inclusion. For more information, see Setting the Monitored the Network, page 7-2.

Automatic device connection verification

Enabled and performed daily at 11:30 p.m.

Cisco ICS automatically verifies that it can communicate with the devices registered to it. For more information, see Setting a Verify Connection Schedule, page 9-5.


You may also want to configure the following features:

Automatic outbreak management task deployment for yellow alerts.

For more information, see Automating Outbreak Management, page 6-8.

Notifications that Cisco ICS sends automatically when certain incidents and events occur.

For more information, see Configuring Notifications, page 9-1.

Syslog severs that collect all log information.

For more information, see Managing Syslog Servers, page 9-4.

Database backup that preserves Cisco ICS settings in the event of database corruption.

For more information, see Backing Up the Database, page 9-12.

Protecting the Network

Your network is now protected. By default, Cisco ICS automatically downloads the latest components after installation and deploys them when you add devices to Cisco ICS.

Cisco ICS deploys the following components:

The OPSig to IPS devices

Damage cleanup components to Damage Cleanup servers


Caution We strongly recommend that you take the following minimum steps to verify that incident control is functioning properly.

To verify that incident control is functioning properly, follow these steps:


Step 1 Verify that the automatic download after installation was successful:

a. Choose Logs > Event Log Query.

b. Under Event, click Server update event and preserve the other default selections.

c. Click Display Logs.

The Event Log window appears.

d. If the update was successful, go to Step 2. If not, download it manually.

For more information, see Downloading Manually, page 5-4.

Step 2 Add devices to the device list tree and configure them.

For more information, see Adding a Device, page 4-4, and Configuring Devices, page 4-12.

Step 3 Verify that the devices received the components when they were added:

a. Choose Logs > Event Log Query.

b. Under Event, click Deployment event and preserve the other default selections.

c. Click Display Logs.

The Event Log window appears.

d. If the deployment was not successful, verify that the devices can communicate with Cisco ICS and manually deploy the components.

For more information, see Verifying Device Connectivity, page 4-9, and Deploying Manually, page 5-8.


Note By preserving the default settings and performing the previous steps, you can be confident that Cisco ICS is helping to protect your network from new threats. If a new red alert threat breaks out, Cisco ICS automatically deploys a new outbreak management task and corresponding OPACL and OPSig to stop the threat from spreading on your network.


Testing OPACL and OPSig Matching

You can verify that your devices are using OPACLs and OPSigs properly to identify threats.

The following components are required:

A host on your network to serve as a victim of a threat attack.

A host on your network to serve as an attacker.

A device to detect the threat. To test an OPACL, you can use a switch, router, or IPS device. To test OPSig matching, use an IPS device.

A network packet generating tool, such as Netcat. To test OPACL matching, run the tool on the computer that serves as the receiver of the virus.

The Malware Tester utility, located on the Cisco ICS server at the following location:

C:\Program Files\Cisco Systems\CICS\PCCSRV\Admin\Utility\malware_tester

This section describes how to test OPACL and OPSig matching. It contains the following topics:

Testing OPACL Matching

Testing OPSig Matching

Testing OPACL Matching

By default, Cisco ICS includes a threat named Malware. The threat's OPACL blocks Telnet traffic that uses port 52843. You can create a test outbreak management task using the Malware threat and its associated OPACL to test OPACL matching.

To test OPACL matching, follow these steps:


Step 1 Create a new manual outbreak management task (see Creating a New Manual Outbreak Management Task, page 6-6.) Configure the following settings for the task:

Threat nameSelect CICS_TEST_FILE, which is the last task in the list.

Other settingsLeave the default settings. Do not modify them.

Step 2 On the host serving as the victim, use the network tool, such as Netcat, to open port 52843.

Step 3 On the host serving as the attacker, telnet to the victim host at port 52843. The device between the hosts should realize that the Telnet traffic matches the OPACL and create a log entry.

Step 4 Choose Logs > Incident Log Query in the main menu of the web console.

Step 5 Under Incident, select OPACL matching.

Step 6 Click Display Logs.

Step 7 Check for the log entry that indicates OPACL matching.

Step 8 To stop the network devices from using the OPACL that identifies the test virus, stop the task (see Stopping an Outbreak Management Task, page 6-13).


Testing OPSig Matching

You can use the Malware Tester tool on two hosts, one serving as the victim, the other serving as the attacker, to transmit a packet that any OPSig identifies as a virus.

To test OPSig matching, follow these steps:


Step 1 Copy the Malware Tester utility file Malware_Tester.exe to both hosts.

Step 2 Open a command prompt on the host serving as the victim.

Step 3 Instruct the Malware Tester tool to listen for the test virus packet:

Malware_Tester.exe -l

Step 4 Open a command prompt on the host serving as the attacker.

Step 5 Instruct the Malware Tester tool to send a test virus packet:

Malware_Tester.exe -s {IP address of victim}

The device between the hosts should identify the packet as a virus.

Step 6 Choose Logs > Incident Log Query in the main menu of the web console.

Step 7 Under Incident, select OPSig matching.

Step 8 Click Display Logs.

Step 9 Verify that there is a log entry that indicates OPSig matching.

Step 10 If the host serving as the victim was in the monitored network, it should appear as an infected host for the task you created. Verify that it appears on the watch list (see Viewing the Watch List Window, page 7-3).

For a list of messages you can see on the Malware Tester utility interface, see Malware Tester Utility Messages, page D-15.


hometocprevnextglossaryfeedbacksearchhelp

Posted: Fri Apr 7 09:45:03 PDT 2006
All contents are Copyright © 1992--2006 Cisco Systems, Inc. All rights reserved.
Important Notices and Privacy Statement.