|
|

Is Cisco documentation helpful? Click here to give us your feedback.
This document provides information about replacing and verifying field-replaceable units (FRUs), including cards and other components, in the Cisco 6400 carrier-class broadband aggregator. All cards, modules, and components support online insertion and removal (often referred to as hot-swapping). Hot-swapping allows you to remove, replace, and rearrange cards without turning off the system power. When the system detects that a card or module is added or removed, it automatically runs diagnostic and discovery routines, acknowledges the presence or absence of the card or module, and resumes system operation without any operator intervention.
 |
Note If you are a network administrator and need personal technical assistance with a Cisco product that is under warranty or covered by a maintenance contract, refer to the "Obtaining Technical Assistance" section. |
|
Note The illustrations in this guide depict the original Cisco 6400 chassis. Your chassis may appear or look slightly different. |
This document includes the following sections:
This publication uses the following conventions:
|
Note Means reader take note. Notes contain helpful suggestions or references to materials not contained in this manual. |
 |
Caution Means reader be careful. In this situation, you might do something that could result in equipment damage or loss of data. |
You need the following tools and equipment to remove and replace modules. If you need additional equipment, see the "Obtaining Technical Assistance" section.
|
Caution Static voltages as low as 30 volts can cause latent damage to circuitry. Be sure to observe all standard anti-static procedures (for example, wear a grounding strap) when handling electronic equipment and components. |
 |
Warning Blank faceplates (filler panels) serve three important functions: they prevent exposure to hazardous voltages and currents inside the chassis; they contain electromagnetic interference (EMI) that might disrupt other equipment; and they direct the flow of cooling air through the chassis. Do not operate the system unless all cards and faceplates are in place. Translations of this warning can be found in the Regulatory Compliance and Safety Information document that accompanied this device. |
|
Warning Class 1 laser product. Translations of this warning can be found in the Regulatory Compliance and Safety Information document that accompanied this device. |
|
Warning Because invisible radiation may be emitted from the aperture of the port when no fiber cable is connected, avoid exposure to radiation and do not stare into open apertures. Translations of this warning can be found in the Regulatory Compliance and Safety Information document that accompanied this device. |
|
Warning Invisible laser radiation present. Translations of this warning can be found in the Regulatory Compliance and Safety Information document that accompanied this device. |
|
Warning To prevent personal injury or damage to the chassis, never attempt to lift or tilt the chassis using the handles on modules (such as power supplies, fans, or cards); these types of handles are not designed to support the weight of the unit. Lift the unit only by using handles that are an integral part of the chassis, or by grasping the chassis underneath its lower edge. Translations of this warning can be found in the Regulatory Compliance and Safety Information document that accompanied this device. |
|
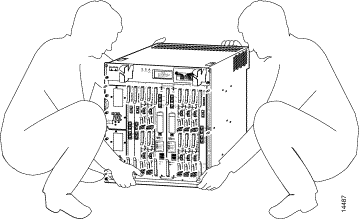
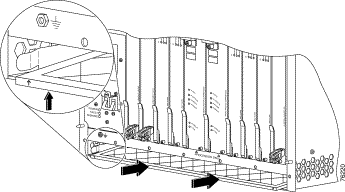
Warning Two people are required to lift the chassis. To prevent injury, keep your back straight and lift with your legs, not your back. Translations of this warning can be found in the Regulatory Compliance and Safety Information document that accompanied this device. |
Figure 1 shows the proper way to lift the Cisco 6400 chassis.
The Cisco 6400 system has a hot-swap feature that allows you to install and remove modules and line cards while the system is operating. With hot swapping, you do not need to power down the system.
When unconfigured node line cards (NLCs) are installed for the first time, the system identifies them as present but unconfigured. Read the instructions for initial interface configurations in the Cisco 6400 Software Setup Guide.
If a card or module similar to the one that was removed is reinserted into a slot, the Cisco 6400 automatically configures its ports and brings it online up to the port count of the original card.
|
Note You must administratively shut down the card or module; otherwise alarms are activated. |
|
Caution To avoid erroneous failure messages, allow at least 15 seconds for the system to reinitialize. Note the current configuration of all interfaces before you remove or insert another card. |
The following are examples of recommended module and card insertion practices:
|
Note Any module that is only partially connected to the backplane can disrupt system operation. |
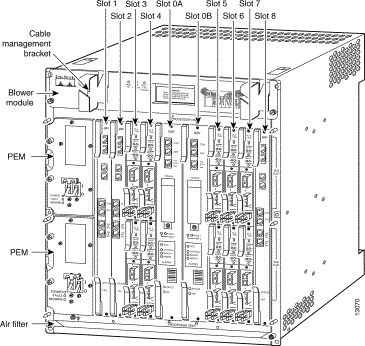
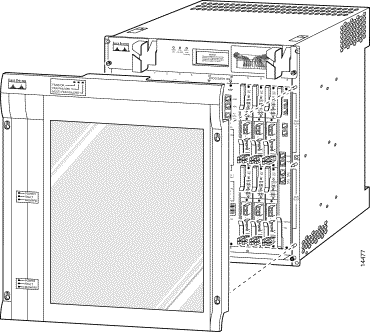
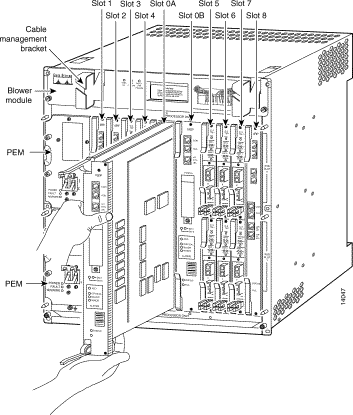
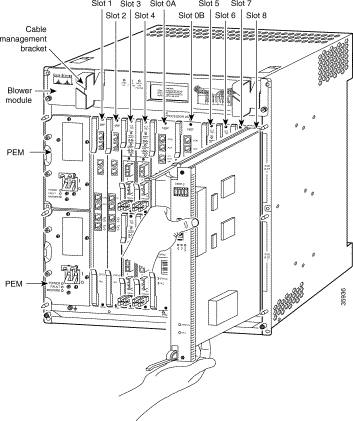
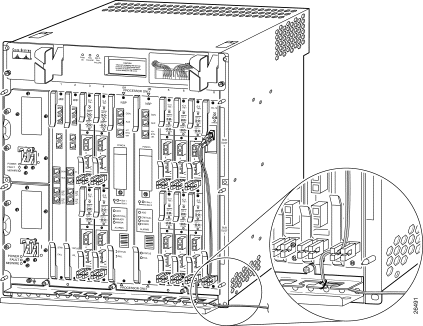
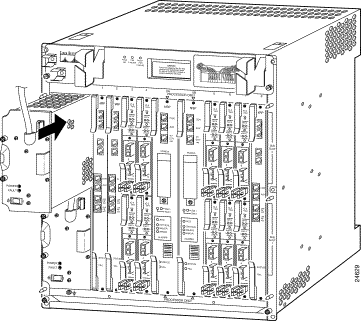
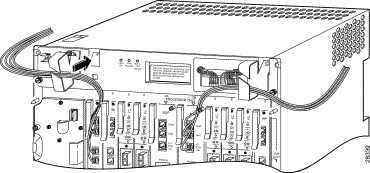
Figure 2 identifies the major components of the Cisco 6400 system. Card slots 1 through 8 can contain a combination of node route processor (NRP) and node line card (NLC) modules; only node switch processor (NSP) modules can be inserted into card slots 0A and 0B.
|
Note The Cisco 6400 no longer ships with the plastic front cover that was included in shipments made before June 2002. This section covering removal and replacement procedures is included only for reference purposes. |
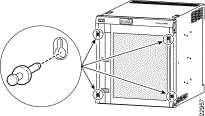
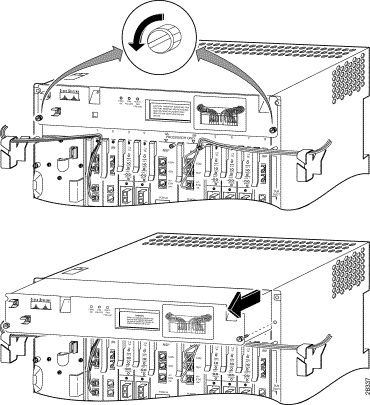
To remove the front cover, first remove the bezel plugs:
Step 2 Rotate the screwdriver blade 90 degrees, pushing out the top of the plug (Figure 3).
Step 3 Remove the plug with your fingers.
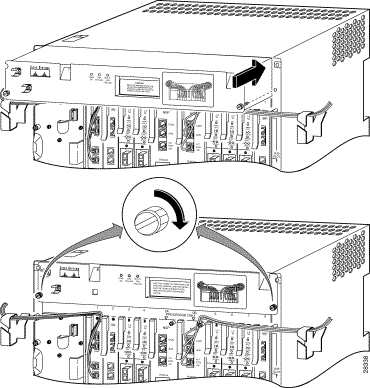
Step 4 Firmly grasp the cover with both hands, lift upward as far as possible (about 1 inch), and pull forward.
|
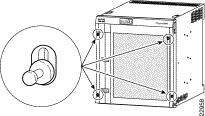
Note The cover is secured by four posts. Avoid bending or twisting cables and connectors. |
Step 2 Gently but firmly push the cover onto the posts and slide downward to secure.
Step 3 Insert one of the bezel plugs into a corner hole, below the post.
Step 4 When the plug is lined up in the hole (Figure 5), use your thumb to gently but firmly press on the top of the plug until the top collapses against the bottom.
Step 5 Repeat Steps 3 and 4 for the remaining three corners. Avoid bending or twisting cables and connectors.
 Installing Bezel Plugs
To power down the Cisco 6400 system:
Step 2 Before shutting down the Cisco 6400, use the copy command to save any configuration changes to NVRAM, and also to a PCMCIA card. (Refer to the Cisco 6400 Command Reference for instructions on using the copy command.)
Step 3 Complete all copy or write operations involving Flash media (PCMCIA slots or boot Flash) before you power down the Cisco 6400.
Step 4 To power down the Cisco 6400, turn off the switch on all PEMs (your system can be configured with one or two PEMs).
We recommend that you create a duplicate PCMCIA card that contains the current boot software image and the current software configuration. You can use the duplicate to recover from a major system failure with less disruption. If you have a backup PCMCIA card, you can use that card to load a new node switch processor (NSP) module and avoid a time-consuming reconfiguration process. For instructions on creating a backup PCMCIA card, refer to the Cisco 6400 Software Setup Guide.
The Cisco 6400 automatically powers down if the system overheats. If the blower module's air filters are too dirty or clogged, the system might have insufficient air flow and might overheat.
You should replace the Cisco 6400 air filters every six months. In certain environments, you might have to replace the air filter more frequently.
The Cisco 6400 ships with either a screw-type or tab-type air filter.
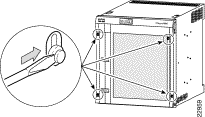
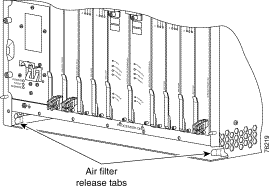
To remove a tab-type air filter, press the release tabs on each side of the chassis to release the air filter and slide it out of the chassis. (See Figure 6.)
To remove a screw-type air filter, refer to Figure 7 and perform the following steps.
Step 2 Gently pull the filter toward you to remove it from the chassis.
Step 3 If you are replacing the filter, discard the old filter and go to the section "Replacing the Air Filter."
The Cisco 6400 ships with either a screw-type or tab-type air filter.
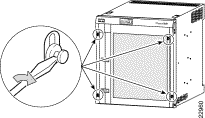
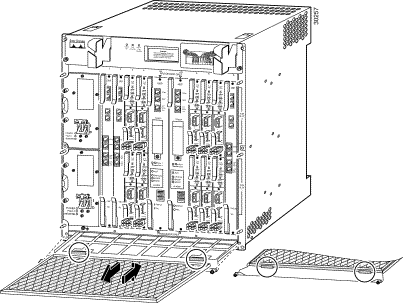
To install a new tab-type air filter, slide the new filter all the way into the chassis and lift it up until it snaps into place. The directional arrows located on the metal frame of the filter should be pointing up. (See Figure 8.)
To install a new screw-type air filter, refer to Figure 7 and perform the following steps:
Step 2 Slide the air filter into the bottom tray of the chassis.
Step 3 Secure the tray by tightening the retaining screws.
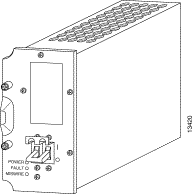
The Cisco 6400 can contain one or two NSP modules, which are located in slots 0A and 0B (in the middle of the chassis). Figure 9 shows the NSP faceplate.
|
Caution Removing an active NSP in a redundant configuration causes a switchover. Removing an active NSP in a nonredundant configuration causes a system shutdown. |
Step 2 Unscrew the upper and lower retaining screws.
Step 3 Disconnect any cables connected to the NSP module that you are about to remove.
Step 4 Grasp the upper and lower extraction levers. Pull up on the upper lever while pushing down on the lower lever. This action disengages the module from the connectors on the backplane.
Step 5 Slide the NSP module out of the slot.
Step 6 Place the NSP module on an antistatic surface. If the module will be out of the chassis for several minutes or longer, put it in a static-shielding bag or in a box lined with antistatic material.
Step 7 Install another NSP module or a blank faceplate in the empty slot.
|
Warning Blank faceplates (filler panels) serve three important functions: they prevent exposure to hazardous voltages and currents inside the chassis; they reduce electromagnetic interference (EMI) that might disrupt other equipment; and they direct the flow of cooling air through the chassis. Do not operate the system unless all cards and faceplates are in place. Translations of this warning can be found in the Regulatory Compliance and Safety Information document that accompanied this device. |
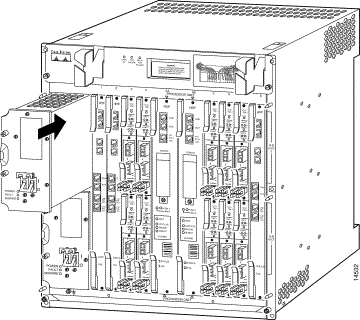
The NSP module can be inserted only in slot 0A or 0B. To install an NSP module in the Cisco 6400 chassis:
Step 2 Hold the NSP module vertically, with the NSP faceplate toward you and the backplane connectors away from you. Ensure that the module is right side up by noting the lettering on the faceplate.
Step 3 Carefully align the upper and lower edges of the NSP carrier with the upper and lower guides in the chassis (Figure 10).
|
Caution To ensure that the NSP module mates properly with all backplane connector pins, the card length and card slots have been designed with very close tolerances. To slide the module into the slot requires gentle pressure with each hand, at the top and bottom of the faceplate. |
Step 4 Gently slide the module into the slot until it makes contact with the backplane.
Step 5 Press the upper lever down and the lower lever up at the same time.
Step 6 Secure the card by tightening the upper and lower retaining screws.
Step 7 Connect the cables.
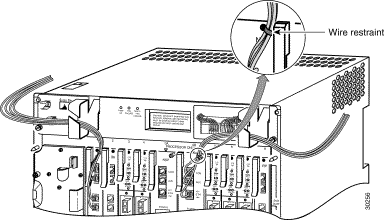
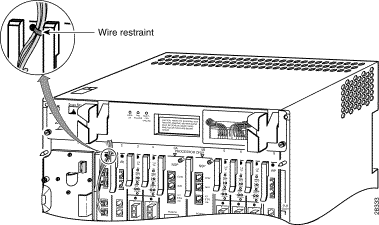
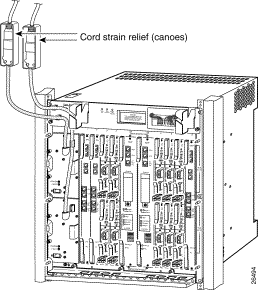
Step 8 Pull the cables across the wire restraint and bend the restraint upward to trap the cables (Figure 11).
Step 9 Route the cables through the cable management bracket, creating a 20-inch (or larger) service loop (Figure 12).
Step 10 Install blank filler panels to cover any unused slots. Like cards and modules, each filler panel is held in place by two retaining screws.
There are two PCMCIA slots in the NSP module. To replace a PCMCIA card:
Step 2 Lift the cover and press the eject button on the PCMCIA slot for the card you are removing. The card ejects.
Step 3 Remove the PCMCIA card and insert the new card. Push firmly to seat the new PCMCIA card.
Step 4 Close the cover and tighten the locking fastener.
|
Note If you seat a PCMCIA Type II card in Slot 0, you cannot use Slot 1. However, if you seat a Type I card in Slot 0, you can insert either a Type I or Type II card in Slot 1. |
SIMMs are sensitive components that are susceptible to ESD damage. Handle SIMMs by the edges only; avoid touching the memory modules, pins, or traces (the metal fingers along the connector edge of the SIMM).
|
Caution To upgrade DRAM, you must install identical SIMMs in both DRAM SIMM connectors. |
The default DRAM configuration is 64 MB, contained in two 32-MB SIMMs. The DRAM can be increased to 128 MB by adding two more 32-MB SIMMs. The amount of DRAM required on the NSP module is determined by the number of active physical and logical ports (virtual path tunnels) and the expected number of active switched virtual channels (SVCs) through the switch.
In a 64-MB DRAM configuration, the two accessible SIMM sockets (U51 and U63) are empty. To upgrade to 128-MB DRAM, you must purchase an upgrade kit from Cisco and insert the SIMMs into the two empty sockets.
|
Note You must use SIMMs obtained from Cisco Systems. |
Step 2 Disconnect the console and auxiliary cables from the NSP module.
Step 3 Loosen the captive installation screws on the NSP module.
Step 4 Place the NSP on an antistatic mat or pad. Position the NSP so that the faceplate is away from you and the edge connector is toward you.
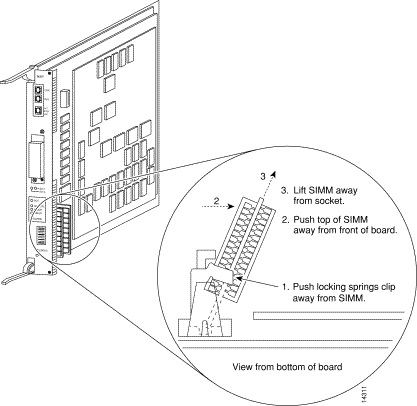
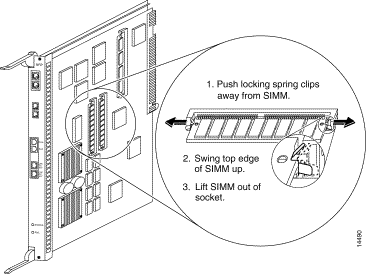
Step 5 Locate the SIMMs. The DRAM SIMMs occupy sockets U51 and U63 (Figure 13).
Step 6 Release the spring clips from the SIMM that you wish to remove and lift the SIMM from the socket (Figure 13).
Step 7 When both ends of the SIMM are released from the socket, use your thumb and forefinger to grasp the ends of the SIMM and pull the SIMM completely out of the socket. Handle the edges of the SIMM only; avoid touching the memory module, pins, or metal traces (fingers) along the socket edge.
Step 8 Place the SIMM in an antistatic bag to protect it from ESD damage.
Step 9 Repeat steps 5 through 8 for the remaining SIMMs, as required for your upgrade.
Step 2 Remove a new SIMM from the antistatic bag.
|
Caution Handle SIMMs by the card edges only. SIMMs are sensitive components that can short out if mishandled. |
Step 3 Hold the SIMM component side up with the connector edge (the metal fingers) closest to you.
Step 4 Hold the sides of the SIMM between your thumb and middle finger, with your forefinger against the far edge, opposite the connector edge (Figure 13).
Step 5 Tilt the SIMM to approximately the same angle as the socket, and insert the entire connector edge into the socket. Insert the first SIMM in the socket farther from you.
|
Caution When inserting SIMMs, use firm but not excessive pressure. If you damage a socket, you must return the NSP to the factory for repair. |
Step 6 Gently push the SIMM into the socket until the spring clips snap over the ends of the SIMM. If necessary, rock the SIMM gently back and forth to seat it properly.
Step 7 Repeat Steps 2 through 6 for the remaining SIMM. Insert the second SIMM in the socket closer to you.
Step 8 When both SIMMs are replaced, check all four alignment holes (two on each SIMM) and ensure that each spring retainer is visible. If it is not, the SIMM is not seated properly. If a SIMM appears misaligned, carefully remove it and reseat it in the socket. Push the SIMM firmly back into the socket until the retainer springs snap into place.
If the system fails to boot properly, or if the console terminal displays a checksum or memory error, check the following:
If the system fails to restart properly after several attempts, contact a service representative for assistance. Before you contact Cisco Systems, make note of any error messages, unusual LED states, or any other indications that might help identify the problem.
NRP modules can be installed in slots 1 through 8 in the Cisco 6400 chassis. The procedure for replacing an NRP module is basically the same for the NRP-1 and NRP-2 modules. The only difference is that for the NRP-1, the attached cables are directed up to wire restraints; and for the NRP-2SV, the cable is directed down to cable management brackets. This is clarified in Step 8 on page 21.
To remove an NRP module from the Cisco 6400 chassis:
Step 2 Disconnect any cables connected to the NRP module that you are about to remove.
Step 3 Unfasten the upper and lower retaining screws.
Step 4 Grasp the upper and lower extraction levers. Pull up on the upper lever while pushing down on the lower lever. This action disengages the NRP carrier from the connectors on the backplane.
Step 5 Slide the module out of the slot.
Step 6 Place the NRP module on an antistatic surface. If it will be out of the chassis for several minutes or longer, put it in a static-shielding bag or in a box lined with antistatic material.
Step 7 Insert another NRP module or a blank faceplate in the empty slot.
|
Warning Blank faceplates (filler panels) serve three important functions: they prevent exposure to hazardous voltages and currents inside the chassis; they reduce electromagnetic interference (EMI) that might disrupt other equipment; and they direct the flow of cooling air through the chassis. Do not operate the system unless all cards and faceplates are in place. To see translations of this warning, refer to the Regulatory Compliance and Safety Information document that accompanied this device. |
To install an NRP-2SV module in the Cisco 6400 chassis:
Step 2 Hold the NRP-2SV module vertically with the NRP-2SV faceplate toward you and the backplane connectors away from you. Ensure that the module is right side up by noting the lettering on the faceplate.
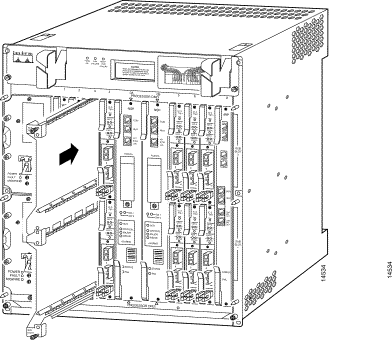
Step 3 Carefully align the upper and lower edges of the NRP-2SV carrier with the upper and lower guides in the chassis. See Figure 14 for an example of inserting an NRP-2SV module in the chassis.
The following warnings apply to the NRP-2SV module.
|
Warning Class 1 laser product. To see translations of this warning, refer to the Regulatory Compliance and Safety Information document that accompanied this device. |
|
Warning Because invisible radiation may be emitted from the aperture of the port when no fiber cable is connected, avoid exposure to radiation and do not stare into open apertures. To see translations of this warning, refer to the Regulatory Compliance and Safety Information document that accompanied this device. |
|
Warning Invisible laser radiation present. To see translations of this warning, refer to the Regulatory Compliance and Safety Information document that accompanied this device. |
|
Caution To ensure that the NRP-2SV module connects properly with all backplane connector pins, the card length and card slots have been designed with very close tolerances. To slide the module into the slot requires gentle pressure with each hand at the top and bottom of the faceplate. |
Step 4 Gently slide the NRP module into the slot until it makes contact with the backplane.
Step 5 Press the upper lever down and the lower lever up at the same time.
Step 6 Secure the carrier by tightening the upper and lower retaining screws.
Step 7 Connect the cables.
Step 8 For an NRP-1 module, follow the first step; for an NRP-2SV module, go to the second step:
Step 9 Install blank filler panels to cover any unused slots. Use two retaining screws to secure each filler panel.
This section describes how to remove and replace an NRP-1 SIMM module.
SIMMs are sensitive components that are susceptible to ESD damage. Handle SIMMs by the edges only; avoid touching the memory modules, pins, or traces (the metal "fingers" along the connector edge of the SIMM).
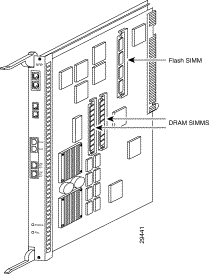
Figure 18 shows the locations of the DRAM and Flash SIMMs on the NRP-1 module. The procedures for removing, installing, and verifying the DRAM and Flash SIMMs are identical.
|
Caution To upgrade DRAM, you must install identical SIMMs in both DRAM SIMM connectors. |
The default DRAM configuration is 64 MB, contained in two 32-MB SIMMs. The DRAM can be increased to 128 MB by replacing them with two 64-MB SIMMs. The amount of DRAM required on the NRP-1 module is determined by the number of routed and bridged sessions the NRP-1 is configured to handle.
The default Flash configuration is 8 MB, but you can upgrade to a 16-MB Flash SIMM. The amount of Flash memory required on the NRP-1 module is determined by the number and sizes of images and configuration files stored in Flash memory.
To upgrade either DRAM or Flash memory on the NRP-1 module, you must purchase an upgrade kit from Cisco Systems and replace the current SIMMs.
|
Note You must use SIMMs obtained from Cisco Systems. |
To remove the SIMM from the Cisco 6400 chassis:
Step 2 Disconnect the signal and control cables from the NRP.
Step 3 Loosen the captive installation screws on the NRP module and remove the module from the chassis.
Step 4 Place the NRP module on an antistatic mat or pad. Position the NRP module so that the faceplate is away from you, and the edge connector is toward you.
Step 5 Locate the SIMMs on the NRP module(Figure 18).
Step 6 Release the spring clips from the SIMM that you wish to remove and lift the SIMM from the socket
(Figure 19).
Step 7 When both ends of the SIMM are released from the socket, use your thumb and forefinger to grasp the ends of the SIMM and pull the SIMM completely out of the socket. Handle the edges of the SIMM only; avoid touching the memory module, pins, or metal traces (fingers) along the socket edge.
Step 8 Place the SIMM in an antistatic bag to protect it from ESD damage.
Step 2 Remove a new SIMM from the antistatic bag.
|
Caution Handle SIMMs by the card edges only. SIMMs are sensitive components that can short out if mishandled. |
Step 3 Hold the SIMM component side up with the connector edge (the metal fingers) closest to you.
Step 4 Hold the sides of the SIMM between your thumb and middle finger, with your forefinger against the far edge, opposite the connector edge.
Step 5 Tilt the SIMM to approximately the same angle as the socket, and insert the entire connector edge into the socket. If you are installing the DRAM SIMMs, insert the first DRAM SIMM in the socket farther from you.
|
Caution When inserting SIMMs, use firm but not excessive pressure. If you damage a socket, you must return the NRP to the factory for repair. |
Step 6 Gently push the SIMM into the socket until the spring clips snap over the ends of the SIMM. If necessary, rock the SIMM gently back and forth to seat it properly.
Step 7 Repeat steps 2 through 6 for each remaining new SIMM.
Step 8 For each SIMM you installed, check both alignment holes and ensure that each spring retainer is visible. If it is not, the SIMM is not seated properly. If a SIMM appears misaligned, carefully remove it and reseat it in the socket. Push the SIMM firmly back into the socket until the retainer springs snap into place.
If the system fails to boot properly, or if the console terminal displays a checksum or memory error, check the following:
If the system fails to restart properly after several attempts, contact a service representative for assistance. Before you contact Cisco Systems, make note of any error messages, unusual LED states, or any other indications that might help identify the problem.
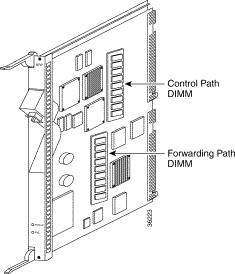
This section describes how to remove and replace an NRP-2SV dual inline memory module (DIMM). There are two DRAMs on the NRP-2SV module: The control path DIMM and the forwarding path DIMM.
DIMMs are sensitive components that are susceptible to ESD damage. Handle DIMMs by the edges only; avoid touching the memory modules, pins, or traces (the metal "fingers" along the connector edge of the DIMM).
Figure 20 shows the location of the DIMMs on the NRP-2SV module.
Each of these DIMMs is 512 MB. (Older cards may have 256 MB DIMMS. An upgrade kit is available from Cisco Systems, Inc.) The amount of DRAM required on the NRP-2 module is determined by the number of routed and bridged sessions the NRP-2 is configured to handle.
There is no Flash memory on the NRP-2SV module.
|
Note You must use DIMMs obtained from Cisco Systems. |
Step 2 Disconnect the cables from the NRP-2SV.
Step 3 Loosen the captive installation screws on the NRP-2SV module and remove it from the chassis.
Step 4 Place the NRP-2SV on an antistatic mat or pad. Position the NRP-2SV module so that the faceplate is away from you and the edge connector is toward you.
Step 5 Locate the DIMMs on the NRP-2SV module (Figure 20).
|
Note Be sure to note the orientation of the DIMM in the socket. The card is notched so that it can be inserted only one way to align the notches on the DIMM with the socket. When you insert the new NRP-2SV, align the new DIMM the same as the old DIMM to avoid damaging the unit and to ensure proper operation. |
Step 6 Pull the levers on the socket to the "outside" to release the DIMM, and then lift the DIMM from the socket.
Step 7 When both ends of the DIMM are released from the socket, use your thumb and forefinger to grasp the ends of the DIMM and pull the DIMM completely out of the socket. Handle the edges of the DIMM only; avoid touching the memory module, pins, or metal traces (fingers) along the socket edge.
Step 8 Place the DIMM in an antistatic bag to protect it from ESD damage.
Step 2 Remove a new DIMM from the antistatic bag.
|
Caution Handle DIMMs by the card edges only. DIMMs are sensitive components that can be shorted by mishandling. When inserting DIMMs, use firm but not excessive pressure. If you damage a socket, you must return the NRP-2SV to the factory for repair. |
Step 3 Align the new DIMM to the same orientation the old DIMM was in when you removed it from the socket.
Step 4 Hold the sides of the DIMM between your thumb and middle finger, with your forefinger against the far edge, opposite the connector edge.
Step 5 Align the two notches on the DIMM with the socket and insert the connector edge into the socket.
Step 6 Gently push the DIMM into the socket until the notches on the DIMM align with the levers on the socket. The DIMM will "click" into place. The DIMM is "self-locking" when properly seated.
If the system fails to boot properly, or if the console terminal displays a checksum or memory error, ensure that the DIMM is installed correctly. Check by looking straight down on the DIMM and then observe it at eye level. Reinstall the NRP-2SV module and reboot the system for another installation check.
If the system fails to restart properly after several attempts, contact a service representative for assistance. Before you contact Cisco Systems, make note of any error messages, unusual LED states, or any other indications that might help identify the problem.
The Cisco 6400 supports three half-height node line card (NLC) modules:
To install a half-height NLC module in the Cisco 6400 chassis, you must do the following:
The carrier module can accommodate two half-height NLCs.
Because the NLCs support different media and interface types, configuration commands used with the cards can vary according to type. For complete NLC configuration information, refer to these documents:
|
Warning Class 1 laser product. Translations of this warning can be found in the Regulatory Compliance and Safety Information document that accompanied this device. |
|
Warning Because invisible radiation may be emitted from the aperture of the port when no fiber cable is connected, avoid exposure to radiation and do not stare into open apertures. Translations of this warning can be found in the Regulatory Compliance and Safety Information document that accompanied this device. |
|
Warning Invisible laser radiation present. Translations of this warning can be found in the Regulatory Compliance and Safety Information document that accompanied this device. |
The full-height carrier module is used to accommodate one or two half-height NLCs. To install a carrier into the Cisco 6400 chassis:
Step 2 Remove the filler panel, if one is present.
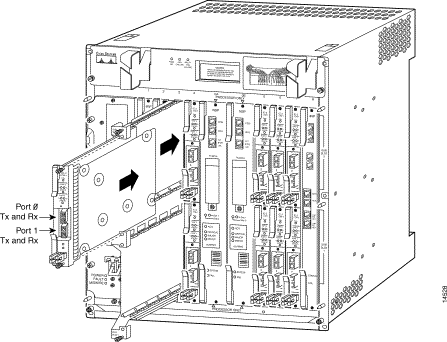
Step 3 While holding the carrier module vertically, align the upper and lower edges with the slot and gently slide the carrier module into the slot until it makes contact with the backplane (Figure 24).
Step 4 Tighten the upper and lower retaining screws to secure the carrier module.
To install a half-height NLC in the Cisco 6400 chassis:
Step 2 Hold the NLC vertically, with the module faceplate toward you and backplane connectors away from you. Ensure that the card is right side up by noting the lettering of the faceplate.
Step 3 Carefully align the upper and lower edges of the NLC with the upper and lower guides in the full-height carrier (Figure 25).
|
Caution To ensure that the card mates properly with all backplane connector pins, the card length and card slots have been designed with very close tolerances. To slide the card into the slot requires gentle pressure with each hand, at the top and bottom of the faceplate. |
Step 4 Gently slide the NLC into the carrier module until it makes contact with the backplane.
Step 5 Press the upper lever down and the lower lever up at the same time. (This action electrically connects the card to the backplane.)
Step 6 Secure the carrier module by tightening the upper and lower retaining screws.
Step 7 Install blank filler panels to cover any unused slots. Like cards, each filler panel is held in place by two retaining screws.
After you install the half-height NLC, you must connect the cables as described in this section.
Cable connections are the same for the OC-3/STM-1 SM NLC and OC-3/STM-1 MM NLC. However:
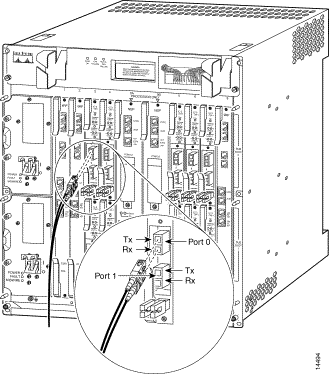
Each port provides an interface to the ATM switching fabric for transmitting and receiving data at rates up to 155 Mbps bidirectionally. Install the fiber-optic cables as shown in Figure 26.
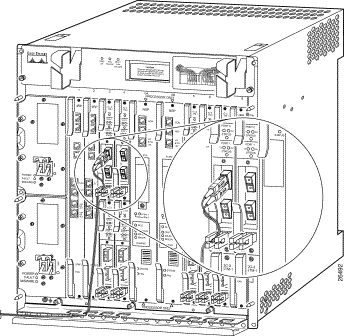
Figure 27 shows suggested cable management for the OC-3/STM-1 SM (single mode) and OC-3/STM-1 MM (multimode) fiber-optic cable.
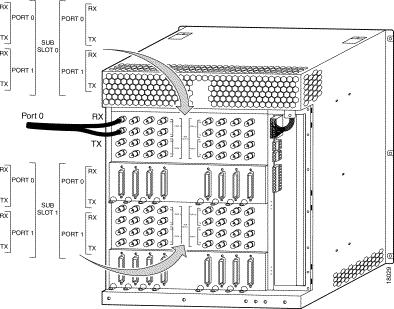
The cable connections for the DS3 NLC are different from those for the OC-3 NLCs. The DS3 NLC has two ports that connect to the ATM switching fabric using 75-ohm single or bundled coaxial cables with bayonet-style twist-lock (BNC) connectors attached to the back of the chassis for each DS3 port (Figure 28).
|
Warning The DS3 ports are not intended to be connected to cables that run outside the building where it is installed. For any connections outside the building, the DS3 ports must be connected to a network termination unit (NTU). NTU devices should comply with appropriate national safety standards such as UL 1950, CSA 950, EN 60950, IEC 950, and AS 3260. Translations of this warning can be found in the Regulatory Compliance and Safety Information document that accompanied this device. |
To remove a half-height NLC from the Cisco 6400 chassis:
Step 2 Remove any connections to the modules. Be sure to cover any fiber-optic connections to prevent contamination from moisture or dirt.
Step 3 Loosen the two (top and bottom) cross-slotted screws securing the NLC metal carrier to the full-height carrier.
Step 4 Grasp the two lever handles on the NLC, and gently pull the handles away from the carrier unit to loosen the unit.
Step 5 Carefully slide the NLC out of the full-height carrier. Avoid damaging the connectors on the rear of the plug-in unit.
Step 6 Place the NLC on an antistatic surface.
The Cisco 6400 supports one full-height NLC module: OC-12/STM-4 NLC (Figure 29). The full-height NLC is premounted on its carrier.
|
Warning Class 1 laser product. Translations of this warning can be found in the Regulatory Compliance and Safety Information document that accompanied this device. |
|
Warning Because invisible radiation may be emitted from the aperture of the port when no fiber cable is connected, avoid exposure to radiation and do not stare into open apertures. Translations of this warning can be found in the Regulatory Compliance and Safety Information document that accompanied this device. |
|
Warning Invisible laser radiation present. Translations of this warning can be found in the Regulatory Compliance and Safety Information document that accompanied this device.Class 1 laser product. Translations of this warning can be found in the Regulatory Compliance and Safety Information document that accompanied this device. |
|
Warning Because invisible radiation may be emitted from the aperture of the port when no fiber cable is connected, avoid exposure to radiation and do not stare into open apertures. Translations of this warning can be found in the Regulatory Compliance and Safety Information document that accompanied this device. |
|
Warning Invisible laser radiation present. Translations of this warning can be found in the Regulatory Compliance and Safety Information document that accompanied this device. |
To install a full-height NLC in the Cisco 6400 chassis:
Step 2 Hold the NLC module vertically, with the NLC faceplate toward you and the backplane connectors away from you. Ensure that the module is right side up by noting the lettering on the faceplate.
Step 3 Carefully align the upper and lower edges of the NLC carrier with the upper and lower guides in the chassis. Refer to Figure 30 for an example of inserting a module in the chassis.
|
Caution To ensure that the NLC module mates properly with all backplane connector pins, the module length and module slots have been designed with very close tolerances. To slide the module into the slot requires gentle pressure with each hand, at the top and bottom of the faceplate. |
Step 4 Gently slide the NLC module into the slot until it makes contact with the backplane.
Step 5 Press the upper lever down and the lower lever up at the same time.
Step 6 Secure the carrier by tightening the upper and lower retaining screws.
Step 7 Connect the cables.
Step 8 Install blank filler panels to cover any unused slots. Use two retaining screws to secure each filler panel.
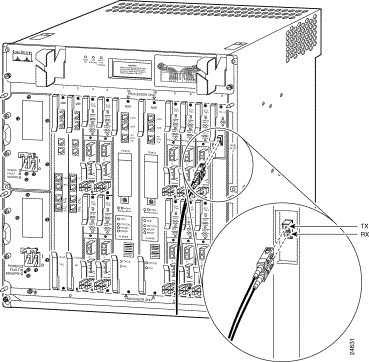
The OC-12/STM-4 NLC has one port for single-mode intermediate reach fiber connection on the front of each NLC. This port provides an interface to the ATM switching fabric for transmitting and receiving data at rates up to 622 Mbps bidirectionally. Install the fiber-optic cables (Figure 31).
Figure 32 shows suggested cable management for the OC-12/STM-4 fiber-optic cable.
To remove a full-height NLC from the Cisco 6400 chassis:
Step 2 Disconnect any cables connected to the NLC module that you are about to remove.
Step 3 Unfasten the upper and lower retaining screws.
Step 4 Grasp the upper and lower extraction levers. Pull up on the upper lever while pushing down on the lower lever. This action disengages the NLC carrier from the connectors on the backplane.
Step 5 Slide the module out of the slot.
Step 6 Place the NLC module on an antistatic surface. If the module will be out of the chassis for several minutes or longer, put it in a static-shielding bag or in a box lined with antistatic material.
Step 7 Insert another NLC module or a blank faceplate in the empty slot.
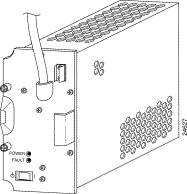
This section describes procedures for removing and installing a DC power entry module (PEM) plug-in unit in the Cisco 6400 chassis (Figure 33).
There are two PEM power bays in the system for redundancy. The PEM power bays are located at the front left side of the chassis:
The PEMs meet critical safety, isolation, and EMC requirements associated with the connection of the CO DC-input power distribution system.
|
Warning Before working on equipment that is connected to power lines, remove jewelry (including rings, necklaces, and watches). Metal objects will heat up when connected to power and ground and can cause serious burns or weld the metal object to the terminals. Translations of this warning can be found in the Regulatory Compliance and Safety Information document that accompanied this device. |
If you remove a redundant DC PEM, the chassis continues to operate normally. If you plan to remove the only operating PEM from a chassis, you must first power down the Cisco 6400 system. Refer to the procedure in the "Powering Down the System" section.
To remove a PEM from the Cisco 6400 chassis:
Step 2 Unscrew the retaining screws on the DC PEM faceplate.
Step 3 Grasp the DC PEM by the handle on the faceplate and pull it out of the chassis.
|
Caution Always install a filler panel over an empty PEM power bay to protect the connectors from contamination and ensure proper air flow. |
Figure 34 shows a DC PEM unit being installed in the Cisco 6400 chassis. You can insert a PEM unit into the Cisco 6400 without powering down the system.
To install a DC PEM in the Cisco 6400 chassis:
Step 2 Align the PEM and insert it into the power bay.
Step 3 Firmly push the PEM all the way into the power bay to ensure that the power connectors mate.
Step 4 Tighten the captive screws on the faceplate of the PEM to secure the PEM to the chassis.
Step 5 If the chassis is connected to power, turn the circuit breaker on the DC PEM to On. The green POWER LED on the faceplate turns on to indicate that the DC PEM is providing power to the chassis. The yellow FAULT LED goes out.
|
Note If the miswire LED is on, reverse the connections on the DC PEM. |
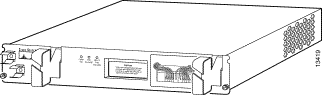
This section describes procedures for removing and installing an AC power entry module (PEM) plug-in unit in the Cisco 6400 chassis (Figure 35).
There are two PEM power bays in the system for redundancy. The PEM power bays are located at the front left side of the chassis:
|
Warning Before working on equipment that is connected to power lines, remove jewelry (including rings, necklaces, and watches). Metal objects will heat up when connected to power and ground and can cause serious burns or weld the metal object to the terminals.Translations of this warning can be found in the Regulatory Compliance and Safety Information document that accompanied this device. |
If you remove a redundant AC PEM, the chassis continues to operate normally. If you plan to remove the only operating PEM from a chassis, you must first power down the Cisco 6400 system. Refer to the procedure in the "Powering Down the System" section.
To remove a PEM from the Cisco 6400 chassis:
Step 2 Unplug the AC power cable.
Step 3 Unscrew the retaining screws on the AC PEM faceplate.
Step 4 Grasp the AC PEM by the handle on the faceplate and pull it out of the chassis.
|
Caution Always install a filler panel over an empty PEM power bay to protect the connectors from contamination and to ensure proper air flow. |
Figure 36 shows an AC PEM unit being installed in the Cisco 6400 chassis. You can insert a PEM unit into the Cisco 6400 without powering down the system.
To install an AC PEM in the Cisco 6400 chassis:
Step 2 Align the PEM and insert it into the power bay.
Step 3 Firmly push the PEM all the way into the power bay to ensure that the power connectors mate.
Step 4 Tighten the captive screws on the faceplate of the PEM to secure the PEM to the chassis.
Step 5 Plug in the AC power cable.
Step 6 Turn the power enable switch on the AC PEM to ON. The green POWER LED on the faceplate turns on to indicate that the AC PEM is providing power to the chassis. The yellow FAULT LED goes out.
Figure 37 shows suggested power cord connections for the AC PEM.
This section describes procedures for removing and installing the blower module in the Cisco 6400 chassis. The blower module is located in the top part of the chassis, above the plug-in modules and cards. Figure 38 shows the blower module.
To remove the blower module from the Cisco 6400 chassis:
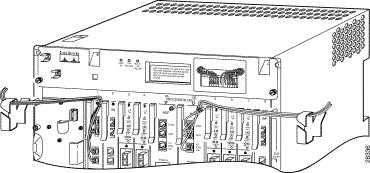
Step 2 Detach the cable management brackets (Figure 39).
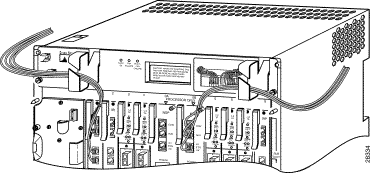
Step 3 Fold the loaded brackets to either side of the Cisco 6400 chassis, leaving the cables attached. The 20-inch service loop will allow you to pull the cables out of the way of the blower (Figure 40).
Step 4 Remove the two screws on the front of the blower module. (See Figure 41.)
Step 5 Carefully slide the blower out of the chassis.
Step 6 Place the blower module on a flat work surface.
|
Caution If the blower module is removed for longer than two minutes, the Cisco 6400 system automatically shuts down. |
Step 2 Tighten the screws that secure the blower module to the chassis.
Step 3 Reattach the loaded cable brackets, reestablishing the service loops (Figure 43).
Step 4 Check the front panel of the blower module to make sure the FANS OK LED is On and both FAN FAILURE LEDs are Off.
After you perform a replacement procedure, verify that any new plug-in module or component is installed correctly. To verify the installation, check the status of the interfaces:
The following sections explain how to obtain documentation from Cisco Systems.
You can access the most current Cisco documentation on the World Wide Web at the following URL:
Translated documentation is available at the following URL:
http://www.cisco.com/public/countries_languages.shtml
Cisco documentation and additional literature are available in a Cisco Documentation CD-ROM package, which is shipped with your product. The Documentation CD-ROM is updated monthly and may be more current than printed documentation. The CD-ROM package is available as a single unit or through an annual subscription.
Cisco documentation is available in the following ways:
http://www.cisco.com/cgi-bin/order/order_root.pl
http://www.cisco.com/go/subscription
If you are reading Cisco product documentation on Cisco.com, you can submit technical comments electronically. Click Feedback at the top of the Cisco Documentation home page. After you complete the form, print it out and fax it to Cisco at 408 527-0730.
You can e-mail your comments to bug-doc@cisco.com.
To submit your comments by mail, use the response card behind the front cover of your document, or write to the following address:
Cisco Systems
Attn: Document Resource Connection
170 West Tasman Drive
San Jose, CA 95134-9883
Cisco provides Cisco.com as a starting point for all technical assistance. Customers and partners can obtain documentation, troubleshooting tips, and sample configurations from online tools by using the Cisco Technical Assistance Center (TAC) Web Site. Cisco.com registered users have complete access to the technical support resources on the Cisco TAC Web Site.
Cisco.com is the foundation of a suite of interactive, networked services that provides immediate, open access to Cisco information, networking solutions, services, programs, and resources at any time, from anywhere in the world.
Cisco.com is a highly integrated Internet application and a powerful, easy-to-use tool that provides a broad range of features and services to help you to
You can self-register on Cisco.com to obtain customized information and service. To access Cisco.com, go to the following URL:
The Cisco TAC is available to all customers who need technical assistance with a Cisco product, technology, or solution. Two types of support are available through the Cisco TAC: the Cisco TAC Web Site and the Cisco TAC Escalation Center.
Inquiries to Cisco TAC are categorized according to the urgency of the issue:
Which Cisco TAC resource you choose is based on the priority of the problem and the conditions of service contracts, when applicable.
The Cisco TAC Web Site allows you to resolve P3 and P4 issues yourself, saving both cost and time. The site provides around-the-clock access to online tools, knowledge bases, and software. To access the Cisco TAC Web Site, go to the following URL:
All customers, partners, and resellers who have a valid Cisco services contract have complete access to the technical support resources on the Cisco TAC Web Site. The Cisco TAC Web Site requires a Cisco.com login ID and password. If you have a valid service contract but do not have a login ID or password, go to the following URL to register:
http://www.cisco.com/register/
If you cannot resolve your technical issues by using the Cisco TAC Web Site, and you are a Cisco.com registered user, you can open a case online by using the TAC Case Open tool at the following URL:
http://www.cisco.com/tac/caseopen
If you have Internet access, it is recommended that you open P3 and P4 cases through the Cisco TAC Web Site.
The Cisco TAC Escalation Center addresses issues that are classified as priority level 1 or priority level 2; these classifications are assigned when severe network degradation significantly impacts business operations. When you contact the TAC Escalation Center with a P1 or P2 problem, a Cisco TAC engineer will automatically open a case.
To obtain a directory of toll-free Cisco TAC telephone numbers for your country, go to the following URL:
http://www.cisco.com/warp/public/687/Directory/DirTAC.shtml
Before calling, please check with your network operations center to determine the level of Cisco support services to which your company is entitled; for example, SMARTnet, SMARTnet Onsite, or Network Supported Accounts (NSA). In addition, please have available your service agreement number and your product serial number.
![]()
![]()
![]()
![]()
![]()
![]()
![]()
![]()
Posted: Wed Aug 13 14:57:24 PDT 2003
All contents are Copyright © 1992--2003 Cisco Systems, Inc. All rights reserved.
Important Notices and Privacy Statement.