|
|

Product Numbers: APP-JX1, APP-LX2, APP-LX4, APP-LX6, APP-LX8, APP-IX1, APP-SX2, APP-SX4, APP-SX2E2, CAB-VTM, CAB-VTF, CAB-VCM, and CAB-VCF
The term applique is used for any hardware unit that provides the external interface connections from your router to the network. An applique includes connector mounting hardware, a connector port, and a printed circuit card that translates communications signals from and into the specified electrical attachment.
This document contains instructions for installing the high-density (HD) V.35 applique (see Figure 1). This applique is dual-mode and functions as either a data terminal equipment (DTE) interface or a data communications equipment (DCE) interface, depending on which of the HD V.35 cables you use for the network interface.
Four HD V.35 cables are available: DTE male to male (CAB-VTM), DTE male to female (CAB-VTF), DCE male to male (CAB-VCM), DCE male to female (CAB-VCF). You must use one of these cables with the HD V.35 applique.
The HD V.35 applique connects to the serial communications interface (SCI) card (providing up to four serial ports) or to a multiport communications interface (MCI) card (providing up to two serial ports).
The HD V.35 applique is mounted on a connector plate (see Figure 1) that attaches to the rear of the chassis. Three connector plate sizes are available: large (L), small (S), and individual (I). An example of the large and individual connector plates is shown in Figure 2. The small connector plate, used in the M chassis, is not shown. An internal ribbon cable connects the applique to the serial network interface card in the chassis card cage; one of these cables is used for every two appliques installed.
Figure 1 shows the HD V.35 applique.
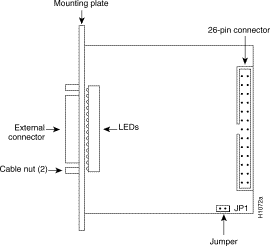
Figure 2 shows the small and large connector plates used with the HD V.35 applique.
The HD V.35 applique and external interface cable options are listed by product number in Table 1 and Table 2.
| Product Number | Mode | Plate Size | Chassis | Number of Interfaces |
|---|---|---|---|---|
| APP-IX11 | Dual | Individual | M, C | 1 HD V.35 |
| APP-JX1 | Dual | Individual | A+, A | 1 HD V.35 |
| APP-LX2 | Dual | Long | A+, A | 2 HD V.35 |
| APP-LX4 | Dual | Long | A+, A | 4 HD V.35 |
| APP-LX6 | Dual | Long | A+, A | 6 HD V.35 |
| APP-LX8 | Dual | Long | A+, A | 8 HD V.35 |
| APP-SX2 | Dual | Small | M, C | 2 HD V.35 |
| APP-SX4 | Dual | Small | M, C | 4 HD V.35 |
| APP-SX2E2 | Dual | Small | M, C | 2 HD V.35 and 2 Ethernet |
| Product Number | Mode1 | Cable Gender |
|---|---|---|
| CAB-VTM | DTE | Male-to-male |
| CAB-VTF | DTE | Male-to-female |
| CAB-VCM | DCE | Male-to-male |
| CAB-VCF | DCE | Male-to-female |
The HD V.35 applique carries the same signals as the old-style V.35 applique, but provides them on a smaller 26-pin D-type connector (the old-style applique used a 34-pin connector). The smaller 26-pin connector is male on all four versions of the HD V.35 cable and the larger connector on each cable carries the male or female configuration. The HD V.35 supports both DTE and DCE modes; the external V.35 cable attached to the applique determines this mode. You must use an HD V.35 cable to provide a standard V.35 network connection.
Table 3 provides pinouts for the HD V.35 applique (and cable) when used as a DTE or DCE interface.
| Applique | Cable | ||||
|---|---|---|---|---|---|
| DTE Pin | DCE Pin | Pin | Signal | Function | Direction |
| 17, 18 | 17, 18 | B | SGND | Signal Ground | - |
| 23 | 24 | C | RTS | Request to Send | To modem |
| 24 | 23 | D | CTS | Clear to Send | To chassis |
| 22 | 25 | E | DSR | Data Set Ready | To chassis |
| 20 | 19 | F | RLSD | Receive Line Signal
Detect (Carrier Detect) |
To chassis |
| 19 | 20 | H | DTR | Data Terminal Ready | To modem |
| 21 | 22 | K | LTST | Local Test (Loopback) | To modem |
| 2 | 4 | R | RxD+ | Receive Data+ | To chassis |
| 12 | 14 | T | RxD- | Receive Data- | To chassis |
| 6 | 5 | V | SCR+ | Serial Clock Receive+ | To chassis |
| 16 | 15 | X | SCR- | Serial Clock Receive- | To chassis |
| 4 | 2 | P | TxD+ | Send Data+ | To modem |
| 14 | 12 | S | TxD- | Send Data- | To modem |
| 5 | 6 | U | SCTE+ | Serial Clock Transmit External+ | To modem |
| 15 | 16 | W | SCTE- | Serial Clock Transmit External- | To modem |
| 1 | 3 | Y | SCT+ | Serial Clock Transmit+ | To chassis |
| 11 | 13 | a | SCT- | Serial Clock Transmit- | To chassis |
| - | 91 | - | DCE/DTE | Selects DCE mode | - |
| - | 18 | - | DCE/DTE | Selects DCE mode | - |
When operating at speeds above 300000 bps, the serial clock transmit external (SCTE) signal becomes especially important. The HD V.35 applique returns Transmit Clock on SCTE. This is designed to compensate for clock phase shift on long cables. The HD V.35 modem must be configured to accept SCTE.
With the HD V.35 applique in DCE mode, the applique can be configured to use either SCTE or serial clock transmit (SCT). The default is SCTE, which is selected when the JP1 jumper is in; SCT is selected when the JP1 jumper is out (see Figure 1).
Table 4 shows the 14 LEDs that indicate the status of the HD V.35 applique.
| LED Number | Color | Mnemonic DTE (DCE) | Function | Direction DCE DTE |
|---|---|---|---|---|
| 1 | Red | RxD (TxD) | Receive Data (Transmit Data) | --> (<--) |
| 2 | Red | SCR (SCTE) | Serial Clock Receive (Serial Clock Transmit External) | --> (<--) |
| 3 | Red | TxD (RxD) | - | <-- (-->) |
| 4 | Red | SCTE (SCR) | - | <-- (-->) |
| 5 | Red | DTR | Data Terminal Ready | --> |
| 6 | Red | RTS | Clear To Send | --> |
| 7 | Red | RTS | Request To Send | <-- |
| 8 | Red | DCD | Data Carrier Detect | <-- |
| 9 | Red | LT | Software Loopback | <-- |
| 10 | Green | +5V | +5V present | On if OK |
| 11 | Green | +12V | +12V present | On if OK |
| 12 | Green | -12V | -12V present | On if OK |
| 13 | Green | OK | Applique test OK | On if OK |
| 14 | Red | DCE | Mode selection | On for DCE |
Following are the procedures for configuring the serial interface.
On the MCI card, jumpers W51 and W41 control the serial ports 0 and 1 in data communications equipment (DCE) mode. On the SCI card, jumpers N22, N26, N12, and N16 control the serial ports 0 through 3 in DCE mode. In addition to changing these jumpers for DCE operation, you must configure the clock rate on each serial interface of the interface card using the clockrate speed interface subcommand (where speed is the bit rate of the interface in bits per second [bps]). The applique must be DCE (or configured as DCE) to generate the clock signals.
Following is sample output of the clockrate speed command:
Router# configure terminal
Enter configuration commands, one per line.
Edit with DELETE, CRTL/W, and CRTL/U;end with CTRL/Z
interface serial 0
clockrate 64000
^Z
Router# write memory
[ok]
Router#
The no clockrate command removes the clock rate if data terminal equipment (DTE) mode is desired. Refer to the appropriate configuration and reference publication for more information on these commands. Following are the acceptable clockrate speed settings, appearing as they are entered with the clockrate speed command:
1200, 2400, 4800, 9600, 19200, 38400, 56000, 6400, 7200, 12500, 148000, 500000, 800000, 1000000, 1300000, 2000000, and 4000000
The fastest clock rates might not work if your cable is too long.
Most DTE interfaces require a Normal External Transmit Clock signal. All DCE interfaces require an Internal Transmit Clock (noninverted) signal. The MCI card clocking options are controlled by jumper areas W40 through W53, and the SCI card clocking options are controlled by jumper areas N11 through N28.
Occasionally, delays occur between the SCTE clock and the transmitted data that may push the data transition out to the point where using an inverted clock is appropriate (jumpers W42 and W52 for the MCI and N13, N17, N23, and N27 for the SCI); however, an inverted clock is not recommended.
Typical delays indicate that the inverted clock may be appropriate above 1.3 megabits per
second (Mbps), depending on the DTE clock-to-data skews and setup required, and allowing some margin for temperature, cable, and other variables. Some DCE devices will not accept SCTE, so Serial Clock transmit (SCT) must be used. Inverting the clock may be the only way to compensate for the cable length and circuit delays in the DTE and DCE.
Table 5 and Table 6 show the jumper settings for the MCI and SCI clock options, respectively. The last two columns of these tables (DTE and DCE) indicate the setting that should be used with either a DTE or DCE applique. Unless specifically noted, all products are shipped with the factory default setting to work with the DTE applique, which requires external clocking; the channel service unit/digital service unit (CSU/DSU) provides the clocking for the circuit.
| Jumper Pair | Signal Description | Interface | DTE | DCE |
|---|---|---|---|---|
| W53 | Normal External Transmit Clock | Serial 0 | X1 | - |
| W52 | Inverted External Transmit Clock | Serial 0 | x | - |
| W51 | Normal Internal Transmit Clock | Serial 0 | - | X |
| W50 | Inverted Internal Transmit Clock | Serial 0 | - | x |
| W43 | Normal External Transmit Clock | Serial 1 | X1 | - |
| W42 | Inverted External Transmit Clock | Serial 1 | x | - |
| W41 | Normal Internal Transmit Clock | Serial 1 | - | X |
| W40 | Inverted Internal Transmit Clock | Serial 1 | - | x |
| Jumper Pair | Signal Description | Interface | DTE | DCE |
|---|---|---|---|---|
| N 24 | Normal External Transmit Clock | Serial 0 | X1 | - |
| N 23 | Inverted External Transmit Clock | Serial 0 | x | - |
| N 22 | Normal Internal Transmit Clock | Serial 0 | - | X |
| N 21 | Inverted Internal Transmit Clock | Serial 0 | - | x |
| N 28 | Normal External Transmit Clock | Serial 1 | X1 | - |
| N 27 | Inverted External Transmit Clock | Serial 1 | x | - |
| N 26 | Normal Internal Transmit Clock | Serial 1 | - | X |
| N 25 | Inverted Internal Transmit Clock | Serial 1 | - | x |
| N 14 | Normal External Transmit Clock | Serial 2 | X1 | - |
| N 13 | Inverted External Transmit Clock | Serial 2 | x | - |
| N 12 | Normal Internal Transmit Clock | Serial 2 | - | X |
| N 11 | Inverted Internal Transmit Clock | Serial 2 | - | x |
| N 18 | Normal External Transmit Clock | Serial 3 | X1 | - |
| N 17 | Inverted External Transmit Clock | Serial 3 | x | - |
| N 16 | Normal Internal Transmit Clock | Serial 3 | - | X |
| N 15 | Inverted Internal Transmit Clock | Serial 3 | - | x |
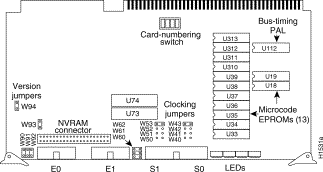
Jumper settings on the interface card (SCI or MCI) determine the mode (DTE or DCE) of the serial port connected to your applique. The cards are shipped with the jumpers in DTE mode as a default (see Figure 3). On the SCI card, assign a serial port as DCE by changing the jumper as described in Table 7.
| Move Jumper | For Serial Port |
|---|---|
| N24 to N22 | serial 0 as DCE |
| N28 to N26 | serial 1 as DCE |
| N14 to N12 | serial 2 as DCE |
| N18 to N16 | serial 3 as DCE |
Figure 3 shows the default jumper settings on the CSC-SCI card.
On the MCI card (see Figure 4), assign a serial port as DCE by changing a jumper as described in Table 8.
| Move Jumper | For Serial Port |
|---|---|
| W53 to W51 | serial 0 as DCE |
| W43 to W41 | serial 1 as DCE |
Figure 4 shows the default jumper settings on the CSC-MCI card.
Following are the procedures for installing the HD V.35 applique.
Before installing the applique, ensure that your system meets the following prerequisites.If your current configuration does not meet the above requirements, contact your service representative for information on hardware and software upgrades.
You must have an HD V.35 cable of the correct gender for the mode you are using (DTE or DCE)
Following are the parts required for these procedures. If any of these parts are missing or appear damaged, contact your service representative.
Following are the tools required for these procedures:
Electrostatic discharge damage (ESD) occurs when electronic printed circuit cards are improperly handled and can result in complete or intermittent failures. ESD can impair electronic circuitry and equipment. Follow ESD prevention procedures when removing and replacing cards.
Following are steps for handling printed circuit cards:
Step 1 Slip on an ESD wrist strap, ensuring that it makes good skin contact.
Step 2 Connect the strap to an unpainted chassis frame surface or another proper grounding point or surface to safely channel unwanted ESD voltages to ground.
Step 3 Use the ejectors to remove the card. Handle the card by its sides. Place the card on an antistatic surface or in a static shielding bag. To prevent further damage to the card by ESD voltages, defective cards must remain in the static shielding bag when returned for repair or replacement.
Step 4 Handling the new card by its edges only, insert it into the chassis. Avoid contact between the card and clothing. The wrist strap only protects the card from ESD voltages on the body; ESD voltages on clothing can still damage the card.
For safety, use an ohmmeter to check the ESD wrist strap to ensure that the resistor is providing proper ESD protection. The measurement should be between 1 and 10 mega ohms.
 | Warning Before accessing the chassis interior and removing any cards, turn off power to the chassis and unplug the power cord. Use extreme caution around the chassis since potentially harmful voltages are present. |
Following are the procedures for accessing the chassis interior and the connector plates in each of the three types of chassis: A-type, M, and C. Refer to the section that applies to your chassis type.
The A-type chassis has four large mounting plates and one large individual connection area with space for six individual mounting plates. The console port connector uses one of the individual mounting plate spaces leaving five plates available for other applique attachments. The large mounting plates are used for multiple or large applique attachments. When ordering replacements from the factory, specify the mode of the appliques and the mounting plate size that you require (see Table 1).
Following is the procedure for accessing the A-type chassis interior:
Step 1 On the front access panel, loosen (but do not attempt to remove) the two thumb fasteners and pull the panel off the chassis (see Figure 5).

Step 2 Locate and remove the seven screws securing the top panel to the chassis; three are located on each of the two sides of the cover, and one at the back.
Step 3 Lift the top cover up and away from the chassis.
Proceed to "Installing the HD V.35 Applique."
The M chassis has two small mounting plates and one individual connection area with space for four appliques. The console port connector uses one of the individual mounting plates leaving three plates available for other applique attachments. The small mounting plates are used for multiple or large applique attachments. When ordering replacements from the factory, specify the mode of the appliques and the mounting plate size that you require (see Table 1).
Following is the procedure for accessing the M chassis interior:
Step 1 Remove the card cage access panel on the side of the chassis. First loosen the three Phillips screws at the bottom of the panel, then turn the top flat-blade screws three quarters of a turn counterclockwise (see Figure 6).
Step 2 Locate and remove the 14 No. 1 Phillips screws that secure the top panel to the chassis.
Step 3 Lift the cover up and away from the chassis.
Proceed to "Installing the HD V.35 Applique."
The C chassis has one small plate and one individual connection area with space for four appliques. The console port connector uses one of the individual plates, which leaves three plates available for HD V.35 appliques. When ordering replacements from the factory, specify the mode of the applique and mounting plate size that you require (see Table 1).
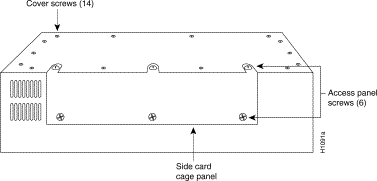
You must remove the cover to gain access to the system card cage. The top cover on a C chassis envelopes the chassis and is secured by ten No. 2 Phillips screws: six on the bottom and two on each side.
Following is the procedure for accessing the C chassis interior:
Step 1 Disconnect all power and interface cables from the rear of the chassis.
Step 2 Remove the two screws on each of the two sides of the cover (see Figure 7 ).

Step 3 Turn the system upside down and remove the six screws along each bottom edge.
Step 4 Turn the chassis over so the bottom is again facing down.
Step 5 Use a flat-blade screwdriver to gently lift the back end of the chassis away from the cover.
Step 6 To remove the cover, pull it from the front of the chassis. The cover fits the chassis quite tightly so some resistance may be met.
Proceed to "Installing the HD V.35 Applique."
Following is the procedure for installing the HD V.35 applique and cable:
Step 1 Turn OFF power to the chassis, but to channel ESD voltages to ground, do not unplug the power cord.
Step 2 Attach an ESD-preventive wrist strap.
Step 3 On the rear of the chassis, remove the appropriate blank plate. Set the screws aside (see Figure 8).
Step 4 Place the new mounting plate (with the attached HD V.35 applique) on the inside of the chassis against the opening.
Step 5 Position the applique with the LEDs facing out and below the connector.
Step 6 Secure the new applique with the screws you removed from the blank plate.
Step 7 Connect an internal ribbon cable between the 26-pin connector on the applique and the appropriate serial connector on the SCI or MCI card in the chassis card cage. Route the cable under the system card cage and up to the card in the front of the chassis. The connector is keyed to prevent improper insertion at the interface card. Do not stress the cable at the applique or serial connector.
 | Caution If installing more than one applique, use the 26-pin ribbon cable connector with the color coded edge as serial 0 (N) and the second connector as serial 1 (N+1). |
Step 8 Attach the smaller HD end of the HD V.35 cable to the HD V.35 connector on the applique and the larger end (standard V.35 male or female) to your network segment.
Following is the procedure for testing the HD V.35 applique installation:
| Caution To prevent the chassis overheating during the following steps, apply power only long enough to check for proper operation. |
Step 1 Connect the power cable and turn on the power to the chassis.
Step 2 For DCE only--Set the clockrate (after system boot) for the new interface using the configure terminal command and set the desired clockrate using the clockrate command. (See the section "CSC-MCI and CSC-SCI Mode and Clocking Options" on page 5)
Step 3 After the system boots up, verify the correct mode of the newly installed interface by using the show controller mci and show interface serial number commands (where number refers to the interface number of the newly installed serial port and applique).
Following is sample output of these commands (serial 0 and DTE mode are used in the examples):
Router# show controller mci
MCI 0, controller type 1.1, microcode version 1.11
  128 Kbytes of main memory, 4 Kbytes cache memory
22 system TX buffers, largest buffer size 1520
  Restarts: 0 line down, 0 hung output, 0 controller error
  Interface 0 is Serial0, electrical interface is V.35 DTE
In this example, the important information is contained in the last line, which indicates the type and mode of serial interface attached.
Router# show interface serial 0
Serial 0 is up, line protocol is up
  Hardware is MCI Serial
In this example, the important information is in the first line, which indicates the state of the newly installed serial interface; the interface should be up if everything is connected and configured correctly.
Following are examples of possible error conditions and symptoms:
Step 1 When the installation check is successful, all LEDs on the applique should be on except the loopback LED (unless loopback has been selected through software) and the DCE LED if DTE mode is selected.
Step 2 Turn OFF the power and unplug the chassis.
Step 3 Replace and secure the chassis cover.
Step 4 Affix the new serial interface labels (Serial 0 and so forth) below the appropriate connector on the rear of the chassis and to the internal interface ribbon cables.
The system is ready to be installed in the network.
Cisco Systems' Customer Information Online (CIO) system provides online information and electronic services to Cisco direct customers and business partners. Basic CIO services include general Cisco information, product announcements, descriptions of service offerings, and download access to public and authorized files, including release notes, and software. Maintenance customers receive a much broader offering, including technical notes, the bug database, and electronic mail access to the TAC. (Maintenance customers must have authorization from their Cisco contract administrators to receive these privileges.)
For dialup or Internet users, CIO supports Zmodem, Kermit, Xmodem, FTP PUT, Internet e-mail, Telnet, rlogin, and fax download options. Internet users also can retrieve files from CIO using FTP.
Registration for CIO is handled on line. To reach CIO via the Internet, use Telnet or FTP to cio.cisco.com (131.108.89.33). To reach CIO by dialup, use 415 903-8070 (Mountain View, California) or 33 1 6446 4082 (Paris, France). 
|
|
