|
|

Product Number: PWR-7513-AC-UPG=
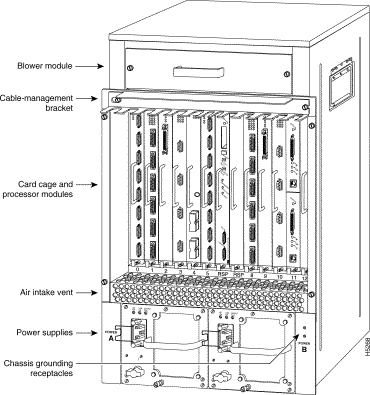
This document contains instructions for upgrading your existing Cisco 7513, 1200-watt (W), alternating current (AC)-input power supplies, with new AC-input power supplies. (See Figure 3.) A single power supply is standard equipment for the Cisco 7513. A second, identical power supply, when installed, provides redundant power. In systems with redundant power, the power supplies are load-sharing and fully hot-swappable; you can remove and replace one supply, while the remaining supply immediately ramps up to full power to maintain uninterrupted system operation.
 | Caution The new and older power supplies must not be used simultaneously in the Cisco 7513. The redundant power, load-sharing feature of the Cisco 7513 requires identical power supplies in each of the two power supply bays. While no physical damage will occur if two different supplies are installed into a Cisco 7513, there is the possibility of erratic system behavior and error messages. |
The sections in this document include the following:
The Cisco 7513, AC-input power supplies carry one of the following part numbers:
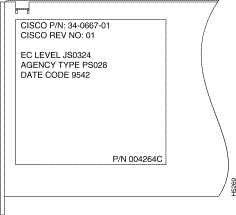
Figure 1 shows the label attached to the right side of the new AC-input power supplies.
If you are unable to determine if your AC-input power supplies need to be upgraded, based on the cosmetic differences shown in Figure 2 and Figure 3, use this label to verify whether or not the AC-input power supply in your chassis needs to be upgraded.
If the part number on your AC-input power supplies is anything other than 34-0667-01, or later, upgrade to the new AC-input power supplies.
The AC-input power supply is optional equipment in the Cisco 7513. Power supplies reside in power supply bays in the rear of the router chassis. Figure 2 shows the Cisco 7513 with the older power supplies installed (Part Number 34-0049-01 or later).
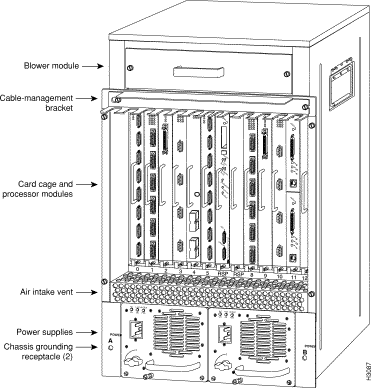
Figure 3 shows the Cisco 7513 with the new power supplies installed (Part Number 34-0667-01 or later).
 | Caution To prevent problems with the Cisco 7513, do not mix DC-input and AC-input power supplies in the same chassis. Your Cisco 7513 must have either DC-input or AC-input power supplies. Do not mix new and older AC-input power supplies in the same chassis. |
The power A bay contains the first (or standard) power supply, and the power B bay contains the second (optional) supply, in systems with redundant power.
Table 1 lists the AC-input power supply specifications.
| Specification | Rating |
|---|---|
AC-input voltage | 100 to 240 VAC1, 20 amps maximum |
50 to 60 Hz | |
Internal DC voltages supplied and steady-state maximum current ratings | +5.2 VAC @ 200A |
Input power requirement | 1600W |
Power output | 1200W with a maximum configuration and one or two AC-input power supplies |
Heat dissipation | 5465 Btu/hr |
Weight | 25 pounds (11.34 kilograms) |
Cable supplied | 12 American Wire Gauge (AWG), 20-amp2 |
| 1VAC = volts direct current. 2The Cisco 7513 requires a minimum of 20-amp service, with a 20-amp receptacle at the power source. The power cable supplied with the Cisco 7513 uses a 20-amp male plug. |
Dual power supplies are automatically load-sharing and redundant, which means that you can install or replace a second power supply on line. During normal operation, dual supplies provide system power simultaneously (load share). When you remove one supply, the remaining supply immediately ramps up to provide full power and maintain uninterrupted power to the system. Whenever possible, connect each power supply to a separate AC source.
 | Caution The new and older power supplies must not be used simultaneously in the Cisco 7513. The redundant power, load-sharing feature of the Cisco 7513 requires identical power supplies in each of the two power supply bays. While no physical damage will occur if the two different supplies are installed into a Cisco 7513, there is the possibility of erratic system behavior and error messages. |
The AC-input power supply uses a power factor corrector (PFC) that automatically adjusts for the input voltage being supplied. The AC-input voltage range is 100 to 240 VAC. The power supplies are self-monitoring. Each supply monitors its own temperature and internal voltages. An internal fan in each power supply draws cooling air from the rear of the chassis, through the power supply, and out the front of the chassis. The power supply airflow is separate from that of the rest of the chassis.
The Cisco 7513 requires a minimum of 20-amp service, with a 20-amp receptacle at the power source. The power cable supplied with the Cisco 7513 uses a 20-amp male plug. Figure 4 shows the cable connector plug and the 20-amp receptacle required to connect the 20-amp cable to your AC source.

On the Cisco 7513 chassis front panel, the power A and power B LEDs go on when the power supply in the corresponding bay is installed and supplying power to the system. Both the power LEDs should be on in systems with redundant power.
The power supply LEDs include the AC OK LED, the fan OK LED, and the output fail LED. (See Figure 5 for an illustration of the new AC-input power supply's LEDs.)
The AC OK LED is on when the input power is applied. The fan OK LED is normally on; however, it is off if the power supply fan fails. The output fail LED is normally off, but flashes at power on for a lamp test.
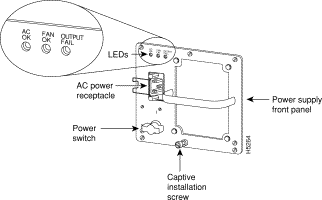
The output fail LED lights for either of the following reasons:
In systems with a single power supply, and in systems with redundant power when both power supplies are shutting down, the output fail LED lights momentarily as the system ramps down, but goes out when the power supply has completely shut down.
The power supplies feature the following three safety interlock features:
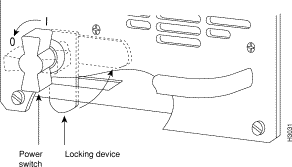
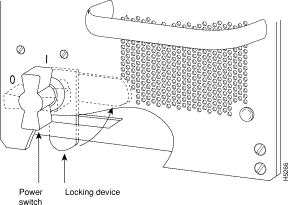
The environmental monitoring and reporting functions, controlled by the chassis interface board, enable you to maintain normal system operation by identifying and resolving adverse conditions prior to loss of operation. The environmental monitoring functions constantly monitor the internal chassis air temperature and DC supply voltages and currents. Each power supply monitors its own voltage and temperature and shuts itself down if it detects a critical condition within the power supply. If conditions reach shutdown thresholds, the system shuts down to avoid equipment damage from excessive heat. The reporting functions periodically log the values of measured parameters so that you can retrieve them for analysis later, and the reporting functions display warnings on the console if any of the monitored parameters exceed defined thresholds.
In addition to monitoring internal temperature and voltage levels, the system also monitors the blower. If the blower fails, the system displays a warning message on the console. If the blower is still not operating properly after two minutes, the system shuts down to protect the internal components against damage from excessive heat.
Three sensors on the Route Switch Processor (RSP2) monitor the temperature of the cooling air that flows through the processor slots: inlet, hotpoint, and exhaust. The sensors are located at the bottom, center, and top of the RSP2, when facing the interface processor end of the chassis and viewing the RSP2 as it is installed.
The power supply uses the Normal, Critical, and Warning levels to monitor DC voltages. Table 2 lists temperature thresholds for the three processor-monitored levels. Table 3 lists the DC power thresholds for the Normal and Critical (power-supply-monitored) levels.
| Parameter | Normal | High Warning | High Critical | Shutdown |
|---|---|---|---|---|
Inlet | 10-40° C | 44° C | 50° C | - |
Hotpoint | 10-40° C | 54° C | 60° C | - |
Exhaust | 10-40° C | - | - | - |
Processors | - | - | - | 70° C |
Power supply | - | - | - | 75° C |
Restart | 40° C | - | - | - |
| Parameter | Normal | Low Critical | Low Warning | High Warning | High Critical |
|---|---|---|---|---|---|
+5V | 4.74 to 5.26 | 4.49 | 4.74 | 5.25 | 5.52 |
+12V | 10.20 to 13.8 | 10.76 | 11.37 | 12.64 | 13.24 |
-12V | -10.20 to -13.80 | -10.15 | -10.76 | -13.25 | -13.86 |
+24V | 20.00 to 28.00 | 19.06 | 21.51 | 28.87 | 26.51 |
If the air temperature exceeds a defined threshold, the system processor displays warning messages on the console terminal and, if the temperature exceeds the shutdown threshold, it shuts down the system. The system stores the present parameter measurements for both temperature and DC voltage in NVRAM, so that you can retrieve it later as a report of the last shutdown parameters.
The power supplies monitor internal power supply temperature and voltages. A power supply is either within tolerance (Normal) or out of tolerance (Critical or Warning levels), as shown in Table 3. If an internal power supply temperature or voltage reaches a critical level, the power supply shuts down without any interaction with the system processor.
If the system detects that AC or DC input power is dropping, but it is able to recover before the power supply shuts down, it logs the event as an intermittent power failure. The reporting functions display the cumulative number of intermittent power failures logged since the last power up.
The system displays warning messages on the console if chassis interface-monitored parameters exceed a desired threshold or if a blower failure occurs. You can also retrieve and display environmental status reports with the show environment, show environment all, show environment last and show environment table commands. Parameters are measured and reporting functions are updated every 60 seconds. A brief description of each of these commands follows.
 | Caution To prevent overheating the chassis, ensure that your system is drawing cool inlet air. Overtemperature conditions can occur if the system is drawing in the exhaust air of other equipment. When viewing the chassis from the interface processor end, the airflow intake vent is on the front of the chassis (below the card cage), and the exhaust vent in on the front of the chassis (behind the lower front panel). Ensure adequate clearance around the sides of the chassis so that cooling air can flow through the chassis interior unimpeded. Obstructing or blocking the chassis sides will restrict the airflow and can cause the internal chassis temperature to exceed acceptable limits. |
The show environment command display reports the current environmental status of the system. The report displays parameters that are out of the normal values. No parameters are displayed if the system status is normal. The example that follows shows the display for a system in which all monitored parameters are within Normal range. Following is sample output of the show env command:
Router# show env


All measured values are normal
If the environmental status is not normal, the system reports the worst-case status level in the last line of the display.
Router# show env last


  RSP(6) Inlet       previously measured at 27C/80F
  RSP(6) Hotpoint    previously measured at 38C/100F
  RSP(6) Exhaust     previously measured at 31C/87F
  +12 Voltage        previously measured at 12.17
  +5 Voltage         previously measured at 5.19
  -12 Voltage        previously measured at -12.17
  +24 Voltage        previously measured at 23.40
The show environment table command displays the temperature and voltage thresholds for each of the three RSP2 temperature sensors, for each monitored status level: low critical, low warning, high warning, and high critical, which are the same as those listed in Tables 2 and 3. The slots in which the RSP2 can be installed are indicated in parentheses (6 and 7). Also listed are the shutdown thresholds for the processor boards and power supplies. Following is sample output of the show env table command:
Router# show env table


Sample Point    LowCritical    LowWarning     HighWarning    HighCritical

RSP(6) Inlet                                    44C/111F       50C/122F
RSP(6) Hotpoint                                 54C/129F       60C/140F
RSP(6) Exhaust
RSP(7) Inlet                                    44C/111F       50C/122F
RSP(7) Hotpoint                                 54C/129F       60C/140F
RSP(7) Exhaust
+12 Voltage     10.76          11.37          12.64          13.24
+5 Voltage      4.49           4.74           5.25           5.52
-12 Voltage     -10.15         -10.76         -13.25         -13.86
+24 Voltage     19.06          21.51          26.51          28.87
Shutdown boards at           101C/213F
Shutdown power supplies at   101C/213F
The show environment all command displays an extended report that includes the arbiter type, backplane type, power supply type (AC or DC), wattage and status, the number and type of intermittent power failures (if any) since the system was last powered on, and the currently measured values at the RSP2 temperature sensors and the DC-input lines. The show environment all command also displays a report showing which slots in the Cisco 7513 are occupied (indicated by an X) and which are empty.
Active fault conditions are indicated when the blower or power supply has failed or is not present (as "Blower #3" indicates in the following example). The system expects to see three blowers or fans in the Cisco 7513: the main system blower, and one fan in each power supply. The system blower is designated #1, the power supply fan in power bay A is #2, and the power supply fan in power bay B is #3. The active fault condition in the following example shows that there is no power supply installed in power bay B because the display indicates that power supply #2 (in power bay B) is removed. System blower speed is displayed as a percentage of maximum.
There are four active trip points: restart OK, temperature warning, board shutdown, and power supply shutdown. (There are no active trip points shown in the following example.) The soft shutdowns refer to the number of times the system will reset itself before it executes a complete chassis (or hard) shutdown.
The current temperature measurements at the three RSP2 sensors are displayed as inlet, hotpoint, and exhaust. The shutdown temperature source is the hotpoint sensor, which is located toward the center of the RSP2. System voltage measurements are also displayed, followed by the system current measurements and power supply wattage calculation. Following is sample output of the show env all command:
Router# show env all


Arbiter type 1, backplane type 7513 (id 2)
Power supply #1 is 1200W AC (id 1), power supply #2 is removed (id 7)
Active fault conditions: Blower #3
Fan speed is 50%
Active trip points: none
15 of 15 soft shutdowns remaining before hard shutdown

                      1
            0123456789012
Dbus slots: XX XXXX XXXX

         inlet        hotpoint     exhaust
RSP(6)   24C/75F      35C/95F      29C/84F

Shutdown temperature source is 'hotpoint' slot6 (requested slot6)

+12V measured at 12.17
 +5V measured at 5.19
-12V measured at -12.26
+24V measured at 24.44
+2.5 reference is 2.49

PS1 +5V Current    measured at 42.35 A (capacity 200 A)
PS1 +12V Current   measured at 6.86 A (capacity 35 A)
PS1 -12V Current   measured at 0.55 A (capacity 3 A)
PS1 output is 296 W
Before you begin this installation, review the safety guidelines in this section to avoid injuring yourself or damaging the equipment. This section also provides power requirements to consider if you are adding a second power supply to your system for redundant power, and lists of the tools and parts you need to perform this installation.
The following guidelines will help to ensure your safety and protect the equipment. This list is not inclusive of all potentially hazardous situations, so be alert.
You can remove or install a redundant (second) power supply without turning off the other supply. Before removing a redundant power supply, ensure that the first supply is powered on to ensure uninterrupted operation.
Follow these basic guidelines when working with any electrical equipment:
In addition, use the guidelines that follow when working with any equipment that is connected to telephone wiring or other network cabling.
Electrostatic discharge (ESD) damage, which can occur when electronic boards or components are handled improperly, can result in complete or intermittent failures.
Following are guidelines for preventing ESD damage:
 | Warning For safety, periodically check the resistance value of the antistatic strap. The measurement should be between 1 and 10 megohms. |
You need the following tools to install or replace a power supply:
Before beginning the power supply installation, check the installation screws on all power supplies and check the area around the power supply bays to determine which tools you will need. The new power supply and the power cable, that you supply, are the only parts you need to complete this installation.
If you remove a power supply and leave the bay empty, install a power supply blank in the empty power supply bay. (See Figure 10.) Chassis shipped with a single power supply include a power supply blank installed in the empty power supply bay.
Based on the NFPA 70 National Electrical Code, you should use a 35A overcurrent protector to meet the requirement for the overcurrent protector size of 125 percent of the load current, which is approximately 27A. An overcurrent protector rated for 30A can be used only if it has been listed by the safety agency for operation at 100 percent of its rating.
The following procedures describe removing the older power supplies from your Cisco 7513 (Part Number 34-0049-01 or later), and installing new power supplies (Part Number 34-0667-01 or later).
All power supplies rest on the floor of the chassis under the card cage.
 | Warning Although it is not necessary to turn OFF both power supplies to remove one of two power supplies, you must turn OFF the power to the power supply you plan to remove. When the power is on with one of two power supplies removed, high current is exposed on the power connector inside the chassis. If you have only one power supply, you must turn OFF the power to this power supply. |
Follow these steps to remove an older power supply (Part Number 34-0049-01 or later):
Step 2 If possible, turn OFF the circuit breaker to which the system is connected and tape the breaker switch in the OFF position.
 | Warning This unit might have more than one power cord. To reduce the risk of electric shock, disconnect the two power supply cords before servicing the unit. (To see translated versions of this warning, refer to page 21.) |
Step 3 Disconnect the power cable from the power receptacle of the power supply to be replaced.
Step 4 Use the large slotted screwdriver to loosen the captive screw that secures the power supply to the chassis frame. (See Figure 8.) Only loosen the captive screw of the power supply you are removing.
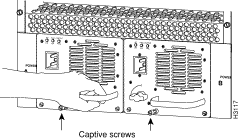
Step 5 Grasp the power supply handle and pull the power supply about halfway out of the bay. Then with your other hand under the power supply, pull it completely out of the bay. (See Figure 9.)
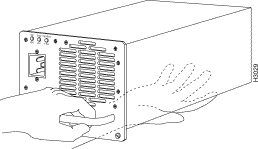
Step 6 If you have a second power supply, repeat steps 1 through 5 to remove it.
 | Caution To maintain agency compliance requirements and meet EMI emissions standards in a Cisco 7513 chassis with a single power supply, the power supply blank must remain in the power supply bay adjacent to the power supply. (See Figure 10.) Do not remove this blank from the chassis unless you do so to install a redundant power supply. To prevent system problems, do not mix AC-input and DC-input power supplies in the same chassis. |
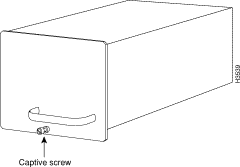
This completes the removal procedure for the older power supplies.
Follow these steps to install a new power supply (Part Number 34-0667-01 or later):

Step 2 Use the large slotted screwdriver to tighten the captive screw that secures the power supply to the chassis frame. (See Figure 8.)
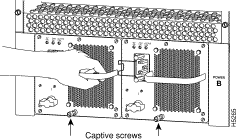
Step 3 Reconnect the power cable to the power receptacle on the power supply.
 | Warning This unit might have more than one power cord. To reduce the risk of electric shock, disconnect the two power supply cords before servicing the unit. (To see translated versions of this warning, refer to page 21.) |
Step 4 After the AC power cable is reconnected, reconnect the power cable at the power source but do not turn ON power to the new power supply.
Step 5 If you are replacing both power supplies, repeat Steps 1 through 3 for the second power supply.
This completes the installation procedure for the new power supplies.
Proceed to the following section "Checking the New Power Supply Installation" to apply power and check the installation.
To complete the installation, turn each power supply on and observe its LEDs to verify that it is operating properly.
Step 2 Check the following components to make sure they are secure:
Step 3 Remove the tape (that you applied earlier) from the circuit breaker switch handle and restore power by moving the circuit breaker handle to the ON position.
Step 4 Turn the power supply ON (|) by turning the switch clockwise one-quarter turn. The AC OK LED and the fan OK LED will go on and stay on. No other LEDs should go on.
If the power supply switch resists, it is probably not fully inserted into the bay. Turn the power switch fully counterclockwise to OFF (O), pull the power supply out of the bay about two inches, then push the power supply firmly back into the slot. Do not slam the supply into the slot—doing so can damage the connectors on the supply and the backplane. Tighten the captive installation screw before proceeding.
Step 5 Verify that the output fail LED stays off.
If the power supply fails to operate properly after several attempts to initialize it, contact a service representative for assistance. If the power supply fails (and you need to order a replacement) and you did not record the type of power supply in your chassis, you will have to check the chassis in order to make this determination.
 | TimeSaver The system can identify which type of power supplies are in your chassis: DC-input or AC-input. As a general precaution, use the show environment all command and note the type of power supply indicated in each of your chassis (indicated as "1200W AC"). Record and save this information in a secure place. |
This completes the power supply upgrade.
Refer to the Cisco 7513 Hardware Installation and Maintenance publication for installation troubleshooting procedures, and to the appropriate software configuration publication for descriptions and examples of software configuration features and commands.
 | Warning This unit might have more than one power cord. To reduce the risk of electric shock, disconnect the two power supply cords before servicing the unit. |
Waarschuwing Dit toestel kan meer dan één netsnoer hebben. Om het risico van een elektrische schok te verminderen, dient u de stekkers van de twee netsnoeren uit het stopcontact te halen voordat u het toestel een servicebeurt geeft.
Varoitus Tässä laitteessa saattaa olla useampi kuin yksi virtajohto. Irrota molemmat virtalähteestä tulevat johtimet ennen laitteen huoltamista, jotta vältät sähköiskun vaaran.
Attention Il est possible que cette unité soit munie de plusieurs cordons d'alimentation. Pour éviter les risques d'électrocution, débrancher les deux cordons d'alimentation avant de réparer l'unité.
Warnung Diese Einheit hat möglicherweise mehr als ein Netzkabel. Zur Verringerung der Stromschlaggefahr trennen Sie beide Netzgerätekabel ab, bevor Sie die Einheit warten.
Avvertenza Questa unità potrebbe essere dotata di più di un cavo di alimentazione. Per ridurre il rischio di scossa elettrica, scollegare i due cavi di alimentazione prima di procedere alla manutenzione dell'unità.
Advarsel Denne enheten kan være utstyrt med mer enn én strømledning. Koble fra de to strømledningene før det utføres reparasjonsarbeid på enheten for å redusere faren for elektriske støt.
Aviso Esta unidade poderá ter mais do que um cabo de alimentação. Para reduzir o risco de choque eléctrico, desligue os dois cabos de alimentação antes de efectuar reparações na unidade.
¡Atención! Puede ser que este equipo posea más de un cable de alimentación. Para reducir el riesgo de descarga eléctrica, desenchufar los dos cables antes de proceder al mantenimiento de la unidad.
Varning! Denna enhet kan vara försedd med mer än en nätsladd. För att minska risken för elektriska stötar skall båda nätsladdarna dras ur innan du utför underhållsarbete på enheten.
Cisco Information Online (CIO) is Cisco Systems' primary, real-time support channel. Maintenance customers and partners can self-register on CIO to obtain additional content and services.
Available 24 hours a day, 7 days a week, CIO provides a wealth of standard and value-added services to Cisco's customers and business partners. CIO services include product information, software updates, release notes, technical tips, the Bug Navigator, configuration notes, brochures, descriptions of service offerings, and download access to public and authorized files.
CIO serves a wide variety of users through two interfaces that are updated and enhanced simultaneously—a character-based version and a multimedia version that resides on the World Wide Web (WWW). The character-based CIO (called "CIO Classic") supports Zmodem, Kermit, Xmodem, FTP, Internet e-mail, and fax download options, and is excellent for quick access to information over lower bandwidths. The WWW version of CIO provides richly formatted documents with photographs, figures, graphics, and video, as well as hyperlinks to related information.
You can access CIO in the following ways:
http://www.cisco.com
cio.cisco.com
For a copy of CIO's Frequently Asked Questions (FAQ), contact cio-help@cisco.com. For additional information, contact cio-team@cisco.com.
tac@cisco.com. To obtain general information about Cisco Systems, Cisco products, or upgrades, contact 800 553-6387, 408 526-7208, or cs-rep@cisco.com.
![]()
![]()
![]()
![]()
![]()
![]()
![]()
![]()
Posted: Fri Apr 27 10:08:11 PDT 2001
All contents are Copyright © 1992--2001 Cisco Systems, Inc. All rights reserved.
Important Notices and Privacy Statement.