|
|

Table Of Contents
MultiChannel Interface Processor (MIP) Installation and Configuration
What is the Cisco 7000 Series?
MIP Electrical Interface Specifications
Preventing Electrostatic Discharge Damage
Overview of Online Insertion and Removal
Configuring Jumper J6 on the E1 Port Adapter
Using the EXEC Command Interpreter
Removing and Replacing Port Adapters
MultiChannel Interface Processor (MIP) Installation and Configuration
Product Numbers: CX-MIP-1CT1=, CX-MIP-2CT1=, CX-MIP-1CE1/120=, CX-MIP-2CE1/120=, CX-MIP-1CE1/75=, and CX-MIP-2CE1/75=
This document contains instructions for installing the MultiChannel Interface Processor (MIP). This document also contains basic configuration steps and examples. For complete descriptions of interface subcommands and the configuration options available for MIP interfaces, refer to the appropriate Cisco software documentation.
For a complete description of software commands, refer to the Router Products Configuration Guide and Router Products Command Reference publications on UniverCD or printed copies.
Sections in this document include the following:
•
What is the Cisco 7000 Series?, page 2
•
•
•
•
•
CautionThe MIP supports online insertion and removal (OIR), which allows you to remove and replace interface processors without first shutting down the system. However, the system can indicate a hardware failure if you do not follow proper procedures. To help avoid problems with the installation, review the section Overview of Online Insertion and Removal, and follow MIP installation steps carefully.
What is the Cisco 7000 Series?
Figure 1 shows the interface processor end of the Cisco 7000 model, which provides access to the seven processor slots and the removable power supplies. When facing the interface processor end of the chassis, the RP and SP (or SSP) slot are on the far right. The five interface processor slots are numbered 0 to 4 from left to right and support any combination of network interface processors.
Figure 1 Cisco 7000 Chassis Rear View
shows the interface processor end of the Cisco 7010 model, which provides access to the five processor slots and the removable power supplies. When facing the interface processor end of the chassis, the RP and SP (or SSP) slots are at the top. The three interface processor slots are numbered from the bottom up, beginning with slot 0 (the bottom slot) through 2 (the center slot).
Figure 2 Cisco 7010—Chassis Rear View
MIP Description
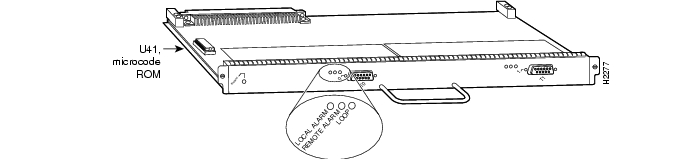
The MIP, shown in , provides up to two channelized T1 or E1 connections via serial cables to a channel service unit (CSU). On the MIP, two controllers can each provide up to 24 T1 channel-groups or 30 E1 channel-groups. Each channel-group is presented to the system as a serial interface that can be configured individually.
The MIP provides one or two controllers for transmitting and receiving data bidirectionally at the T1 rate of 1.544 Mbps or one or two controllers for transmitting and receiving data bidirectionally at the E1 rate of 2.048 Mbps. For wide-area networking, the MIP can function as a concentrator for a remote site.
Figure 3 MultiChannel Interface Processor (MIP)—Dual-Port Module Shown
MIP Electrical Interface Specifications
Following are the T1 specifications:
•
•
•
•
Following are the E1 specifications:
•
•
•
•
Maximum Configuration
For T1 and E1, the Cisco 7000 supports a maximum of four MIP modules for a total of 8 MIP ports and up to 240 serial interfaces. The Cisco 7010 supports a maximum of three MIP modules for a total of 6 MIP ports and up to 180 serial interfaces.
Note
MIP LEDs
After system initialization, the enabled LED, which is present on all interface processors, turns on to indicate that the MIP is enabled for operation. The following conditions must be met before the MIP is enabled:
•
•
•
If any of these conditions are not met, or if the initialization fails, the enabled LED does not turn on.
There are three LEDs associated with each MIP port that indicate alarm or loop conditions on that port. (See Figure 3.) The three LEDs above each MIP port indicate the following:
•
•
•
Microcode
The MIP microcode is a software image that provides card-specific software instructions. Cisco 7000 series routers support downloadable microcode, which enables you to upgrade microcode versions by downloading new microcode images, storing them in Flash memory, and instructing the system to load an image from Flash instead of the default ROM image. You can store multiple images for an interface type and instruct the system to load any one of them or the default ROM image with a configuration command. All interfaces of the same type (all MIPs, all FIPs, and so on) will load the same microcode image, from either the default ROM image or from a single image stored in Flash.
Although multiple microcode versions for a specific interface type can be stored concurrently in Flash, only one image can load at startup. The show controller cbus command displays the currently loaded and running microcode version for the SP (or SSP) and for each interface processor. The show configuration command displays the current system instructions for loading microcode at startup. For a complete description of microcode and downloading procedures, refer to the section Downloading Microcode.
Cables
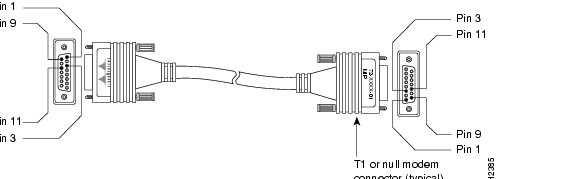
For T1, two standard serial cables, null-modem and straight-through, are available from Cisco Systems and other vendors for use with the MIP. The MIP, T1 interface cables are used to connect your router to external CSUs. The MIP T1 interface cables have two male 15-pin DB connectors at each end to connect the MIP with the external CSU. Figure 4 shows the MIP interface cable, connectors, and pinouts. Table 1 lists the signal pinouts for the null-modem cable and Table 2 lists the signal pinouts for the straight-through cable.
Figure 4 MIP T1 Interface Cable and Connectors
Table 1 T1 Null-Modem Cable Signals
1
Tx tip
3
Rx tip
3
Rx tip
1
Tx tip
9
Tx ring
11
Rx ring
11
Rx ring
9
Tx ring
1 Tx = transmit. Rx = receive.
Table 2 T1 Straight-Through Cable Signals
1
Tx tip
1
Tx tip
3
Rx tip
3
Rx tip
9
Tx ring
9
Tx ring
11
Rx ring
11
Rx ring
1 Tx = transmit. Rx = receive.
For E1, four serial cables are available from Cisco Systems for use with the MIP. All three have DB-15 connectors on the MIP end and either BNC, DB-15, Twinax, or RJ-45 connectors on the network end. Figure 5, Figure 6, Figure 7, and Figure 8 show the E1 interface cables (respectively). Table 3 lists the cable pinouts.
Figure 5 E1 Interface Cable for 75-Ohm, Unbalanced Connections (with BNC Connectors)
Figure 6 E1 Interface Cable for 120-Ohm, Balanced Connections (with DB-15 Connectors)
Figure 7 E1 Interface Cable for 120-Ohm, Balanced Connections (with Twinax Connectors)
Figure 8 E1 Interface Cable for 120-Ohm, Balanced Connections (with RJ-45 Connector)
Table 3 E1 Interface Cable Pinouts
9
Tx tip
Tx tip
1
Tx tip
Tx-1
Tx tip
1
Tx tip
2
Tx ring
Tx shield
9
Tx ring
Tx-2
Tx ring
2
Tx ring
10
Tx shield
-
2
Tx shield
Shield
Tx shield
3
Tx shield
8
Rx tip
Rx tip
3
Rx tip
Rx-1
Rx tip
4
Rx tip
15
Rx ring
Rx shield
11
Rx ring
Rx-2
Rx ring
5
Rx ring
7
Rx shield
-
4
Rx shield
Shield
Rx shield
6
Rx shield
1 Any pins not described in this table are not connected.
2 Tx = transmit. Rx = receive.
Installation Prerequisites
Before you begin this installation, review the safety and ESD-prevention guidelines in this section to avoid injuring yourself or damaging the equipment. This section also provides a list of parts and tools you will need to perform the installation.
Software Requirements
The MIP is compatible with any Cisco 7000 series router that is operating with the following software and microcode:
•
•
The show version command displays the current hardware configuration of the router, including the system software version that is currently loaded and running. The show controller cbus command lists all CxBus interfaces and includes the currently loaded and running microcode version for each. Use the show version command to display the current system software version, and use the
show controller cbus command to display the microcode version of the SP (or SSP) and each interface processor.In the following example of the show version command, the running system software is Cisco IOS Release 10.0 (or Cisco IOS 10.3 for E1).
Router> show versionGS Software (GS7), IOS 10.0(5187) (or IOS 10.3(x) for E1) Copyright (c) 1986-1993 by cisco Systems, Inc. Compiled Wed 02-Feb-94 15:52ROM: System Bootstrap, Version 4.6(1) [fc2], SOFTWARE(remainder of displayed text omitted from example)In the following example of the show controller cbus display, the running SP (or SSP) microcode is Version 170.46 although the microcode ROM on the SP (or SSP) contains Version 1.0. (In this example, ROM Version 1.0 is assumed.)
Router# show controller cbusSwitch Processor 5, hardware version 11.1, microcode version 170.46Microcode loaded from system512 Kbytes of main memory, 128 Kbytes cache memory 105 1520 byte buffers,75 4496 byte buffers Restarts: 0 line down, 0 hung output, 0 controller errorFIP 0, hardware version 2.2, microcode version 170.12Microcode loaded from systemInterface 0 - Fddi0/0, address 0000.0c03.648b (bia 0000.0c03.648b)15 buffer RX queue threshold, 37 buffer TX queue limit, buffer size 4496ift 0006, rql 13, tq 0000 01A0, tql 37(text omitted from example)MIP 2, hardware version 1.0, microcode version 10.0 Microcode loaded from system Interface 16 - T1 2/0, electrical interface is Channelized T1 10 buffer RX queue threshold, 14 buffer TX queue limit, buffer size 1580 ift 0001, rql 7, tq 0000 05B0, tql 14 Transmitter delay is 0 microseconds Router#Or, for E1, as follows:
MIP 2, hardware version 1.0, microcode version 11.0
 Microcode loaded from system
 Interface 16 - E1 2/0, electrical interface is Channelized E1-balance (or unbalanced)
   10 buffer RX queue threshold, 14 buffer TX queue limit, buffer size 1580 ift 0001, rql
   7, tq 0000 05B0, tql 14
   Transmitter delay is 0 microseconds
Router#
If the displays indicate that the running system software is earlier than Cisco IOS Release 10.0 for T1 (or Cisco IOS Release 10.3 for E1) or that the running SP (or SSP) microcode is earlier than Version 10.0, check the contents of Flash memory to determine whether the required images are available on your system. The show flash command displays a list of all files stored in Flash memory. The following example shows FIP Microcode Version 1.1 and SP (or SSP) Microcode Version 1.2 stored in Flash:
Router# show flash4096K bytes of flash memory on embedded flash (in RP1).file offset length name1041 0 0x80 53364 fip1-11 0xD134 55410 sp1-2[4085336/4194304 bytes free]If the preceding displays indicate that the required system software and microcode is not available, contact a customer service representative for upgrade information. (See the section Downloading Microcode for more information.)
Parts and Tools
You need the following tools and parts to install or upgrade the MIP. If you need additional equipment, contact your service representative for ordering information.
•
•
•
•
•
•
•
•
•
•
•
•
•
•
•
Safety
This section lists safety guidelines you should follow when working with any equipment that connects to electrical power or telephone wiring.
Electrical Equipment
Follow these basic guidelines when working with any electrical equipment:
•
•
•
•
•
•
Telephone Wiring
Use the following guidelines when working with any equipment that is connected to telephone wiring or to other network cabling:
•
•
•
•
Preventing Electrostatic Discharge Damage
Electrostatic discharge (ESD) damage, which can occur when electronic cards or components are improperly handled, results in complete or intermittent failures. The MIP comprises a printed circuit board that is fixed in a metal carrier. Electromagnetic interference (EMI) shielding, connectors, and a handle are integral components of the carrier. Although the metal carrier helps to protect the board from ESD, use a preventive antistatic strap whenever handling the MIP. Handle the carriers by the handles and the carrier edges only; never touch the boards or connector pins.
Following are guidelines for preventing ESD damage:
•
•
•
•
•
•
•
•
CautionFor safety, periodically check the resistance value of the antistatic strap. The measurement should be between 1 and 10 megohms.
Overview of Online Insertion and Removal
The OIR feature allows you to remove and replace CxBus interface processors while the system is operating; you do not need to notify the software or shut down the system power.
Note
Each RP, SP, SSP, and interface processor contains a male connector with which it connects to the system backplane. Each card (male) connector comprises a set of tiered pins, in three lengths. The pins send specific signals to the system as they make contact with the backplane. The system assesses the signals it receives and the order in which it receives them to determine what event is occurring and what task it needs to perform, such as reinitializing new interfaces or shutting down removed ones. For example, when inserting an interface processor, the longest pins make contact with the backplane first, and the shortest pins make contact last. The system recognizes the signals and the sequence in which it receives them. The system expects to receive signals from the individual pins in this logical sequence, and the ejector levers help to ensure that the pins mate in this sequence.
When you remove or insert an interface processor, the backplane pins send signals to notify the system, which then performs as follows:
1
2
3
The system brings on line only interfaces that match the current configuration and were previously configured as up; all others require that you configure them with the configure command.
OIR functionality enables you to add, remove, or replace interface processors with the system online, which provides a method that is seamless to end users on the network, maintains all routing information, and ensures session preservation.
CautionWhen removing or replacing interface processors, you can avoid erroneous failure messages by allowing at least 15 seconds for the system to reinitialize before removing or inserting another interface processor.
The function of the ejector levers (see Figure 9) is to align and seat the card connectors in the backplane. Failure to use the ejector levers and insert the interface processor properly can disrupt the order in which the pins make contact with the backplane. Follow the MIP installation and removal instructions carefully, and review the following examples of incorrect insertion practices and results:
•
•
•
•
It is also important to use the ejector levers when removing an interface processor to ensure that the board connector pins disconnect from the backplane in the logical sequence expected by the system. Any RP, SP (or SSP), or interface processor that is only partially connected to the backplane can hang the bus. Detailed steps for correctly performing OIR are included with the following procedures for installing and removing the MIP.
Figure 9 Bottom Ejector Lever and Captive Installation Screw
Installation
The following sections describe the procedures for removing or installing the MIP in the Cisco 7010. The OIR feature allows you to install and remove the MIP without turning off system power. Refer to the section Overview of Online Insertion and Removal for a complete description of OIR.
CautionTo avoid erroneous failure messages, remove or insert only one interface processor at a time. Also, after inserting or removing an interface processor, allow at least 15 seconds before removing or inserting another interface processor so that the system can reinitialize and note the current configuration of all interfaces.
Removing the MIP
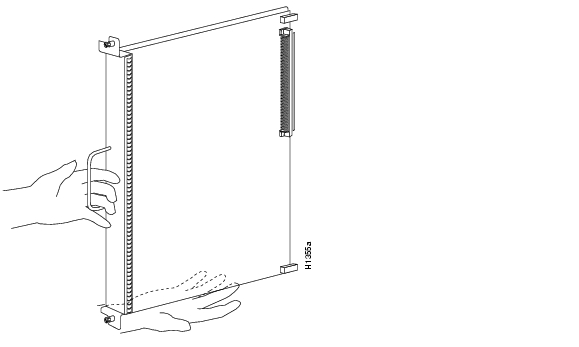
The MIP supports OIR; therefore, you need not shut down the interface or the system power when removing the MIP. If you are replacing a failed MIP, remove the existing board first, then replace the new MIP in the same slot. Figure 10 shows proper handling of an interface processor during installation.
Figure 10 Handling Interface Processors during Installation
To remove the MIP, follow these steps:
Step 1
Step 2
CautionAlways use the ejector levers to remove or install the MIP. Failure to do so can cause erroneous system error messages, indicating a board failure.
Step 3
Step 4
Step 5
Step 6
Step 7
(MAS-7000BLANK=) to keep dust out of the chassis and to maintain proper airflow through the interface processor compartment.Installing the MIP
The MIP slides into any available interface processor slot and connects directly to the backplane. The backplane slots are keyed so that the MIP can be installed only in an interface processor slot. (See Figure 1 or Figure 2.) Interface processor fillers, which are blank interface processor carriers, occupy empty slots to maintain consistent air flow through the interface processor compartment. If you are installing a new MIP, you will have to first remove the interface processor filler from the available interface processor slot. Figure 9 shows the functional details of inserting an interface processor and using the ejector levers. Figure 10 shows proper handling of an interface processor during installation.
CautionRemove or insert only one interface processor at a time. Allow at least 15 seconds for the system to complete the preceding tasks before removing or inserting another interface processor. Disrupting the sequence before the system completes its verification can cause the system to interpret hardware failures.
Follow these steps to install the MIP:
Step 1
Step 2
Step 3
Step 4
CautionTo prevent ESD damage, handle interface processors by the handles and carrier edges only.
Step 5
Step 6
CautionAlways use the ejector levers when installing or removing processor modules. A module that is partially seated in the backplane will cause the system to hang and subsequently crash.
Step 7
Step 8
CautionAlways tighten the captive installation screws on interface processors. These screws prevent accidental removal and provide proper grounding for the system.
Step 9
Step 10
Checking the Installation
After you install the MIP, verify the installation by observing the LED states and the console display. When the system finishes reinitializing all interfaces, the enabled LED on the MIP and on all interface processors should be lit. The console screen will also display a message as the system discovers each interface during its reinitialization.
When you remove and replace CxBus interface processors, the system provides status messages on the console screen. The messages are for information only. The following sample display shows the events logged by the system as the MIP was removed from slot 4; the system then reinitialized the remaining interface processors and marked as down the MIP that was removed from slot 4. When the MIP was reinserted, the system marked the interfaces as down again because the MIP interfaces were not shut down before the MIP was removed.
Router#%OIR-6-REMCARD: Card removed from slot 4, interfaces disabled%LINK-5-CHANGED: Interfaces MIP1/0, changed to administratively downRouter#%OIR-6-INSCARD: Card inserted in slot 4, interfaces administratively shut downRouter#Router#When a new MIP is inserted or when the MIP is moved to a new slot, the system recognizes the new MIP controllers, but leaves them in a down state until you configure them and change the state to up with the configure command.
The following example display shows the events logged by the system as a new MIP is inserted in slot 4:
Router#OIR-6-REMCARD: Card removed from slot 4, interface disabledLink-5-CHANGED: Interface MIPl/0, changed state to administratively downRouter#%OIR-6-INSCARD: Card inserted in slot 4, interfaces administratively shut downRouter#Verify that the MIP is installed correctly as follows:
Step 1
•
•
Step 2
Step 3
Step 4
•
•
•
•
Step 5
Step 6
Step 7
The LED states are described in the section " MIP LEDs" on page 4.
Figure 11 MIP LEDs
If an error message displays on the console terminal, refer to the Router Products Configuration Guide and Router Products Command Reference publication for error message definitions. If you experience other problems that you are unable to solve, contact a customer service representative for assistance.
This completes the MIP installation. If you installed a new MIP, you must now configure the new MIP controller, as described in the following section.
Configuring the Interfaces
If you installed a new MIP or if you want to change the configuration of an existing controller, you must enter the configuration mode. If you replaced the MIP that was previously configured, the system will recognize the new MIP and bring it up in the existing configuration.
After you verify that the new MIP is installed correctly (the enabled LED is on), use the
privileged-level configure command to configure the new MIP controller. Be prepared with the information you will need, such as the following:•
•
•
•
•
Refer to the Router Products Configuration Guide and Router Products Command Reference publications for a summary of the configuration options available and instructions for configuring the MIP controller.
Configuring Jumper J6 on the E1 Port Adapter
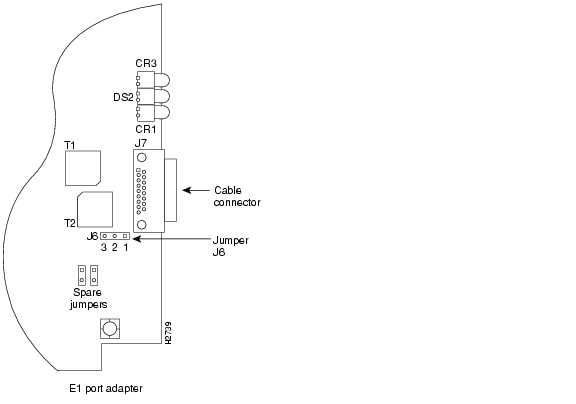
By default, channelized E1 port adapters are set with capacitive coupling between the receive (Rx) shield and chassis ground. This provides direct current (DC) isolation between the chassis and external devices, as stated in the G.703 specification. Jumper J6 controls this function. To make changes, remove the E1 port adapter from the mother board, place one of the spare jumpers on J6 pins one and two or pins two and three (refer to Table 4), and replace the port adapter on the mother board. Pin 1 of J6 is designated with a square. (See Figure 12.)
Figure 12 Location of Jumper J6 on the E1 Port Adapter—Partial View
Table 4 Jumper Settings a nd Functions
Warning
To prevent problems with the E1 interface and to reduce the potential for injury, jumper J6 should be installed by trained service personnel only. For either impedance option, a jumper installed at J6 bypasses the AC-decoupling capacitor to ground, thereby coupling the interface directly to AC. This is a setting that could pose a risk of severe injury. By default and for safety, J6 has no jumper installed.
After you set jumper J6, proceed to the section "Installing Port Adapters" on page 31.
Using the EXEC Command Interpreter
Before you use the configure command, you must enter the privileged level of the EXEC command interpreter with the enable command. The system will prompt you for a password if one has been set.
The system prompt for the privileged level ends with a pound sign (#) instead of an angle bracket (>). At the console terminal, enter the privileged level as follows:
Step 1
Router> enablePassword:Step 2
Step 3
Router#Step 4
Using the Configure Commands
Following are instructions for a configuration: enabling a controller and specifying IP routing. You might also need to enter other configuration subcommands, depending on the requirements for your system configuration and the protocols you plan to route on the interface.
The channel-groups must be mapped before the MIP controller can be configured.
For complete descriptions of configuration subcommands and the configuration options available, refer to the Router Products Configuration Guide and Router Products Command Reference publication.
Following are commands used to map the channel-group, with he default variable is listed first:
Number is the channel-group 0 to 23 for T1 and 0 to 29 for E1.
Timeslots list is a number between 1 to 24 for T1 and 1 to 31 for E1. It conforms to D3/D4 numbering for T1. Timeslots may be entered individually and separated by commas or as a range that is separated by a hyphen (for example, 1-3, 8, 9-18). For E1 and T1, 0 is illegal.
Speed specifies the DSO speed of the channel-group: T1 default is 56 kbps and E1 default is 64 kbps.
Note
T1 Configuration
The following steps describe a basic T1 configuration. Press the Return key after each configuration step.
Step 1
Router# conf t
Enter configuration commands, one per line. End with CNTL/Z. Router(config)#
Step 2
Router(config)# cont t1 4/1Step 3
Router(config-controller)# clock source line
Note
Step 4
Router(config-controller)# framing esfStep 5
Router(config-controller)# linecode b8zsRouter(config-controller)#%CONTROLLER-3-UPDOWN: Controller T1 4/1, changed state to up Router(config-controller)#Step 6
Router(config-controller)# channel-group 0 timeslots 1,3-5,7
Router(config-controller)#
%LINEPROTO-5-UPDOWN: Line protocol on Interface Serial4/1:0, changed state to down
%LINEPROTO-5-UPDOWN: Line protocol on Interface Serial4/1:0, changed state to up
Router(config-controller)#
Router(config-controller)#
Step 7
Router(config-controller)# int serial 4/1:0Step 8
Router(config-if)# ip address 1.1.15.1 255.255.255.0Router(config-if)#Step 9
Step 10
Step 11
Router# write memoryThe system will display an OK message when the configuration is stored.
Step 12
Router# disableRouter>Step 13
E1 Configuration
The following steps describe a basic E1 configuration. Press the Return key after each step.
Step 1
Router# conf t
Enter configuration commands, one per line. End with CNTL/Z. Router(config)#
Step 2
Router(config)# cont e1 4/1Step 3
Router(config-controller)# framing crc4Step 4
Router(config-controller)# linecode hdb3Router(config-controller)#%CONTROLLER-3-UPDOWN: Controller E1 4/1, changed state to up Router(config-controller)#Step 5
Router(config-controller)# channel-group 0 timeslots 1,3-5,7
Router(config-controller)#
%LINEPROTO-5-UPDOWN: Line protocol on Interface Serial4/1:0, changed state to down
%LINEPROTO-5-UPDOWN: Line protocol on Interface Serial4/1:0, changed state to up
Router(config-controller)#
Router(config-controller)#
Step 6
Router(config-controller)# int serial 4/1:0Step 7
Router(config-if)# ip address 1.1.15.1 255.255.255.0Router(config-if)#Step 8
Step 9
Step 10
Router# write memoryThe system will display an OK message when the configuration is stored.
Step 11
Router# disableRouter>Step 12
Checking the Configuration
After configuring the new interface, use the show commands to display the status of the new interface or all interfaces.
Command Descriptions and Examples
Following are descriptions and examples of the show commands. Descriptions are limited to fields that are relevant for verifying the configuration.
•
Router> show versionGS Software (GS7), Version 10.0(5187) (for E1, 10.3[x]) Copyright (c) 1986-1994 by cisco Systems, Inc. Compiled Wed 02-Feb-94 15:52ROM: System Bootstrap, Version 4.6(1) [fc2], SOFTWARERouter uptime is 42 minutesSystem restarted by reloadSystem image file is "wmay/gs7-k", booted via tftp from 131.108.13.111RP (68040) processor with 16384K bytes of memory. X.25 software, Version 2.0, NET2, BFE and GOSIP compliant. Bridging software.1 Switch Processor.1 EIP controller (6 Ethernet).1 TRIP controller (4 Token Ring).1 FSIP controller (4 Serial).1 MIP controller (1 T1). (or 1 E1, and so forth)6 Ethernet/IEEE 802.3 interfaces.4 Token Ring/IEEE 802.5 interfaces.6 Serial network interfaces.1 FDDI network interface.128K bytes of non-volatile configuration memory.4096K bytes of flash memory sized on embedded flash.Configuration register is 0x100•
Router# show controller cbusSwitch Processor 5, hardware version 11.1, microcode version 170.46Microcode loaded from system512 Kbytes of main memory, 128 Kbytes cache memory 105 1520 byte buffers,75 4496 byte buffers Restarts: 0 line down, 0 hung output, 0 controller errorFIP 0, hardware version 2.2, microcode version 170.12Microcode loaded from systemInterface 0 - Fddi0/0, address 0000.0c03.648b (bia 0000.0c03.648b)15 buffer RX queue threshold, 37 buffer TX queue limit, buffer size 4496ift 0006, rql 13, tq 0000 01A0, tql 37(text omitted from example)MIP 2, hardware version 1.0, microcode version 10.0 Microcode loaded from system Interface 16 - T1 2/0, electrical interface is Channelized T1 10 buffer RX queue threshold, 14 buffer TX queue limit, buffer size 1580 ift 0001, rql 7, tq 0000 05B0, tql 14 Transmitter delay is 0 microseconds Router#•
Router# show cont t1T1 4/1 is up.No alarms detected.Framing is ESF, Line Code is AMI, Clock Source is lineData in current interval (0 seconds elapsed):0 Line Code Violations, 0 Path Code Violations 0 Slip Secs, 0 Fr Loss Secs,0 Line Err Secs, 0 Degraded Mins 0 Errored Secs, 0 Bursty Err Secs,0 Severely Err Secs, 0 Unavail SecsTotal Data (last 79 15 minute intervals):0 Line Code Violations, 0 Path Code Violations, 0 Slip Secs, 0 Fr Loss Secs,0 Line Err Secs, 0 Degraded Mins, 0 Errored Secs, 0 Bursty Err Secs,0 Severely Err Secs, 0 Unavail SecsRouter#•
Router# show cont e1E1 4/1 is up.No alarms detected.Framing is E1-crc, Line Code is hdb3Data in current interval (0 seconds elapsed):0 Line Code Violations, 0 Path Code Violations 0 Slip Secs, 0 Fr Loss Secs,0 Line Err Secs, 0 Degraded Mins 0 Errored Secs, 0 Bursty Err Secs,0 Severely Err Secs, 0 Unavail SecsTotal Data (last 79 15 minute intervals):0 Line Code Violations, 0 Path Code Violations, 0 Slip Secs, 0 Fr Loss Secs,0 Line Err Secs, 0 Degraded Mins, 0 Errored Secs, 0 Bursty Err Secs,0 Severely Err Secs, 0 Unavail SecsRouter#•
Router# show configUsing 1708 out of 130048 bytes!version 10.0 (or 10.3 for E1)!hostname Router!enable password *****!clns routing!controller T1 4/1 (for E1, E1 4/1, and so forth)framing esf (for E1, crc4, and so forth)linecode b8zs (for E1, hdb3, and so forth)channel-group 0 1,3,5,7channel-group 1 2,4,6,8-10!interface Ethernet 1/0ip address 131.108.43.220 255.255.255.0no mop enabled!interface Ethernet1/1no ip addressshutdown!interface Ethernet1/2no ip addressshutdown!interface Ethernet1/3(display text omitted)•
Router> show protocolsGlobal values:Internet Protocol routing is enabledCLNS routing is enabled (address 41.0000.0000.0000.0001.0000.0000.00) Fddi0/0 is down, line protocol is downInternet address is 1.1.20.1, subnet mask is 255.255.255.0CLNS enabledEthernet1/0 is up, line protocol is upInternet address is 131.108.43.220, subnet mask is 255.255.255.0(display text omitted)Using Show Commands to Verify the MIP Status
The following procedure describes how to use the show commands to verify that the new MIP interface is configured correctly:
Step 1
Step 2
Step 3
Step 4
Step 5
Step 6
If the interface is down and you configured it as up, or if the displays indicate that the hardware is not functioning properly, ensure that the network interface is properly connected and terminated. If you still have problems bringing the interface up, contact a customer service representative for assistance.
This completes the configuration procedure for the new MIP interface.
Downloading Microcode
Cisco 7000 series routers support downloadable microcode, which enables you to upgrade microcode versions without having to physically replace the ROMs on the boards. You can download new microcode versions and store multiple versions in Flash memory, and you can boot from them just as you can with the system software images. System software upgrades might also contain upgraded microcode images, which will load automatically when the new software image is loaded.
You can download microcode to Flash memory by copying the TFTP image of a microcode version to Flash memory. When the microcode image is stored in Flash memory you can use the microcode reload command to manually load the new microcode file, and the configure command to instruct the system to load the new image automatically at each system boot.
CautionBefore you copy a file to Flash, be sure there is ample space available in Flash memory. Compare the size of the file you wish to copy to the amount of available Flash memory shown. If the space available is less than the space required by the file you wish to copy, the copy process will continue, but the entire file will not be copied into Flash.
In order to compare the size of the microcode image and the amount of Flash memory available, you must know the size of the new microcode image. The image size is specified in the README file that is included on the floppy disk with the new image, and in the Upgrading System Software and Microcode in the Cisco 7000 publication that is shipped with all Cisco 7000 microcode upgrades. Note the size of the new image before proceeding to ensure that you have sufficient available Flash memory for the new image.
Follow these steps to copy a microcode version from the TFTP server to Flash memory.
Step 1
Router# show flash4096K bytes of flash memory on embedded flash (in RP1).file offset length name0 0xD134 55410 sp1-2[4085336/4194304 bytes free]Step 2
buffer overflow - xxxx/xxxxwhere xxxx/xxxx is the number of bytes read in/number of bytes available.
Step 3
Router# copy tftp flashStep 4
IP address or name of remote host [255.255.255.255]? 131.108.12.106Step 5
Name of file to copy ? MIP1-1Step 6
Copy MIP1-1 from 131.108.12.106 into flash memory? [confirm]If the correct file is not shown, enter no at the prompt to return to the system prompt and enter the correct file name.
Step 7
Erase flash before writing? [confirm] noWhile the file is copied to Flash, output similar to the following is displayed:
Loading from 131.108.12.106: !!!!!!!!!!!!!!!!!!!!!!!!!!!!!!!!!!!!!!!!!!!!!!!!!!!![OK - 108966/4194304 bytes] Verifying via checksum... Flash verification successful. Length = 53364, checksum = 0x0000Step 8
Router# show flash
4096K bytes of flash memory on embedded flash (in RP1).
file offset length name 0 0x40 55410 sp1-2 1 0xD0D4 53364 MIP1-1 [4085336/4194304 bytes free]Step 9
Router# configure terminalStep 10
microcode MIP flash MIP1-1Step 11
Step 12
Router# write memoryThe microcode reload command is automatically added to your running configuration. The new MIP microcode image will load automatically the next time the system boots or reinitializes.
Step 13
Router# configuremicrocode reloadImmediately after you enter the microcode reload command and press Return, the system reloads all microcode. Configuration mode remains enabled; after the reload is complete, enter Ctrl-Z to exit from configuration mode and return to the system prompt.
Step 14
Router# show configurationThis completes the procedure for downloading microcode to Flash memory.
Removing and Replacing Port Adapters
Port adapters provide the ports for the E1 and T1 interfaces. Each port adapter provides one port. Each MIP is shipped from the factory with one or two port adapters installed. You cannot add ports to an MIP by installing an additional port adapter. Port adapters are not field-replaceable units (FRUs); however, you need to remove an existing E1 port adapter in order to access jumper J6.
Before proceeding, refer to the section Removing the MIP.
CautionTo prevent damaging the MIP and port adapters, remove and install port adapters only when it is necessary. Do not attempt to isolate faults or to troubleshoot MIPs or interfaces by swapping port adapters. The surface-mount circuitry on the port adapters will not tolerate excessive handling. Do not mix T1 and E1 port adapters on the same mother board.
Tools Required
You need the following tools to complete this procedure:
•
•
•
Removing a Port Adapter
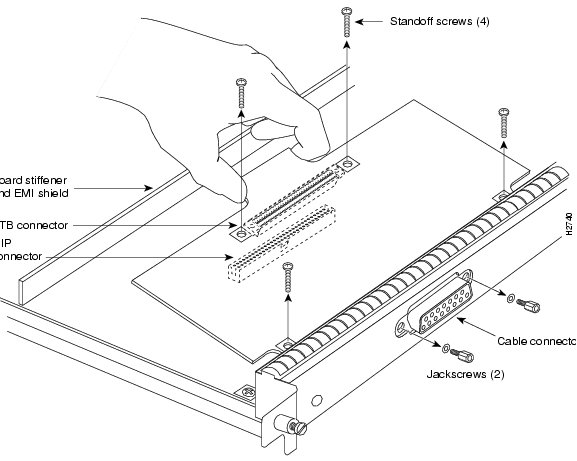
Port adapters are installed on each MIP at the factory. Each port adapter is anchored to the MIP with one plastic double-row vertical board-to-board (BTB) connector and four Phillips screws that extend through standoffs, into the mother board. (See Figure 13.) The port adapter is also anchored to the carrier faceplate with two jackscrews and two lock washers.
CautionThe surface-mounted components on the port adapters are extremely susceptible to ESD damage. Keep each port adapter in a separate antistatic bag until you are ready to install it. Always wear an ESD-preventive ground strap and handle boards as little as possible. When you must handle the board, limit contact to the board edges only, avoiding contact between the board and clothing.
To remove an E1 port adapter from the MIP, refer to Figure 13 and perform the following steps:
Step 1
Step 2
Step 3
Figure 13 Removing an E1 Port Adapter
Step 4
Step 5
Step 6
CautionTo prevent damage to the MIP, do not pry the port adapter out with a screwdriver or any other tool. In particular, do not use the board stiffener for leverage.
Step 7
Step 8
CautionTo prevent overheating chassis components, do not reinstall the MIP in the chassis unless all port adapters are in place. The empty port will allow cooling air to escape freely through the cutouts in the faceplate, which could misdirect the airflow inside the chassis and allow components on other boards to overheat.
Replacing a Port Adapter
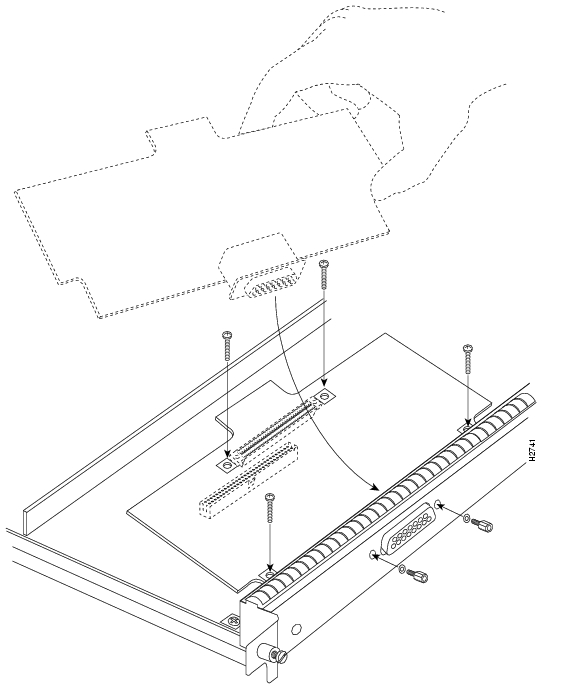
If necessary, refer to the previous section to remove an E1 port adapter from the MIP. Refer to Figure 14 while you perform the following steps:
Step 1
Step 2
Step 3
Step 4
Step 5
Figure 14 Installing an E1 Port Adapter
Step 6
Step 7
Step 8
Step 9
Step 10
Step 11
Step 12
CautionTo prevent potential EMI and overheating problems, do not replace the MIP in the chassis unless all port adapters are installed. An empty port violates the EMI integrity of the system, and also allows cooling air to escape freely through the cutouts in the carrier faceplate, which could misdirect the airflow inside the chassis and allow components on other boards to overheat.
When you insert the new MIP, the console terminal will display several lines of status information about OIR as it reinitializes the interfaces. Change the state of the interfaces to up and verify that the configuration matches that of the interfaces you replaced.
Use the configure command or the setup command facility to configure the new interfaces. You do not have to do this immediately, but the interfaces will not be available until you configure them and bring them up.
After you configure the interfaces, use the show controller cbus, show controller T1, show controller E1 commands to display the status of the new interface. For brief descriptions of commands refer to Using Show Commands to Verify the MIP Status.
For complete command descriptions and instructions refer to the appropriate software publications.
This completes the port adapter replacement procedure.
Cisco Information Online
Cisco Information Online (CIO) is Cisco Systems' primary, real-time support channel. Maintenance customers and partners can self-register on CIO to obtain additional content and services.
Available 24 hours a day, 7 days a week, CIO provides a wealth of standard and value-added services to Cisco's customers and business partners. CIO services include product information, software updates, release notes, technical tips, the Bug Navigator, configuration notes, brochures, descriptions of service offerings, and download access to public and authorized files.
CIO serves a wide variety of users through two interfaces that are updated and enhanced simultaneously—a character-based version and a multimedia version that resides on the World Wide Web (WWW). The character-based CIO (called "CIO Classic") supports Zmodem, Kermit, Xmodem, FTP, Internet e-mail, and fax download options, and is excellent for quick access to information over lower bandwidths. The WWW version of CIO provides richly formatted documents with photographs, figures, graphics, and video, as well as hyperlinks to related information.
You can access CIO in the following ways:
•
http://www.cisco.com•
cio.cisco.com(198.92.32.130)•
For a copy of CIO's Frequently Asked Questions (FAQ), contact
cio-help@cisco.com.For additional information, contactcio-team@cisco.com.
Note
tac@cisco.com.To obtain general information about Cisco Systems, Cisco products, or upgrades, contact 800 553-6387, 408 526-7208, orcs-rep@cisco.com.
DOC-781208=
78-1208-08
![]()
![]()
![]()
![]()
![]()
![]()
![]()
![]()
Posted: Sun May 21 08:21:31 PDT 2006
All contents are Copyright © 1992--2006 Cisco Systems, Inc. All rights reserved.
Important Notices and Privacy Statement.