|
|

This chapter includes procedures for rack-mounting and installing the Cisco 7010.
If you choose not to rack-mount the chassis, proceed to the section "General Installation." Before you begin the optional rack installation, have the following tools and parts on hand:
Warning 
To prevent bodily injury when mounting or servicing this unit in a rack, you must take special precautions to ensure that the system remains stable. The following guidelines are provided to ensure your safety:
For translated versions of this warning, refer to the appendix "Translated Safety Warnings."
 | Caution To prevent injury or damage to the chassis, have someone assist you by supporting the chassis while you secure the chassis ears to the rack-mounting strips. When you install the chassis in an enclosed rack, temporarily remove the rack door to provide additional clearance. |
Rack-mounting instructions are provided in Figure 3-1.

The chassis should already be in the area where you will install it, and your installation location should already be determined. When installing the chassis on a table, ensure that you have planned a clean, safe location for the chassis and have considered the following:
 | Warning Two people are required to lift the chassis. Grasp the chassis underneath the lower edge and lift with both hands. To prevent injury, keep your back straight and lift with your legs, not your back. To prevent damage to the chassis and components, never attempt to lift the chassis with the handles on the power supplies or on the interface processors, or by the plastic panels on the front of the chassis. These handles were not designed to support the weight of the chassis. (For translated versions of this warning, refer to the appendix "Translated Safety Warnings.") |
If you do not install the chassis ina rack, follow these steps to install the chassis on a bench or table:
Step 1 Make sure that the area in which you will install the chassis is free of debris and dust.
Step 2 Make sure your path between the chassis and where you will place it is unobstructed.
Step 3 On the chassis, ensure that all captive screws (on the processor modules, and so forth) are tightened and the components are secure.
 | Caution To prevent damage to the chassis and components, never attempt to lift or tilt the chassis with the handles on the interface processors. These handles are not designed to support the weight of the chassis. |
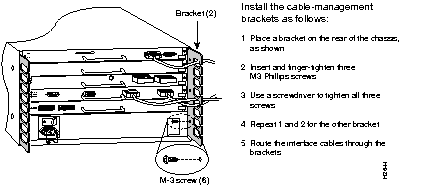
The cable-management brackets attach to the interface processor end of the chassis. To install the brackets, you need a number 1 Phillips screwdriver, two cable-management brackets, and six M3 x 8-mm Phillips panhead screws.
Use the brackets to keep network interface cables untangled and orderly, and to prevent cables from hindering access to interface processors in the lower slots.
Install the brackets before connecting network interface cables to the interface processor ports; otherwise, you will probably need to disconnect the cables to install the screws that secure the brackets. Route interface cables through the brackets as you connect them to the interface processor ports.
Figure 3-2 shows how to install the cable-management brackets.

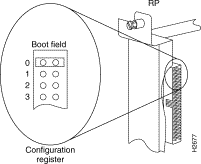
On the RP (running Cisco IOS releases earlier than Release 10.0), pins (also called bits) 0 through 3 on the configuration register form the boot field, as shown in Figure 3-3.
The boot field specifies a number in binary. When the boot field is set to either 0 or 1 (0-0-0-0 or 0-0-0-1), the system ignores any boot instructions in the configuration file. When the boot field is set to 0, you must boot the operating system manually by giving a b (or boot) command to the system bootstrap program or ROM monitor.

You can enter the boot command only, or include additional boot instructions with the command such as the name of a file stored in Flash memory or a file that you specify for netbooting. If you use the boot command without specifying a file or any other boot instructions, the system boots from the read-only memory (ROM) image.
Otherwise, you can instruct the system to boot from a specific image such as a Flash file (using the boot system flash filename command), or boot from a network server by sending broadcast TFTP requests (using the boot system filename command), or send a direct TFTP request to a specific server (using the boot system filename address command).
When the boot field is set to 1 (the factory default), the system boots from ROM. Boot field settings of 0 and 1 both override any boot instructions in the system configuration file. If you set the boot field to any bit pattern other than 0 or 1, the system uses the resulting number to form a filename for booting from a network.
To form the filename, the system starts with cisco and links the octal equivalent of the boot field value (jumper setting) and the processor type in the following format: cisco<jumpervalue>-<processorname>. The system uses that filename to invoke the system image from ROM or by booting from a network.
However, if the configuration file contains any boot instructions, the system uses those boot instructions instead of the filename it computed from the jumper settings. You must set the boot field on your RP for the boot functions you require.
For more detailed information on the hardware configuration register or the software configuration register feature, which is available in the Cisco Internetwork Operating System (Cisco IOS) Release 10.0 or later, refer to the Cisco 7010 Hardware Installation and Maintenance publication, which is available on UniverCD or as a printed copy.
|
|