|
|

This document explains how to remove and replace the 24V or 48V 280-Watt (W) DC-input power supply in the Cisco 7200 series routers—which consist of the two-slot Cisco 7202, four-slot Cisco 7204 and Cisco 7204VXR, and the six-slot Cisco 7206 and Cisco 7206VXR. It includes instructions for powering down the router, removing an installed power supply, and installing a new power supply. This document also includes steps for verifying the initialization of the system after you power up the router.
 |
Note The Cisco 7206VXR and Cisco 7206 can be used as router shelves in a Cisco AS5800 Universal Access Server. References to the Cisco 7200 series routers in this document include the Cisco 7206VXR and Cisco 7206 as router shelves in a Cisco AS5800 Universal Access Server, unless indicated otherwise. |
The following sections are included in this document:
For Cisco IOS software configuration information and support, refer to the modular configuration and modular command reference publications in the Cisco IOS software configuration documentation set that corresponds to the software release installed on your Cisco hardware.
The Cisco 7200 series routers are equipped with a single DC-input power supply (when DC-input power is specified). An optional, second DC-input power supply is available for the router; it must be ordered as a spare. The router operates with one installed power supply; however, the second power supply provides hot-swappable, load-sharing redundant power.
Two 280W DC-input power supplies are available:
This power supply operates from 48V to 60V.
A 24V power supply (PWR-7200-DC+, PWR-7200-DC+= PWR-7200/2-DC+)
This power supply operates from 24V to 60V.
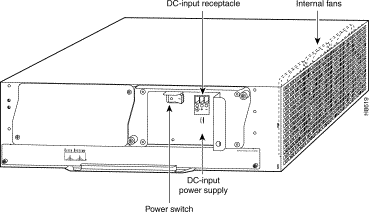
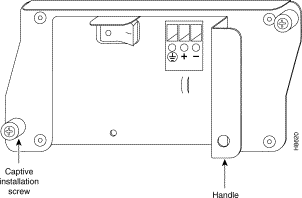
The faceplates of both 280W DC-input power supplies have a green OK LED, a power switch, a handle for removing, installing, and handling the power supply, three DC-input lead receptacles, and two captive installation screws. (See Figure 1.)
The power supply handle provides a grip point for pulling the power supply out of the router (refer to Figure 1). Two captive installation screws secure the power supply in the router. Three DC-input leads (-, +[return], and ground) connect the DC-input power supply to the site DC power source.
A cable tie is shipped with each DC-input power supply to secure the leads to the power supply faceplate and provide strain relief for the leads.
Use the following table for LED status information.
 |
Caution Do not mix AC- and DC-input power supplies in the same router. |
To distinguish the two power supplie,s look for these characteristics:
The 24V power supply requires one of these four minimum Cisco IOS Releases:
|
Note Site wiring and circuit breakers or fuses should be chosen to meet local safety requirements. |
|
Note The values in Table 3 are absolute
maximum values. Typical system configurations use substantially less. To obtain typical values for
your configuration, contact your Cisco sales representative. This product relies on the building's installation for short-circuit (overcurrent) protection. Ensure that a listed and certified fuse or circuit breaker, 35A maximum 60 VDC, is used on all current-carrying conductors. Site wiring and circuit breakers need to be sized to accommodate the maximum values (noted in the preceding table) for safety reasons. |
This section provides a list of parts and tools you need to remove and replace the DC-input power supply in the Cisco 7200 series routers. This section also includes safety and ESD-prevention guidelines to help you avoid injury to yourself and damage to the equipment. The following releases are the minimum required Cisco IOS releases for the 24V - 60V power supply.
You need the following parts and tools to remove and replace the DC-input power supply. If you need additional equipment, contact a service representative for ordering information.
Following are safety guidelines that you should follow when working with any equipment that connects to electrical power or telephone wiring.
 |
Warning Only trained and qualified personnel should be allowed to install or replace this equipment. |
Follow these basic guidelines when working with any electrical equipment:
Use the following guidelines when working with any equipment that is connected to telephone wiring or to other network cabling:
If your Cisco 7200 series router is installed in a standard 19-inch, four-post or telco rack, cables from other equipment in the rack might obstruct access to the rear of the router. Also, rack power strips or other permanent fixtures may obstruct access to the router. Review the following guidelines to ensure easy access to the rear of the router when it is installed in a rack. If the router is not installed in a rack, or if you already have clear access to the rear of the router, proceed to the following section "Removing and Replacing a DC-Input Power Supply."
Use the following guidelines to ensure easy access to the rear of the router when it is installed in a rack:
|
Caution Make sure that at least one other person is available to support the front of the router as you slide it out from the rack and, if necessary, to continue to support it while you remove and insert the power supply, network processing engine or network services engine, or subchassis. |
The following sections explain how to remove and replace a DC-input power supply in Cisco 7200 series routers.
|
Note The procedures for removing and replacing a DC-input power supply in a single or dual power supply configuration are the same for the Cisco 7200 series routers and the Cisco 7206 and Cisco 7206VXR when used as router shelves in the Cisco AS5800 Universal Access Server. Therefore, the illustrations and procedures in the following sections apply to the Cisco 7200 series and the Cisco AS5800 Universal Access Server router shelf unless indicated otherwise. |
The procedures for removing and replacing the DC-input power supply in a single power supply configuration are explained in the following sections:
To power down Cisco 7200 series routers that have an installed DC-input power supply, complete the following steps:
|
Note Before powering down the router, use the copy running-config startup-config command to save the router's running configuration to nonvolatile memory. |
|
Warning This unit might have more than one power cord. To reduce the risk of electric shock, disconnect the two power cords before servicing the router. |
Step 2 Observe the following items:
Step 3 Turn off the power source and disconnect the DC-input power leads from the power source. You can leave the ground cable connected.
This completes the procedure for powering down Cisco 7200 series routers.
To disconnect DC-input power to the Cisco 7200 series routers, complete the following steps:
|
Warning Before completing any of the following steps, and to prevent short-circuit or shock hazards, ensure that power is removed from the DC circuit. To ensure that all power is OFF, locate the circuit breaker on the panel board that services the DC circuit, switch the circuit breaker to the OFF position, and tape the switch handle of the circuit breaker in the OFF position. |
|
Warning When installing the unit, the ground connection must always be made first and disconnected last. |
Step 2 Ensure that no current is flowing through the DC power supply leads. To ensure that all power is OFF, locate the circuit breaker on the panel board that services the DC circuit, switch the circuit breaker to the OFF position, and tape the switch handle of the circuit breaker in the OFF position.
Step 3 Disconnect the -V and +V and ground leads from the power supply.
Step 4 Remove the cable tie that secures the DC power line input leads and ground leads to the power supply faceplate. Save the cable tie.
|
Note The cable tie that accompanied your DC-input power supply can be removed and replaced on the power supply without the use of a tool. If you secured the DC-input power supply leads to the power supply faceplate using a different type of cable tie, use the wire stripper to cut that cable tie from the power supply. |
Step 5 Using a 3/16-inch flat-blade screwdriver, loosen the screw below the +DC power line input lead receptacle and pull the lead from the connector (see Figure 3). Repeat this step for the -DC power power input lead and the ground lead.
|
Note The color coding of the DC-input power supply leads depends on the color coding of the DC power source at your site. Typically, green or green/yellow is used for ground. Make certain the lead color coding you choose for the DC-input power supply matches lead color coding used at the DC power source. |
This completes the procedure for disconnecting DC-input power. Proceed to the section "Removing the DC-Input Power Supply."
To remove the DC-input power supply from Cisco 7200 series routers, complete the following steps:
If the router is not installed in a standard 19-inch, four-post or telco rack, skip to Step 5. If the router is installed in a rack, determine if any permanent rack fixtures, such as a power strip, are obstructing access to the power supply. If a rack fixture is obstructing access to the power supply, proceed to Step 2.
Step 2 Using a 3/16-inch flat-blade screwdriver, loosen the screws that secure the router to the front mounting strips of the rack.
Step 3 Position at least one person in front of the rack to support the front underside of the router.
Step 4 From the rear of the rack, carefully push the front of the router out of the rack until there is enough clearance to remove the power supply.
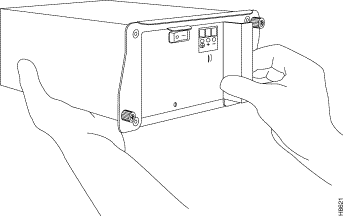
Step 5 Grasp the power supply handle and pull the DC-input power supply from the router.
|
Caution To maintain agency compliance requirements and meet EMI emissions standards for the Cisco 7200 series routers with a single power supply, the power supply filler plate must remain in the power supply adjacent to the installed power supply. Do not remove this filler plate from the router unless you intend to install a redundant power supply. |
This completes the procedure for removing the DC-input power supply from Cisco 7200 series routers.
|
Caution Do not mix AC- and DC-input power supplies in the same router. |
To install a new DC-input power supply in a Cisco 7200 series chassis, complete the following steps:
Step 2 Grasp the power supply handle with one hand and place your other hand underneath the power supply for support (refer to Figure 5).
Step 3 Align the power supply to the power supply bay.
Step 4 Slide the power supply completely into the power supply bay until its faceplate is flush with the router's rear panel.
|
Caution When inserting a power supply into the router, do not use unnecessary force; slamming the power supply into the bay can damage the connectors on the rear of the supply and on the midplane. |
Step 5 Seat the power supply in the router by tightening its captive installation screws with a number 2 Phillips or a 3/16-inch flat-blade screwdriver.
|
Note The power supply is not fully seated in the router midplane until you tighten its captive installation screws. |
Step 6 If there is no second power supply, replace the filler plate on the empty power supply bay. Using a number 2 Phillips screwdriver, tighten the filler plate's captive installation screws.
Step 7 If you pushed the router from the rack, slowly guide the router back into the rack.
Step 8 Use a 3/16-inch flat-blade screwdriver to tighten the screws that secure the router to the front mounting strips of the rack.
|
Caution To maintain agency compliance requirements and meet EMI emissions standards for the Cisco 7200 series routers with a single power supply, the power supply filler plate must remain in the power supply adjacent to the installed power supply. Do not remove this filler plate from the router unless you intend to install a redundant power supply. |
This completes the procedures for replacing a DC-input power supply in the router. Proceed to the following section "Reconnecting DC-Input Power and Turning On the Power Supply."
The following procedures explain how to reconnect DC-input power to Cisco 7200 series routers, power up the router, and verify a successful system boot.
|
Warning Read the installation instructions before you connect the system to its power source. |
|
Note The color coding of the DC-input power supply leads depends on the color coding of the DC power source at your site. Typically, green or green/yellow is used for ground. Make certain the lead color coding you choose for the DC-input power supply matches lead color coding used at the DC power source. |
To reconnect DC-input power to Cisco 7200 series routers, complete the following steps:
|
Warning Before completing any of the following steps, and to prevent short-circuit or shock hazards, ensure that power is removed from the DC circuit. To ensure that all power is OFF, locate the circuit breaker on the panel board that services the DC circuit, switch the circuit breaker to the OFF position, and tape the switch handle of the circuit breaker in the OFF position. |
|
Warning When installing the unit, the ground connection must always be made first and disconnected last. |
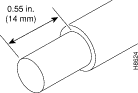
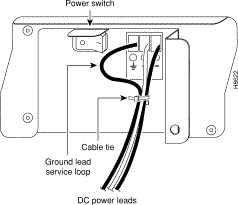
Step 2 If necessary, use a wire stripper to strip approximately 0.55 inch (14 mm) from the DC power line input and ground leads. (See Figure 6.)
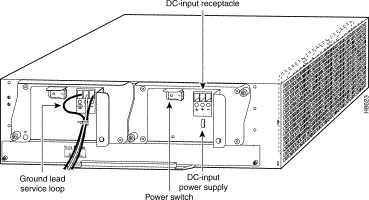
Step 3 At the rear of the router, check that the power switch on the power supply is in the off (O) position. (See Figure 7.)
Step 4 Insert the stripped end of the ground lead all the way into the ground lead receptacle on the DC-input power supply and tighten the receptacle screw using a 3/16-inch flat-blade screwdriver. (See Figure 7.)
Step 5 Insert the stripped end of the + DC power line input lead all the way into the + lead receptacle and tighten the receptacle screw using the same 3/16-inch flat-blade screwdriver. Repeat Step 5 for the -DC power line input lead.
|
Note Make sure the entire stripped end of each lead is inserted all the way into its receptacle. If any exposed wire at the stripped end of a lead is visible after inserting the lead into its receptacle, remove the lead from the receptacle, use the wire stripper to cut the stripped end of the lead, and repeat Step 2 through Step 5. |
Step 6 After tightening the receptacle screw for the ground and DC power line input leads, use the cable tie you saved earlier to secure the three leads to the power supply faceplate.
|
Note When securing the ground and DC power line input leads to the power supply faceplate, leave a small service loop in the ground lead to ensure that it is the last lead to disconnect from the power supply if a great deal of strain is placed on all three leads (refer to Figure 7). |
Step 7 Turn the circuit breaker to the ON position to restore power to the DC-input power leads..
|
Note Each DC-input power supply operating at 24V DC requires a minimum of 19A service. Each DC-input power supply operating at 48 VDC requires a minimum of 13A service. Each DC-input power supply operating at 60 VDC requires a minimum of 8A service. The preceding values are absolute maximum values. Typical system configurations use substantially less. To obtain typical values for your configuration, contact your Cisco sales representative. This product relies on the building's installation for short-circuit (overcurrent) protection. Ensure that a listed and certified fuse or circuit breaker, 35A maximum 60 VDC, is used on all current-carrying conductors. Site wiring and circuit breakers need to be sized to accommodate the maximum values for safety reasons. |
This completes the steps for connecting DC-input power to Cisco 7200 series routers.
To power up Cisco 7200 series routers that have an installed DC-input power supply, complete the following steps:
Step 2 At the rear of the router, place the power switch on the power supply in the on (|) position. The green OK LED on the power supply turns on.
Step 3 Listen for the fans; you should immediately hear them operating.
Step 4 During the boot process, observe the system's LEDs. The LEDs on most of the port adapters go on and off in irregular sequence. Some may go on, go out, and go on again for a short time. On the I/O controller, the IO power OK LED comes on immediately.
Step 5 Observe the initialization process. When the system boot is complete (a few seconds), the network processing engine or network services engine begins to initialize the port adapters and the I/O controller. During this initialization, the LEDs on each port adapter behave differently (most flash on and off). The enabled LED on each port adapter goes on when initialization is completed, and the console screen displays a script and system banner similar to the following:
This completes the procedure for replacing the DC-input power supply in a single power supply configuration, reconnecting input power, and powering up the router.
The procedures for removing and replacing the DC-input power supply in a dual power supply configuration are explained in the following sections:
Before beginning the installation, read the following rules:
|
Caution Do not mix AC- and DC-input power supplies in the same router. |
To distinguish the two DC power supplies, look for these characteristics:
|
Warning Before completing any of the following steps, and to prevent short-circuit or shock hazards, ensure that power is removed from the DC circuit. To ensure that all power is OFF, locate the circuit breaker on the panel board that services the DC circuit, switch the circuit breaker to the OFF position, and tape the switch handle of the circuit breaker in the OFF position. |
|
Warning When installing the unit, the ground connection must always be made first and disconnected last. |
|
Caution It is possible to remove and replace one DC power supply while the router remains powered up and running on the other DC power supply if the two DC power supplies are on separate circuit breakers. If they are on the same circuit breaker, both power supplies must be powered off, and the circuit breaker turned to the OFF position before replacing one of the power supplies. |
To turn off the DC-input power supply you plan to replace and to disconnect power, complete the following steps:
Step 2 To ensure that all power (to the power supply you wish to replace) is off, locate the circuit breaker on the panel board that services the DC circuit, switch the circuit breaker to the OFF position, and tape the switch handle of the circuit breaker in the OFF position.
|
Note Assuming the two power supplies are on separate power circuits and can have power to one turned off by turning off the circuit breaker, the second power supply maintains full system power (the system continues to operate as normal). |
Step 3 Remove the cable tie that secures the DC power line input leads and ground leads to the power supply faceplate. Save the cable tie.
|
Note The cable tie that accompanied your DC-input power supply can be removed and replaced on the power supply without using a tool. If you secured the DC-input power supply leads to the power supply faceplate using a different type of cable tie, use the wire stripper to cut the cable tie from the power supply. |
Step 4 Using a 3/16-inch flat-blade screwdriver, loosen the screw below the +DC input power lead receptacle and pull the lead from the connector (see Figure 3). Repeat this step for the -DC input power lead and the ground lead.
|
Note The color coding of the DC-input power supply leads depends on the color coding of the DC power source at your site. Typically, green or green/yellow is used for ground. Make certain the lead color coding you choose for the DC-input power supply matches lead color coding used at the DC power source. |
This completes the procedure for disconnecting DC-input power. Proceed to the section "Removing the DC-Input Power Supply."
To remove the DC-input power supply from Cisco 7200 series routers, complete the following steps:
If the router is not installed in a standard 19-inch rack or in a telco rack, skip to Step 5. If the router is installed in a rack, determine if any permanent rack fixtures, such as a power strip, are obstructing access to the power supply. If a rack fixture is obstructing access to the power supply, proceed with Step 2.
Step 2 Using a 3/16-inch flat-blade screwdriver, loosen the screws that secure the router to the front mounting strips of the rack.
Step 3 Position at least one person in front of the rack to support the front underside of the router.
Step 4 From the rear of the rack, carefully push the front of the router out of the rack until there is enough clearance to remove the power supply from the router.
Step 5 Grasp the power supply handle and pull the DC-input power supply from the router.
This completes the procedure for removing the DC-input power supply from Cisco 7200 series routers.
To install a new DC-input power supply in Cisco 7200 series routers, complete the following steps:
Step 2 Grasp the power supply handle with one hand and place your other hand underneath the power supply for support (refer to Figure 5).
Step 3 Align the power supply to the power supply bay.
Step 4 Slide the power supply completely into the power supply bay until its faceplate is flush with the router's rear panel.
|
Caution When inserting a power supply into the router, do not use unnecessary force; slamming the power supply into the bay can damage the connectors on the rear of the supply and on the midplane. |
Step 5 Seat the power supply in the router by tightening its captive screws with a number 2 Phillips or a 3/16-inch flat-blade screwdriver.
|
Note The power supply is not fully seated in the router midplane until you tighten its captive installation screws. |
Step 6 If you pushed the router forward in the rack, slowly guide the router back into the rack.
Step 7 Use a 3/16-inch flat-blade screwdriver to tighten the screws that secure the router to front mounting strips of the rack.
This completes the procedures for replacing a DC-input power supply in the router. Proceed to the following section "Reconnecting DC-Input Power and Turning On the Power Supply."
|
Warning Read the installation instructions before you connect the system to its power source. |
The following procedures explain how to reconnect DC-input power to Cisco 7200 series routers, turn on the power supply, and verify the power supply is operating properly.
|
Note The color coding of the DC-input power supply leads depends on the color coding of the DC power source at your site. Typically, green or green/yellow is used for ground. Make certain the lead color coding you choose for the DC-input power supply matches lead color coding used at the DC power source. |
To reconnect DC-input power to Cisco 7200 series routers, complete the following steps:
|
Warning Before completing any of the following steps, and to prevent short-circuit or shock hazards, ensure that power is removed from the DC circuit. To ensure that all power is OFF, locate the circuit breaker on the panel board that services the DC circuit, switch the circuit breaker to the OFF position, and tape the switch handle of the circuit breaker in the OFF position. |
|
Warning When installing the unit, the ground connection must always be made first and disconnected last. |
Step 2 If necessary, use a wire stripper to strip approximately 0.55 inch (14 mm) from the DC power line input and ground leads. (See Figure 6).
Step 3 At the rear of the router, check that the power switch on the power supply is in the off (O) position (refer to Figure 9).
Step 4 Insert the stripped end of the ground lead all the way into the ground lead receptacle on the DC-input power supply and tighten the receptacle screw using a 3/16-inch flat-blade screwdriver.
Step 5 Insert the stripped end of the + DC power line input leads all the way into the + lead receptacle and tighten the receptacle screw using the same 3/16-inch flat-blade screwdriver. Repeat Step 5 for the - DC power line input lead.
|
Note Make sure the entire stripped end of each lead is inserted all the way into its receptacle. If any exposed wire at the stripped end of a lead is visible after inserting the lead into its receptacle, remove the lead from the receptacle, use the wire stripper to cut the stripped end of the lead, and repeat Step 2 through Step 5. |
Step 6 After tightening the receptacle screw for the ground and DC power line input leads, use the cable tie you saved earlier to secure the three leads to the power supply faceplate.
|
Note When securing the ground and DC power line input leads to the power supply faceplate, leave a small service loop in the ground lead to ensure that it is the last lead to disconnect from the power supply if a great deal of strain is placed on all three leads (refer to Figure 9). |
Step 7 Connect the ground and DC power line input leads to the power source.
|
Note Each DC-input power supply operating at 24 VDC requires a minimum of 19A service. Each DC-input power supply operating at 48 VDC requires a minimum of 13A service. Each DC-input power supply operating at 60 VDC requires a minimum of 8A service. The preceding values are absolute maximum values. Typical system configurations use substantially less. To obtain typical values for your configuration, contact your Cisco sales representative. This product relies on the building's installation for short-circuit (overcurrent) protection. Ensure that a listed and certified fuse or circuit breaker, 35A maximum 60 VDC, is used on all current-carrying conductors. Site wiring and circuit breakers need to be sized to accommodate the maximum values for safety reasons. |
This completes the steps for connecting DC-input power to Cisco 7200 series routers.
To turn on the power supply, complete the following steps:
Step 2 Listen for the fans; you should immediately hear them operating.
Step 3 During the boot process, observe the system's LEDs. The LEDs on most of the port adapters go on and off in irregular sequence. Some may go on, go out, and go on again for a short time. On the I/O controller, the IO power OK LED comes on immediately.
Step 4 Observe the initialization process. When the system boot is complete (a few seconds), the network processing engine or network services engine begins to initialize the port adapters and the I/O controller. During this initialization, the LEDs on each port adapter behave differently (most flash on and off). The enabled LED on each port adapter goes on when initialization is completed, and the console screen displays a script and system banner similar to the following:
This completes the procedure for removing and replacing the DC-input power supply in a dual power supply configuration, reconnecting input power, and turning on the power supply.
The following sections explain how to obtain documentation from Cisco Systems.
You can access the most current Cisco documentation on the World Wide Web at the following URL:
Translated documentation is available at the following URL:
http://www.cisco.com/public/countries_languages.shtml
Cisco documentation and additional literature are available in a Cisco Documentation CD-ROM package, which is shipped with your product. The Documentation CD-ROM is updated monthly and may be more current than printed documentation. The CD-ROM package is available as a single unit or through an annual subscription.
Cisco documentation is available in the following ways:
http://www.cisco.com/cgi-bin/order/order_root.pl
http://www.cisco.com/go/subscription
If you are reading Cisco product documentation on Cisco.com, you can submit technical comments electronically. Click Leave Feedback at the bottom of the Cisco Documentation home page. After you complete the form, print it out and fax it to Cisco at 408 527-0730.
You can e-mail your comments to bug-doc@cisco.com.
To submit your comments by mail, use the response card behind the front cover of your document, or write to the following address:
Cisco Systems
Attn: Document Resource Connection
170 West Tasman Drive
San Jose, CA 95134-9883
Cisco provides Cisco.com as a starting point for all technical assistance. Customers and partners can obtain documentation, troubleshooting tips, and sample configurations from online tools by using the Cisco Technical Assistance Center (TAC) Web Site. Cisco.com registered users have complete access to the technical support resources on the Cisco TAC Web Site.
Cisco.com is the foundation of a suite of interactive, networked services that provides immediate, open access to Cisco information, networking solutions, services, programs, and resources at any time, from anywhere in the world.
Cisco.com is a highly integrated Internet application and a powerful, easy-to-use tool that provides a broad range of features and services to help you to
You can self-register on Cisco.com to obtain customized information and service. To access Cisco.com, go to the following URL:
The Cisco TAC is available to all customers who need technical assistance with a Cisco product, technology, or solution. Two types of support are available through the Cisco TAC: the Cisco TAC Web Site and the Cisco TAC Escalation Center.
Inquiries to Cisco TAC are categorized according to the urgency of the issue:
Which Cisco TAC resource you choose is based on the priority of the problem and the conditions of service contracts, when applicable.
The Cisco TAC Web Site allows you to resolve P3 and P4 issues yourself, saving both cost and time. The site provides around-the-clock access to online tools, knowledge bases, and software. To access the Cisco TAC Web Site, go to the following URL:
All customers, partners, and resellers who have a valid Cisco services contract have complete access to the technical support resources on the Cisco TAC Web Site. The Cisco TAC Web Site requires a Cisco.com login ID and password. If you have a valid service contract but do not have a login ID or password, go to the following URL to register:
http://www.cisco.com/register/
If you cannot resolve your technical issues by using the Cisco TAC Web Site, and you are a Cisco.com registered user, you can open a case online by using the TAC Case Open tool at the following URL:
http://www.cisco.com/tac/caseopen
If you have Internet access, it is recommended that you open P3 and P4 cases through the Cisco TAC Web Site.
The Cisco TAC Escalation Center addresses issues that are classified as priority level 1 or priority level 2; these classifications are assigned when severe network degradation significantly impacts business operations. When you contact the TAC Escalation Center with a P1 or P2 problem, a Cisco TAC engineer will automatically open a case.
To obtain a directory of toll-free Cisco TAC telephone numbers for your country, go to the following URL:
http://www.cisco.com/warp/public/687/Directory/DirTAC.shtml
Before calling, please check with your network operations center to determine the level of Cisco support services to which your company is entitled; for example, SMARTnet, SMARTnet Onsite, or Network Supported Accounts (NSA). In addition, please have available your service agreement number and your product serial number.
![]()
![]()
![]()
![]()
![]()
![]()
![]()
![]()
Posted: Sun Jan 19 11:10:14 PST 2003
All contents are Copyright © 1992--2002 Cisco Systems, Inc. All rights reserved.
Important Notices and Privacy Statement.