|
|

Release 1.10
May 13, 2002
These release notes describe the features and caveats for CDDI/FDDI Workgroup WS-C1400 Concentrator Software Release 1.10. Refer to the CDDI/FDDI C1400 Concentrator Installation and Configuration Guide for detailed information about the CDDI/FDDI Workgroup WS-C1400 Concentrator.
This document is divided into the following sections:
The following sections describe the caveats and corrected caveats in Software Release 1.9.
This section describes caveats that have been corrected in Software Release 1.10 .
This section describes the caveats for Software Release 1.9.
Console> (enable) set ipaddress new_ipaddress new_netmask new_broadcastaddress
Console> (enable) set ipaddress old_ipaddress old_netmask
The following sections describe the caveats and corrected caveats in Software Release 1.9.
This section describes caveats that have been corrected in Software Release 1.9 .
This section describes the caveats for Software Release 1.9.
Console> (enable) set ipaddress new_ipaddress new_netmask new_broadcastaddress
Console> (enable) set ipaddress old_ipaddress old_netmask
The following sections describe the features, caveats, and corrected caveats in Software Release 1.8.
This section describes the Module-Priority Attachment Mode, a new feature in CDDI/FDDI Workgroup WS-C1400 Concentrator Software Release 1.8.
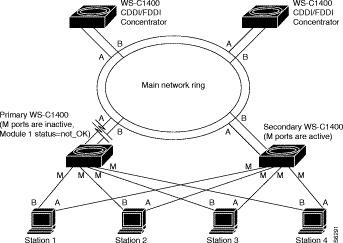
A WS-C1400 concentrator in module-priority attachment mode functions like a concentrator that is in dual-attachment mode, except that Module 1 must be present, enabled, and functional before any master (M) port can connect. If Module 1 experiences a major or minor hardware failure or is disabled or removed, the M ports report as inactive and are disabled.
Module-priority attachment mode can be used to switch a primary WS-C1400 to a secondary WS-C1400 if the primary concentrator loses the main network ring connection due to the removal, disabling, or failure of Module 1. Figure 1 shows an example of a primary and secondary WS-C1400 configuration during a failover.
 |
Note If you are using SNMP to manage the WS-C1400 while in module-priority attachment mode, you must
update the CISCO-STACK-MIB.my file. You can obtain the latest version of the CISCO-STACK-MIB.my
file from the Cisco Systems FTP site. Refer to the
"Using FTP to Obtain the MIB File"
section later in this document. You can also obtain the CISCO-STACK-MIB.my file from Cisco Connection Online (CCO). Refer to the "Obtaining Documentation" section later in this document for information about using CCO. |
To enable module-priority attachment mode, enter the following command from the command-line interface (CLI):
Console> (enable) set attach modpri
Once the set attach modpri command is executed, the following message is displayed:
Attachment type changed to module-priority attach.
The following applies to module-priority attachment:
Console> (enable) show port

Port  Name                  Status      Req-Path   Cur-Path   Type  Neigh
----  --------------------  ----------  ---------  ---------  ----  -----
1/1                         notconnect  secondary  isolated    A     U
1/2                         notconnect  primary    isolated    B     U
1/3                         inactive    primary    isolated    M     U
1/4                         inactive    primary    isolated    M     U
:
:
1/16                        disabled    primary    isolated    M     U
2/1                         inactive    primary    isolated    M     U
:
:
2/8                         inactive    primary    isolated    M     U
|
Note Module-priority attachment mode does not affect ports that you disable. All ports that you disable remain disabled until configured otherwise. All disabled ports are identified as disabled in the show port command display. |
Console> (enable) set port 2/9 enable

Port 2/9 inactive due to dual priority attachment mode in effect.
Console> (enable) set module 1 enable

Module 1 M-ports may be inactive due to module priority attach mode in effect.
Console> (enable) set module 2 enable

Module 2 ports inactive due to module priority attach mode in effect.
Attachment type changed to module-priority attach.
Must reset concentrator for this to take effect!
This section describes caveats that have been corrected in the 1.8 release.
This section describes the caveats for Release 1.8.
Console> (enable) set ipaddress new_ipaddress new_netmask new_broadcastaddress
Console> (enable) set ipaddress old_ipaddress old_netmask
The following section describes caveats and caveats that have been corrected for Release 1.7.
The following caveat is resolved in Release 1.7: When a standby PHY-A port transitions up and down due to normal standby port activity, the dual-homed concentrator no longer sends SNMP trap messages. [CSCdi66807]
This section describes the caveats for Release 1.7.
Console> (enable) set ipaddress new_ipaddress new_netmask new_broadcastaddress
Console> (enable) set ipaddress old_ipaddress old_netmask
The following sections describe features, caveats, and caveat corrections for Release 1.6.
The following enhancements added to Release 1.6 are described in the following sections:
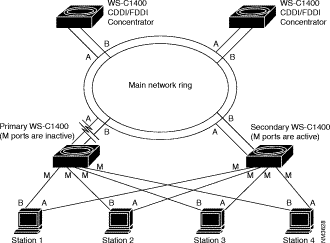
A WS-C1400 concentrator in dual-priority attachment mode functions like a concentrator that is in dual-attachment mode, except that the A or B ports must be active before any master (M) port can connect. If the A or B ports are not active, the M ports will report as inactive and are disabled until either the A or B port becomes active.
Dual-priority attachment mode can be used to switch a primary WS-C1400 to a secondary WS-C1400 if the primary loses the main network ring connection via the A and B ports. Figure 2 shows an example of a primary and secondary WS-C1400 configuration during a main network ring disconnect.
|
Note If you are using SNMP to manage the WS-C1400 while in dual-priority attachment mode, you must
update the CISCO-STACK-MIB.my file. You can obtain the latest version of the CISCO-STACK-MIB.my
file from the Cisco Systems FTP site. Refer to the
"Using FTP to Obtain the MIB File"
section later in this document. You can also obtain the CISCO-STACK-MIB.my file from Cisco Connection Online (CCO). Refer to the "Obtaining Documentation" section later in this document for information about using CCO. |
|
Note It is recommended that you set the primary WS-C1400 to dual-priority attachment mode and set the secondary WS-C1400 to dual-attachment mode when only two concentrators are connected to the main network ring or when two concentrators are connected back-to-back. |
To enable dual-priority attachment mode, enter the following command from the command-line interface (CLI):
Console> (enable) set attach dualpri
Once the set attach dualpri command is executed, the following message is displayed:
Attachment type changed to dual-priority attach.
The following applies to dual-priority attachment:
Console> (enable) show port

Port  Name                  Status      Req-Path   Cur-Path   Type  Neigh
----  --------------------  ----------  ---------  ---------  ----  -----
1/1                         notconnect  secondary  isolated    A     U
1/2                         notconnect  primary    isolated    B     U
1/3                         inactive    primary    isolated    M     U
1/4                         inactive    primary    isolated    M     U
:
:
1/16                        disabled    primary    isolated    M     U
2/1                         inactive    primary    isolated    M     U
:
:
2/8                         inactive    primary    isolated    M     U
|
Note Dual-priority attachment mode does not affect ports that you disable. All ports that you disable remain disabled until configured otherwise. All disabled ports are identified as disabled in the show port command display. |
Console> (enable) set port 1/9 enable

Port 1/9 inactive due to dualpriority attachment mode in effect.
Console> (enable) set module 1 enable

Module 1 M-ports may be inactive due to dual attach priority mode in effect.
Console> (enable) set module 2 enable

Module 2 ports inactive due to dual attach priority mode in effect.
Attachment type changed to dual-priority attach.
Must reset concentrator for this to take effect!
The set ringmap [enable | disable] command enables or disables the WS-C1400 ring-mapping feature and saves the state to NVRAM. The default is enable.
To enable ring-mapping, enter the following command:
Console> (enable) set ringmap enable

Ring mapping enabled
To disable ring-mapping, enter the following command:
Console> (enable) set ringmap disable

Ring mapping disabled
To verify the ring map status, use the show ringmap command.
The following caveats are resolved in Release 1.6:
tftp error: access denied. [CSCdi66808]
This section describes the caveats for Release 1.6.
Console> (enable) set port trap 1 disable
Console> (enable) set ipaddress new_ipaddress new_netmask new_broadcastaddress
Console> (enable) set ipaddress old_ipaddress old_netmask
The following sections describe enhancements, caveats, and caveat corrections for Release 1.5.
The following enhancement has been added to Release 1.5:
This release supports a timeout feature that is configured from the console. It lets you change the time interval until the system disconnects an idle session after a period of non-activity. Use the following command:
Console> (enable) set logout timeout
The timeout variable is the number of minutes, from 0 to 10,000, until the system disconnects an idle session. The default is 20 minutes, and 0 disables the feature.
The following caveats are resolved in Release 1.5:
This section describes possibly unexpected behavior by Release 1.5.
tftp error: access denied. [CSCdi66808]
The following sections describe enhancements, caveats, and corrections for Release 1.4.
The following enhancements have been added to Release 1.4:
|
Note No trap is generated if a port transitions from a dormant or standby state to an up state or vice versa. |
The following caveats are resolved for Release 1.4:
Console> (enable) set porttrap

Usage: set porttrap <mod_num/port_num> <enable|disable>
Console> (enable)
Console> (enable) set porttrap 2/1 disable

Port 2/1 up/down trap disabled.
Console> (enable)
This section describes possibly unexpected behavior by Release 1.4.
Console> (enable) set ipaddress new_ipaddress new_netmask new_broadcastaddress
Console> (enable) set ipaddress old_ipaddress old_netmask
The following sections describe new features, important information, and caveats for Release 1.3.
The following enhancements have been added to Release 1.3:
Console> (enable) set unreachable enable

ICMP Unreachables enabled
Console> (enable) show snmp
Console> (enable) set ipaddress

Usage: set ipaddress <ip_addr> [net_mask [broadcast_addr]]

(all values given in IP dot notation: a.b.c.d)
Step 2 Use the ping utility to verify that you can reach the SNMP management station. If the SNMP management station is on a different network, set a default gateway for the concentrator by using the following command:
Console> (enable) set route default ip_addr
Step 3 Use the following command to enable the trap on the concentrator:
Console> (enable) set trap enable

SNMP authentication traps enabled
Step 4 Use the following command to set the trap receiver address with the proper community string:
Console> (enable) set trap 172.20.21.201 public

SNMP trap receiver added
Step 5 Use the following command to view the status of the SNMP configuration:
Console> (enable) show snmp
The following is an example of the show snmp output:
Console (enable) show snmp


IP_Address          IP-Netmask          IP-Broadcast

------------------  ------------------  ---------------

199.133.219.163     255.255.255.0       199.133.219.255


ICMP-Redirects      ICMP-Unreachables   DefaultTTL       Traps Enabled

------------------  ------------------  ---------------  -------------

enabled             enabled             60               None


Community-Access    Community-String

------------------  ------------------

none

read-only           public

read-write          private

read-write-all      secret


Trap-Rec-Address    Trap-Rec-Community

------------------  -------------------

199.133.219.161     Public
Port  Name                 Status     Req-Path  Cur-Path  Conn-State Type Neigh
----  -------------------- ---------- --------- --------- ---------- ---- -----
1/1                        notconnect secondary isolated  standby     A    M
1/2                        connected  primary   concat    active      B    M
1/3                        notconnect primary   isolated  connecting  M    U
1/4                        notconnect primary   isolated  connecting  M    U
1/5                        notconnect primary   isolated  connecting  M    U
1/6                        notconnect primary   isolated  connecting  M    U
1/7                        notconnect primary   isolated  connecting  M    U
1/8                        notconnect primary   isolated  connecting  M    U
1/9                        notconnect primary   isolated  connecting  M    U
1/10                       notconnect primary   isolated  connecting  M    U
1/11                       notconnect primary   isolated  connecting  M    U
1/12                       notconnect primary   isolated  connecting  M    U
1/13                       notconnect primary   isolated  connecting  M    U
1/14                       notconnect primary   isolated  connecting  M    U
1/15                       notconnect primary   isolated  connecting  M    U
1/16                       notconnect primary   isolated  connecting  M    U
      Ler    Ler  Ler   Ler
Port  Cond   Est  Alarm Cutoff Lem-Ct     Lem-Rej-Ct tl-min  Media   Link-Trap
----  -----  ---- ----- ------ ---------- ---------- ------- ------  ---------
1/1   false  16   8     7      0          0          286     tp-pmd  enable
1/2   false  15   8     7      0          0          286     tp-pmd  enable
1/3   false  16   8     7      0          0          286     tp-pmd  enable
1/4   false  16   8     7      0          0          286     tp-pmd  enable
1/5   false  16   8     7      0          0          286     tp-pmd  enable
1/6   false  16   8     7      0          0          286     tp-pmd  enable
1/7   false  16   8     7      0          0          286     tp-pmd  enable
1/8   false  16   8     7      0          0          286     tp-pmd  enable
1/9   false  16   8     7      0          0          286     tp-pmd  enable
1/10  false  16   8     7      0          0          286     tp-pmd  enable
1/11  false  16   8     7      0          0          286     tp-pmd  enable
1/12  false  16   8     7      0          0          286     tp-pmd  enable
1/13  false  16   8     7      0          0          286     tp-pmd  enable
1/14  false  16   8     7      0          0          286     tp-pmd  enable
1/15  false  16   8     7      0          0          286     tp-pmd  enable
1/16  false  16   8     7      0          0          286     tp-pmd  enable
Release 1.3 supports RFC 1572. For more information, refer to the Evolution of the Interfaces Group of MIB-II.
The latest version of the CISCO-STACK-MIB.my file can be obtained from the Cisco Systems FTP site. Refer to the "Using FTP to Obtain the MIB File" section.
You can also obtain the CISCO-STACK-MIB.my file from Cisco Connection Online (CCO). Refer to the "Obtaining Documentation" section later in this document for information about using CCO.
You can obtain the CISCO-STACK-MIB.my file that describes the Cisco MIB by following these steps:
Step 2 Use the anonymous username to log into the server.
Step 3 Enter your e-mail name when prompted for the password.
Step 4 At the ftp> prompt, change directories to /pub/mibs/.
Step 5 Change directories to one of the following:
Step 6 Use the get README command to display the file that has the list of available files.
Step 7 Use the get CISCO-STACK-MIB.my command to obtain a copy of the MIB file.
The following caveats describe possibly unexpected behavior by Release 1.3:
The following sections describe new features and important Flashcode information for Release 1.2.
The following enhancement has been added to Release 1.2:
The set tlmin command sets the time required for PHY hardware to transmit a given line state before advancing to the next physical connection management (PCM) state at the station management (SMT) level. The mod_num is 1 or 2, and the port_num is 1 through 16, depending on the card. The hexvalue is between 0 and 0xffff. The tl_min setting is stored in the TL_MIN register (also known as the LS_MAX register) as part of the SMT MIB structure in nonvolatile memory and is used for initializing the PHY hardware setting each time the concentrator is rebooted.
Console> (enable) set tlmin ?

Usage: set tlmin <mod_num/port_num> <hexvalue>
       (hexvalue is in 2's complement)
Console> (enable) set tlmin 2/5 fdfd

Port 2/5 tlmin set to 0xfdfd.
Console> (enable)
After the Workgroup WS-C1400 Concentrator firmware Version 1.2 is installed, future network downloads will allow only Flashcode with the WS-C1400 signature to be loaded. Version 1.2 and later versions of the Workgroup WS-C1400 Concentrator Flashcode will contain the WS-C1400 signature.
To download or copy an earlier Flashcode version, you must specifically request the no-signature option by adding the nosig argument to the download command. The following is an example of a download attempt without using the nosig argument:
Console> (enable) download 198.133.219.40 c1400_11.net

This command will disconnect your telnet session.
Download image c1400_11.net from host 198.133.219.40 to flash (y/n) [n]? y
\
Done.  Finished Network Download.  (453636 bytes)
ERROR: Downloaded code signature incorrect
The following is an example of a successful download using the nosig argument:
Console> (enable) download 198.133.219.40 c1400_11.net nosig

This command will disconnect your telnet session.
Download image c1400_11.net from host 198.133.219.40 to flash (y/n) [n]? y
\
Done. Finished Network Download. (453636 bytes)
Initializing flash...Erasing Flash...Done
Programming flash
Base....Code....Length....Time....Done
Disconnected from FDDI ring.
Connection closed by foreign host.
The following sections explain how to obtain documentation from Cisco Systems.
You can access the most current Cisco documentation on the World Wide Web at the following URL:
Translated documentation is available at the following URL:
http://www.cisco.com/public/countries_languages.shtml
Cisco documentation and additional literature are available in a Cisco Documentation CD-ROM package, which is shipped with your product. The Documentation CD-ROM is updated monthly and may be more current than printed documentation. The CD-ROM package is available as a single unit or through an annual subscription.
Cisco documentation is available in the following ways:
If you are reading Cisco product documentation on Cisco.com, you can submit technical comments electronically. Click the Fax or Email option under the "Leave Feedback" at the bottom of the Cisco Documentation home page.
You can e-mail your comments to bug-doc@cisco.com.
To submit your comments by mail, use the response card behind the front cover of your document, or write to the following address:
Cisco Systems
Attn: Document Resource Connection
170 West Tasman Drive
San Jose, CA 95134-9883
We appreciate your comments.
Cisco provides Cisco.com as a starting point for all technical assistance. Customers and partners can obtain documentation, troubleshooting tips, and sample configurations from online tools by using the Cisco Technical Assistance Center (TAC) Web Site. Cisco.com registered users have complete access to the technical support resources on the Cisco TAC Web Site.
Cisco.com is the foundation of a suite of interactive, networked services that provides immediate, open access to Cisco information, networking solutions, services, programs, and resources at any time, from anywhere in the world.
Cisco.com is a highly integrated Internet application and a powerful, easy-to-use tool that provides a broad range of features and services to help you to
You can self-register on Cisco.com to obtain customized information and service. To access Cisco.com, go to the following URL:
The Cisco TAC is available to all customers who need technical assistance with a Cisco product, technology, or solution. Two types of support are available through the Cisco TAC: the Cisco TAC Web Site and the Cisco TAC Escalation Center.
Inquiries to Cisco TAC are categorized according to the urgency of the issue:
Which Cisco TAC resource you choose is based on the priority of the problem and the conditions of service contracts, when applicable.
The Cisco TAC Web Site allows you to resolve P3 and P4 issues yourself, saving both cost and time. The site provides around-the-clock access to online tools, knowledge bases, and software. To access the Cisco TAC Web Site, go to the following URL:
All customers, partners, and resellers who have a valid Cisco services contract have complete access to the technical support resources on the Cisco TAC Web Site. The Cisco TAC Web Site requires a Cisco.com login ID and password. If you have a valid service contract but do not have a login ID or password, go to the following URL to register:
http://www.cisco.com/register/
If you cannot resolve your technical issues by using the Cisco TAC Web Site, and you are a Cisco.com registered user, you can open a case online by using the TAC Case Open tool at the following URL:
http://www.cisco.com/tac/caseopen
If you have Internet access, it is recommended that you open P3 and P4 cases through the Cisco TAC Web Site.
The Cisco TAC Escalation Center addresses issues that are classified as priority level 1 or priority level 2; these classifications are assigned when severe network degradation significantly impacts business operations. When you contact the TAC Escalation Center with a P1 or P2 problem, a Cisco TAC engineer will automatically open a case.
To obtain a directory of toll-free Cisco TAC telephone numbers for your country, go to the following URL:
http://www.cisco.com/warp/public/687/Directory/DirTAC.shtml
Before calling, please check with your network operations center to determine the level of Cisco support services to which your company is entitled; for example, SMARTnet, SMARTnet Onsite, or Network Supported Accounts (NSA). In addition, please have available your service agreement number and your product serial number.
CCIP, the Cisco Powered Network mark, the Cisco Systems Verified logo, Cisco Unity, Follow Me Browsing, FormShare, Internet Quotient, iQ Breakthrough, iQ Expertise, iQ FastTrack, the iQ Logo, iQ Net Readiness Scorecard, Networking Academy, ScriptShare, SMARTnet, TransPath, and Voice LAN are trademarks of Cisco Systems, Inc.; Changing the Way We Work, Live, Play, and Learn, Discover All That's Possible, The Fastest Way to Increase Your Internet Quotient, and iQuick Study are service marks of Cisco Systems, Inc.; and Aironet, ASIST, BPX, Catalyst, CCDA, CCDP, CCIE, CCNA, CCNP, Cisco, the Cisco Certified Internetwork Expert logo, Cisco IOS, the Cisco IOS logo, Cisco Press, Cisco Systems, Cisco Systems Capital, the Cisco Systems logo, Empowering the Internet Generation, Enterprise/Solver, EtherChannel, EtherSwitch, Fast Step, GigaStack, IOS, IP/TV, LightStream, MGX, MICA, the Networkers logo, Network Registrar, Packet, PIX, Post-Routing, Pre-Routing, RateMUX, Registrar, SlideCast, StrataView Plus, Stratm, SwitchProbe, TeleRouter, and VCO are registered trademarks of Cisco Systems, Inc. and/or its affiliates in the U.S. and certain other countries.
Copyright © 2000-2002, Cisco Systems, Inc.
All rights reserved. Printed in USA.
![]()
![]()
![]()
![]()
![]()
![]()
![]()
![]()
Posted: Tue May 14 13:30:05 PDT 2002
All contents are Copyright © 1992--2002 Cisco Systems, Inc. All rights reserved.
Important Notices and Privacy Statement.