|
|

This publication provides instructions for upgrading SBus adapter cards to enable diskless boot operation over the network. Instructions are provided for both SunOS 4.1.x and Solaris 2.x operating systems. The upgrade instructions include steps for configuring the firmware and upgrading SBus adapter cards.
For complete descriptions of configuration options available for the CDDI/FDDI SBus adapter, refer to the Workgroup CDDI/FDDI SBus Adapter User Guide.
Sections in this publication include the following:
The diskless client is any system that does not have a hard disk and relies on an assigned server for all of its resources. The diskless boot client's file systems, disk storage, and swap space are stored on a server, and it requires access to a server to boot.
Before you can begin upgrading adapter cards, you will need the following:
Make sure you have the following equipment before you begin the upgrading procedure:
 | Caution To prevent electrostatic discharge (ESD) wear an antistatic strap at all times when handling hardware. |
Electrostatic discharge (ESD) damage, which can occur when electronic boards or components are handled improperly, can result in complete or intermittent failures. Make sure to handle the PROMs by the metal frame or carrier only; avoid touching the board (particularly avoid touching any components, connector pins, or the metal fingers on the edge connector).
Following are guidelines for preventing ESD damage:
| Caution For safety, periodically check the resistance value of the antistatic strap. The measurement should be between 1 and 10 megohms. |
Perform the following tasks to configure the firmware:
Step 1 The latest firmware must be installed in the same directory as the driver utilities. For SunOS 4.1.x, the firmware is usually in the /usr/cfddi directory, and for Solaris 2.x, it is usually in the /opt/SBUSfddi directory. The firmware is in tar format.
Step 2 Enter the following command, where sbusxx.rom is the name of the firmware (and xx is the most current version). For example, for version 4.4, enter 44, and for version 2.7, enter 27.
download_flash sbusxx.rom
Following are the procedures for replacing the programmable read-only (PROM) devices on the SBus adapters. Make sure to follow the procedures with the numbers that correspond to the adapters you are replacing.
Following are the steps for replacing the PROM for the WA-C300T, WA-C301T, or WA-303T adapters.
| Caution To prevent ESD damage, handle adapter cards by the carrier edges only, and always use a grounding strap. |
Step 1 Turn OFF power to the workstation.
Step 2 Open the workstation using the appropriate documentation.
Step 3 Remove the SBus adapter card using the appropriate documentation.
Step 4 Place the removed SBus adapter card on an antistatic mat or foam.
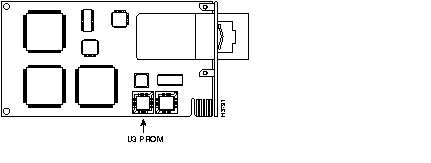
Step 5 Locate the PROM in socket U3. Note the orientation of the notch on the existing PROM so that you can install the new PROM with the same orientation. (See Figure 1.)
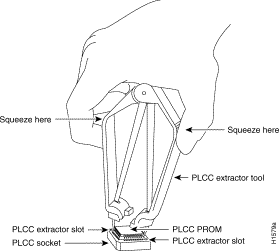
| Caution You must use a PLCC extractor to remove the PROM. (See Figure 2.) You cannot use a small flat-blade screwdriver to pry it out of the socket as with the older type of ICs. A PLCC IC does not have legs or pins that plug into the socket; instead, the contacts are on the sides of the IC and along the inner sides of the socket. When the IC is seated in the socket, the top of the IC is flush with the top of the socket. Forcing a small screwdriver or other tool between the IC and the sides of the socket to pry out the IC will damage the component or the socket or both, and you will have to replace them. |
Step 6 Use a chip or PLCC-type extractor to remove the PROM labeled U3 from the PROM socket. Place the removed PROM on antistatic foam or into an antistatic bag. (See Figure 2)
Step 7 Insert the new PROM in the same socket with the notched corner in the same orientation as the PROM you removed.
| Caution Electrical damage may result if the PROM is positioned incorrectly. Always double-check the positioning of the PROM in the socket. |
Step 8 After you have installed the PROM, replace the upgraded card into the workstation using the appropriate documentation.
Step 9 For the SunOS driver, extract the contents of the tar format driver diskette into a subdirectory (example: /usr/local/diskless/cfddi) on the diskless boot server, and proceed to the section "Installing the SunOS 4.1.x Diskless Boot Server Software" in this document.
For Solaris, follow the instructions in the section "Instructions for Installing the Sun Solaris 2.x Diskless Boot Server Software" in this document.
Step 10 Close the workstation using the appropriate documentation.
Step 11 Turn ON the system power.
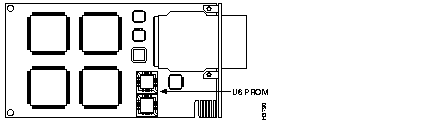
In general, you follow the preceding instructions to replace the PROM for the WA-C300, WA-C301M, or WA-C303 adapters. However, instead of replacing the PROM from the U3 socket, replace the PROM from the socket labeled U6. (See Figure 3.) If you are upgrading a CDDI card, you may need to remove the daughterboard to get direct access to the PROM.
This section describes how to install of diskless boot clients using the SunOS 4.1.x operating system using the ./install.fddi command and how to add a client using the add_client command. Refer to the section "Administering Workstations" in the Sun System and Network Configuration manual for detailed installation instructions.
The installation requires the following steps:
Perform the following tasks to add the client to the server databases:
Step 1 Change directories to /usr/etc/install to use the add_client utility.
Step 2 At the server command line, enter the ./add_client -i command. The -i option invokes full screen interactive mode, as shown in the following example:
add_client -i
[sun4c.sunos.4.1.3] x [sun4m.sunos.4.1.3_u1]cisco-fddi
Choice : x [create] [delete] [display] [edit]
[x/X=select choice] [space=next choice] [^B/^P=backward] [^F/^N=forward]Step 3 From the preceding screen, select the following:
Information similar to the following is added to the screen:
[sun4c.sunos.4.1] x [sun4m.sunos.4.1.3_u1]cisco-fddi
Choice : x [create] [delete] [display] [edit]y
[x/X=select choice][space=next choice][^B/^P=backward][^F/^N=forward]
Step 4 Verify that all displayed variables are correct. If all of the displayed variables are correct, enter y. The following confirmation screen appears:
[sun4c.sunos.4.1] x [sun4m.sunos.4.1.3_u1]cisco-fddi
Choice : x [create] [delete] [display] [edit]y
[x/X=select choice][space=next choice][^B/^P=backward][^F/^N=forward]Step 5 Enter y. The add_client utility adds the new client. The following message appears:
Step 6 If the server where you ran the add_client utility contains the network information services (NIS) database, verify that the following files were updated:
If this server does not contain the NIS database, the system administrator must update the following files in the database:
Perform the following tasks to install the SunOS diskless boot driver on the server:
Step 1 At the server, change the directory to /usr/local/diskless/cfddi (same directory as in Step 9 in the section "Replacing the PROM" in this document.
Step 2 At the prompt, enter ./install.fddi to run the install script:
./install.fddi
You have invoked the ./install.fddi script, which is used to install
y
Step 3 At the prompt, enter the path to the diskless boot files, as shown in the preceding example. The following prompt appears:
/export/root/cisco-fddi
Step 4 At the prompt, enter the path to the diskless boot files. The following prompt appears:
y
Step 5 At the prompt, enter y to install the SNMP agent on the diskless station. The following information appears:
Step 6 At the prompt, enter the number of FDDI interfaces installed in this workstation. The following prompt appears:
Step 7 The FDDI interface host name prompt appears. Enter the new host name of this workstation or use the default assigned (the existing name appended with -fddi). The following prompt appears:
Step 8 Enter y to have the IP address retrieved from the host. The following prompt appears:
Step 9 Confirm the IP address retrieved and displayed in default brackets, is correct or manually add the correct IP address if needed. The following prompt appears:
Step 10 Enter the correct client architecture for this system. Enter either sun4c or sun4m. The following information and prompt appear:
Step 11 At the prompt, enter the path to the client architecture kernel. In this example, the path is /export/exec/kvm/sun4m. The following prompt appears:
Step 12 At the prompt, enter the name of the existing kernel configuration file to be copied and modified in the next step. The following prompt appears:
Step 13 At the prompt, enter the name you want given to the new kernel configuration file. Information similar to the following appears:
When the server console prompt reappears, the SunOS diskless boot driver installation is complete. Continue with the instructions in the section "Configuring the Diskless Boot Client" at each diskless boot client.
This section describes to install diskless boot clients for the Sun Solaris 2.x operating system using the administration tool and how to add a client using the pkg_add command. Refer to the section "Introducing a Machine to a Network" in the Solaris 2.3 System Configuration and Installation Guide for detailed installation instructions.
This section includes the following:
This section describes how to use the host manager to add a client using the administration tool.
Perform the following steps to modify the administration files to add a client using the host manager:
Step 1 Start the administration tool at the boot server by entering /usr/bin/admintool at the command line, as in the following example:
The Administration Tool base screen appears.
Step 2 From the Administration Tool, screen select Host Manager. The Host Manager: Select Naming Service screen appears.
Step 3 Under Naming Service, select none.
Step 4 After selecting none, at the prompt Use /etc files on host:, enter the name of the server where the diskless workstation's /etc configuration files will reside.
Step 5 Select apply. The Host Manager base screen appears.
Step 6 From the Host Manager base screen, select Edit. The Host Manager: Add Host screen appears.
Step 7 Click on the Client Type menu button, and select diskless.
Step 8 In the host name field, enter a host name for the diskless client workstation.
Step 9 In the IP address field, enter the IP address for the diskless client workstation.
Step 10 In the Ethernet address field, enter the Ethernet address for the diskless client workstation.
Step 11 Select the correct variable for time zone and region, file server, and OS release.
Step 12 Enter the correct root and swap paths, swap size, system core path, and size.
Step 13 Select add to update the administration files.
Step 14 After adding all the clients to the server administration files, quit the administering tool.
Step 15 If the server where you ran the admin_tool utility contains the network information services (NIS) database, verify that the following files were updated:
If this server does not contain the NIS database, the system administrator must update the following files in the database:
Continue with the following procedure in the section "Installing the Solaris Client Using the pkgadd Script" at each diskless boot client.
At the server, use the pkgadd utility to add the SBus FDDI diskless boot adapter driver for the client workstation.
Perform the following steps:
Step 1 Put the drive diskette into the floppy drive.
Step 2 At the command line, enter the following command to start the pkgadd script:
pkgadd -R /export/root/client name -d /floppy/floppy0
as in the following example:
The following information appears:
2
Step 3 At the prompt, select package 2. The following information appears:
y
Step 4 At the prompt, enter y to install a diskless workstation adapter driver. The following information appears:
y
Step 5 At the prompt, enter y if the adapter is currently installed. The following information appears:
y
Step 6 At the prompt, enter y to continue to use the Ethernet interface. The following information appears:
Step 7 At the prompt, enter the number of interfaces installed in this machine. The following information appears:
y
Step 8 At the prompt, enter y if you want to get the IP address from NIS. The following information appears:
Step 9 At the prompt, enter the new host name for this workstation. The following information appears:
Step 10 At the prompt, enter the IP address for the diskless workstation. The following information appears:
y
Step 11 At the confirmation, enter y to continue with the installation. The following information appears:
q
Step 12 When the initial screen reappears, enter q to quit the pkgadd utility, and reboot the client workstation.
Step 13 If the server where you ran the pkgadd utility contains the network information services (NIS) database, verify that the following files were updated:
If this server does not contain the NIS database, the system administrator must update the following files in the database:
This section describes how to configure the diskless workstation and server to use the Sun Microsystems custom JumpStart utility to automatically install the Solaris software over the FDDI network. Refer to the Sun Microsystems document SPARC: Installing Solaris Software for detailed installation instructions.
Follow the instructions in the Sun document to configure the local server as an install server and/or as a boot server.
The following procedure will not affect the kernel running on the server, but it will make changes to JumpStart files to allow Solaris installation over the FDDI.
Follow these steps to prepare the install server to perform the jumpstart installation over FDDI.
Step 1 Access the file system on the diskette from the server using either a file manager or mount the Solaris FDDI/CDDI diskette.
Step 2 Copy the SBUSfddi directory and its contents from the diskette to the install_dir_path/Solaris_2.4 directory on the server.
cp -r SBUSfddi install_dir_path/Solaris_2.4
This will create a directory with all FDDI files and scripts in install_dir _path/Solaris_2.4/SBUSfddi.
Step 3 Change directories to install_dir_path/Solaris_2.4/SBUSfddi/reloc.
Step 4 Change the permission of the neti file. Enter the following:
Step 5 Enter ./neti to run the neti script. The following information appears:
Step 6 Enter y to continue with the FDDI jumpstart network installation script. The following information appears:
Step 7 At the prompt, enter the type of Sun architecture on the target workstation, either sun4m, sun4c or sun 4d. Information similar to the following appears:
Step 8 Change directories to the install_dir_path, and issue the add_an_install_client command. Following is an example:
Step 9 Refer to Chapter 4, "Preparing Custom Jumpstart Installations" in the Sun SPARC: Installing Solaris Software document for instructions on how to create the JumpStart directory and profile. Confirm that the SBUSfddi package is included in the profile. For example:
Step 10 Create a rules file following the instructions in the Sun SPARC: Installing Solaris Software document.
The server is now configured to use custom JumpStart to automatically install the Solaris software over the FDDI.
Step 11 At the diskless station command line, enter the following:
boot device_path -install, where the device_path is your type of workstation. See Table 1 for the proper device path.
| Workstation Type | Device Path | Notes |
|---|---|---|
| Sun4c | /sbus/fddi | |
| Sun4d | /io-unit@f,e0200000/sbi/fddi | For Solaris only |
| Sun4m | /iommu/sbus/fddi |
Following is an example of the boot device path for a Sun4m workstation:
Step 12 Once the installation is complete, the following message is displayed:
Step 13 Reboot to clear the problem or use the ifconfig command to initiate the interface.
where:
fddi#--is the FDDI adapter number. Usually fddi0.
plumb--opens the device associated with the interface.
diskless_name--is the name of the diskless workstation.
The Solaris custom JumpStart feature configuration is complete.
Perform the following steps at each diskless boot client to boot from the remote server:
Step 1 At the diskless station command line, enter boot device_path, where device_path is your type of workstation. See Table 2 for the proper device path.
| Workstation Type | Device Path | Notes |
|---|---|---|
| Sun4c | /sbus/fddi | |
| Sun4d | /io-unit@f,e0200000/sbi/fddi | For Solaris only |
| Sun4m | /iommu/sbus/fddi |
Following is an example of the boot device path for a Sun4c workstation:
The following information appears, displaying the device path:
show-devs
Step 2 At the ok prompt, enter setenv boot-device device_path to set the diskless workstation open boot PROM (OBP) environment path to use the FDDI adapter as the default boot device. See Table 2 for the proper device path or use the absolute device path, as shown in the preceding example.
Following is an example setting the environment path for a Sun4c workstation:
Step 3 Use the printenv command to show the OBP's current settings; the device path is displayed as in the following example:
Step 4 At the next ok prompt, enter boot to boot the diskless workstation using the FDDI adapter as the boot device, as in the following example:
Example:
Cisco Information Online (CIO) is Cisco Systems' primary, real-time support channel. Maintenance customers and partners can self-register on CIO to obtain additional content and services.
Available 24 hours a day, 7 days a week, CIO provides a wealth of standard and value-added services to Cisco's customers and business partners. CIO services include product information, software updates, release notes, technical tips, the Bug Navigator, configuration notes, brochures, descriptions of service offerings, and download access to public and authorized files.
CIO serves a wide variety of users through two interfaces that are updated and enhanced simultaneously--a character-based version and a multimedia version that resides on the World Wide Web (WWW). The character-based CIO (called "CIO Classic") supports Zmodem, Kermit, Xmodem, FTP, Internet e-mail, and fax download options, and is excellent for quick access to information over lower bandwidths. The WWW version of CIO provides richly formatted documents with photographs, figures, graphics, and video, as well as hyperlinks to related information.
You can access CIO in the following ways:
http://www.cisco.com
cio.cisco.com
For a copy of CIO's Frequently Asked Questions (FAQ), contact cio-help@cisco.com. For additional information, contact cio-team@cisco.com.
If you are a network administrator and need personal technical assistance with a Cisco product that is under warranty or covered by a maintenance contract, contact Cisco's Technical Assistance Center (TAC) at 800 553-2447, 408 526-7209, or tac@cisco.com. To obtain general information about Cisco Systems, Cisco products, or upgrades, contact 800 553-6387, 408 526-7208, or cs-rep@cisco.com.
|
|