This document describes the concept of a DHCP Login Event Generator (LEG) and explains how to install and configure it on the SCMS Subscriber Manager (SM) platform and on a Service Control Engine.
Note
This document assumes a basic familiarity with the Cisco SCMS Subscriber Management, subscriber integration concepts, and the DHCP protocol.
For complete information about Cisco's SCMS subscriber integration concept, see the Cisco SCMS Subscriber Manager User Guide.
|
Cisco Service Center Release |
Part Number |
Publication Date |
|---|---|---|
|
Release 3.0.5 |
OL-7808-04 |
November, 2006 |
Description of Changes
Changes in how to dynamically assign package information. See Dynamic Assignment of Package Information.
|
Cisco Service Center Release |
Part Number |
Publication Date |
|---|---|---|
|
Release 3.0.3 |
OL-7808-03 |
May, 2006 |
Description of Changes
No major changes or new features.
|
Release 3.0 |
OL-7808-02 |
December, 2005 |
This document is intended for system administrators and system integrators who are familiar with DHCP Lease Query concepts and the Cisco Service Control Subscriber Management and Subscriber Integration concepts.
This guide contains the following topics:
|
Chapter |
Title |
Description |
|---|---|---|
|
Chapter 1 |
Describes the Subscriber Manager DHCP Lease Query LEG software module and the terms and concepts used in this guide. | |
|
Chapter 2 |
Provides a description of the DHCP Lease Query LEG process and transactions | |
|
Chapter 3 |
Details the procedures for installing the software either on the Subscriber Manager or on an SCE device. It also describes uninstalling the software and upgrading procedures. | |
|
Chapter 4 |
Describes the configuration procedure for the DHCP Lease Query LEG on the SM and configuring the Package Association | |
|
Chapter 5 |
Provides a description of the command-line utility commands when the software is installed on the Subscriber Manager. | |
|
Chapter 6 |
Provides a description of the command-line interface commands when the software is installed on the SCE device. | |
|
Appendix A |
Describes the DHCP Forwarder application, installation instructions, and adding and removing a resource. |
Use this Reference Guide in conjunction with the following Cisco documentation:
Cisco SCMS Subscriber Manager User Guide
This document uses the following conventions:
|
Convention |
Description |
|---|---|
|
boldface font |
Commands and keywords are in boldface. |
|
italic font |
Arguments for which you supply values are in italics. |
|
[ ] |
Elements in square brackets are optional. |
|
{x | y | z} |
Alternative keywords are grouped in braces and separated by vertical bars. |
|
[x | y | z] |
Optional alternative keywords are grouped in brackets and separated by vertical bars. |
|
string |
A nonquoted set of characters. Do not use quotation marks around the string, or the string will include the quotation marks. |
|
|
Terminal sessions and information that the system displays are in |
|
|
Information you must enter is in |
|
|
Arguments for which you supply values are in |
|
< > |
Nonprinting characters, such as passwords, are in angle brackets. |
|
[ ] |
Default responses to system prompts are in square brackets. |
|
!, # |
An exclamation point (!) or a pound sign (#) at the beginning of a line of code indicates a comment line. |
Note
Means reader take note. Notes contain helpful suggestions or references to materials not covered in this manual.
Caution
Means reader be careful. In this situation, you might do something that could result in loss of data.
The following sections provide sources for obtaining documentation from Cisco Systems.
You can access the most current Cisco documentation on the World Wide Web at the following sites:
Cisco documentation and additional literature are available in a CD-ROM package that ships with your product. The Documentation CD-ROM is updated monthly and may be more current than printed documentation. The CD-ROM package is available as a single unit or as an annual subscription.
Cisco documentation is available in the following ways:
Registered Cisco Direct Customers can order Cisco Product documentation from the networking Products MarketPlace:
Registered Cisco.com users can order the Documentation CD-ROM through the online Subscription Store:
Nonregistered Cisco.com users can order documentation through a local account representative by calling Cisco corporate headquarters (California, USA) at 408 526-7208 or, in North America, by calling 800 553-NETS(6387).
If you are reading Cisco product documentation on the World Wide Web, you can submit technical comments electronically. Click Feedback in the toolbar and select Documentation. After you complete the form, click Submit to send it to Cisco.
You can e-mail your comments to bug-doc@cisco.com.
To submit your comments by mail, use the response card behind the front cover of your document, or write to the following address:
Attn Document Resource Connection Cisco Systems, Inc. 170 West Tasman Drive San Jose, CA 95134-9883
We appreciate your comments.
Cisco provides Cisco.com as a starting point for all technical assistance. Customers and partners can obtain documentation, troubleshooting tips, and sample configurations from online tools. For Cisco.com registered users, additional troubleshooting tools are available from the TAC website.
Cisco.com is the foundation of a suite of interactive, networked services that provides immediate, open access to Cisco information and resources at any time, from anywhere in the world. This highly integrated Internet application is a powerful, easy-to-use tool for doing business with Cisco.
Cisco.com provides a broad range of features and services to help customers and partners streamline business processes and improve productivity. Through Cisco.com, you can find information about Cisco and our networking solutions, services, and programs. In addition, you can resolve technical issues with online technical support, download and test software packages, and order Cisco learning materials and merchandise. Valuable online skill assessment, training, and certification programs are also available.
Customers and partners can self-register on Cisco.com to obtain additional personalized information and services. Registered users can order products, check on the status of an order, access technical support, and view benefits specific to their relationships with Cisco.
To access Cisco.com, go to http://www.cisco.com.
The Cisco Technical Assistance Center (TAC) website is available to all customers who need technical assistance with a Cisco product or technology that is under warranty or covered by a maintenance contract.
If you have a priority level 3 (P3) or priority level 4 (P4) problem, contact TAC by going to the TAC website http://www.cisco.com/tac.
P3 and P4 level problems are defined as follows:
P3—Your network is degraded. Network functionality is noticeably impaired, but most business operations continue.
P4—You need information or assistance on Cisco product capabilities, product installation, or basic product configuration.
In each of the above cases, use the Cisco TAC website to quickly find answers to your questions.
To register for Cisco.com, go to http://tools.cisco.com/RPF/register/register.do.
If you cannot resolve your technical issue by using the TAC online resources, Cisco.com registered users can open a case online by using the TAC Case Open tool at http://www.cisco.com/tac/caseopen.
If you have a priority level 1 (P1) or priority level 2 (P2) problem, contact TAC by telephone and immediately open a case. To obtain a directory of toll-free numbers for your country, go to http://www.cisco.com/warp/public/687/Directory/DirTAC.shtml.
P1 and P2 level problems are defined as follows:
P1—Your production network is down, causing a critical impact to business operations if service is not restored quickly. No workaround is available.
P2—Your production network is severely degraded, affecting significant aspects of your business operations. No workaround is available.
The DHCP Lease Query LEG is a software module that handles pull-requests from the different SCE platforms in the network that the Subscriber Manager (SM) could not handle. The LEG queries the DHCP server using a DHCP Lease-Query transaction. The DHCP Lease Query LEG can be run on the SM server or on the SCE device. If you use an SM, the LEG must be used on the SM as well, and not on the SCE.
The following diagram represents the operation of the DHCP Lease Query LEG:
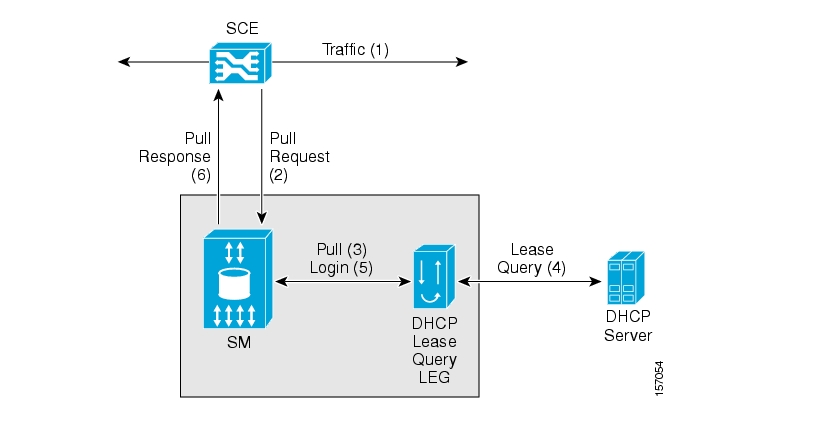
The subscriber's traffic (1) triggers a pull-request from the SCE (2). The SM receives the request for processing. If the SM does not find a subscriber with a matching IP address in the subscriber database, it passes the pull-request to the DHCP Lease Query LEG (3). The LEG queries the DHCP server. If the server finds a match for the IP address in its database, the server replies with the subscriber information (4). The LEG performs a login operation (5). This operation updates the subscriber database based on the received information and logs the subscriber into the SCE (6), which triggered the pull-request.
If desired, install the DHCP Lease Query LEG directly on the SCE device to integrate the SCE with DHCP servers without the use of an SM server. The following diagram represents the operation of the LEG when installed on the SCE device:
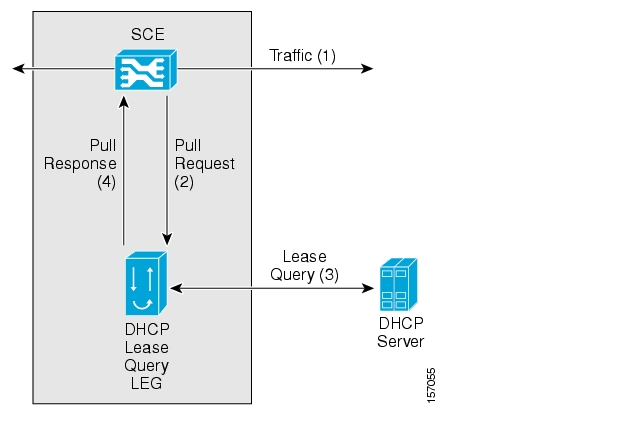
The subscriber's traffic (1) triggers a pull-request from the SCE (2). The Lease Query LEG receives the request and queries the DHCP server. If the server finds a match for the IP address in its database, the server replies with the subscriber information (3). Based on the received information, the LEG responds to the SCE with a pull-response, which includes the subscriber ID and the IP address lease-time returned from the DHCP server (4).
Note
An Internet Engineering Task Force (IETF) draft defines the DHCP Lease-Query transaction. The LEG supports version 7 of the draft and an earlier draft supported by the Cisco Network Registrar (CNR) DHCP server. For more information, see the IETF website.
The following terms and concepts are necessary to understand the DHCP Lease Query LEG and SM configuration and operation. Additional information can be found in the Cisco SCMS Subscriber Manager User Guide.
A software component that performs subscriber login and logout operations on the SM/SCE. The LEG handles dynamic subscriber integration.
A data modem that provides Internet access over cable and satellite networks. The modem usually corresponds to a single subscriber of the Internet Service Provider (ISP).
Any type of equipment that an end user can connect to the network through a modem. The end user can connect multiple CPE devices to the Internet through a single modem.
The DHCP Lease Query transaction is a DHCP transaction with special message types that enable, among other things, clients to query DHCP servers regarding the owner and the lease-expiration-time of an IP address.
An IETF draft defines the DHCP Lease-Query transaction. For more information, see the IETF website.
The SCE platform requires mappings between the network IDs (IP addresses) of the flows it encounters and the subscriber IDs. The SM database contains the network IDs that map to the subscriber IDs. The SCE network-ID-to-subscriber mappings are constantly updated from the SM database.
The main function of the DHCP Lease Query LEG is to provide the SM/SCE with network-ID-to-subscriber mappings in real time.
A message sent from an SCE device to the SM or the LEG when it identifies the use of a new subscriber IP address in the network. The SM uses the IP address provided in this message to query the database to retrieve the subscriber data of the subscriber associated with this address and to send its data to the SCE.
The SM provides the option of partitioning SCE platforms and subscribers into subscriber domains. A subscriber domain is a group of SCE platforms that share a group of subscribers. Subscriber domains can be configured using the SM configuration file and can be viewed using the SM CLU.
For additional information about domains and domain aliases, see Appendix A of the Cisco SCMS Subscriber Manager User Guide.
A subscriber policy package usually defines the policy enforced by Cisco SCMS solutions on each subscriber. The DHCP Lease Query LEG can handle the package ID in any of the following ways:
Set the package ID according to configurable options of the DHCP initial login or lease extension transactions
Set the package ID using a constant default value
Leave the package ID unset
For additional information, see Package Association Configuration, and the Cisco Service Control Application for Broadband (SCA BB) User Guide.
The LEG processes DHCP Lease-Query transactions to the DHCP server using the IP address indicated in the pull-request from the SCE. The DHCP server replies whether there is an active lease (DHCPLEASEACTIVE message) for this IP address and provides information about the subscriber associated with this IP address according to a list of options requested by the LEG. By default, the LEG requests the lease time and the modem MAC and adds package association related options if needed.
The DHCP Lease Query LEG supports up to two redundant DHCP servers. The LEG identifies a server failure by counting the consecutive requests that time out. After a configurable threshold of timed-out requests, the LEG starts to send the requests to the recently activated server, which was previously in standby. The LEG does not return to the failed server until the activated server fails.
When installing the LEG on the SM server, it runs with the privileges assigned to the user pcube on this machine. On UNIX platforms, because only the super-user (root) can open ports under 1024, the LEG cannot open the DHCP ports. To solve this problem, a simple application is supplied with the LEG, which forwards the DHCP packets between the LEG and the DHCP servers. This application is the DHCP Forwarder, which is described in Appendix A of this document.
When installing the LEG on the SCE device, there is no need to use the DHCP Forwarder application.
The DHCP Lease Query transaction is a DHCP transaction where the client (LEG) sends a DHCPLEASEQUERY message to the server, indicating the information it wants to query about. The LEG only queries about IP address. The server can reply with several types of messages, for example, DHCPLEASEACTIVE, which means that an active lease was found and the request information is supplied, or DHCPLEASEUNASSIGNED, which means this IP currently is not assigned to any subscriber.
The following is a detailed description of the attributes extracted from the DHCP Lease Query transaction:
Subscriber ID—By default, the subscriber ID is the modem MAC address, which you extract from option 82 (Remote ID sub-option of the DHCP Relay Agent Information Option). Therefore, the DHCP server must support and store option 82 for each Customer Premise Equipment (CPE). This default can be overwritten by configuration. Furthermore, the LEG can assign the IP address as a fallback if the option does not exist in the server's response. This fallback is disabled by default.
Lease time—The assigned IP is added to the SM or SCE database with a lease time taken from option 51. Note that if option 51 does not appear in the DHCPLEASEACTIVE reply, an infinite lease time is assigned for this IP address.
Package—Configurable options in the DHCP message determine how to assign the package information. The LEG includes a component that converts the package information data from the DHCP packet to a subscriber package ID. If the packet does not contain package information, it is possible to log in the subscriber with a default package, or log in the subscriber with no package information at all. The package options are assumed to be encoded as strings.
After extracting the above information, the LEG logs the subscriber into the SM/SCE.
This section describes the procedures for configuring and running the DHCP Lease Query LEG. It also describes the uninstall procedure.
The DHCP Lease Query LEG is an external component (PQI file) that should be installed on the SM or SCE device, depending on your installation configuration. The DHCP Lease Query LEG distribution is part of the SM LEG distribution. The DHCP Forwarder application distribution and installation script are also part of the SM LEG distribution.
The DHCP Lease Query LEG uses the DHCP Forwarder application on UNIX machines. For more information, see Appendix A, DHCP Forwarder Application.
The LEG installation package includes a set of configuration files and command-line utilities for the LEG.
The SCMS SM LEG distribution file contains the DHCP Lease Query LEG distribution, which is located in the Lease_Query_LEG directory. Cisco supplies a DHCP Lease Query LEG distribution package. The following table describes the package contents:
Table 3.1. File layout of the DHCP Lease Query LEG distribution package
|
Root |
Folder (under root) |
File name |
Notes |
|---|---|---|---|
|
|
|
|
|
|
|
|
Install |
LEG installation procedure description |
|
|
|
install-forwarder.sh |
DHCP Forwarder installation script |
|
|
|
linux-def.sh |
Linux-specific definitions |
|
|
|
solaris-def.sh |
Solaris-specific definitions |
|
|
|
dhcp_forwarder.tar.gz |
DHCP Forwarder distribution |
|
|
|
sm-common.sh |
General utility script |
|
|
sce |
|
|
|
|
|
dhcp_pkg.cfg |
Default configuration file for package association |
|
|
|
leaseq.pqi |
DHCP Lease Query LEG distribution |
|
|
sm |
|
|
|
|
|
leaseq.pqi |
DHCP Lease Query LEG distribution |
Note
The directory to which the distribution is extracted is referred to as pkg-ext-dir.
Note
This section is relevant if you are using the Subscriber Manager server on your network. You should install the DHCP Lease Query LEG on the SM server and not on the SCE device.
To install the DHCP Lease Query LEG on the SM server:
Install the DHCP Forwarder application
The DHCP Forwarder application bridges between the LEG and the DHCP server. See Installing the DHCP Forwarder.
Install the PQI file of the DHCP Lease Query LEG
Run the p3inst command-line utility (CLU) from the SM CLU directory
~pcube/sm/server/bin:> p3inst --install -f leaseq.pqiNote
After the installation of the PQI file, the SM restarts itself automatically.
Edit the DHCP Lease Query LEG configuration files:
The DHCP Lease Query LEG includes two configuration files under
~pcube/sm/server/root/config:leaseq.cfg—Configures general attributes of the LEGdhcp_pkg.cfg—Configures rules for package assignment
It is recommended to edit the files according to the configuration required at first use.
Edit the SM configuration file
p3sm.cfgand set the subscriber introduction mode to be pull mode:[SM General] # The following parameter defines whether the SM introduces # the subscribers to # the SCEs immediately after the subscriber's # login operation (push-mode) or when the SE requests # subscriber information specifically (pull-mode). # Optional values: [pull, push]. Default: push. introduction_mode=pullLoad the configuration files to the SM.
Run the p3sm command-line utility:
> p3sm --load-configThis command-line utility loads the new configuration to the SM and activates it.
Add a resource to the Veritas Cluster Server (optional)
This can be done only on SM Cluster setups. To add a resource, see Adding a DHCP Forwarder Resource.
To uninstall the DHCP Lease Query LEG:
Run the p3inst command-line utility from the SM CLU:
> p3inst --uninstall -f leaseq.pqiNote
After the uninstall process, the SM restarts itself automatically.
Uninstall the DHCP Forwarder Veritas Cluster Agent.
This can be done only on SM Cluster setups. See Removing a DHCP Forwarder Resource.
Uninstall the DHCP Forwarder application. See Uninstalling the DHCP Forwarder.
Note
This section is relevant if you intend to install the DHCP Lease Query LEG directly on the SCE device in an SM-less installation. If you are using an SM server, you must skip this section.
To install the DHCP Lease Query LEG on an SCE device:
Install the PQI file of the DHCP Lease Query LEG.
Run the following CLI on the SCE device:
SCE2000#> configureSCE2000(config)#> interface LineCard 0SCE2000(config if)#> pqi install file <LEG-PQI>Note
After the installation of the PQI file, the management agent restarts itself automatically. Please wait until the management agent is up to proceed with configuring the LEG.
Configure the LEG using the SCE CLI.
Before you start using the LEG, you must configure the DHCP servers and start the LEG operation. See the Configuration CLI for more details.
To uninstall the DHCP Lease Query LEG from the SCE device:
Run the following CLI on the SCE device:
SCE2000#> configureSCE2000(config)#> interface LineCard 0SCE2000(config if)#> pqi uninstall file <LEG-PQI>
Note
After the uninstallation of the PQI file, the management agent restarts itself automatically. Please wait until the management agent is up to proceed using the SCE device.
The DHCP Lease Query LEG must be upgraded as part of the SM upgrade process, because previous versions of the DHCP Lease Query LEG are incompatible with the SM 3.0 version. The upgrade for the DHCP Lease Query LEG should be performed together with the upgrade process of the SM.
To upgrade the DHCP Lease Query LEG:
Backup the configuration files of the DHCP Lease Query LEG. The original configuration files are deleted by the uninstall process in the next step.
Uninstall the DHCP Lease Query LEG by running the following CLU:
> p3inst --uninstall -f <lease-query-pqi>Note
After the uninstall process, the SM restarts itself automatically. Please wait until the management agent is up to proceed using the SCE device.
Perform an upgrade of the SM as described in the Cisco SCMS Subscriber Manager User Guide.
Install the new version of the DHCP Lease Query LEG by running the following CLU:
> p3inst --install -f <lease-query-pqi>Restore the configuration files of the DHCP Lease Query LEG.
Load the new configuration of the SM by running the following CLU:
> p3sm --load-config
The DHCP Lease Query LEG on the SM is configured using two configuration files: leaseq.cfg (general configuration) and dhcp_pkg.cfg (dynamic package association), which reside in the ~pcube/sm/server/root/config directory.
Use the CLI to configure the DHCP Lease Query LEG on the SCE and a configuration file to configure the dynamic package association. The user specifies the location of the configuration file.
The configuration files consist of sections headed by a bracketed section title; for example, [DHCP-Lease-Query-LEG]. Each section consists of several parameters having the format parameter=value. The number sign (“#”) at the beginning of a line signifies that it is a remark.
Note
The configuration section is only relevant for SM installations. Use the CLI to configure the LEG on the SCE device. See the Configuration CLI section.
The following is a description of the configuration variables of leaseq.cfg.
The [DHCP-Lease-Query-LEG] section contains the following parameters:
startDefines whether the SM runs the DHCP Lease Query LEG at startup.
Possible values for this parameter are
yesandno. The default value isno.To run the LEG, this parameter must be set to
yes.max_concurrent_sessionsDefines the number of concurrent sessions the LEG should support. This parameter limits the resources used by this module.
Possible values for this parameter are integers. The default value is 256.
dhcp_serversDefines to which DHCP servers the LEG can send requests. You must enter the IP addresses or hostnames of the DHCP servers separated by commas.
server_portDefines the UDP port to which the DHCP servers listen and the Lease Query messages are sent. It is recommended to use 9067 when working with the DHCP Forwarder. The default value is 9067.
listening_portDefines the UDP port to which the LEG listens and the Lease Query replies are sent. It is recommended to use 9068 when working with the DHCP Forwarder. The default value is 9068.
client_portDefines the UDP port that the LEG uses when sending Lease Query messages to the DHCP servers. It is recommended to use 8068 when working with the DHCP Forwarder. The default value is 8068.
client_ip_addressDefines the source IP address of the lease-query packets sent to the DHCP servers. The giaddr field of the DHCP packet also uses this IP address. This parameter is useful for machines with multiple network interfaces.
The default value is the loopback IP address of the machine
support_auto_logoutDefines whether the LEG should query the DHCP servers whenever the auto-logout mechanism identifies an expired lease. The default value is
false.use_forwarderDefines whether the LEG utilizes the DHCP Forwarder application on the local machine. The default value is
true.fail_over_criteriaDefines the number of consecutive request failures (timeouts) that triggers a fail-over. Since the queries are not answered when the server fails, these queries will time out. The consecutive timed-out queries are counted and when they reach this threshold, the second server is set as the active server. The default value is 3.
session_timeoutDefines the timeout in seconds for queries, starting at the time the DHCP Lease Query message is sent. If this timeout expires and no reply is received, the session is discarded. The default value is 20 seconds
Note
The session_timeout parameter affects how long it will take to detect a failed server. Only when the configured amount of queries fail will the fail-over process be triggered.
log_timed_out_queriesControls log messages regarding timed-out queries. Possible values for this parameter are
trueorfalse. The default value istrue.log_failed_queriesControls log messages regarding queries that are not sent. Possible values for this parameter are
trueorfalse. The default value istrue.log_all_queriesControls log messages regarding each query sent and any reply received. Possible values for this parameter are
trueorfalse. The default value isfalse.Use this parameter only for troubleshooting.
log_login_failuresControls log messages regarding replies that did not result in the login of a subscriber to the SM. Possible values for this parameter are
trueorfalse. The default value istrue.
The [Subscriber ID] section defines the functionality of how the LEG handles the subscriber ID. The subscriber ID can be taken from a DHCP option, with the ability to fallback to using the allocated IP address as the subscriber ID. This section contains the following parameters:
dhcp_optionDefines which DHCP option to use as the subscriber ID. The format of this parameter is the option number itself; or for DHCP options that have sub-options, the format is the DHCP option and sub-option type, separated by a colon. For example: 43:123 or 61. The default value is 82:2 (Relay-Agent-Information using the Remote-ID information).
dhcp_option_typeDefines the format type of the DHCP option defined by the
dhcp_optionparameter. Optional values arebinary, indicating a binary string converted to an ASCII hexadecimal string; orstring, indicating an ASCII string. The default value isbinary.default_idDefines whether in cases where the
dhcp_optionis not found in the DHCP packet, the LEG should fall back to a different way of defining the subscriber ID. The supported fallbacks are:ip—Use the allocated IP address to create a subscriber ID in the format of: IP_aaa.bbb.ccc.ddd
Not setting this parameter—No fallback. No login will be performed.
By default, this parameter is not set.
The [DHCP-Lease-Query-Ids] section contains the message type numbers of the different Lease Query transaction message types. This is necessary, because the DHCP Lease Query definition is an IETF draft. This section contains the following parameters:
lease_queryDefines the DHCPLEASEQUERY message type value. The default value is 13.
lease_activeDefines the DHCPLEASEACTIVE message type value. The default value is 16.
The following is a sample configuration file:
[DHCP-Lease-Query-LEG]
start=yes

dhcp_servers = 198.1.2.3, 198.5.6.7
fail_over_criteria=10
session_timeout=10

log_timed_out_queries=true
log_failed_queries=true
log_all_queries=true
log_login_failures=true

[Subscriber ID]
dhcp_option=44
dhcp_option_type=binary

[DHCP-Lease-Query-Ids]
lease_query=13
lease_active=16Note
The configuration described in this section is optional.
The subscriber package configuration in the DHCP Lease Query LEG can be handled in one of the following ways:
Dynamic assignment of package information using information extracted from the DHCP packet. See Dynamic Assignment of Package Information.
Static assignment of a constant package ID for all subscribers who log on via the DHCP Lease Query LEG. See Static Assignment of Package Information.
Dynamic assignment of package information is supported when package information is submitted in the DHCP packets. The LEG concatenates the desired options and creates a package-name. It is possible to map the configuration between the package-names and the application package IDs.
To extract the package information data from the DHCP packet, the dhcp_pkg.cfg configuration file should define the option types that contain the package information and define the conversion map of the package-names to the package IDs of the Service Control Application for Broadband (SCA BB).
The LEG is able to add additional data to the login operation based on the LEG configuration. This data is added as a key-value pair. Other modules in the login chain can use this data, such as the SOAP LEG (see Cisco SCMS SM SOAP LEG Reference Guide). This data can be created by concatenating the data of several DHCP options and can be given a user-defined label.
The [Package Association] section contains the following parameters:
options_order_for_package_nameDefines the DHCP options that contain the package association information and defines the order of concatenation of the data.
The format is:
option[:subtype],option[:subtype]options_typeDefines the format type of the DHCP options and fields defined by the
options_order_for_package_nameparameter.Possible values are
binary(a binary string that is converted to an ASCII hexadecimal string) orstring(an ASCII string). Order the list in the same way asoptions_order_for_package_name.name_seperator_valueDefines the separator character to use between two options when concatenating them to each other to create the package name. Any character is accepted. The default value is '_'.
use_defaultDetermines whether to use a default package when no package information can be extracted from the DHCP data, such as the configurable options are missing or no options were configured.
Possible values for this parameter are
trueorfalse. The default value istrue.default_packageDefines the default package ID to use if no package information is extracted from the DHCP data. This parameter is relevant only if the
use_defaultparameter is set totrue.Possible values for this parameter are any integer number. This parameter has no default value.
allow_login_with_no_packageDefines whether to perform a login without package information when no package information can be extracted from the DHCP data and the
use_defaultparameter is set tofalse.This parameter is relevant only if the
use_defaultparameter is set tofalse.Possible values are
trueorfalse. The default value isfalse.package_property_nameDefines the name of the application property that contains the package information. The default value is
packageId, as used by SCA BB.log_allDefines whether to write detailed user-log messages for all package association events.
Possible values are
trueorfalse. The default value isfalse.log_default_pkg_assignmentDefines whether to write a user-log message for every assignment of the default value (as defined by the
default_packageparameter).Possible values are
trueorfalse. The default value isfalse.
The [Package Names] section contains the information to convert from the package information as it appears in the DHCP packet to the package ID number to be used by the SCA BB application.
The [Additional Data] section of the configuration file contains the following parameters:
label_optionsDefines which DHCP option to extract to add to the login operation.
Possible values are the option number or, in the case of DHCP options with sub-options, the option and sub-option separated by a colon. For example, 43:123 or 61.
There is no default value for this parameter.
label_keysDefines the keys that should mark the DHCP options defined by the
label_optionsparameter.There is no default value for this parameter.
label_options_typeDefines the format type of the DHCP option defined by the
label_optionsparameter.Possible values are
binary(a binary string that is converted to an ASCII hexadecimal string) orstring(an ASCII string).The default value is
binary.
Suppose that the package information appears inside option 43 (Vendor Specific Option) of the DHCP packet and that both subtypes, 102 and 101, are in use. Configure the options_order_for_package_name parameter as follows:
options_order_for_package_name=43:102,43:101Suppose that option 43 with subtype 102 contains the type of package (gold, silver, or bronze), and that option 43 with subtype 101 contains domain information (the package type has a different meaning in different domains). If the separator value is configured to the default value, configure the package names section as follows:
[Package Names]
gold_domain1=11
gold_domain2=12
silver_domain1=13
silver_domain2=14
This configuration means that if the DHCP packet contains the value 'gold' inside option 43 with subtype 102, and the value 'domain1' inside option 43 with subtype 101, the package ID that will be associated to the subscriber in the SM will have the value 11.
The following configuration describes how to add the data of the Relay-Agent Circuit-Id option as additional data to the login operation:
[Additional Data]
label_options=82:1
label_keys=PORT_ID
label_option_type=string
The following is an example of the entire configuration file:
[Package Association]
options_order_for_package_name=43:102,43:101
name_separator_value=_
use_default=true
default_package=1
package_property_name=packageId

[Package Names]
gold_domain1=11
gold_domain2=12
silver_domain1=13
silver_domain2=14

[Additional Data]
label_options=82:1
label_keys=PORT_ID
label_option_type=stringIf the installation does not require dynamic assignment of package information, the configuration file dhcp_pkg.cfg should define the default package ID to be assigned to all the subscribers, as shown in the following example:
[Package Association]
use_default=true
default_package=1
All other configuration parameters should not be set.
Note
This chapter is only relevant when the DHCP Lease Query LEG is installed on the SM server.
The p3leasequery utility displays the DHCP Lease Query LEG configuration, status, and statistics. The command format is p3leasequery <operation>.
The following table lists the p3leasequery operations.
Table 5.1. p3leasequery Operations
|
Operation |
Description |
|---|---|
|
--show |
Displays all of DHCP Lease Query LEG configurations and status |
|
--show-statistics |
Displays counters of DHCP messages handled and number of logon operations performed |
|
--show-version |
Displays the version number of the DHCP Lease Query LEG |
|
--help |
Displays a list of available operations and arguments with a short explanation of their meanings |
The following is an example using the p3leasequery command-line utility with the show operation:
> p3leasequery --show
DHCP Lease-Query LEG:
=====================
Active:    true
DHCP Servers:
        Active:  N/A
        Standby: N/A
        Session timeout: 20
        Fail over criteria: 3
Subscriber ID:
        Option:   82:2
        Format:   binary
        Fallback: none
Command terminated successfully
>The following is an example of the p3leasequery command-line utility using the showstatistics operation:
> p3leasequery --show-statistics
DHCP Lease-Query LEG Statistics:
================================
Lease-Queries Sent:             16
Lease-Queries Replied:          16
Active Lease Replies:           16
Non-Active Lease Replies:       0
Total timed-out sessions:       0
Consecutive timed-out sessions: 0
Number of fail-overs            0
Invalid Replies:                0
Sessions in process:            0
Max-Concurrent sessions:        3
Command terminated successfully
>Note
This chapter is only relevant when the DHCP Lease Query LEG is installed on an SCE device.
Use the Command-Line Interface (CLI) to configure the general LEG settings of the DHCP Lease Query LEG, and a configuration file for package association.
To enable the LEG:
SCE(config)# subscriber LEG dhcp-lease-queryTo disable the LEG:
SCE(config)# no subscriber LEG dhcp-lease-query
To set the IP addresses of the DHCP servers (one or two addresses):
SCE(config)# subscriber LEG dhcp-lease-query servers STRING STRING
To reset the DHCP servers:
SCE(config)# no subscriber LEG dhcp-lease-query servers
To set the session_timeout configuration variable (see Configuring the DHCP Lease Query LEG on the SM):
SCE(config)# subscriber LEG dhcp-lease-query session-timeout DECIMAL
To set the session_timeout variable to the default value:
SCE(config)# default subscriber LEG dhcp-lease-query session_timeout
The failover criteria configuration variable defines the number of consecutive request failures (timeouts) that triggers a fail-over. Because the queries are not be answered when the server fails, these queries time out. The consecutive timed-out queries are counted and when they reach this threshold, the second server is set as the active server. The default value is 3.
To set the fail_over_criteria:
SCE(config)# subscriber LEG dhcp-lease-query failover-criteria DECIMAL
To set the fail_over_criteria variable to the default value:
SCE(config)# default subscriber LEG dhcp-lease-query failover-criteria
To set subscriber ID option:
SCE(config)# subscriber LEG dhcp-lease-query sub-id-option STRING <binary|string> [ip-fallback]
To set the subscriber ID option to the default value:
SCE(config)# default subscriber LEG dhcp-lease-query sub-id-option
For package association, the LEG uses exactly the same file described in the Package Association Configuration section. Set and load the configuration file with the following CLI (you must specify the full path and the file name):
SCE(config)# subscriber LEG dhcp-lease-query package-association-file STRING
The default package association configuration does not assign package information. To set the configuration back to the default configuration file:
SCE(config)# default subscriber LEG dhcp-lease-query package-association-file
To set all parameters of the DHCP lease query LEG to the default settings, use the following CLI:
SCE(config)# default subscriber LEG dhcp-lease-query
To view the general configuration of the LEG, enter the following command:
SCE# show subscriber LEG dhcp-lease-query
To view the statistics counters of the LEG:
SCE# show subscriber LEG dhcp-lease-query counters
To reset the statistics counters of the LEG:
SCE# clear subscriber LEG dhcp-lease-query counters
Note
This chapter is only relevant when the DHCP Lease Query LEG is installed on the SM server.
The DHCP Forwarder application acts as a bridge between the DHCP Lease Query LEG and the DHCP servers. The LEG sends a request to the DHCP Forwarder, which then forwards the request to the appropriate DHCP server. The DHCP Forwarder passes the replies from the DHCP servers to the LEG. The LEG signals the forwarder which server should receive each request. Therefore, no special configuration is needed for this application.
Because only root privileged applications can open ports under 1024 (DHCP uses ports 67 and 68), the DHCP Forwarder runs with root privileges.
To install the DHCP Forwarder:
Run the DHCP Forwarder installation script from the SM DIST root directory (must be run as
root):#./install-forwarder.shThe installation script extracts the DHCP Forwarder distribution to the
sm-inst-dir\sm\server\addons\dhcp-forwarderdirectory (sm-inst-dirrefers to the SM installation directory). The script adds the initialization scripts to their location according to the machine's OS.Run the DHCP Forwarder application using one of the following procedures:
Restart the machine. The initialization script will start the application automatically.
Run the following command (must be run as root):
#/etc/init.d/p3dhcpforwarder start
To uninstall the DHCP Forwarder:
Stop the application by running following command (must be run as root):
#/etc/init.d/p3dhcpforwarder stopRemove the DHCP Forwarder application startup and shutdown scripts, by running the following command (must be run as root):
For Solaris:
# rm /etc/rc*.d/[SK]*p3dhcpforwarder /etc/init.d/p3dhcpforwarderFor Red Hat:
# rm /etc/rc.d/rc*.d/[SK]*p3dhcpforwarder /etc/rc.d/init.d/ p3dhcpforwarder
Remove the DHCP Forwarder application directory, by running the following command:
# rm -r ~pcube/sm/server/addons/dhcp-forwarder
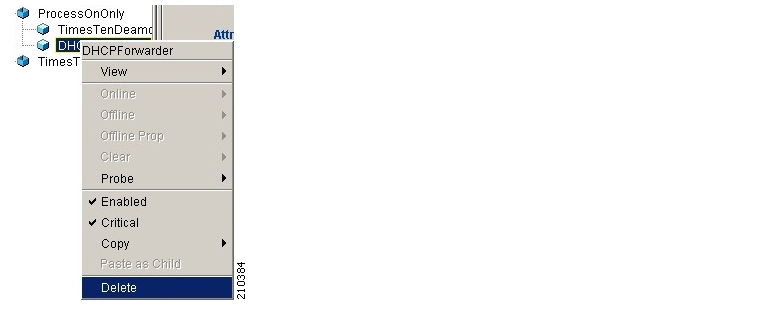
To verify that the DHCP Forwarder process is active at all times, a Veritas Cluster Server (VCS) Agent of type OnOnlyProcess is added as a resource.
To add a DHCP Forwarder Resource:
Import the OnOnlyProcess agent's type from the file:
/opt/VRTSvcs/bin/OnOnlyProcess/OnOnlyProcess.cf.Add an OnOnlyProcess resource called DHCP_Forwarder to the service group.
Run the following command via Telnet session on each one of the servers:
>ps -ea -o pid,s,argsLook for the line containing the text "DHCP_FORWARDER". This line contains the path and arguments of the DHCP Forwarder to be used in the next step.
Define the following parameters (see the following figure):
OnlineCmd—Type the DHCP Forwarder start command:
/etc/init.d/p3dhcpforwarder startPathName—Type the DHCP Forwarder process path (from the previous step). For example:
/opt/pcube/j2re1.4.2_05/bin/javaArguments—Type the DHCP Forwarder process arguments (from the previous step). For example:
DAPP=DHCP_FORWARDER -jar /opt/pcube/sm/server.
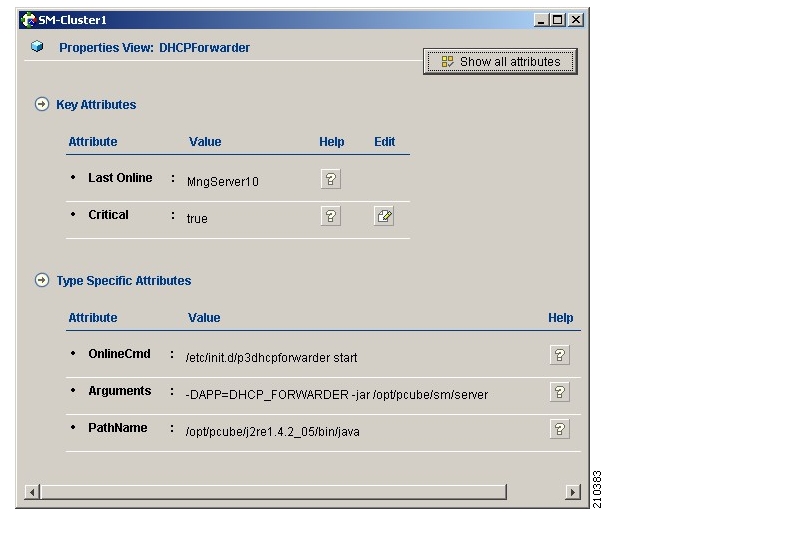
Note
The arguments line might seem shorter than the actual full argument list. This is perfectly acceptable.